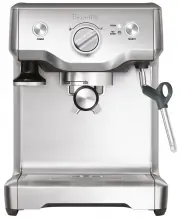
Page 2 - READ ALL; IMPORTANT; Contents
2 BREVILLE ® RECOMMENDS SAFETY FIRST At Breville ® we are very safety conscious. We design and manufacture consumer products with the safety of you, our valued customer, foremost in mind. In addition, we ask that you exercise a degree of care when using any electrical appliance and adhere to the fol...
Page 6 - Intelligent Dosing; Features
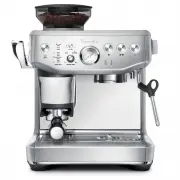
6 THERMOCOIL PRECISION HEATING SYSTEM Integrated stainless steel water coil that accurately controls water temperature. PRECISION CONICAL BURR GRINDER Precision conical burrs maximise ground coffee surface area for a full espresso flavour. LESS MESS The portafilter remains secure in the same positio...
Page 7 - Components
7 A. 250g Bean HopperB. Dose Button (Grind Start) – Illuminates when portafilter is properly inserted ‘A Bit More’ – when flashing C. Tamp Indicator – Flashes when ready to tamp D. Automatic / Manual Dose Light IndicatorsE. Assisted Tamp LeverF. Dose Level IndicatorG. Manual Dose Adjust Dial – Press...
Page 8 - ACCESSORIES
8 ACCESSORIES A. 54mm Stainless Steel PortafilterB. Stainless Steel Milk JugC. Water Filter Holder With FilterD. 1 CUP & 2 CUP Single Wall Filter BasketsE. 1 CUP & 2 CUP Dual Wall Filter BasketsF. Cleaning Tablets G. The Razor™ Precision Trimming ToolH. Allen KeyI. Cleaning Tool For Steam Wa...
Page 9 - BEFORE FIRST USE; Machine Preparation; NOTE; Assembly
9 BEFORE FIRST USE Machine Preparation Remove and discard all labels and packaging materials attached to your espresso machine. Ensure you have removed all parts and accessories from the box before discarding the packaging.Remove the water tank located at the back of the machine by pulling the water...
Page 10 - Attaching the Hopper; Attaching the Drip Tray; Functions
10 Attaching the Hopper • Insert the bean hopper into position on top of the machine. • Turn the dial to lock the hopper into place. • Fill the hopper with fresh beans. NOTE The filter light flashes between single and double basket size when the bean hopper is not correctly locked into position. Att...
Page 11 - GENERAL OPERATION; First Use Priming and Flushing the Machine; Single Wall Filter Baskets
11 GENERAL OPERATION • Check the water tank is filled with cold tap water up to the maximum mark. • Plug the power cord into power outlet. • Press the POWER button. The POWER button will flash while the machine is heating. (Light will flash for approximately up to 40 seconds while the machine is hea...
Page 12 - THE GRIND; Setting the Grind Size; OR
12 THE GRIND Setting the Grind Size FINER GRIND SIZE TURN COARSER GRIND SIZE TURN The grind size will affect the rate of water flow through the coffee in the filter basket and the flavour of the espresso. When setting the grind size, it should be fine but not too fine and powdery.There are 25 settin...
Page 13 - TAMPING; TIP
13 TAMPING When the grind cycle is completed, the TAMP light indicator blinks. • Push the lever downwards to the end position until a beep sound plays. This will tamp the coffee grinds in the portafilter using a consistent amount of tamp force. Pushing the lever slowly and consistently will help to ...
Page 14 - DEDUCT TIME FROM AUTO DOSE; Automatic Dosing
14 HOW TO CORRECT AN UNDER OR OVER DOSE? An under or over dose can occur when fresh beans are added to the hopper; when coffee beans age; a different type of coffee bean is used or if a change is made to the grind size. What to do when dose level is below the ideal middle bar? • When tamp is below t...
Page 15 - the; Razor; Manual Dosing; Grinder Purge
15 To initiate the top up, the portafilter will need to be inserted into the cradle and tamped. If the tamp level displays an under dose, the DOSE button will blink indicating a top up. Press the DOSE button to start the grind and it will dose the right amount to get the ideal level. NOTE • This fea...
Page 16 - Extracting Espresso; HOW TO MAKE COFFEE; Purging the Group Head
16 Extracting Espresso • Place pre-warmed cup(s) beneath the portafilter and press the 1 CUP or 2 CUP button for the required volume. OR • As a guide, the espresso will start to flow after 8-12 seconds (infusion time) and should be the consistency of dripping honey. • If the espresso starts to flow ...
Page 17 - BALANCED; GRIND; TOO FINE; OVER EXTRACTED; TOO COARSE; UNDER EXTRACTED
17 EXTRACTION GUIDE OPTIMUM 8-11g (1 CUP) 16-19g (2 CUP) 25-30 SEC BALANCED GRIND GRIND DOSE SHOT TIME TOO FINE TOO MUCH OVER 35 SEC OVER EXTRACTED BITTER • ASTRINGENT TOO COARSE TOO LITTLE UNDER 20 SEC UNDERDEVELOPED • SOUR UNDER EXTRACTED MANUAL PRE-INFUSION • Press and hold the 1 CUP or 2 CUP but...
Page 19 - Adjusting Water Temperature
19 • With the milk spinning, slowly lower the jug. This will bring the steam tip to the surface of the milk and start to introduce air into the milk. You may have to gently break the surface of the milk with the tip to get the milk spinning fast enough. • Keep the tip at or slightly below the surfac...
Page 20 - ADJUSTING CONICAL BURRS
20 ADJUSTING CONICAL BURRS Some types of coffee may require a wider grind range to achieve an ideal extraction or brew.A feature of your Barista Express Impress™ is the ability to extend this range with an adjustable upper burr. We recommend making only one adjustment at a time. 1 Unlock hopper 2 Ho...
Page 21 - RESET DEFAULT SETTINGS; Reset Auto Dose Time; ALERTS; No Hopper Warning
21 RESET DEFAULT SETTINGS Reset Auto Dose Time Resetting the auto dose time is recommended, if there is a significant change to the grind size or there is an accidental double dose into the portafilter.The machine must be on STANDBY mode. • Press and hold MANUAL DOSE button and FILTER button for 3 s...
Page 22 - WARNING
22 REPLACING THE WATER FILTER IN THE WATER TANK REPLACEMENT DUE 4 Set date 3 months ahead 5m H 2 0 1 Soak water filter for 5 mins 2 Rinse water filter 3 Place filter into filter holder 5 Install filter in water tank 6 Insert & lock water tank The provided water filter helps reduce the risk of sc...
Page 24 - CLEANING CONICAL BURRS; ADVANCED CLEANING FOR THE CONICAL BURR GRINDER
24 CLEANING CONICAL BURRS Regular cleaning helps the burrs achieve consistent grinding results. 1 Unlock hopper 2 Empty hopper 3 Replace hopper 4 Lock hopper DOSE 5 Run grinder until empty 6 Unlock hopper 7 Remove hopper 8 Unlock top burr 9 Remove top burr 10 Clean top burr with brush 11 Clean lower...
Page 27 - Troubleshooting; PROBLEM
27 Troubleshooting PROBLEM POSSIBLE CAUSES WHAT TO DO The machine is on but ceases to operate • Machine is too hot. Turn machine off. Wait for 30-60 minutes and turn machine back on. If problem persists, call Breville Consumer Support. Water does not flow from the group head • Machine has not reache...
Page 30 - Breville Customer Service Centre
Breville, the Breville Logo, Barista Express and Temp Control are trademarks of Breville Pty Ltd (“Breville”) and Breville's products are distributed in Australia and New Zealand under license. Copyright Breville Pty. Ltd. 2022. Due to continued product improvement, the products illustrated/photogra...