Page 2 - READ AND SAVE THESE INSTRUCTIONS; WARNING; OBSERVE THE FOLLOWING:; INTENDED FOR DOMESTIC COOKING ONLY
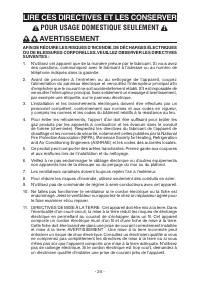
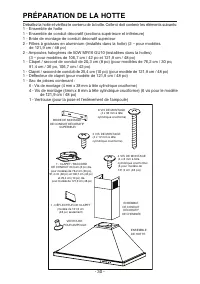
- 2 - READ AND SAVE THESE INSTRUCTIONS WARNING TO REDUCE THE RISK OF FIRE, ELECTRIC SHOCK, OR INJURY TO PERSON(S) OBSERVE THE FOLLOWING: 1. Use this unit only in the manner intended by the manufacturer. If you have questions, contact the manufacturer at the address or telephone number listed in the ...
Page 3 - CAUTION; TO REDUCE THE RISK OF A RANGE TOP GREASE FIRE:
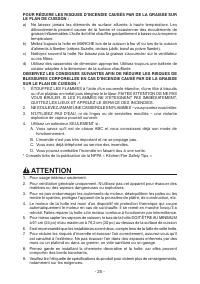
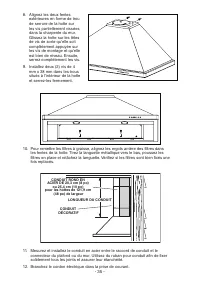
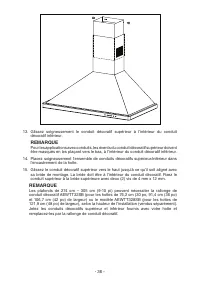
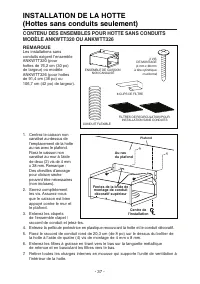
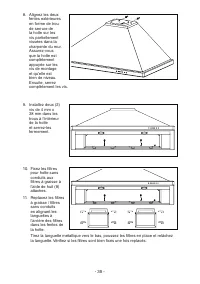
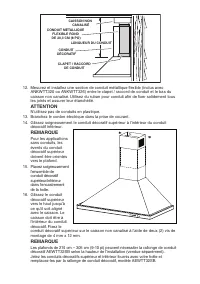
- 3 - ! CAUTION 1. For indoor use only.2. For general ventilating use only. Do not use to exhaust hazardous or explosive materials and vapors. 3. To avoid motor bearing damage and noisy and/or unbalanced impeller, keep drywall spray, construction dust, etc. off power unit. 4. Your hood motor has a t...
Page 4 - OPERATION; WARNING: The Heat Sentry can start the blower even if the hood is; A B
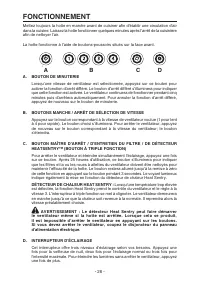
- 4 - OPERATION Always turn your hood on before you begin cooking to establish an air flow in the kitchen. Let the blower run for a few minutes to clear the air after you turn off the range. The hood is operated using the push buttons on the front panel. A. DELAY SWITCH When a blower speed is select...
Page 6 - CLEANING & MAINTENANCE; LIGHT BULBS
- 6 - CLEANING & MAINTENANCE For performance, appearance, and health reasons, clean filter, fan and grease-laden surfaces regularly. Use only a clean cloth and mild detergent solution on stainless and painted surfaces.Clean all-metal filters in the dishwasher using a non-phosphate detergent. Dis...
Page 7 - MEASURE THE INSTALLATION
- 7 - INSTALL THE DUCTWORK (Ducted Hoods Only) 1. Decide where the ductwork will run between the hood and the outside.2. A straight, short duct run will allow the hood to perform most efficiently. 3. Long duct runs, elbows and transitions will reduce the performance of the hood. Use as few of them a...
Page 8 - PREPARE THE HOOD
- 8 - PREPARE THE HOOD Unpack hood and check contents. You should receive:1 - Hood Assembly 1 - Decorative Flue Assembly (consisting of upper and lower flue)1 - Upper Flue Mounting Bracket2 - Aluminum Grease Filters (installed on hood) (3 - on 48” model)2 - 50W MR16 GU10 Halogen Lamps (installed on ...
Page 9 - INSTALL THE WIRING
- 9 - 24” MAX. HOOD CENTERLINE 4 3 / 4 ” (30”, 36”, & 42” models) 7 3 / 4 ” (48” model) 12 3 / 8 ” 24” TO 36” ABOVE COOK TOP INSTALL THE WIRING GROUNDING INSTRUCTIONS This appliance must be grounded. In the event of an electrical short circuit, grounding reduces the risk of electric shock by pro...
Page 10 - INSTALL THE HOOD MOUNTING SUPPORT; NOTE
- 10 - INSTALL THE HOOD MOUNTING SUPPORT 1. Construct structural wall framing that is flush with interior surface of wall studs. Make sure the framing is centered over installation location. NOTE Hood distance above cooktop is: Minimum 24”, Maximum 30”. 9-ft. and 10-ft. ceilings may require Flue Ext...
Page 12 - For 48” wide hood only:
- 12 - Flush with the ceiling Center of installation Upper flue mounting bracket slots Ceiling INSTALL THE HOOD (Ducted Hoods Only) 1. Center the flue mounting bracket over the hood location and flush with the ceiling. Secure the upper flue bracket to the wall using (2) 4mm x 38mm mounting screws. N...
Page 15 - INSTALL THE HOOD; NON-DUCT KIT MODEL ANKWTT320 OR ANKWTT326 CONTENTS
- 15 - INSTALL THE HOOD (Non-Ducted Hoods Only) NON-DUCT KIT MODEL ANKWTT320 OR ANKWTT326 CONTENTS NOTE Non-ducted installations require Non-Duct Kit, Model ANKWTT320 (for 30” wide hood) or Model ANKWTT326 (for 36” or 42” wide hood). 1. Center the non-duct plenum over the hood location and flush wit...
Page 18 - SERVICE PARTS
- 18 - SERVICE PARTS KEY PART NO. DESCRIPTION QTY. 1 S99528405 Decorative Upper and Lower Flues 1 2 S99528407 Motor / Blower Assembly 1 3 S99528408 Light Socket (30” & 36” wide hoods) 2 (includes mounting hardware) Light Socket (42” wide hood) 3 (includes mounting hardware) 4 S99528409 Light Soc...
Page 20 - 8” Wide Model
- 20 - SERVICE PARTS 48” Wide Model KEY PART NO. DESCRIPTION QTY. 1 S99528406 Decorative Upper and Lower Flues 1 2 S99528407 Motor / Blower Assembly 2 3 S99528408 Light Socket 3 (includes mounting hardware) 4 S99528409 Light Socket Bracket 3 (includes mounting hardware) 5 S99528410 User Interface As...
Page 22 - WARRANTY; ONE YEAR LIMITED WARRANTY FOR BEST PRODUCTS
- 22 - WARRANTY ONE YEAR LIMITED WARRANTY FOR BEST PRODUCTS Broan-NuTone LLC (Broan-NuTone) warrants to the original consumer purchaser of Best products that such products will be free from defects in materials or work-manship for a period of one year from the date of original purchase. THERE ARE NO...
Page 24 - LIRE CES DIRECTIVES ET LES CONSERVER; AVERTISSEMENT; AFIN DE RÉDUIRE LES RISQUES D’INCENDIE, DE DÉCHARGES ÉLECTRIQUES; POUR USAGE DOMESTIQUE SEULEMENT
- 24 - LIRE CES DIRECTIVES ET LES CONSERVER AVERTISSEMENT AFIN DE RÉDUIRE LES RISQUES D’INCENDIE, DE DÉCHARGES ÉLECTRIQUES OU DE BLESSURES CORPORELLES, VEUILLEZ OBSERVER LES DIRECTIVES SUIVANTES : 1. N’utilisez cet appareil que de la manière prévue par le fabricant. Si vous avez des questions, commu...
Page 25 - ATTENTION
- 25 - ! ATTENTION 1. Pour usage intérieur seulement. 2. Pour ventilation générale uniquement. N’utilisez pas cet appareil pour évacuer des matières ou des vapeurs dangereuses ou explosives. 3. Pour ne pas endommager les roulements du moteur, déséquilibrer les pales ou les rendre bruyantes, protégez...
Page 26 - FONCTIONNEMENT
- 26 - FONCTIONNEMENT Mettez toujours la hotte en marche avant de cuisiner afin d’établir une circulation d’air dans la cuisine. Laissez la hotte fonctionner quelques minutes après l’arrêt de la cuisinière afin de nettoyer l’air. La hotte fonctionne à l’aide de boutons-poussoirs situés sur la face a...
Page 28 - NETTOYAGE ET ENTRETIEN
- 28 - NETTOYAGE ET ENTRETIEN Pour des raisons de santé, de performance et d’apparence, nettoyez régulièrement le filtre, le ventilateur et les surfaces graisseuses. Utilisez seulement un chiffon propre et une solution de détergent doux sur l’acier inoxydable et les surfaces peintes.Nettoyez les fil...
Page 29 - MESURES DE L’INSTALLATION
- 29 - POSE DU CONDUIT (Hottes avec conduit seulement) 1. Planifiez la pose du conduit en déterminant son tracé entre la hotte et l’extérieur de la maison. 2. Un tracé droit et court permet à la hotte d’être plus efficace.3. Des conduits longs, des coudes et des transitions réduisent l’efficacité de...
Page 30 - PRÉPARATION DE LA HOTTE
- 30 - PRÉPARATION DE LA HOTTE Déballez la hotte et vérifiez le contenu de la boîte. Celle-ci doit contenir les éléments suivants:1 - Ensemble de hotte 1 - Ensemble de conduit décoratif (sections supérieure et inférieure)1 - Bride de montage de conduit décoratif supérieur2 - Filtres à graisses en al...
Page 31 - INSTALLATION DU CÂBLAGE
- 31 - MAX. 61 CM (24 PO) LIGNE CENTRALE DE LA HOTTE 12,1 CM (4 3/4 PO) MODÈLES DE 76,2 CM (30 PO), 91,4 CM (36 PO) ET 106,7 CM (42 PO) 19,7 CM (7 3/4 PO) POUR MODÈLE 121,9 CM (48 PO) 31,4 CM (12 3/8 PO) 61 CM (24 PO) À 91,4 CM (36 PO) AU-DESSUS DE LA SURF ACE DE CUISSON INSTALLATION DU CÂBLAGE INST...
Page 36 - REMARQUE
- 36 - 13. Glissez soigneusement le conduit décoratif supérieur à l’intérieur du conduit décoratif inférieur. REMARQUE Pour les applications avec conduits, les évents du conduit décoratif supérieur doivent être masqués en les plaçant vers le bas, à l’intérieur du conduit décoratif inférieur. 14. Pla...
Page 37 - INSTALLATION DE LA HOTTE; CONTENU DES ENSEMBLES POUR HOTTE SANS CONDUITS
- 37 - INSTALLATION DE LA HOTTE (Hottes sans conduits seulement) CONTENU DES ENSEMBLES POUR HOTTE SANS CONDUITS MODÈLE ANKWTT320 OU ANKWTT326 REMARQUE Les installations sans conduits exigent l’ensemble ANKWTT320 (pour hottes de 76,2 cm (30 po) de largeur) ou modèle ANKWTT326 (pour hottes de 91,4 cm ...
Page 40 - PIÈCES DE RECHANGE
- 40 - PIÈCES DE RECHANGE N° DE REPÈRE N° DE PIÈCE DESCRIPTION QTÉ 1 S99528405 Conduits décoratifs supérieur et inférieur 1 2 S99528407 Ensemble moteur / ventilateur 1 3 S99528408 Socle d’ampoule (hottes de 76,2 cm (30 po), 91,4 cm (36 po) de largeur) (comprend la quincaillerie de montage) Socle d’a...
Page 44 - GARANTIE; GARANTIE LIMITÉE D’UN AN DES PRODUITS BEST
- 44 - GARANTIE GARANTIE LIMITÉE D’UN AN DES PRODUITS BEST Broan-NuTone LLC (Broan-NuTone) garantit à l’acheteur original que les produits Best sont libres de tout vice de matériau ou de fabrication pour une période d’un an à compter de la date d’achat originale. CETTE GARANTIE NE COMPORTE AUCUNE AU...
Page 46 - LEA Y CONSERVE ESTAS INSTRUCCIONES; ADVERTENCIA; INDICADO SOLAMENTE PARA COCINAR EN CASA
- 46 - LEA Y CONSERVE ESTAS INSTRUCCIONES ADVERTENCIA PARA REDUCIR EL RIESGO DE INCENDIO, DESCARGA ELÉCTRICA O LESIONES PERSONALES, OBSERVE LO SIGUIENTE: 1. Use la unidad solo de la manera indicada por el fabricante. Si tiene preguntas, comuníquese con el fabricante a la dirección o al número telefó...
Page 47 - PRECAUCIÓN
- 47 - ! PRECAUCIÓN 1. Solo debe usarse bajo techo.2. Solo para usarse como medio de ventilación general. No debe usarse para la extracción de materiales o vapores peligrosos o explosivos. 3. Para evitar daños a los cojinetes del motor y rotores ruidosos o desbalanceados, mantenga la unidad de poten...
Page 48 - FUNCIONAMIENTO
- 48 - FUNCIONAMIENTO Encienda siempre la campana antes de comenzar a cocinar para establecer un flujo de aire en la cocina. Deje el ventilador funcionando unos cuantos minutos para despejar el aire después de apagar la estufa. La campana se hace funcionar con los botones en el panel frontal. A. INT...
Page 50 - LIMPIEZA Y MANTENIMIENTO; BOMBILLAS
- 50 - LIMPIEZA Y MANTENIMIENTO Por motivos de desempeño, apariencia y salud, limpie periódicamente el filtro, el ventilador y las superficies que tengan grasa. Utilice únicamente un trapo limpio y una solución de detergente suave en superficies de acero inoxidable y pintadas.Limpie los filtros comp...
Page 51 - MIDA LA INSTALACIÓN; Para campanas de 48 pulg.
- 51 - INSTALACIÓN DEL SISTEMA DE CONDUCTOS (Solo campanas para sistemas con conductos) 1. Decida dónde instalará el conducto entre la campana y el exterior.2. Un conducto recto y corto permitirá que la campana funcione más eficientemente.3. Los tramos largos de conductos, codos y transiciones reduc...
Page 52 - PREPARE LA CAMPANA
- 52 - PREPARE LA CAMPANA Desempaque la campana y revise el contenido del paquete. Debe contener lo siguiente: 1 - Conjunto de campana 1 - Conjunto de tubo de humos decorativo (contiene el tubo de humos superior e inferior) 1 - Soporte de montaje del tubo de humos superior 2 - Filtros de aluminio pa...
Page 53 - INSTALE EL CABLEADO
- 53 - 24 PULG. (61 CM) MÁX. LÍNEA CENTRAL DE LA CAMP ANA MODELOS DE 4 ¾ PU LG (12.1 C M) (30 PULG (7 6.2 CM), 36 PULG (9 1.4 CM), Y 42 PULG . (106.7 CM )) 7 ¾ PULG. ( 19.7 CM) (MODELO DE 48 PUL G. (121.9 CM)) 12 3/8 PULG. (31.4 CM) 24 A 36 PU LG. (61 A 91.4 C M) POR ARRIB A DE LA EST UFA INSTALE EL...
Page 58 - NOTA
- 58 - 13. Deslice la sección superior del tubo de humos decorativo en la sección inferior del tubo de humos decorativo. NOTA En las aplicaciones con conductos, las rejillas del tubo de humos superior deben ocultarse colocando las rejillas abajo, en el interior del tubo de humos inferior. 14. Coloqu...
Page 62 - PIEZAS DE SERVICIO; de ancho
- 62 - PIEZAS DE SERVICIO CLAVE N.º DE PIEZA DESCRIPCIÓN CANT. 1 S99528405 Tubos de humos decorativos superior e inferior 1 2 S99528407 Conjunto de motor/ventilador 1 3 S99528408 Portaluces (campanas de 30 y 36 pulg. 2 (76.2 y 91.4 cm) de ancho) (incluye las piezas de montaje) Portaluces (campana de...
Page 66 - GARANTÍA
- 66 - GARANTÍA GARANTÍA LIMITADA DE UN AÑO PARA LOS PRODUCTOS BEST Broan-NuTone LLC (Broan-NuTone) garantiza al consumidor comprador original de los productos BEST que tales productos estarán libres de defectos en materiales o mano de obra durante un período de un año a partir de la fecha de la com...