Page 2 - Copyright © 2019 ASUSTeK Computer Inc. All Rights Reserved.
2 Copyright © 2019 ASUSTeK Computer Inc. All Rights Reserved. No part of this manual, including the products and software described in it, may be reproduced, transmitted, transcribed, stored in a retrieval system, or translated into any language in any form or by any means, except documentation kept...
Page 3 - Table of contents; Getting to know your wireless router
3 Table of contents 1 Getting to know your wireless router 6 1.1 Welcome! ........................................................................................61.2 Package contents .........................................................................6 1.3 Your wireless router ...................
Page 4 - Configuring the Advanced Settings
4 Table of contents 3.6.3 3G/4G ........................................................................................ 47 3.7 Using AiCloud 2.0 ...................................................................... 49 3.7.1 Cloud Disk ..................................................................
Page 5 - Utilities
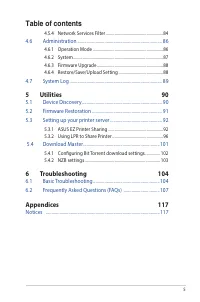
5 Table of contents 4.5.4 Network Services Filter ....................................................... 84 4.6 Administration ........................................................................... 86 4.6.1 Operation Mode .................................................................... 864...
Page 6 - • If any of the items are damaged or missing, contact ASUS for; Thank; Package contents
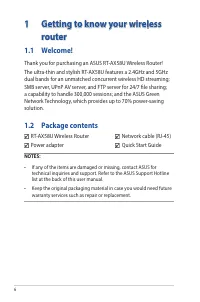
6 1 Getting to know your wireless router NOTES: • If any of the items are damaged or missing, contact ASUS for technical inquiries and support. Refer to the ASUS Support Hotline list at the back of this user manual. • Keep the original packaging material in case you would need future warranty servic...
Page 7 - Your wireless router
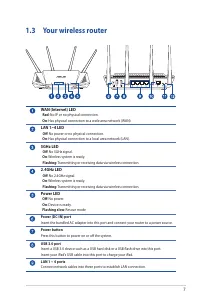
7 1.3 Your wireless router WAN (Internet) LED Red : No IP or no physical connection. On : Has physical connection to a wide area network (WAN). LAN 1~4 LED Off : No power or no physical connection. On : Has physical connection to a local area network (LAN). 5GHz LED Off : No 5GHz signal. On : Wirele...
Page 9 - Positioning your router; For the best wireless signal transmission between the wireless
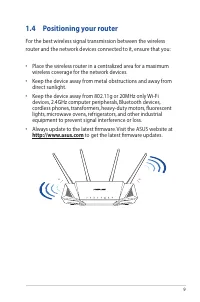
9 1.4 Positioning your router For the best wireless signal transmission between the wireless router and the network devices connected to it, ensure that you: • Place the wireless router in a centralized area for a maximum wireless coverage for the network devices. • Keep the device away from metal o...
Page 10 - Setup Requirements; To set up your wireless network, you need a computer that meets; to connect to the network.
10 1.5 Setup Requirements To set up your wireless network, you need a computer that meets the following system requirements: • Ethernet RJ-45 (LAN) port (10Base-T/100Base-TX/ 1000BaseTX) • IEEE 802.11a/b/g/n/ac/ax wireless capability• An installed TCP/IP service• Web browser such as Internet Explore...
Page 12 - To set up your wireless router via wired connection:; Ensure that the LAN LED is blinking.; To set up your wireless router via wireless connection:
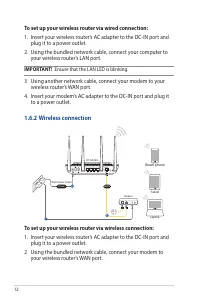
12 To set up your wireless router via wired connection: 1. Insert your wireless router’s AC adapter to the DC-IN port and plug it to a power outlet. 2. Using the bundled network cable, connect your computer to your wireless router’s LAN port. IMPORTANT! Ensure that the LAN LED is blinking. 3 Using a...
Page 13 - Insert your modem’s AC adapter to the DC-IN port and plug it; • For details on connecting to a wireless network, refer to the WLAN; Setting up the wireless security settings; in Chapter 3 of this user
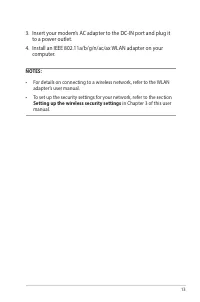
13 3. Insert your modem’s AC adapter to the DC-IN port and plug it to a power outlet. 4. Install an IEEE 802.11a/b/g/n/ac/ax WLAN adapter on your computer. NOTES: • For details on connecting to a wireless network, refer to the WLAN adapter’s user manual. • To set up the security settings for your ne...
Page 14 - Getting started; Logging into the Web GUI; Your ASUS Wireless Router comes with an intuitive web graphical; The features may vary with different firmware versions.; To log into the web GUI:; You can now use the Web GUI to configure various settings of; If you are logging into the Web GUI for the first time, you will be
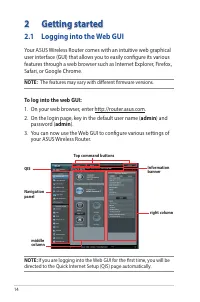
14 2 Getting started 2.1 Logging into the Web GUI Your ASUS Wireless Router comes with an intuitive web graphical user interface (GUI) that allows you to easily configure its various features through a web browser such as Internet Explorer, Firefox, Safari, or Google Chrome. NOTE: The features may v...
Page 15 - detection; The Quick Internet Setup (QIS) function guides you in quickly; When setting the Internet connection for the first time, press; Log into the Web GUI. The QIS page launches automatically.; NOTES; • By default, the login username and password for your wireless; admin; . For details on changing your wireless
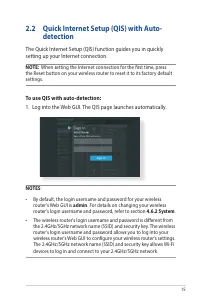
15 2.2 Quick Internet Setup (QIS) with Auto- detection The Quick Internet Setup (QIS) function guides you in quickly setting up your Internet connection. NOTE: When setting the Internet connection for the first time, press the Reset button on your wireless router to reset it to its factory default s...
Page 16 - type is; Dynamic IP; the necessary information for your ISP connection type.; IMPORTANT; Obtain the necessary information from your ISP about
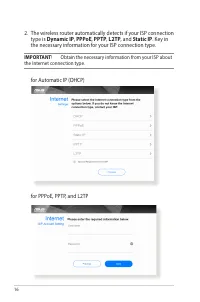
16 2. The wireless router automatically detects if your ISP connection type is Dynamic IP , PPPoE , PPTP , L2TP , and Static IP . Key in the necessary information for your ISP connection type. IMPORTANT ! Obtain the necessary information from your ISP about the Internet connection type. for Automati...
Page 17 - for Static IP; • The auto-detection of your ISP connection type takes place when; Skip to; and manually configure your connection settings.; Assign the wireless network name (SSID) and security key for; Apply; when
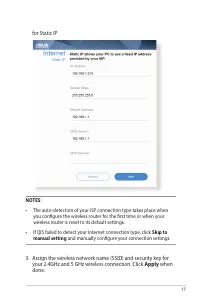
17 for Static IP NOTES : • The auto-detection of your ISP connection type takes place when you configure the wireless router for the first time or when your wireless router is reset to its default settings. • If QIS failed to detect your Internet connection type, click Skip to manual setting and man...
Page 18 - Your Internet and wireless settings are displayed. Click; Next; to; Finish
18 4. Your Internet and wireless settings are displayed. Click Next to continue. 5. Read the wireless network connection tutorial. When done, click Finish .
Page 19 - Connecting to your wireless network; To connect to your network:; • Refer to the next chapters for more details on configuring your
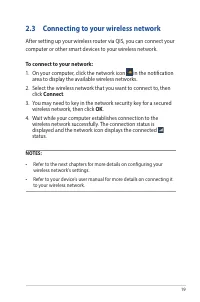
19 2.3 Connecting to your wireless network After setting up your wireless router via QIS, you can connect your computer or other smart devices to your wireless network. To connect to your network: 1. On your computer, click the network icon in the notification area to display the available wireless ...
Page 20 - Using the Network Map; Network Map allows you to configure your network’s security
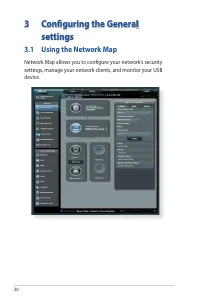
20 3 Configuring the General settings 3.1 Using the Network Map Network Map allows you to configure your network’s security settings, manage your network clients, and monitor your USB device.
Page 21 - Setting up the wireless security settings; To protect your wireless network from unauthorized access, you; To set up the wireless security settings:; On the Network Map screen and under; System status; configure the wireless security settings such as SSID, security; NOTE; : You can set up different wireless security settings for 2.4GHz and; GHz security settings; field, key in a unique name for
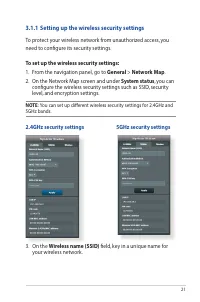
21 3.1.1 Setting up the wireless security settings To protect your wireless network from unauthorized access, you need to configure its security settings. To set up the wireless security settings: 1. From the navigation panel, go to General > Network Map . 2. On the Network Map screen and under S...
Page 22 - encryption methods, your data rate will drop to IEEE 802.11g 54Mbps; . On the Network Map screen, select the
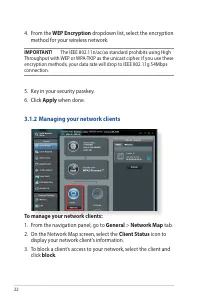
22 4. From the WEP Encryption dropdown list, select the encryption method for your wireless network. IMPORTANT! The IEEE 802.11n/ac/ax standard prohibits using High Throughput with WEP or WPA-TKIP as the unicast cipher. If you use these encryption methods, your data rate will drop to IEEE 802.11g 54...
Page 23 - To use this feature, you need to plug a USB storage device, such
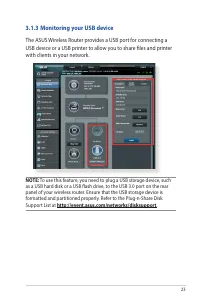
23 3.1.3 Monitoring your USB device The ASUS Wireless Router provides a USB port for connecting a USB device or a USB printer to allow you to share files and printer with clients in your network. NOTE: To use this feature, you need to plug a USB storage device, such as a USB hard disk or a USB flash...
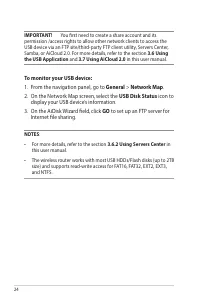
Page 24 - You first need to create a share account and its; the USB Application; and; To monitor your USB device:; On the Network Map screen, select the; USB Disk Status; icon to; GO; to set up an FTP server for; • For more details, refer to the section
24 IMPORTANT! You first need to create a share account and its permission /access rights to allow other network clients to access the USB device via an FTP site/third-party FTP client utility, Servers Center, Samba, or AiCloud 2.0. For more details, refer to the section 3.6 Using the USB Application...
Page 25 - Safely removing the USB disk; : Incorrect removal of the USB disk may cause data; To safely remove the USB disk:; the USB disk is ejected successfully, the USB status shows; Unmounted
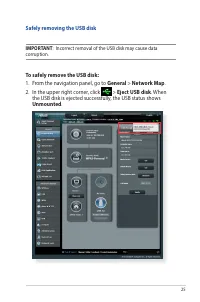
25 Safely removing the USB disk IMPORTANT : Incorrect removal of the USB disk may cause data corruption. To safely remove the USB disk: 1. From the navigation panel, go to General > Network Map . 2. In the upper right corner, click > Eject USB disk . When the USB disk is ejected successfully, ...
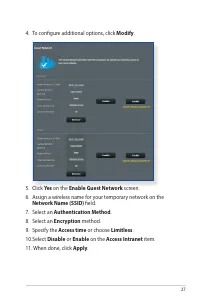
Page 26 - Creating a Guest Network; The Guest Network provides temporary visitors with Internet; RT-AX58U supports up to six SSIDs (three 2.4GHz and three 5GHz; To create a guest network:; On the Guest Network screen, select 2.4Ghz or 5Ghz frequency; Enable
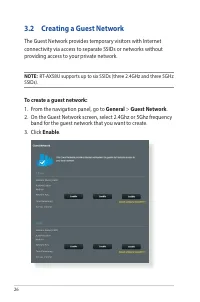
26 3.2 Creating a Guest Network The Guest Network provides temporary visitors with Internet connectivity via access to separate SSIDs or networks without providing access to your private network. NOTE: RT-AX58U supports up to six SSIDs (three 2.4GHz and three 5GHz SSIDs). To create a guest network: ...
Page 29 - Configuring Network Protection; main page, click on
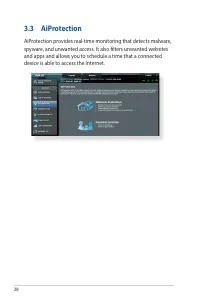
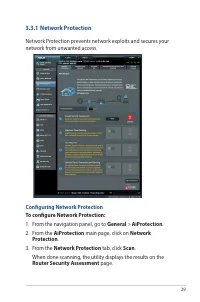
29 3.3.1 Network Protection Network Protection prevents network exploits and secures your network from unwanted access. Configuring Network Protection To configure Network Protection: 1. From the navigation panel, go to General > AiProtection . 2. From the AiProtection main page, click on Network...
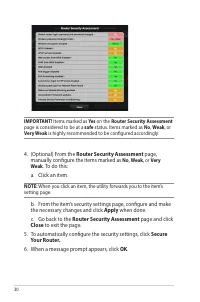
Page 31 - Malicious Sites Blocking; Router; Router
31 Malicious Sites Blocking This feature restricts access to known malicious websites in the cloud database for an always-up-to-date protection. NOTE: This function is automatically enabled if you run the Router Weakness Scan . To enable Malicious Sites Blocking: 1. From the navigation panel, go to ...
Page 32 - Infected Device Prevention and Blocking
32 Infected Device Prevention and Blocking This feature prevents infected devices from communicating personal information or infected status to external parties. NOTE: This function is automatically enabled if you run the Router Weakness Scan . To enable Infected Device Prevention and Blocking: 1. F...
Page 33 - main page, click on the; Parental
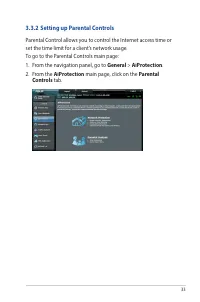
33 3.3.2 Setting up Parental Controls Parental Control allows you to control the Internet access time or set the time limit for a client’s network usage.To go to the Parental Controls main page:1. From the navigation panel, go to General > AiProtection . 2. From the AiProtection main page, click ...
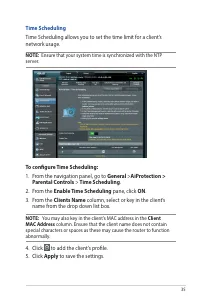
Page 35 - Time Scheduling; Time Scheduling allows you to set the time limit for a client’s; Ensure that your system time is synchronized with the NTP; column, select or key in the client’s; You may also key in the client’s MAC address in the; Client; column. Ensure that the client name does not contain; to add the client’s profile.
35 Time Scheduling Time Scheduling allows you to set the time limit for a client’s network usage. NOTE: Ensure that your system time is synchronized with the NTP server. To configure Time Scheduling: 1. From the navigation panel, go to General > AiProtection > Parental Controls > Time Sched...
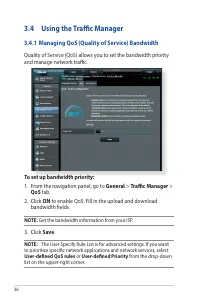
Page 36 - Using the Traffic Manager; Quality of Service (QoS) allows you to set the bandwidth priority; Get the bandwidth information from your ISP.; User-defined QoS rules; or; User-defined Priority
36 3.4 Using the Traffic Manager 3.4.1 Managing QoS (Quality of Service) Bandwidth Quality of Service (QoS) allows you to set the bandwidth priority and manage network traffic. To set up bandwidth priority: 1. From the navigation panel, go to General > Traffic Manager > QoS tab. 2. Click ON to...
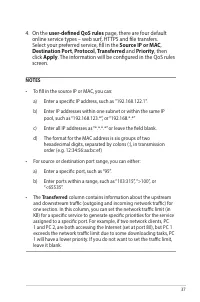
Page 37 - • To fill in the source IP or MAC, you can:; Transferred; column contains information about the upstream
37 4. On the user-defined QoS rules page, there are four default online service types – web surf, HTTPS and file transfers. Select your preferred service, fill in the Source IP or MAC , Destination Port , Protocol , Transferred and Priority , then click Apply . The information will be configured in ...
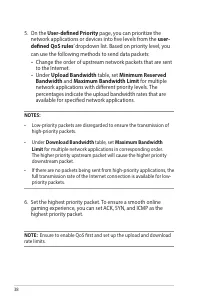
Page 38 - • Under; Download Bandwidth; for multiple network applications in corresponding order.
38 5. On the User-defined Priority page, you can prioritize the network applications or devices into five levels from the user- defined QoS rules ’ dropdown list. Based on priority level, you can use the following methods to send data packets: • Change the order of upstream network packets that are ...
Page 39 - Traffic Analyzer; The traffic monitor feature allows you to access the bandwidth
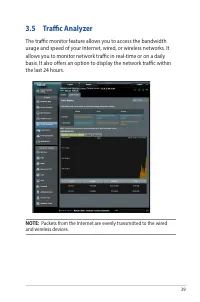
39 NOTE: Packets from the Internet are evenly transmitted to the wired and wireless devices. 3.5 Traffic Analyzer The traffic monitor feature allows you to access the bandwidth usage and speed of your Internet, wired, or wireless networks. It allows you to monitor network traffic in real-time or on ...
Page 40 - Using the USB Application; To use the server functions, you need to insert a USB; General
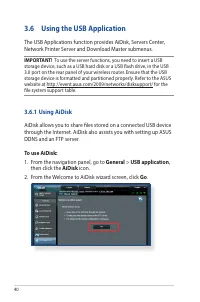
40 3.6 Using the USB Application The USB Applications function provides AiDisk, Servers Center, Network Printer Server and Download Master submenus. IMPORTANT! To use the server functions, you need to insert a USB storage device, such as a USB hard disk or a USB flash drive, in the USB 3.0 port on t...
Page 42 - Using Media Server; : Before using the DLNA Media Server function, connect your
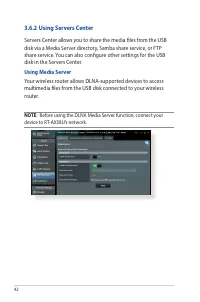
42 3.6.2 Using Servers Center Servers Center allows you to share the media files from the USB disk via a Media Server directory, Samba share service, or FTP share service. You can also configure other settings for the USB disk in the Servers Center. Using Media Server Your wireless router allows DLN...
Page 43 - Using Network Place (Samba) Share service
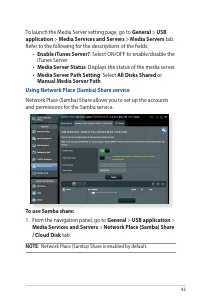
43 To launch the Media Server setting page, go to General > USB application > Media Services and Servers > Media Servers tab. Refer to the following for the descriptions of the fields: • Enable iTunes Server? : Select ON/OFF to enable/disable the iTunes Server. • Media Server Status : Displ...
Page 45 - USB disk may cause data corruption.; Safely removing; under
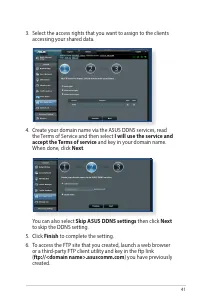
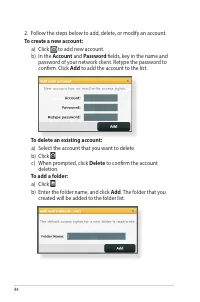
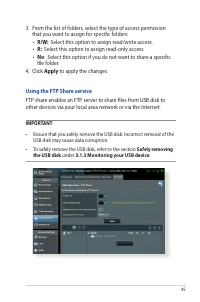
45 3. From the list of folders, select the type of access permission that you want to assign for specific folders: • R/W: Select this option to assign read/write access. • R: Select this option to assign read-only access. • No : Select this option if you do not want to share a specific file folder. ...
Page 46 - For more details, refer to the section
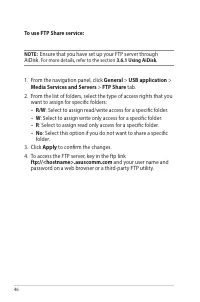
46 To use FTP Share service: NOTE: Ensure that you have set up your FTP server through AiDisk. For more details, refer to the section 3.6.1 Using AiDisk . 1. From the navigation panel, click General > USB application > Media Services and Servers > FTP Share tab. 2. From the list of folders,...
Page 47 - G/4G USB modems can be connected to RT-AX58U to allow
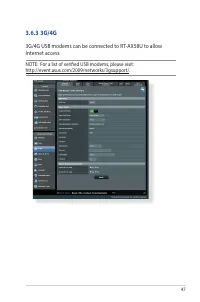
47 3.6.3 3G/4G 3G/4G USB modems can be connected to RT-AX58U to allow Internet access. NOTE: For a list of verified USB modems, please visit: http://event.asus.com/2009/networks/3gsupport/.
Page 50 - account and password. For better user experience, we; Google Chrome; Firefox; You can now start accessing Cloud Disk files on devices; When accessing the devices that are connected to the network,
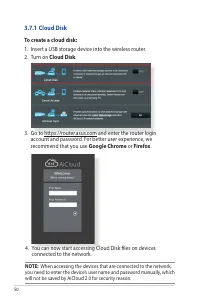
50 3.7.1 Cloud Disk To create a cloud disk: 1. Insert a USB storage device into the wireless router.2. Turn on Cloud Disk . 3. Go to https://router.asus.com and enter the router login account and password. For better user experience, we recommend that you use Google Chrome or Firefox . 4. You can no...
Page 51 - • You can create a domain name for your router with ASUS DDNS. For
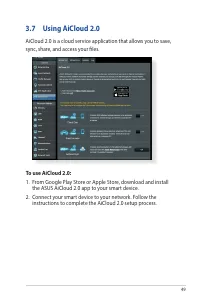
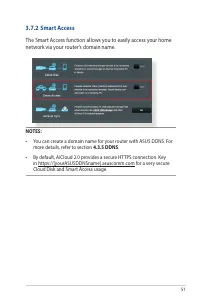
51 3.7.2 Smart Access The Smart Access function allows you to easily access your home network via your router’s domain name. NOTES: • You can create a domain name for your router with ASUS DDNS. For more details, refer to section 4.3.5 DDNS . • By default, AiCloud 2.0 provides a secure HTTPS connect...
Page 52 - to enable AiCloud Sync.; Add new account; Enter your ASUS WebStorage account password and select the
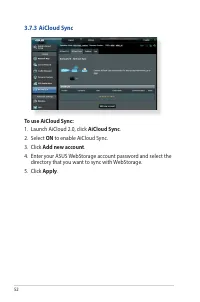
52 3.7.3 AiCloud Sync To use AiCloud Sync: 1. Launch AiCloud 2.0, click AiCloud Sync . 2. Select ON to enable AiCloud Sync. 3. Click Add new account . 4. Enter your ASUS WebStorage account password and select the directory that you want to sync with WebStorage. 5. Click Apply .
Page 53 - To configure the basic wireless settings:
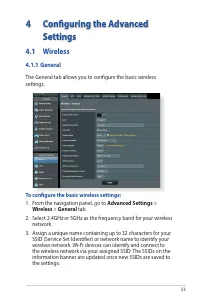
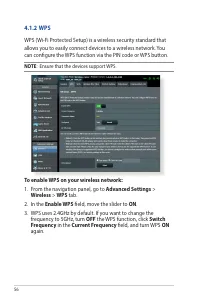
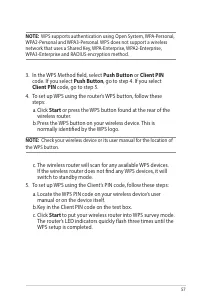
53 4 Configuring the Advanced Settings 4.1 Wireless 4.1.1 General The General tab allows you to configure the basic wireless settings. To configure the basic wireless settings: 1. From the navigation panel, go to Advanced Settings > Wireless > General tab. 2. Select 2.4GHz or 5GHz as the frequ...
Page 54 - : You can assign unique SSIDs for the 2.4 GHz and 5GHz frequency
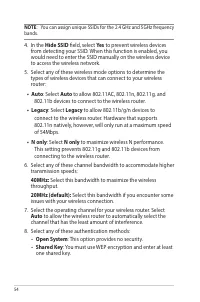
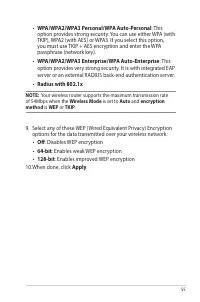
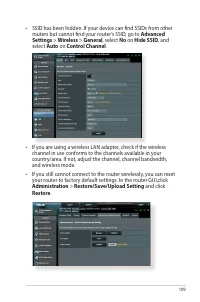
54 NOTE : You can assign unique SSIDs for the 2.4 GHz and 5GHz frequency bands. 4. In the Hide SSID field, select Yes to prevent wireless devices from detecting your SSID. When this function is enabled, you would need to enter the SSID manually on the wireless device to access the wireless network. ...
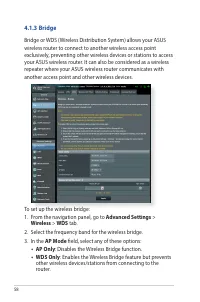
Page 59 - • HYBRID; In Hybrid mode, wireless devices connected to the ASUS wireless
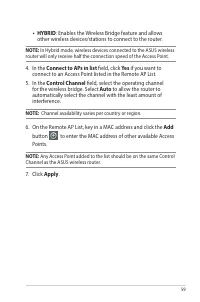
59 • HYBRID : Enables the Wireless Bridge feature and allows other wireless devices/stations to connect to the router. NOTE: In Hybrid mode, wireless devices connected to the ASUS wireless router will only receive half the connection speed of the Access Point. 4. In the Connect to APs in list field,...
Page 61 - : Please refer to section; field, key in your RADIUS server’s IP
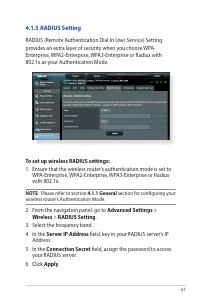
61 4.1.5 RADIUS Setting RADIUS (Remote Authentication Dial In User Service) Setting provides an extra layer of security when you choose WPA- Enterprise, WPA2-Enterprise, WPA3-Enterprise or Radius with 802.1x as your Authentication Mode. To set up wireless RADIUS settings: 1. Ensure that the wireless...
Page 62 - We recommend that you use the default values on this page.
62 In the Professional Settings screen, you can configure the following: • Frequency : Select the frequency band that the professional settings will be applied to. • Enable Radio : Select Yes to enable wireless networking. Select No to disable wireless networking. • Enable wireless scheduler : You c...
Page 65 - The LAN IP screen allows you to modify the LAN IP settings of your; Any changes to the LAN IP address will be reflected on your
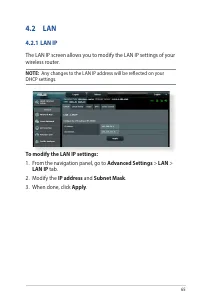
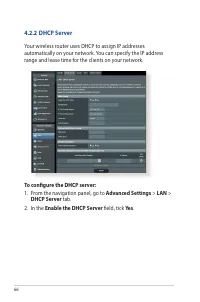
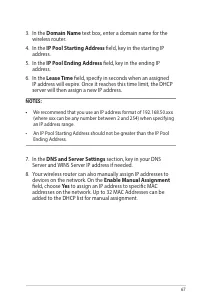
65 4.2 LAN 4.2.1 LAN IP The LAN IP screen allows you to modify the LAN IP settings of your wireless router. NOTE: Any changes to the LAN IP address will be reflected on your DHCP settings. To modify the LAN IP settings: 1. From the navigation panel, go to Advanced Settings > LAN > LAN IP tab. ...
Page 68 - : We recommend that you do not change the default route
68 4.2.3 Route If your network makes use of more than one wireless router, you can configure a routing table to share the same Internet service. NOTE : We recommend that you do not change the default route settings unless you have advanced knowledge of routing tables. To configure the LAN Routing ta...
Page 69 - an ISP or a LAN. The IPTV tab provides the configuration settings
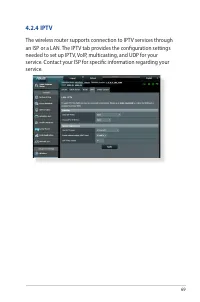
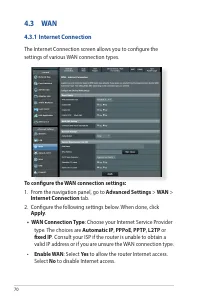
69 4.2.4 IPTV The wireless router supports connection to IPTV services through an ISP or a LAN. The IPTV tab provides the configuration settings needed to set up IPTV, VoIP, multicasting, and UDP for your service. Contact your ISP for specific information regarding your service.
Page 72 - MAC Address; • Contact your ISP and update the MAC address associated
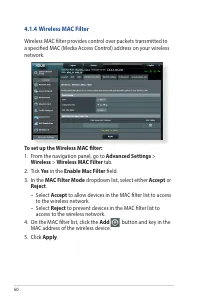
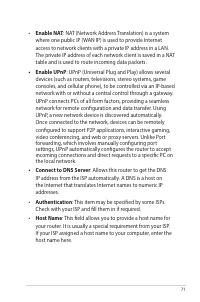
72 • MAC Address : MAC (Media Access Control) address is a unique identifier for your networking device. Some ISPs monitor the MAC address of networking devices that connect to their service and reject any unrecognized device that attempt to connect. To avoid connection issues due to an unregistered...
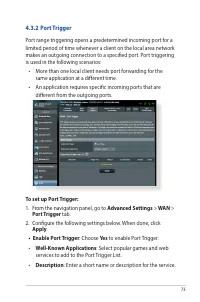
Page 74 - Trigger Port; : Specify a trigger port to open the incoming; : Specify an incoming port to receive inbound; Protocol; • When connecting to an IRC server, a client PC makes an outgoing
74 • Trigger Port : Specify a trigger port to open the incoming port. • Protocol : Select the protocol, TCP, or UDP. • Incoming Port : Specify an incoming port to receive inbound data from the Internet. • Protocol : Select the protocol, TCP, or UDP. NOTES: • When connecting to an IRC server, a clien...
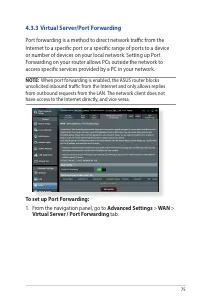
Page 75 - When port forwarding is enabled, the ASUS router blocks; To set up Port Forwarding:
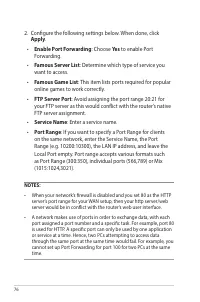
75 4.3.3 Virtual Server/Port Forwarding Port forwarding is a method to direct network traffic from the Internet to a specific port or a specific range of ports to a device or number of devices on your local network. Setting up Port Forwarding on your router allows PCs outside the network to access s...
Page 77 - work properly. Refer to section
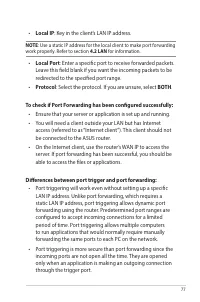
77 • Local IP : Key in the client’s LAN IP address. NOTE : Use a static IP address for the local client to make port forwarding work properly. Refer to section 4.2 LAN for information. • Local Port : Enter a specific port to receive forwarded packets. Leave this field blank if you want the incoming ...
Page 80 - Enable wildcard; : Enable wildcard if your DDNS service; DDNS service will not work under these conditions:; NAT Passthrough allows a Virtual Private Network (VPN); Advanced Settings; click
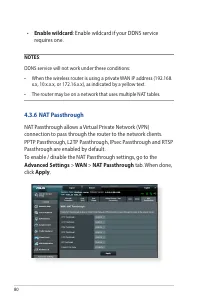
80 • Enable wildcard : Enable wildcard if your DDNS service requires one. NOTES : DDNS service will not work under these conditions: • When the wireless router is using a private WAN IP address (192.168. x.x, 10.x.x.x, or 172.16.x.x), as indicated by a yellow text. • The router may be on a network t...
Page 81 - . The configuration options vary; : Please refer to your ISP regarding specific IPv6 information for
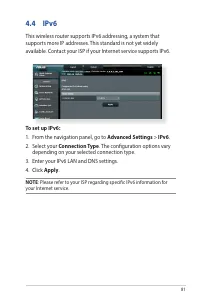
81 4.4 IPv6 This wireless router supports IPv6 addressing, a system that supports more IP addresses. This standard is not yet widely available. Contact your ISP if your Internet service supports IPv6. To set up IPv6: 1. From the navigation panel, go to Advanced Settings > IPv6 . 2. Select your Co...
Page 82 - : The Firewall feature is enabled by default.; : The URL Filter is based on a DNS query. If a network client has
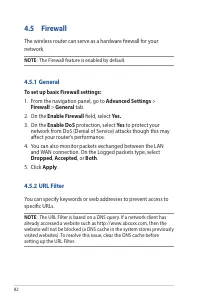
82 4.5 Firewall The wireless router can serve as a hardware firewall for your network. NOTE : The Firewall feature is enabled by default. 4.5.1 General To set up basic Firewall settings: 1. From the navigation panel, go to Advanced Settings > Firewall > General tab. 2. On the Enable Firewall f...
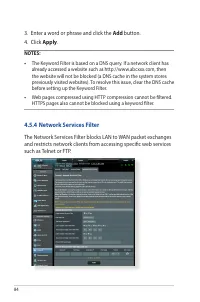
Page 84 - Enter a word or phrase and click the; Add; The Keyword Filter is based on a DNS query. If a network client has; The Network Services Filter blocks LAN to WAN packet exchanges
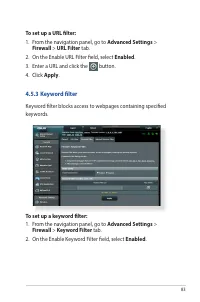
84 3. Enter a word or phrase and click the Add button. 4. Click Apply . NOTES: • The Keyword Filter is based on a DNS query. If a network client has already accessed a website such as http://www.abcxxx.com, then the website will not be blocked (a DNS cache in the system stores previously visited web...
Page 86 - : The router will reboot when you change the modes.
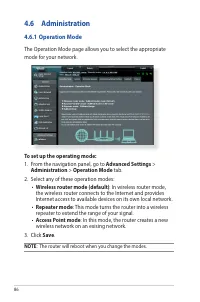
86 4.6 Administration 4.6.1 Operation Mode The Operation Mode page allows you to select the appropriate mode for your network. To set up the operating mode: 1. From the navigation panel, go to Advanced Settings > Administration > Operation Mode tab. 2. Select any of these operation modes: • Wi...
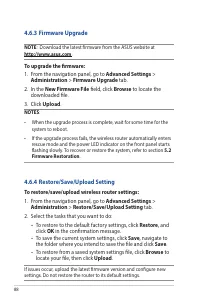
Page 88 - : Download the latest firmware from the ASUS website at; • When the upgrade process is complete, wait for some time for the; Firmware Restoration; • To restore to the default factory settings, click; settings. Do not restore the router to its default settings.
88 4.6.3 Firmware Upgrade NOTE : Download the latest firmware from the ASUS website at http://www.asus.com . To upgrade the firmware: 1. From the navigation panel, go to Advanced Settings > Administration > Firmware Upgrade tab. 2. In the New Firmware File field, click Browse to locate the dow...
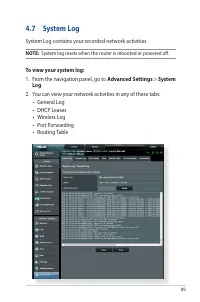
Page 89 - System Log contains your recorded network activities.; System log resets when the router is rebooted or powered off.; To view your system log:; You can view your network activities in any of these tabs:
89 4.7 System Log System Log contains your recorded network activities. NOTE: System log resets when the router is rebooted or powered off. To view your system log: 1. From the navigation panel, go to Advanced Settings > System Log . 2. You can view your network activities in any of these tabs: •...
Page 90 - • The utilities are not supported on MAC OS.; Device Discovery; Device Discovery is an ASUS WLAN utility that detects an ASUS; When you set the router to Access Point mode, you need to use
90 5 Utilities NOTES: • Download and install the wireless router's utilities from the ASUS website: • Device Discovery v1.4.7.1 at http://dlcdnet.asus.com/pub/ASUS/ LiveUpdate/Release/Wireless/Discovery.zip • Firmware Restoration v1.9.0.4 at http://dlcdnet.asus.com/pub/ ASUS/LiveUpdate/Release/Wirel...
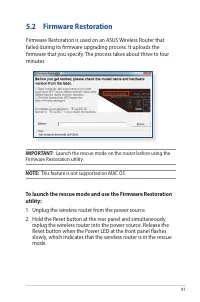
Page 91 - Firmware Restoration; Launch the rescue mode on the router before using the; To launch the rescue mode and use the Firmware Restoration
91 5.2 Firmware Restoration Firmware Restoration is used on an ASUS Wireless Router that failed during its firmware upgrading process. It uploads the firmware that you specify. The process takes about three to four minutes. IMPORTANT: Launch the rescue mode on the router before using the Firmware Re...
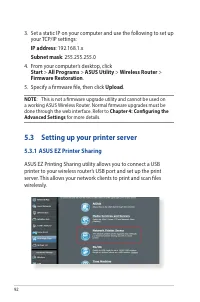
Page 92 - : This is not a firmware upgrade utility and cannot be used on; Chapter 4: Configuring the; Setting up your printer server; ASUS EZ Printing Sharing utility allows you to connect a USB
92 3. Set a static IP on your computer and use the following to set up your TCP/IP settings: IP address : 192.168.1.x Subnet mask : 255.255.255.0 4. From your computer’s desktop, click Start > All Programs > ASUS Utility > Wireless Router > Firmware Restoration . 5. Specify a firmware fi...
Page 93 - The print server function is supported on Windows® XP,; To set up the EZ Printer sharing mode:; to download the network printer utility.; Network printer utility is supported on Windows® XP, Windows®; Use; Unzip the downloaded file and click the Printer icon to run the
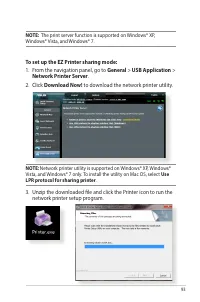
93 NOTE: The print server function is supported on Windows® XP, Windows® Vista, and Windows® 7. To set up the EZ Printer sharing mode: 1. From the navigation panel, go to General > USB Application > Network Printer Server . 2. Click Download Now! to download the network printer utility. NOTE: ...
Page 96 - You can share your printer with computers running on Windows®; Sharing your LPR printer; to run the
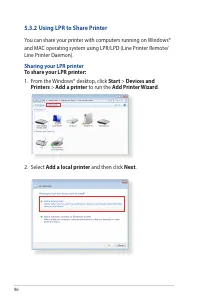
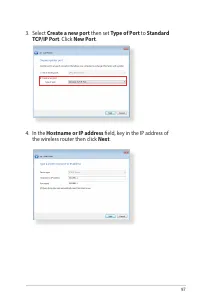
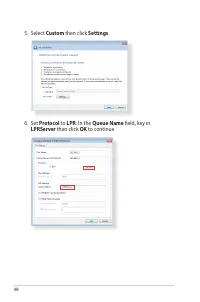
96 5.3.2 Using LPR to Share Printer You can share your printer with computers running on Windows® and MAC operating system using LPR/LPD (Line Printer Remote/ Line Printer Daemon). Sharing your LPR printer To share your LPR printer: 1. From the Windows® desktop, click Start > Devices and Printers...
Page 99 - to finish setting up the standard TCP/IP port.; Have Disk; to manually install the
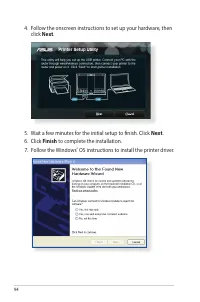
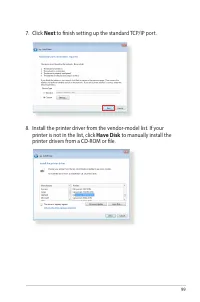
99 7. Click Next to finish setting up the standard TCP/IP port. 8. Install the printer driver from the vendor-model list. If your printer is not in the list, click Have Disk to manually install the printer drivers from a CD-ROM or file.
Page 100 - to accept the default name for the printer.; to complete the installation.
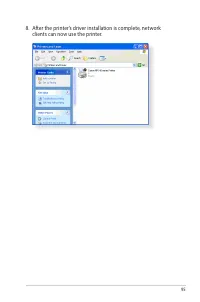
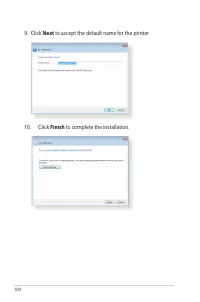
100 9. Click Next to accept the default name for the printer. 10. Click Finish to complete the installation.
Page 101 - Download Master; You need a USB device connected to the wireless router to use; To use Download Master:; If you have more than one USB drive, select the USB device you; For details on Bit Torrent, refer to section; Bit Torrent download settings
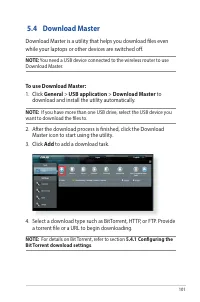
101 5.4 Download Master Download Master is a utility that helps you download files even while your laptops or other devices are switched off. NOTE: You need a USB device connected to the wireless router to use Download Master. To use Download Master: 1. Click General > USB application > Downlo...
Page 102 - Configuring Bit Torrent download settings
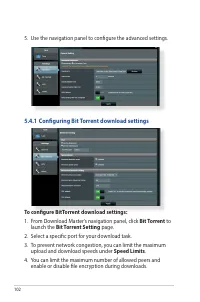
102 5. Use the navigation panel to configure the advanced settings. To configure BitTorrent download settings: 1. From Download Master’s navigation panel, click Bit Torrent to launch the Bit Torrent Setting page. 2. Select a specific port for your download task.3. To prevent network congestion, you ...
Page 104 - Troubleshooting; Basic Troubleshooting; Upgrade Firmware to the latest version.
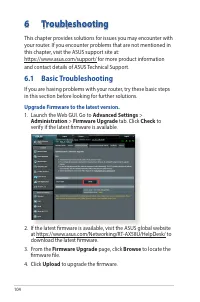
104 6 Troubleshooting This chapter provides solutions for issues you may encounter with your router. If you encounter problems that are not mentioned in this chapter, visit the ASUS support site at: https://www.asus.com/support/ for more product information and contact details of ASUS Technical Supp...
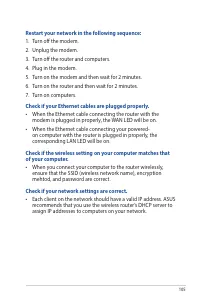
Page 105 - • When the Ethernet cable connecting the router with the; Check if the wireless setting on your computer matches that; • When you connect your computer to the router wirelessly,; Check if your network settings are correct.; • Each client on the network should have a valid IP address. ASUS
105 Restart your network in the following sequence: 1. Turn off the modem.2. Unplug the modem.3. Turn off the router and computers.4. Plug in the modem.5. Turn on the modem and then wait for 2 minutes.6. Turn on the router and then wait for 2 minutes.7. Turn on computers. Check if your Ethernet cabl...
Page 106 - Network Map; page, and hover the mouse pointer; Client Status
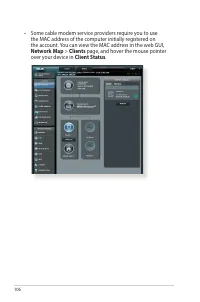
106 • Some cable modem service providers require you to use the MAC address of the computer initially registered on the account. You can view the MAC address in the web GUI, Network Map > Clients page, and hover the mouse pointer over your device in Client Status .
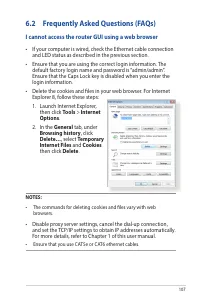
Page 107 - I cannot access the router GUI using a web browser; • If your computer is wired, check the Ethernet cable connection; • The commands for deleting cookies and files vary with web; • Disable proxy server settings, cancel the dial-up connection,; • Ensure that you use CAT5e or CAT6 ethernet cables.
107 6.2 Frequently Asked Questions (FAQs) I cannot access the router GUI using a web browser • If your computer is wired, check the Ethernet cable connection and LED status as described in the previous section. • Ensure that you are using the correct login information. The default factory login name...
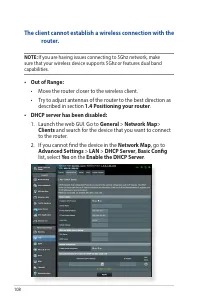
Page 108 - The client cannot establish a wireless connection with the; If you are having issues connecting to 5Ghz network, make; described in section; • DHCP server has been disabled:; and search for the device that you want to connect
108 The client cannot establish a wireless connection with the router. NOTE: If you are having issues connecting to 5Ghz network, make sure that your wireless device supports 5Ghz or features dual band capabilities. • Out of Range: • Move the router closer to the wireless client. • Try to adjust ant...
Page 110 - Internet is not accessible.; • Check if your router can connect to your ISP’s WAN IP address.
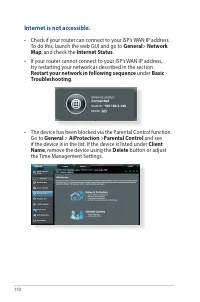
110 Internet is not accessible. • Check if your router can connect to your ISP’s WAN IP address. To do this, launch the web GUI and go to General > Network Map , and check the Internet Status . • If your router cannot connect to your ISP’s WAN IP address, try restarting your network as described ...
Page 111 - You forgot the SSID (network name) or network password; • Setup a new SSID and encryption key via a wired connection; How to restore the system to its default settings?; • Go to
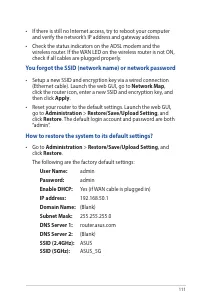
111 • If there is still no Internet access, try to reboot your computer and verify the network’s IP address and gateway address. • Check the status indicators on the ADSL modem and the wireless router. If the WAN LED on the wireless router is not ON, check if all cables are plugged properly. You for...
Page 112 - Firmware upgrade failed.; Launch the rescue mode and run the Firmware Restoration utility.; Firmware Restoration; on how to use the
112 Firmware upgrade failed. Launch the rescue mode and run the Firmware Restoration utility. Refer to section 5.2 Firmware Restoration on how to use the Firmware Restoration utility.
Page 113 - Cannot access Web GUI; Windows; to launch the browser.
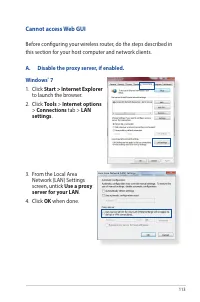
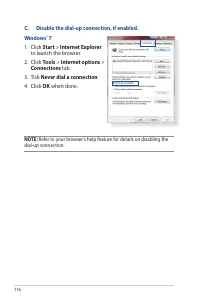
113 Cannot access Web GUI A. Disable the proxy server, if enabled. Windows ® 7 1. Click Start > Internet Explorer to launch the browser. 2. Click Tools > Internet options > Connections tab > LAN settings . Before configuring your wireless router, do the steps described in this section fo...
Page 114 - MAC OS; From your Safari; Refer to your browser's help feature for details on disabling the; B. Set the TCP/IP settings to automatically obtain an IP
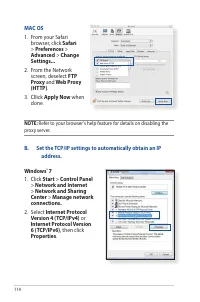
114 MAC OS 1. From your Safari browser, click Safari > Preferences > Advanced > Change Settings... 2. From the Network screen, deselect FTP Proxy and Web Proxy (HTTP) . 3. Cllick Apply Now when done. NOTE: Refer to your browser's help feature for details on disabling the proxy server. B. Se...
Page 115 - Refer to your operating system’s help and support feature for
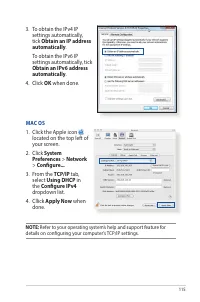
115 3. To obtain the IPv4 IP settings automatically, tick Obtain an IP address automatically . To obtain the IPv6 IP settings automatically, tick Obtain an IPv6 address automatically . 4. Click OK when done. MAC OS 1. Click the Apple icon located on the top left of your screen. 2. Click System Prefe...
Page 117 - Appendices; Notices; ASUS Recycling/Takeback Services
117 Appendices Notices This device is an Energy Related Product (ErP) with High Network Availability (HiNA), the power consumption will be less than 12watts when the system is in network standby mode (idle mode). ASUS Recycling/Takeback Services ASUS recycling and takeback programs come from our com...
Page 118 - Prohibition of Co-location; CAUTION; : Any changes or modifications not expressly approved by; • Consult the dealer or an experienced radio/TV technician for
118 Prohibition of Co-location This device and its antenna(s) must not be co-located or operating in conjunction with any other antenna or transmitter except in accordance with FCC multi-transmitter product procedures. For product available in the USA/Canada market, only channel 1~11 can be operated...
Page 120 - Radio Frequency (RF) Exposure Information
120 The frequency, mode and the maximum transmitted power in EU are listed below:2412-2472MHz (802.11g 6Mbps): 19.81 dBm 5180-5240MHz (802.11ac VHT20 MCS0): 20.1 dBm5260-5320MHz (802.11ac VHT40 MCS0): 21.31 dBm5500-5700MHz (802.11ac VHT80 MCS0): 27.48 dBmThe device is restricted to indoor use only w...
Page 121 - Informations concernant l’exposition aux fréquences
121 minimized. This equipment should be installed and operated with a minimum distance of 20 cm between the radiator and any part of your body. This device has been certified for use in Canada. Status of the listing in the Industry Canada’s REL (Radio Equipment List) can be found at the following we...
Page 122 - Precautions for the use of the device
122 Cet équipement doit être installé et utilisé avec une distance minimale de 20 cm entre le radiateur et toute partie de votre corps. Ce périphérique est homologué pour l’utilisation au Canada. Pour consulter l’entrée correspondant à l’appareil dans la liste d’équipement radio (REL - Radio Equipme...
Page 123 - RoHS; 「產品之限用物質含有情況」之相關資訊,請參考下表:; NCC; 警語
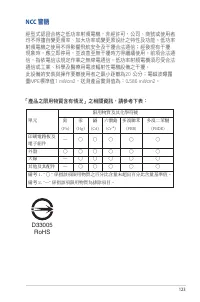
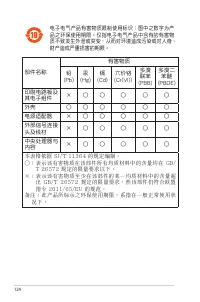
123 D33005 RoHS 單元 限用物質及其化學符號 鉛 (Pb) 汞 (Hg) 鎘 (Cd) 六價鉻 (Cr +6 ) 多溴聯苯 (PBB) 多溴二苯醚 (PBDE) 印刷電路板及電子組件 — ○ ○ ○ ○ ○ 外殼 ○ ○ ○ ○ ○ ○ 天線 — ○ ○ ○ ○ ○ 其他及其配件 — ○ ○ ○ ○ ○ 備考 1. " ○ " 係指該項限用物質之百分比含量未超出百分比含量基準值。 備考 2. "—" 係指該項限用物質為排除項目。 「產品之限用物質含有情況」之相關資訊,請參考下表: NCC 警語 經型式認證合格之低功率射頻電機,非經許可,公司、商號或...
Page 125 - GNU General Public License; Licensing information
125 GNU General Public License Licensing information This product includes copyrighted third-party software licensed under the terms of the GNU General Public License. Please see The GNU General Public License for the exact terms and conditions of this license. All future firmware updates will also ...
Page 133 - NO WARRANTY
133 NO WARRANTY 11 BECAUSE THE PROGRAM IS LICENSED FREE OF CHARGE, THERE IS NO WARRANTY FOR THE PROGRAM, TO THE EXTENT PERMITTED BY APPLICABLE LAW. EXCEPT WHEN OTHERWISE STATED IN WRITING THE COPYRIGHT HOLDERS AND/OR OTHER PARTIES PROVIDE THE PROGRAM “AS IS” WITHOUT WARRANTY OF ANY KIND, EITHER EXPR...
Page 134 - For Turkey only; AEEE Yönetmeliğine Uygundur.; Authorised distributors in Turkey:; CEMAL SURURI CD. HALIM MERIC IS MERKEZI
134 For Turkey only AEEE Yönetmeliğine Uygundur. Authorised distributors in Turkey: BOGAZICI BIL GISAYAR SAN. VE TIC. A.S.Tel. No.: +90 212 3311000 Address: AYAZAGA MAH. KEMERBURGAZ CAD. NO.10 AYAZAGA/ISTANBUL CIZGI Elektronik San. Tic. Ltd. Sti.Tel. No.: +90 212 3567070 Address: CEMAL SURURI CD. HA...
Page 135 - ASUS Contact information; Online support; Technical Support; Telephone Germany
135 ASUS Contact information ASUSTeK COMPUTER INC. (Asia Pacific) Address 15 Li-Te Road, Peitou, Taipei, Taiwan 11259 Website www.asus.com.tw Technical Support Telephone +886228943447 Support Fax +886228907698 Online support https://www.asus.com/support/ ASUS COMPUTER INTERNATIONAL (America) Address...


 Asus GT-AX6000
User Manual
Asus GT-AX6000
User Manual
 Asus RP-N12
Manual
Asus RP-N12
Manual
 Asus RT-AC53
Manual
Asus RT-AC53
Manual
 Asus RT-AC55U
Manual
Asus RT-AC55U
Manual
 Asus RT-AX1800S
User Manual
Asus RT-AX1800S
User Manual
 Asus RTAX3000
User Manual
Asus RTAX3000
User Manual
 Asus RT-AX53U AX1800
User Manual
Asus RT-AX53U AX1800
User Manual
 Asus RT-AX86U
User Manual
Asus RT-AX86U
User Manual
 Asus RT-AX89X AX6000
User Manual
Asus RT-AX89X AX6000
User Manual
 Asus WL-520GC
Manual
Asus WL-520GC
Manual
 Asus ZenWiFi XD6 1PK AX5400 (XD6-1PK)
User Manual
Asus ZenWiFi XD6 1PK AX5400 (XD6-1PK)
User Manual
 Asus 4G-AC53U
Manual
Asus 4G-AC53U
Manual
 Asus RT-N19
Manual
Asus RT-N19
Manual
 Asus BRT-AC828
Manual
Asus BRT-AC828
Manual
 Asus RT-AC1200
Manual
Asus RT-AC1200
Manual