Page 3 - CONTENTS
EN 3 CONTENTS Your gas-induction hob Introduction 4 Control panel 6 Description 7 Safety instructions Temperature safety 8 Cooking-time limiter 8 Use induction Using the touch controls 9 Induction cooking 9 How does induction work 10 Induction noises 10 Pans 11 Operation induction Switching on the h...
Page 4 - Introduction; YOUR GAS-INDUCTION HOB
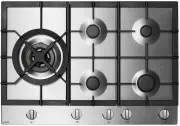
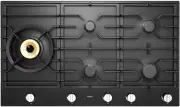
EN 4 Introduction This hob has been designed for the real lover of cooking. The hob consists of a gas wok burner and four induction cooking zones. Cooking on an induction hob has a number of advantages. It is easy, because the hob reacts quickly and can also be set to a very low power level. Because...
Page 5 - at the back of the manual. The appliance identification; Attention
EN 5 The manual also serves as reference material for service technicians. Please, therefore, stick the appliance identification card in the space provided, at the back of the manual. The appliance identification card contains all the information that the service technician will need in order to res...
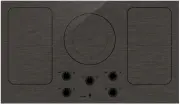
Page 6 - Control panel
EN 6 Control panel 1. Pause button2. Pause indicator3. Childproof lock/Eco stand-by button4. Childproof lock indicator/Eco stand-by indicator5. Level indicator in cubes6. On/off button7. Reduce the power quickly8. Reduce the power9. Raise the power10. Raise the power quickly11. Boost12. Timer/alarmc...
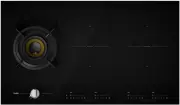
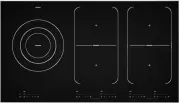
Page 7 - Description
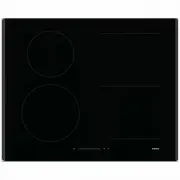
EN 7 Description 1. Cookingzone left wok burner (gas)2. Vario zone 180 x 220 mm 3,7 kW (zones that can be connected) 1. 0 position2. High setting 3. Low setting4. Wok setting (wok burner) 5. Roasting setting (wok burner) YOUR GAS-INDUCTION HOB 1 2 2 2 2 1 2 5 3 4
Page 8 - Before use, read the separate safety; Temperature safety; SAFETY
EN 8 Before use, read the separate safety instructions first! Temperature safety • A sensor continuously measures the temperature of certain parts of the hob. Every induction zone is equipped with a sensor that measures the temperature of the bottom of the pan to avoid any risk of overheating when a...
Page 9 - USE INDUCTION; Using the touch controls; Induction cooking is fast; • To start you will be surprised by the speed of induction cooking.; The power will be adjusted; • In the case of induction cooking, it is only the part of the zone on; • Grains of sand may cause scratches which cannot be removed.
EN 9 USE INDUCTION Using the touch controls The touch controls may take some getting used to if you are used to other (rotary) controls. Place the tip of your finger flat on the control to achieve the best results. You do not have to apply any pressure. The touch sensors only react to the light pres...
Page 10 - How does induction work
EN 10 USE INDUCTION How does induction work A magnetic field is generated in the appliance. By placing a pan with an iron base on a cooking zone, a current is induced in the pan base. This induced current generates heat in the base of the pan. Easy The electronic controls are accurate and easy to se...
Page 11 - Pans
EN 11 The fan is making noise To enlarge the lifespan of the electronics, the appliance is equiped with a fan. If you use the appliance intense, the fan is activated to cool down the appliance and you will hear a buzzing sound. The fan runs on for several minutes after the hob has been switched off....
Page 12 - you switch the hob on at a high setting when the pan is (too) dry
EN 12 USE INDUCTION Attention Be careful with enamelled sheet-steel pans:• the enamel may chip (the enamel comes loose from the steel), if you switch the hob on at a high setting when the pan is (too) dry; • the base of the pan may warp - due, for example, to overheating or to the use of too high a ...
Page 13 - Switching on the hob and setting the power; You will hear a single beep.; Tips; • With the + or - button you can raise or reduce the power setting; Pandetection; Residual warmth indicator; OPERATION INDUCTION
EN 13 Switching on the hob and setting the power The cooking zones have 12 levels. Beside it there is a level ‘boost’.1. Place a pan in the middle of a cooking zone.2. Press the child lock button. You will hear a single beep. 3. Press the on/off button of the cooking zone concerned. A flashing ‘-’ a...
Page 14 - Boost; Switching on ‘boost’; Level 12 and ‘boost’ appear in the display.; Switching off ‘boost’; ‘Boost’ has been switched on, the display shows level 12 and ‘boost’.; Two cooking zones one in front of the other
EN 14 Boost You can use the ‘boost’ function to cook at the highest power level during a short period of time (max.10 minutes). After the maximum boost time the power will be reduced to setting 12. Switching on ‘boost’ 1. Put a pan on a cooking zone.2. Press the >> button immediately after you...
Page 15 - How to bridge the Vario induction zones; menu functions cannot be used.; Activating the bridge mode; Place the large pan on both cooking zones so that these are both; Deactivating the bridge mode; Press simultaneously on the >> button on the front vario zone and
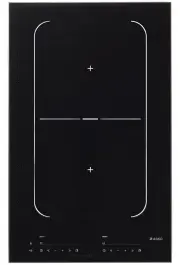
EN 15 OPERATION INDUCTION How to bridge the Vario induction zones The Vario induction zones can be bridged (linked) to each other. This creates 1 large zone that can be used for example for a large fish pan or one large cooking pan.• If the vario zones are bridged, they cannot be set to boost and th...
Page 16 - Switching off; Switching off one cooking zone; Press the on/off button of the cooking zone you want to switch off.; Switching off all cooking zones; • The induction hob is now in eco stand-by modus; Did you know that
EN 16 Switching off Switching off one cooking zone Press the on/off button of the cooking zone you want to switch off. You will hear a beep and the level in the display disappears. • If all cooking zones have been switched off in this way, the hob will automatically be in the stand-by mode (also ref...
Page 17 - Switching the hob to the eco stand-by mode; • Press the child lock button.; Child lock; Switching on the child lock; Press the child lock button for two seconds.; Tip
EN 17 Switching the hob to the eco stand-by mode • Press the child lock button. You will hear a single beep. The eco stand-by mode is active, the red light next to the child lock button keeps slowly going on and off. From the eco stand-by mode you can’t immediately start cooking. To be able to, the ...
Page 18 - Pause; Switching the hob to the pause mode; • Press the pause button once.; Recognizing a mode; Not a single light is lit.; The eco stand-by mode
EN 18 Pause With this pause function, you can set the entire hob to ‘pause’ for 5 minutes during cooking. In this way you can leave or clean the hob in a safe way during a short period of time, without losing settings. Switching the hob to the pause mode • Press the pause button once. You will hear ...
Page 19 - Timer / Kitchen timer; The timer function; The red arrow pointing up lights up and the time increases.
EN 19 OPERATION INDUCTION Timer / Kitchen timer The timer/alarmclock button of each cooking zone has two functions: The timer function The kitchen timer function This function can be recognized by the red small arrow pointing up. This function can be recognized by the red small arrow pointing down. ...
Page 20 - Switching on the kitchen timer; The red small arrow pointing down lights up. Time is counting down.; • If the kitchen timer is linked to a cooking zone, the cooking zone; Setting the cooking time; • Switch the kitchen timer on.; Button
EN 20 Switching on the kitchen timer 1. Press the timer/alarmclock button of the cooking zone once. 2. Press the + or - button to switch from the timer function to the kitchen timer function. After that you can set the desired cooking time with the + button. Then you can change the set time with the...
Page 21 - Switching on and off the beep; Use the same button combination to switch the sound back on.; Switching on/off the automatic pan detection
EN 21 Tip You can press and hold the + or - button to set the desired cooking time quicker. Switching on and off the beep 1. Press the on/off button on the far left twice. 2. Press and hold the << button and the + button simultaneously until you hear a beep. The beep is now switched off for al...
Page 22 - Automatic cooking programs; To set an automatic program; The cooking zone is switched on.
EN 22 OPERATION INDUCTION Automatic cooking programs Your hob is fitted with 6 automatic cooking programs. You can set any end time of an automatic cooking program with the aid of the kitchen timer function. The cooking programs are based on regular quantities. The tables are meant as a guideline, b...
Page 23 - ) After the beep the rice or pasta can be added.
EN 23 OPERATION INDUCTION Boiling function*/** This function brings the content of the pan to a boil (100 °C) and keeps it boiling. A beep can be heard when the content is cooking or if the food has to be added. This function works only with the lid on the pan. Dish Number of people Quantity Pan Zon...
Page 24 - Function for keeping warm*; * This function works best with pans recommended by Asko (please
EN 24 Function for keeping warm* The temperature of a dish is automatically kept at a constant tempera-ture of 70 °C - 75 °C. The setting for keeping warm works best with a lid on the pan. Larger quantities and thicker dishes need to be stirred occasionally. The maximum time for keeping warm is 8 ho...
Page 25 - Healthy cooking; Burning point of different types of oil
EN 25 Grill function*/** The grill setting provides the optimal grilling temperature. A beep can be heard when the pan has reached its temperature. Dish Number of people Quantity Pan Zone Meat, fish, vegetables 3 - 4 300 - 400 g Grill pan / plate Ø 210 / Vario Healthy cooking Burning point of differ...
Page 26 - Cooking settings; Use setting ‘boost’ and; • bring the food or liquid to the; Use setting 9 and 10 to:; • complete the cooking of large
EN 26 Cooking settings Because the settings depend on the quantity and composition of thecontents of the pan, the table below is intended as a guideline only. OPERATION INDUCTION Use setting ‘boost’ and setting 11 and 12 to: • bring the food or liquid to the boil quickly; • ‘shrink’ greens;• heat oi...
Page 27 - Cleaning; MAINTENANCE INDUCTION
EN 27 Cleaning Tip Set the child lock before you start cleaning the hob. Daily cleaning • Although food spills cannot burn into the glass, we nevertheless recommend you to clean the hob immediately after use. • Best for daily cleaning is a damp cloth with a mild cleaning agent.• Dry with kitchen pap...
Page 28 - TROUBLESHOOTING INDUCTION; General; Symptom
EN 28 TROUBLESHOOTING INDUCTION General If you notice a crack in the glass top (however small), switch the hob off immediately, unplug the hob, turn off the (automatic) fuse switch(es) in the meter cupboard or, in the event of a permanent connection, set the switch in the power supply lead to zero. ...
Page 30 - OPERATION GAS; Ignition and adjustment; • The wok burner will switch automatically to the wok setting if the; Use; • Always ensure than the flames stay under the pan. A lot of energy
EN 30 OPERATION GAS Ignition and adjustment The burner is fully adjustable between high and low settings. • Press the control knob and turn it anticlockwise. The burner will ignite.• Keep the control knob fully depressed for at least 3 seconds between high and low settings. The flame failure device ...
Page 31 - Wok ring and small pan grid; wok ring
EN 31 OPERATION GAS Wok ring and small pan grid The wok ring for use with the wok burner supplied or obtainable as an accessory provides extra stability for woks with a round base. The small pan grid supplied or obtainable as an accessory makes it possible to use very small pans. Do not use the wok ...
Page 32 - Wok burner; position distributor
EN 32 OPERATION GAS Wok burner Place the wok burner correctly. Placing the wok burner parts incorrectly can result in a poorly functioning burner.1. Place the burner distributor (2) in the burner housing (1).2. Use the leads to place the inner ring (3) on the burner distributor (2).3. Use the leads ...
Page 33 - MAINTENANCE GAS; Persistent stains on the glass cover
EN 33 MAINTENANCE GAS Cleaning Regular maintenance after use prevents spilt food from setting too long and creating stubborn stains. Use a mild detergent for this. First clean the control knob, burner and pan support and only then the drip tray or glass cover. This prevents the drip tray or glass co...
Page 34 - FAULTS GAS; Troubleshooting table
EN 34 FAULTS GAS Troubleshooting table If your gas hob does not work properly, this does not always mean that it is defective. Try to deal with the problem yourself first by checking the points below or check the ‘ www.asko.com ’ website for more information. Symptom Possible cause Solution You smel...
Page 35 - Object fallen onto it.
EN 35 FAULTS GAS Symptom Possible cause Solution Burner extinguishes after igniting. The control knob has not been depressed long or deep enough (at least 3 seconds). Thermocouple (2) is dirty. Keep the control knob fully depressed for at least 3 seconds between high and low settings. This can take ...
Page 36 - ENVIRONMENTAL ASPECTS; Disposal of packaging and appliance; Declaration of conformity
EN 36 ENVIRONMENTAL ASPECTS Disposal of packaging and appliance In the manufacturing of this appliance durable materials were used. Make sure to dispose of this equipment responsibly at the end of its lifecycle. Ask the authorities for more information regarding this. The appliance packaging is recy...


 Asko HG1666AD
User Manual
Asko HG1666AD
User Manual
 Asko HG1666SD
User Manual
Asko HG1666SD
User Manual
 Asko HG1776AD
User Manual
Asko HG1776AD
User Manual
 Asko HG1776SD
User Manual
Asko HG1776SD
User Manual
 Asko HG1984S
User Manual
Asko HG1984S
User Manual
 Asko HG1986AD
User Manual
Asko HG1986AD
User Manual
 Asko HI1355G
User Manual
Asko HI1355G
User Manual
 Asko HI1611G
User Manual
Asko HI1611G
User Manual
 Asko HI1621G
User Manual
Asko HI1621G
User Manual
 Asko HI1631G
User Manual
Asko HI1631G
User Manual
 Asko HI1655G
User Manual
Asko HI1655G
User Manual
 Asko HI1655MF
User Manual
Asko HI1655MF
User Manual
 Asko HI1975G
User Manual
Asko HI1975G
User Manual
 Asko HI1994M
User Manual
Asko HI1994M
User Manual
 Asko HI1995G
User Manual
Asko HI1995G
User Manual