Page 2 - Inleiding; Lees eerst de gebruiksaanwijzing geheel en aandachtig door; UW INDUCTIEKOOKPLAAT
NL 4 Inleiding Deze inductiekookplaat is ontworpen voor de echte kookliefhebber. Koken op een inductiekookplaat heeft een aantal voordelen. Het is comfortabel, omdat de kookplaat snel reageert en ook op een zeer laag vermogen is in te stellen. Dankzij het hoge vermogen gaat het aan de kook brengen z...
Page 3 - Bedieningspaneel
NL 5 Bedieningspaneel 1. Pauze-indicatie 2. Pauzetoets 3. Kinderslot-/Eco stand-by toets 4. Kinderslot-indicatie/Eco stand-by indicatie 5. Standen-indicatie in blokjes 6. Aan-/uittoets 7. Vermogen versneld verlagen 8. Vermogen verlagen 9. Kookzone-aanduiding 10. Vermogen ophogen 11. Vermogen versnel...
Page 4 - Beschrijving
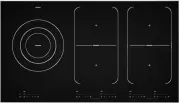
NL 6 Beschrijving Hi1683g Hi1983g UW INDUCTIEKOOKPLAAT 1. Adaptive zone 180 x 220 mm 3,7kW (koppelbare zones) 2. Kookzone Ø260 5,5 kW (dubbel ring) 1 1 1 2 1
Page 5 - WAARSCHUWING; VEILIGHEID
NL 7 Waar u op moet letten • Inductiekoken is uiterst veilig. De kookplaat is uitgerust met diverse beveiligingen zoals restwarmte-signalering en kookduurbegrenzing. Toch is er net als bij elk toestel een aantal zaken waar u op moet letten. • ASKO is niet verantwoordelijk voor mogelijke schade ten g...
Page 7 - Kookstand
NL 9 • Een klein voorwerp, zoals een te kleine kookpan (kleiner dan 12 cm), een vork of een lepel, wordt door de kookplaat niet als een kookpan gedetecteerd. De display van de zone knippert met de ingestelde stand en de kookzone wordt niet ingeschakeld. • Het apparaat is niet bedoeld om te worden be...
Page 8 - GEBRUIK; Werking van de aanraaktoetsen; Inductiekoken is snel
NL 10 GEBRUIK Werking van de aanraaktoetsen Het bedienen van de kookplaat door middel van de aanraaktoetsen is even wennen als u andere bediening gewend bent. Leg uw vinger- toppen plat op de toetsen voor het beste effect. U hoeft niet hard te drukken. De aanraaksensoren zijn zodanig ingesteld dat d...
Page 9 - Werking inductie; Comfortabel; Inductiegeluiden; Tikkend geluid
NL 11 GEBRUIK Werking inductie In het toestel wordt een magnetisch veld opgewekt. Door een pan met een ijzeren bodem op een kookzone te plaatsen ontstaat in de panbodem een inductiestroom. Deze inductiestroom wekt warmte op in de panbodem. Comfortabel De elektronische regeling is nauwkeurig en eenvo...
Page 10 - Pannen
NL 12 Pan maakt geluid • De pannen kunnen geluid maken tijdens het koken. Dit wordt veroorzaakt door de doorstroming van de energie van de kookplaat naar de pan. Met name bij een hoge kookstand is dit normaal bij bepaalde pannen. Het is niet schadelijk voor de pan of de kookplaat. • Als de panbodem ...
Page 12 - Inschakelen en vermogen instellen; Er klinkt een enkel geluidssignaal.; Tips; Restwarmte-indicatie; BEDIENING
NL 14 Inschakelen en vermogen instellen Het vermogen is in te stellen in 12 standen. Daarnaast is er nog een ‘boost’ stand. 1. Zet een pan op een kookzone. 2. Druk op de sleuteltoets. Er klinkt een enkel geluidssignaal. 3. Druk op de aan-/uittoets van de gewenste kookzone. In de display verschijnt e...
Page 13 - Boost; Boost inschakelen; In de display verschijnt stand 12 en ‘boost’.; De boost functie uitschakelen; De boost functie is ingeschakeld, in de display is stand 12 en ‘boost’; Twee achter elkaar liggende kookzones
NL 15 Boost De ‘boost’ functie kunt u gebruiken om gedurende een korte tijd (maximaal 10 minuten) op het hoogste vermogen te koken. Na het verstrijken van de maximale boosttijd wordt het vermogen verlaagd naar stand 12. Boost inschakelen 1. Zet een pan op een kookzone en schakel de kookzone in. 2. D...
Page 14 - Bridgen van de Adaptive inductiezones; Bridge functie inschakelen; ‘BR’ verschijnt in de display van de achterste zone. Daarna kunt u met; Bridge functie uitschakelen; Uitschakelen; Eén kookzone uitschakelen; Er klinkt een enkel geluidssignaal en de display dooft.
NL 16 BEDIENING Bridgen van de Adaptive inductiezones De Adaptive inductiezones kunnen aan elkaar gebridged (gekoppeld) worden. Hierdoor ontstaat 1 grote zone die gebruikt kan worden voor bijv. een grote vispan. • Indien de Adaptive zones gebridged zijn kunnen deze niet op boost gezet worden en kunn...
Page 15 - Alle kookzones tegelijk uitschakelen; lampje langzaam aan en uit gaan.; De kookplaat vanuit eco stand-by modus naar stand-by modus; Er klinkt een enkel geluidssignaal. De eco stand-by modus is actief,
NL 17 Alle kookzones tegelijk uitschakelen Druk kort op de sleuteltoets om alle kookzones gelijktijdig uit te schakelen. Er klinkt een enkel geluidssignaal. Naast de sleuteltoets blijft een rood lampje langzaam aan en uit gaan. • De kookplaat staat nu in de eco stand-by modus (zie ook ‘eco stand-by ...
Page 16 - Wist u dat; Kinderslot; De kookplaat naar kinderslot schakelen; by modus en dan door naar de kinderslot modus. Het rode lampje; Tip; Pauze
NL 18 Vanuit de eco stand-by modus kunt u niet meteen beginnen met koken. Hiervoor moet de kookplaat eerst naar stand-by modus geschakeld worden. Wist u dat Na 30 minuten in de stand-by modus schakelt de kookplaat automatisch naar eco stand-by modus om onnodig energieverbruik te voorkomen. Kinderslo...
Page 17 - De kookplaat naar pauze modus schakelen; Herkennen van een modus; De eco stand-by modus
NL 19 De kookplaat naar pauze modus schakelen • Druk éénmaal op de pauzetoets. Er klinkt een dubbel geluidssignaal, de kookzones gaan uit en het rode lampje naast de pauzetoets knippert. ▷ Eventueel ingestelde timers/kookwekkers staan stil. ▷ Alle kookzones worden automatisch uitgeschakeld. ▷ Alle t...
Page 18 - De timerfunctie; Het rode pijltje naar boven licht op en de tijd loopt op.
NL 20 BEDIENING Timer / Kookwekker De timer-/kookwekkertoets van elke kookzone heeft twee functies: De timerfunctie De kookwekkerfunctie Deze functie is te herkennen aan het rode pijltje naar boven. Deze functie is te herkennen aan het rode pijltje naar beneden. In de timerfunctie loopt de tijd op. ...
Page 20 - Geluidssignaal in- en uitschakelen; totdat u een geluidssignaal hoort.
NL 22 Geluidssignaal in- en uitschakelen 1. Druk tweemaal op de meest linker aan-/uittoets. 2. Houd daarna tegelijkertijd de << toets en de + toets ingedrukt totdat u een geluidssignaal hoort. Het geluidssignaal is nu uitgeschakeld voor alle toetsbedieningen, behalve bij de pauzetoets en de sl...
Page 21 - Automatische kookprogramma’s; Een automatisch kookprogramma instellen; De kookzone is ingeschakeld.; Let op
NL 23 BEDIENING Automatische kookprogramma’s Uw kookplaat is voorzien van 6 automatische kookprogramma’s. De eventuele eindtijd van een automatisch kookprogramma kunt u zelf instellen met behulp van de kookwekkerfunctie (zie pagina 21). De kookprogramma’s zijn gebaseerd op gangbare hoeveelheden. De ...
Page 25 - Gezond koken; Rookpunt van verschillende oliesoorten; * Deze menufuncties werken het best als ze worden opgestart aan het
NL 27 Grillfunctie* De grillstand zorgt voor een optimale grilltemperatuur. Er klinkt een geluidssignaal als de pan op temperatuur is. Gerecht Aantal personen Hoeveelheid Pan Zone Vlees, vis, groenten 1 - 2 100 - 200 g Grill pan / plaat Ø 145 2 - 3 200 - 300 g Grill pan / plaat Ø 180 3 - 4 300 - 400...
Page 26 - Kookstanden; Gebruik ‘boost’ en stand 12 voor:
NL 28 Kookstanden Het onderstaande overzicht is uitsluitend bedoeld als leidraad, omdat de instelwaarde afhankelijk is van de hoeveelheid en samenstelling van het gerecht en de pan. Gebruik ‘boost’ en stand 12 voor: • snel aan de kook brengen; • slinken van bladgroenten; • verhitten van olie en vet;...
Page 27 - Reinigen; ONDERHOUD
NL 29 Reinigen Tip Schakel, voordat u met schoonmaken begint, eerst het kinderslot in. Dagelijkse reiniging • Hoewel overgekookt voedsel niet kan inbranden verdient het aanbeveling de kookplaat direct na gebruik schoon te maken. • Voor de dagelijkse reiniging kunt u het beste een mild reinigingsmidd...
Page 28 - Symptoom; STORINGEN
NL 30 Algemeen Indien u een barstje of scheurtje (hoe klein ook) op de glasplaat ziet, schakel dan de kookplaat onmiddellijk uit, neem direct de stekker van de kookplaat uit het stopcontact, verbreek de (automatische) zekering(en) in de meterkast of zet de schakelaar in de meterkast op nul bij een v...
Page 30 - Waar u op moet letten; Veiligheidsvoorschriften installatie; INSTALLATIE
NL 32 Waar u op moet letten Veiligheidsvoorschriften installatie • De aansluiting moet voldoen aan de nationale en lokale voorschriften. • Het toestel moet altijd geaard zijn. • Alleen een erkend elektrotechnisch installateur mag dit toestel aansluiten. • Gebruik voor het aansluiten een goedgekeurde...
Page 31 - Benodigde vrije ruimte rondom
NL 33 • Defecte onderdelen mogen alleen vervangen worden door originele Asko onder delen. Alleen van die onderdelen kan Asko garanderen dat zij aan de veiligheidseisen voldoen. • Indien de aansluitkabel beschadigd is mag deze alleen worden vervangen door de fabrikant, zijn service-organisatie of gel...
Page 32 - Inbouwmaten; Wanneer de kookplaat breder is dan het kastje, met een werkblad met
NL 34 Inbouwmaten In de volgende illustraties zijn de afmetingen van de uitsparingen aangegeven. Wanneer de kookplaat breder is dan het kastje, met een werkblad met een dikte van minder dan 46 mm, moet u een uitsparing aan beide zijden in het kastje zagen, zodat het toestel vrij ligt van het kastje....
Page 33 - Beluchting
NL 35 INSTALLATIE Beluchting De elektronica in het toestel heeft koeling nodig. Het toestel schakelt na korte tijd uit wanneer er onvoldoende lucht circuleert. Aan de onderzijde van het toestel bevinden zich de ventilatie-openingen. Door deze openingen moet koele lucht aangezogen kunnen worden. Aan ...
Page 34 - Elektrische aansluiting; Veel voorkomende aansluitingen:
NL 36 INSTALLATIE Elektrische aansluiting Veel voorkomende aansluitingen: • 3 fasen met 1 nul aansluiting (3 1N, 400 V ~ / 50 Hz): ▷ De spanning tussen de fasen en de nul is 230 V ~. Tussen de fasen staat een spanning van 400 V ~. Breng een verbindingsbrug aan tussen de aansluitpunten 4-5. Fase 3 wo...
Page 35 - Inbouwen
NL 37 INSTALLATIE Inbouwen Controleer of het keukenmeubel en de uitsparing voldoen aan de gestelde eisen ten aanzien van afmetingen en venti latie. Behandel van kunststof of houten werkbladen de kopse kanten met eventueel afdichtvernis, om uitzetten van het werkblad door vocht te voorkomen. Leg het ...
Page 36 - Technische gegevens; Kookplaattype
NL 38 INSTALLATIE Technische gegevens Deze toestellen voldoen aan alle relevante CE richtlijnen. Kookplaattype Hi1683g Hi1983g Inductie x x Aansluiting 230V - 50Hz 230V - 50Hz Aantal fasen 2 3 Max. vermogen kookzones Linksmidden 5,5 kW (Ø260) Linksvoor 3,7 kW (180x220) 3,7 kW (180x220) Linksachter 3...
Page 37 - MILIEUASPECTEN; Afvoeren toestel en verpakking; Conformiteitsverklaring
NL 39 MILIEUASPECTEN Afvoeren toestel en verpakking Bij de vervaardiging van dit toestel is gebruik gemaakt van duurzame materialen. Dit toestel moet aan het eind van zijn levenscyclus op verantwoorde wijze worden afgevoerd. De overheid kan u hierover informatie verschaffen. De verpakking van het to...
Page 39 - CONTENTS
GB 3 CONTENTS Your induction hob Introduction 4Control panel 5 Description 6 Safety instructions What you should pay attention to 7 Connection and repair 7 During use 7 Temperature safety 9 Cooking-time limiter 9 Use Using the touch controls 10 Induction cooking 10 How does induction work 11 Inducti...
Page 40 - Introduction; Read the manual thorougly before using the appliance and store it; YOUR INDUCTION HOB
GB 4 Introduction This hob has been designed for the real lover of cooking. Cooking on an induction hob has a number of advantages. It is easy, because the hob reacts quickly and can also be set to a very low power level. Because, moreover, it can also be set to a high power level, it can bring dish...
Page 41 - Control panel
GB 5 Control panel 1. Pause indicator 2. Pause button 3. Childproof lock/Eco stand-by button 4. Childproof lock indicator/Eco stand-by indicator 5. Level indicator in cubes 6. On/off button 7. Reduce the power quickly 8. Reduce the power 9. Cooking zone indicator 10. Increase the power 11. Increase ...
Page 42 - Description
GB 6 Description Hi1683g Hi1983g YOUR INDUCTION HOB 1. Adaptive zone 180 x 220 mm 3,7kW (zones that can be connected) 2. Cooking zone Ø260 5,5 kW (double ring) 1 1 1 2 1
Page 43 - SAFETY
GB 7 What you should pay attention to • Induction cooking is extremely safe. Various safety devices have been incorporated in the hob such as a residual heat indicator and a cooking time limiter. There are nevertheless a number of precautions you should take. • ASKO cannot be held liable for damage ...
Page 45 - Temperature safety; Setting
GB 9 • If the connecting cable is damaged, it may only be replaced by the manufacturer, the manufacturer’s service organisation or equivalently qualified persons, in order to avoid dangerous situations. Temperature safety • A sensor continuously measures the temperature of certain parts of the hob. ...
Page 46 - USE; Using the touch controls; Induction cooking is fast
GB 10 USE Using the touch controls The touch controls may take some getting used to if you are used to other (rotary) controls. Place your fingertip flat on the control to achieve the best results. You do not have to apply any pressure. The touch sensors only react to the light pressure of a fingert...
Page 47 - How does induction work
GB 11 USE How does induction work A magnetic field is generated in the appliance. By placing a pan with an iron base on a cooking zone, a current is induced in the pan base. This induced current generates heat in the base of the pan. Easy The electronic controls are accurate and easy to set. On the ...
Page 48 - Pans
GB 12 • If the pan base is made from layers of different material (i.e sandwich base), it might emit a crackling sound. The fan is making noise To enlarge the lifespan of the electronics, the appliance is equiped with a fan. If you use the appliance intense, the fan is activated to cool down the app...
Page 50 - Switching on the hob and setting the power; You will hear a single beep.; Residual warmth indicator; OPERATION
GB 14 Switching on the hob and setting the power The cooking zones have 12 levels. Beside it there is a level ‘boost’. 1. Put a pan on a cooking zone. 2. Press the child lock button. You will hear a single beep. 3. Press the on/off button of the cooking zone concerned. A flashing ‘-’ appears in the ...
Page 51 - Switching on ‘boost’; Level 12 and ‘boost’ appear in the display.; Switching off ‘boost’; ‘Boost’ has been switched on, the display shows level 12 and ‘boost’.; Two cooking zones one in front of the other
GB 15 Boost You can use the ‘boost’ function to cook at the highest power level during a short period of time (max.10 minutes). After the maximum boost time the power will be reduced to setting 12. Switching on ‘boost’ 1. Put a pan on a cooking zone. 2. Press the >> button immediately after yo...
Page 52 - How to bridge the adaptive induction zones; Use a (fish) pan where at least one of the centre/middle positions of; Activating the bridge mode; Switching off; Switching off one cooking zone
GB 16 OPERATION How to bridge the adaptive induction zones The adaptive induction zones can be bridged. Both zones in the front and the back will have the same settings after activating this function (they are now connected; one big zone for a large cooking pan). • If the adaptive zones are bridged,...
Page 53 - Switching off all cooking zones; lock button will blink very slowly.; Switching the hob from the eco stand-by mode to the standy-by; A single beep will be heard. All lights on the hob are off.; Did you know that; A will hear a single beep. The eco stand-by mode is active, the red
GB 17 Switching off all cooking zones Press the child lock button to switch off all the cooking zones at the same time. You will hear a beep. The red childproof lock indicator next to the child lock button will blink very slowly. • The induction hob is now in eco stand-by mode (see also ‘eco stand-b...
Page 54 - Child lock; Switching on the child lock; Pause
GB 18 From the eco stand-by mode you can’t immediately start cooking. To be able to, the hob first needs to be switched to the stand-by mode. Did you know that After 30 minutes in the stand-by mode the hob will automatically switch to the eco stand-by mode to prevent unnecessary energy consumption. ...
Page 55 - Switching the hob to the pause mode; Recognizing a mode; The eco stand-by mode
GB 19 Switching the hob to the pause mode • Press the pause button once. You will hear a double beep, the settings change into a lower setting and the red light next to the pause button flashes. ▷ Any set timers/kitchen timers stop. All cooking zones are automatically changed to a lower setting. ▷ A...
Page 56 - Timer / Kitchen timer; The timer function; The display of the timer lights up and you’ll see three zeroes
GB 20 OPERATION Timer / Kitchen timer The timer/alarmclock button of each cooking zone has two functions: The timer function The kitchen timer function This function can be recognized by the red small arrow pointing up. This function can be recognized by the red small arrow pointing down. The time i...
Page 58 - Switching on and off the beep; The beep is now switched off for all button operations, except for
GB 22 Switching on and off the beep 1. Press the on/off button on the far left twice. 2. Press and hold the << button and the + button simultaneously until you hear a beep. The beep is now switched off for all button operations, except for the pause button and the child lock button. Note: the ...
Page 59 - Automatic cooking programs; To set an automatic program; The cooking zone is switched on.; Attention
GB 23 OPERATION Automatic cooking programs Your hob is fitted with 6 automatic cooking programs. You can set any end time of an automatic cooking program with the aid of the kitchen timer function (refer to page 21). The cooking programs are based on regular quantities. The tables are meant as a gui...
Page 61 - Simmering function; Thicker dishes have to be stirred every 15 minutes. The maximum; Function for keeping warm; ture of 70 °C - 75 °C. The setting for keeping warm works best with a
GB 25 Simmering function The temperature of the dish is constantly kept near the boiling point (90 °C - 95 °C). The simmer setting works best with a lid on the pan. Thicker dishes have to be stirred every 15 minutes. The maximum simmering time is 8 hours, unless a shorter time has been set with the ...
Page 63 - Healthy cooking; Burning point of different types of oil
GB 27 Grill function* The grill setting provides the optimal grilling temperature. A beep can be heard when the pan has reached its temperature. Dish Number of people Quantity Pan Zone Meat, fi sh, vegetables 1 - 2 100 - 200 g Grill pan / plate Ø 145 2 - 3 200 - 300 g Grill pan / plate Ø 180 3 - 4 30...
Page 64 - Cooking settings; Use setting ‘boost’ and setting 12 to:
GB 28 Cooking settings Because the settings depend on the quantity and composition of the contents of the pan, the table below is intended as a guideline only. Use setting ‘boost’ and setting 12 to: • bring the food or liquid to the boil quickly; • ‘shrink’ greens; • heat oil and fat; • bring a pres...
Page 65 - Cleaning; MAINTENANCE
GB 29 Cleaning Tip Set the child lock before you start cleaning the hob. Daily cleaning • Although food spills cannot burn into the glass, we nevertheless recommend you to clean the hob immediately after use. • Best for daily cleaning is a damp cloth with a mild cleaning agent. • Dry with kitchen pa...
Page 66 - General; If you notice a crack in the glass top (however small), switch the hob; Troubleshooting table; the points mentioned below.; Symptom; The preset time has ended.; TROUBLESHOOTING
GB 30 General If you notice a crack in the glass top (however small), switch the hob off immediately, unplug the hob, turn off the (automatic) fuse switch(es) in the meter cupboard or, in the event of a permanent connection, set the switch in the power supply lead to zero.) Contact the service depar...
Page 68 - What you need to consider; Safety instructions for the installation; INSTALLATION
GB 32 What you need to consider Safety instructions for the installation • The connection must comply with national and local regulations. • The appliance must always be earthed. • This appliance may only be connected by a competent electrical installer. • For the connection, use an approved cable (...
Page 69 - Clearance; Check that there is enough clearance.
GB 33 • Faulty parts may only be replaced by original Asko parts. Only those parts are guaranteed by Asko to meet the safety requirements. • If the connecting cable is damaged, it may only be replaced by the manufacturer, the manufacturer’s service organisation or equivalently qualified persons, in ...
Page 70 - If the hob is wider than the cupboard, with a worktop less than 46 mm
GB 34 Installation dimensions The dimensions and recesses are shown in the illustrations beneath. If the hob is wider than the cupboard, with a worktop less than 46 mm thick, saw a cut-out in both sides of the cupboard, so the appliance is detached from the cupboard. Y Y X 600 Installation dimension...
Page 71 - Ventilation
GB 35 INSTALLATION Ventilation The electronics in the appliance need cooling. The appliance will automatically switch off if there is insufficient air circulation. There are ventilation openings on the underside of the appliance. It must be possible for cool air to be drawn in through these openings...
Page 72 - Electrical connection; Connection for hob Hi1983g:
GB 36 INSTALLATION Electrical connection Common connections: • 3 phases with 1 neutral connection (3 1N, 400 V ~ / 50 Hz): ▷ The voltage between the phases and the neutral is 230 V ~. The voltage between the phases is 400 V ~. Fit a connecting bridge between connecting points 4-5. Phase 3 carries no...
Page 73 - Building in
GB 37 INSTALLATION Building in Check that the cabinet and the cut-out meet the dimension and ventilation requirement Threat the sawn ends of wooden or synthetic worktops with sealing varnish if necessary, to prevent moisture causing the worktop to swell. Lay the hob upside down on the worktop. Fit t...
Page 74 - Technical details; Hob type
GB 38 INSTALLATION Technical details This appliance complies with all relevant CE directives. Hob type Hi1683g Hi1983g Induction x x Connection 230V - 50Hz 230V - 50Hz Phases 2 3 Maximum capacity cooking zones Middle left 5,5 kW (Ø260) Front left 3,7 kW (180x220) 3,7 kW (180x220) Rear left 3,7 kW (1...
Page 75 - ENVIRONMENTAL ASPECTS; Disposal of packaging and appliance; Declaration of conformity
GB 39 ENVIRONMENTAL ASPECTS Disposal of packaging and appliance In the manufacturing of this appliance durable materials were used. Make sure to dispose of this equipment responsibly at the end of its lifecycle. Ask the authorities for more information regarding this. The appliance packaging is recy...