Page 3 - CONTENTS
CONTENTS 4 Safety information 5 Installation instructions 7 Product description 9 Operating instructions 12 Helpful hints and tips 13 Care and cleaning 14 What to do if… 15 Environment concerns 15 Warranty The following symbols are used in this user manual: Important information concerning your pers...
Page 4 - Children and vulnerable people safety; vation of the appliance.; Safety during operation; Too hot fats and oils can occur with ignition very quickly.; Correct operation; plastic or aluminium) on or near the appliance.; How to prevent a damage to the appliance; scratch of the glass ceramic. Do not move them on the surface.
SAFETY INFORMATION For your safety and correct operation of the appliance, read this manual carefully before the installation and use. Always keep these instructions with the appliance also if you move or sell it. The users must fully know the operation and safety functions of the appliance. Childre...
Page 5 - INSTALLATION INSTRUCTIONS; Before the installation; The Safety Instructions
• Do not put the aluminium foil on the appliance. WARNING! If there is a crack on the surface, disconnect power supply to prevent the electrical shock. CAUTION! 5 mm ventilation space is essential, failure to include this during installation can cause ap- pliance malfunctions which are not covered u...
Page 6 - Assembly
WARNING! Risk of injury from electrical current. Carefully obey the instructions for electrical connec- tions. • The electrical mains terminal is live.• Make electrical mains terminal free of voltage.• Install correctly to give shock protection.• Loose and incorrect plug and socket connections can m...
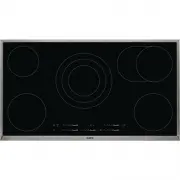
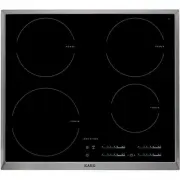
Page 7 - PRODUCT DESCRIPTION; Cooking surface layout; Control panel
min. 28 mm If you use a protection box (the additional acces-sory 1) ), the protective floor directly below the ap- pliance is not necessary. You can not use the protection box if you install the appliance above an oven. PRODUCT DESCRIPTION Cooking surface layout 170 mm 265 mm 145 mm 180 mm 180 mm 1...
Page 8 - Control panel layout; Heat setting displays; Product description
Control panel layout 12 9 10 11 8 7 3 4 5 1 2 6 Use the sensor fields to operate the appliance. The displays, indicators and sounds tell which functions operate. sensor field function 1 It activates and deactivates the appliance. 2 It locks/unlocks the control panel. 3 Cooking zones' indicators of t...
Page 9 - OptiHeat Control (3 step Residual heat indicator); OPERATING INSTRUCTIONS; Activation and deactivation; The function deactivates the appliance automatically if:; The heat setting
Display Description The Automatic Switch Of function operates. OptiHeat Control (3 step Residual heat indicator) WARNING! / / The risk of burns from residual heat! OptiHeat Control shows the level of the residual heat. OPERATING INSTRUCTIONS Activation and deactivation Touch for 1 second to activate...
Page 11 - Lock
CountUp Timer ( The count up timer) Use the CountUp Timer to monitor how long the cooking zone operates.• To set the cooking zone (if more than 1 cooking zone operate ) : touch again and again until the indicator of a necessary cooking zone comes on. • To activate the CountUp Timer: touch of the tim...
Page 12 - OffSound Control (Deactivation and activation of the sounds); HELPFUL HINTS AND TIPS; Cookware
To override the child safety device for only one cooking time • Activate the appliance with . The symbol comes on.• Touch for 4 seconds. Set the heat setting in 10 seconds. You can operate the appli- ance. • When you deactivate the appliance with , the child safety device operates again. OffSound Co...
Page 13 - Information on acrylamides; CARE AND CLEANING; not
Heat setting Use to: Time Hints 1 Keep cooked foods warm as nec- essary Put a lid on a cookware. 1 - 3 Hollandaise sauce, melt: butter, choco- late, gelatine 5 - 25 min Mix from time to time. 1 - 3 Solidify: fluffy omelettes, baked eggs 10 - 40 min Cook with a lid on. 3 - 5 Simmer rice and milkbased...
Page 14 - WHAT TO DO IF...; What to do if...
To remove the dirt: 1. – Remove immediately: melted plastic, plastic foil, and food with sugar. If not, the dirt can cause damage to the appliance. Use a special scraper for the glass . Put the scraper on the glass surface at an acute angle and move the blade on the surface . – Remove after the appl...
Page 15 - ENVIRONMENT CONCERNS; you purchased the product.; Packaging material; Environment concerns
Problem Possible cause and remedy and number comes on. There is an error in the appliance. Disconnect the appliance from the electrical supply for some time. Disconnect the fuse from the electrical system of the house.Connect again. If comes on again, speak to the service centre. If you tried the ab...
Page 16 - LENGTH OF WARRANTY; TWO YEAR FULL WARRANTY; THIS GUARANTEE DOES NOT COVER COMMERCIAL USE; EURO-LINE APPLIANCES WILL NOT PAY FOR THE FOLLOWING SERVICE CALLS:; To install or correct the installation of an appliance.; EURO-LINE APPLIANCES WILL NOT PAY WHEN THE FOLLOWING OCCURS:; not in accordance with local building codes.
Guarantee/Customer Service Centres EURO-LINE APPLIANCES LENGTH OF WARRANTY EURO-LINE WILL PAY FOR: TWO YEAR FULL WARRANTY from original date of purchase, including parts and labour, to the first purchaser of this appliance This warranty is not transferable. Replacement parts and/or labour to repair ...
Page 17 - For Service and Parts Contact:; User Instructions & Installation Manual; If service is required, contact the Service Center:
In no event, will Euro-Line be responsible for incidental or consequential damages. For warranty service and parts, contact EURO-PARTS. Service will be provided during normal business hours. Should you have a service problem that is not resolved locally, contact: For Service and Parts Contact: EURO-...