Page 2 - Visit the webshop at:
FOR PERFECT RESULTS Thank you for choosing this AEG product. We have created it to give you impeccable performance for many years, with innovative technologies that help make life simpler – features you might not find on ordinary appliances. Please spend a few minutes reading to get the very best fr...
Page 3 - CONTENTS
CONTENTS 4 Safety information 6 Installation 12 Product description 13 Operation 14 Helpful hints and tips 15 Care and cleaning 17 What to do if… 18 Technical data 19 Environment concerns The following symbols are used in this user manual: Important information concerning your personal safety and in...
Page 4 - General safety
SAFETY INFORMATION WARNING! These instructions are only valid in the countries whose symbols appear on this booklet's cover. For your safety and correct operation of the appliance, read this manual carefully before installation and use. Always keep these instructions with the appliance even if you m...
Page 5 - Installation
• Pots must not enter the control zone.• Do not use not stable cookware to prevent from tilt and accident.• Do not put flammable products or items that are wet with flammable products, and/or fusible objects (made of plastic or aluminium) and/or fabrics in, near or on the appliance. There is the ris...
Page 6 - Disposal of the appliance; INSTALLATION
• This appliance is not connected to a combustion products evacuation device. It must be installed and connected in accordance with current installation regulations. Particular attention must be given to the relevant requirements regarding ventilation. • The use of a gas cooking appliance cause heat...
Page 7 - Important safety requirements; Gas Connection
Important safety requirements This hob must be installed in accordance with the Gas Safety (Installation and Use) Regula- tions (Current Edition) and the IEE Wiring Regulations (Current Edition). For appliances installed in the Republic of Ireland please refer to NSAI - Domestic Gas Instal- lation I...
Page 9 - Electrical connection
1. Light the burner.2. Turn the knob on the minimum position.3. Remove the knob.4. With a thin screwdriver, adjust the by - pass screw position. 1 1 The by - pass screw – If you change from natural gas 20 mbar to liquid gas, fully tighten the by - pass screw in. – If you change from liquid gas to na...
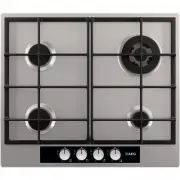
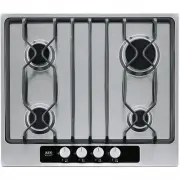
Page 12 - PRODUCT DESCRIPTION; Cooking surface layout
b) Space for connections Kitchen unit with oven The hob recess dimensions must obey the indication and the kitchen unit must be equipped with vents to let a continuous supply of air. The electrical connection of the hob and the oven must be installed separately for safety reasons and to let easy rem...
Page 13 - OPERATION; Ignition of the burner; responsibility in case misuse of the flame
OPERATION Ignition of the burner WARNING! Be very careful when you use open fire in kitchen environment. Manufacturer decline any responsibility in case misuse of the flame Always light the burner before you put cookware. To light the burner:1. Turn the control knob counterclockwise to the maximum p...
Page 14 - HELPFUL HINTS AND TIPS; Energy savings
1 Burner cap 2 Burner crown 3 Ignition candle 4 Thermocouple WARNING! Do not keep the control knob pushed for more than 15 seconds. If the burner does not light after 15 seconds, release the control knob, turn it into off posi- tion and try to light the burner again after minimum 1 minute. In the ab...
Page 15 - Information on acrylamides; CARE AND CLEANING
WARNING! Use pots and pans with diameter applicable to the dimension of burner. Do not use cooking vessels on the hotplate that overlap its edges. Burner Diameters of cookware Triple Crown 180 - 260 mm Front Semi - rapid 120 - 180 mm Rear Semi - rapid 120 - 220 mm Auxiliary 80 - 160 mm WARNING! Pots...
Page 16 - Cleaning of the spark plug
• Stainless steel parts wash with water, and then dry with a soft cloth.• The pan supports are not dishwasher proof; they must be washed by hand . • When you wash the pan supports by hand, take care when you dry them as the enamel- ling process occasionally leaves rough edges. If necessary, remove s...
Page 17 - WHAT TO DO IF...; free of charge, even during the warranty period.; Labels supplied with the accessories bag; Stick the adhesive labels as indicated below:
WHAT TO DO IF… Problem Possible cause Remedy There is no spark when lighting the gas • There is no electrical supply • Make sure that the unit is connected and the electrical supply is switched on. • Control the fuse. If the fuse is released more than one time, refer to a qualified electrician. • Bu...
Page 18 - Stick it on Guarantee Card and send this part; TECHNICAL DATA; Technical data
MOD.PROD.NO.SER.NODATA MOD.PROD.NO.SER.NODATA MODEL MODEL MOD. PROD.NO. SER.NO. 03 ITMADE IN ITALY TYPE 230V-50Hz IP20 0049 1 2 3 1 Stick it on Guarantee Card and send this part 2 Stick it on Guarantee Card and keep this part 3 Stick it on instruction booklet These data are necessary to help you qui...
Page 19 - ENVIRONMENT CONCERNS; you purchased the product.
Electric supply: 230 V ~ 50 Hz 3 core flexible cable with non rewireable plug fitted with a 3 amp cartridge fuse Gas connection: G 1/2 " Category: II2H3+ Gas supply: G20 (2H) 20 mbar Appliance class: 3 By - pass diameters Burner Ø By - pass in 1/100 mm. Auxiliary 28 Semi - rapid 32 Triple Crown ...
Page 20 - Packaging material
Packaging material The packaging materials are friendly to the environment and can be recycled. The plastic components are identified by marking: >PE<,>PS<, etc. Discard the packaging materials as household waste at the waste disposal facilities in your municipality. 20