Page 3 - TABLE OF CONTENTS; IMPORTANT SAFETY
Table of Contents Questions? 1-800-944-2904 www.bosch-home.com/us We look forward to hearing from you! This Bosch Appliance is made by BSH Home Appliances Corporation 1901 Main Street, Suite 600 Irvine, CA 92614 About This Manual . . . . . . . . . . . . . . . . . . . . . . . . . . . . . 1 Safety Def...
Page 4 - 9 SMART FUNCTIONS; 2 MAINTENANCE; 1 LIMITED WARRANTY
English 1 About This Manual How This Manual Is Organized This manual contains several sections:• The Safety section describes important procedures that can ensure your safety while using the appliance. • The Getting Started section describes the features and functionality of the appliance, including...
Page 5 - IMPORTANT SAFETY INSTRUCTIONS; READ ALL INSTRUCTIONS BEFORE USE; Safety Messages
9 IMPORTANT SAFETY INSTRUCTIONS READ AND SAVE THESE INSTRUCTIONS English 2 Safety Proper Installation and Maintenance • WARNING: When properly cared for, your new appliance has been designed to be safe and reliable. Read all instructions carefully before use. These precautions will reduce the risk o...
Page 6 - Installation
9 IMPORTANT SAFETY INSTRUCTIONS READ AND SAVE THESE INSTRUCTIONS English 3 • If the cooktop is near a window, forced air vent, or fan, be certain that flammable materials such as window coverings do not blow over or near the burners or elements. They could catch on fire. • Always have a working smok...
Page 7 - Operation
9 IMPORTANT SAFETY INSTRUCTIONS READ AND SAVE THESE INSTRUCTIONS English 4 • Exercise caution when opening the appliance. Standing to the side, open the door (or drawer) slowly and slightly to let hot air and/or steam escape. Keep your face clear of the opening and make sure there are no children or...
Page 8 - Maintenance
9 IMPORTANT SAFETY INSTRUCTIONS English 5 • IMPORTANT SAFETY NOTICE: The California Saf e Drinking and Toxic Enforcement Act requires the Governor of California to publish a list of substances known to the state to cause cancer, birth defects or other reproductive harm, and requires businesses to wa...
Page 9 - SAVE THESE INSTRUCTIONS; CAUTION
English 6 Getting Started Parts and Accessories Your appliance may vary slightly. Range Parts Key 1 Oven Control Panel 2 Cooktop Control Knobs 3 Door Gasket 4 Door Latch 5 Probe Jack (some models) 6 Convection Fan 7 Rack Position Guides with 6 rack positions 8 Oven Bottom 9 Door Hinge 10 Warming Dra...
Page 10 - PRODUCT OVERVIEW; Product Features; Product Specifications
English 7 Range Features Sealed Gas Burners The cooktop has sealed gas burners. As a result, there are no parts under the cooktop to clean, disassemble or adjust. Spills stay on top of the cooktop where they are easier to wipe up. Burner Caps The cooktop has three different burner sizes; small, medi...
Page 11 - Accessories; Included Accessories; LP Nozzle Conversion Kit; Optional Accessories; NOTE
English 8 Checking Burner Cap Placement • Check to make sure there is not a gap between the burner cap and burner base. See figure “Burner Cap Placement” on page 8 to see the correct and incorrect placements of the burner cap. • You may gently try to move the burner cap from side to side to check if...
Page 12 - INSTALLATION; Before Installing; Tools Needed; Parts You May Need; In the Commonwealth of
English 9 Control Knobs The cooktop has one control knob for each burner. The cooktop has standard burner controls and rubber grommets. The standard burner controls have an infinite number of heat settings. These settings are located on the burner knob. To operate: Select the appropriate control kno...
Page 13 - Choosing the Proper; Ventilation; Mobile Home
English 10 Accessories Inserting Racks Flat Rack The rack is designed with a stop so it will stop before coming completely out of the oven and not tilt. To insert the flat rack into the oven: 1. Grasp rack firmly on both sides.2. Insert rack (see picture). 3. Tilt rack up (A) to allow the upwardly s...
Page 14 - Dimensions and Clearances
English 11 Telescopic Rack (some models) To insert the telescopic rack into the oven: 1. Slide the rack in evenly until the rear of the rack is about 2 inches from the back of the oven. 2. Tilt the front of the rack up about 3/4 of an inch (A) and finish pushing the rack all the way back (B). Note: ...
Page 15 - Clearances; Leveling; Leveling the Range
English 12 Operation - Cooktop This section explains how to operate the cooktop. See “Cooktop Cooking Guide” on page 22 for guidelines to improve cooktop results. About the Cooktop Use the cooktop for surface cooking applications such as boiling, frying, simmering, steaming and sautéing. When using ...
Page 16 - Checking Adjustments; Connecting Gas; Providing Adequate Gas Supply
English 13 Operation - Oven Oven Control Panel 800 Series Oven Control Panel Touchpads Note: You only need to press lightly on the touchpads to operate them. Touchpad Descriptions 2 3 4 1 1 Mode Selection Touchpads 2 Display 3 Numeric Keypad Touchpads 4 Special Function Touchpads Turns Panel Lock mo...
Page 17 - Flexible Connector Hookup; Adjusting Air Shutters (for LP; Connecting Electricity; Electrical Requirements
English 14 More Modes Additional modes are available by pressing the More Modes touchpad. These modes include Warm, Pizza, Proof and Roast. These are discussed in the Getting the Most Out of Your Appliance section later in this manual. Display Symbols Before Using the Oven for the First Time • Oven ...
Page 18 - Surface Burners; Assembling the Surface Burners
English 15 Setting the Cooking Mode and Temperature There are two alternate methods to set cooking mode and temperature. To set the Cooking Mode first, then the temperature : 1. Press the desired Cooking Mode Touchpad. The cooking mode and default temperature are displayed. The temperature flashes t...
Page 19 - Checking Ignition of the Surface; Electric Ignition; Quality of Flames; Adjusting the Surface Burner to the; Optional Rear Filler; Installing the Rear Filler
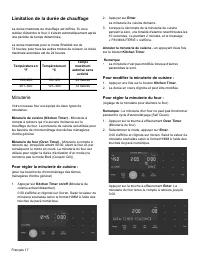
English 16 Heating Time Limitation The maximum heating time is limited. If you forget to turn off the oven, it turns off automatically after a set period of time. The maximum time for Sabbath mode is 74 hours; for all other cooking modes the maximum allowed time is 24 hours. Timer Your new oven is e...
Page 20 - Installing the Anti-Tip Device; Tip Hazard; Using the Anti-Tip Bracket Template
English 17 3. The timer value blinks, indicating it can be edited. Input the new time and restart the timer by pressing the Enter touchpad. The oven timer may be cleared by entering 0:00. Special Features The special features provide you with additional conveniences when cooking. Learn more about th...
Page 21 - Engaging the Anti-tip Device; Test Run; Test the Range Before Use; Checking Operation of Bake Burners; Checking Operation of Broil Burners
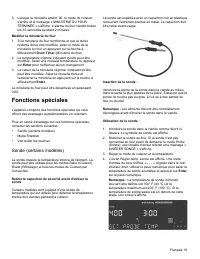
English 18 This screen remains in the display until it is cleared by pressing the Oven Clear/Off touchpad or until the probe is removed. The display then goes back to stand by mode. Note: • Probe is not available when an Oven Timer has been set. • To change the probe temperature press the Probe touc...
Page 22 - OPERATION; Control Panel; Control Panel Features
English 19 Note: • The temperature range in Sabbath Mode is 100° F to 450° F. • The Sabbath Mode timer can be set between 0:01 and 74 hours. To edit the Sabbath Temperature: While editing the temperature in Sabbath mode, there is no feedback from the control. If an invalid temperature is set, the ov...
Page 23 - Knob Lighting
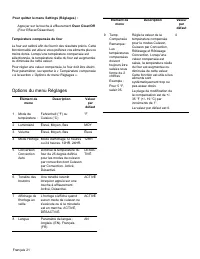
English 20 Settings Menu Options Menu Item Description Default 1 Temperature Mode Fahrenheit (° F) or Celsius (° C) °F 2 Brightness High, Medium, Low MED 3 Volume High, Medium, Low High 4 Clock mode 12-hour or 24-hour display mode. 12HR, 24HR. 12HR 5 Auto Convection Conversion Decreases oven tempera...
Page 24 - Changing Oven Settings; Clock
English 21 Operation - Warming Drawer This section explains how to operate the warming drawer. See “Getting the Most Out of Your Warming Drawer” on page 28 for guidelines to improve warming drawer results. About the Warming Drawer The warming drawer will keep hot, cooked foods at serving temperature...
Page 25 - Preheat Alarm Light, Beeper; Setting the Hour Mode
English 22 Getting the Most Out of Your Cooktop Cooktop Cooking Guide Boiling Water Time to boil can vary greatly depending on environmental conditions. Try the following tips to decrease boil time:• Use a lid. • Use a pan that is appropriately sized for the amount of water and the size of the eleme...
Page 26 - Control Lock
English 23 Specialty pans such as griddles, roasters, pressure cookers, woks, water bath canners and pressure canners must have the same features as described above. Use only a flat-bottomed wok or wok ring when using a wok. Getting the Most Out of Your Oven General Tips Pan Placement Baking results...
Page 27 - Setting a Timed Cook; Minimum & Maximum Default
English 24 • Setting a higher temperature does not shorten preheat time. • Once oven is preheated, place food in the oven as quickly as possible to minimize the loss of heat and reduction of oven temperature. Preheat Reminders • Preheating is not necessary for meats, poultry, casseroles and some fro...
Page 28 - Gas Surface Burners; Before Using the Gas Surface
English 25 • For best results, bake food on a single rack with at least 1 1/2” space between pans or dishes and oven walls. • Eliminate heat loss from the oven by using the window to periodically check food for doneness instead of opening the door. • If multiple racks are used, use a maximum of 2 ra...
Page 29 - Burner Locations
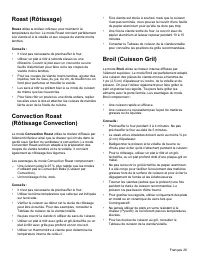
English 26 Convection Roast Convection Roast uses heat from the lower burner as well as heat circulated by the convection fan. The Convection Roast mode is well suited for preparing tender cuts of meat and poultry. It is also suitable for roasting vegetables. The benefits of Convection Roast include...
Page 30 - Using the Gas Surface Burners; Setting the Flame Size; Using the Proper Cookware
English 27 Getting the Most Out of Your Warming Drawer About the Appliance The warming drawer will keep hot, cooked foods at serving temperature. Always start with hot food. DO NOT use to heat cold food other than crisping crackers, chips, dry cereal,warming breads and biscuits, or warming dishes or...
Page 31 - Using a Wok; Using the Wok Grate
English 28 Cleaning and Maintenance Cooktop Daily Cleaning The entire Cooktop can be safely cleaned by wiping with a soapy sponge, then rinsing and drying. If stubborn soil remains, follow the recommended cleaning methods below. • Always use the mildest cleaner that will do the job. Use clean, soft ...
Page 32 - Using Stove-Top Grills; Using the Griddle; How to Place the Griddle; Preheating Guide
English 29 Burner CapPorcelain Enamel • Hot sudsy water; rinse and dry thoroughly. • Nonabrasive Cleansers: Fantastic®, Formula 409®. • Mild Abrasive Cleansers: Bon Ami®, Ajax®, Comet®. • Liquid cleaners: Kleen King®, Soft Scrub®. • For food stains, use an abrasive cleanser such as, Zud® or Bar Keep...
Page 33 - In Case of Power Failure; Oven; Before Using the Oven
English 30 Cleaning the Oven Self Clean During self-clean, the oven is heated to a very high temperature. Soil is burned off at this temperature. NOTICE : • Wipe out excessive spillage before self-cleaning the oven. • Do not clean parts or accessories in the self-clean oven. Remove all baking dishes...
Page 34 - Oven Vent; Using Oven Racks; Instaview
English 31 6. When the cool down is complete, the message “SELF CLEAN FINISHED” is displayed. Continue to use caution when opening the oven door. 7. Press Oven Clear/Off to clear the display when self- clean is finished. 8. After the oven has cooled down and the door is unlocked, wipe remaining ash ...
Page 35 - Convection Mode
English 32 Maintenance Cooktop Maintenance The appliance requires only regular cleaning for proper operation. No other maintenance is required. Stainless Steel Surfaces Always wipe or rub in the direction of the grain. Clean with a soapy sponge, then rinse and dry, or wipe with Fantastik® or Formula...
Page 36 - Recommended Baking and; Rack and Pan Placement
English 33 To change the bulb: Removing the Oven Door To remove the oven door: 1. Turn off power to the oven at the main power supply (fuse or breaker box). 2. Remove the glass cover by unscrewing it. Turn the glass counterclockwise to remove it. 3. Remove the bulb. The bulb unscrews counterclockwis...
Page 37 - Baking Rack Guide; Broil
English 34 To replace the oven door: 3. Bring both door hinge levers to their fullest down position as shown in the illustration. The left and right door hinge levers may differ slightly but operate in the same manner. 4. Close the oven door until it catches on the hinge stop levers, locking the hin...
Page 38 - Tips for Reducing Smoke
English 35 Removing Drawer from Housing NOTICE: The following is the manufacturer’s recommendations for removing and installing the drawer to minimize the risk of damage to the PTO mechanism. 1. Remove the drawer from the drawer housing. ▯ Pull drawer to fully open position. ▯ Press down right drawe...
Page 39 - Recommended Broiling Guide
English 36 1. With the drawer removed, set the slide inner rail to thedrawer locked position by pushing the slide inner rail toward the rear of the housing until it locks in place. Note: A moderate force pushing on the black plastic ball carrier locking mechanism is required to set the slide to the ...
Page 41 - Proof; Setting the Proof Function; Warm; Setting the Warm Function; Keep Warm; Setting the Keep Warm Function after
English 3 8 Service How to Obtain Service or Parts To reach a service representative, see the contact information at the front of the manual. Please be prepared with the information printed on your product rating label when calling. Rating Label The rating label shows the model and serial number. Re...
Page 42 - Setting the Air Fry Function; Tips for Air Fry
English 39 Oven Troubleshooting Use these suggestions before calling for service to avoid service charges. Oven Problem Possible Causes and Suggested Solutions The oven mode or temperature selected or the numbers selected do not appear in the display Review manual instructions when setting clock, ti...
Page 43 - Recommended Air Frying Guide
English 40 With a new range there is a strong odor when oven is turned on This is normal with a new range and will disappear after a few uses. Operating the self-clean cycle will also “burn-off” the smell more quickly. Control does not react when the pad is touched Be sure that pad is clean. Touch t...
Page 44 - Benefits of Air Sous-Vide
STATEMENT OF LIMITED PRODUCT WARRANTY What this Warranty Covers & Who it Applies to The limited warranty provided by BSH Home Appliances “Bosch” in this Statement of Limited Product Warranty applies only to the Bosch appliance sold to you, the first using purchaser, provided that the Product was...
Page 45 - Setting Air Sous-Vide Mode; Recommended; Setting the Frozen Meal Function; Slow Cook; Setting the Slow Cook Function
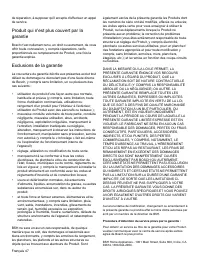
Out of Warranty Product Bosch is under no obligation, at law or otherwise, to provide you with any concessions, including repairs, pro- rates, or Product replacement, once this warranty has expired. Warranty Exclusions The warranty coverage described herein excludes all defects or damage that are no...
Page 46 - Remote Start; Setting Remote Start; Meat Probe; Setting the Meat Probe Function
Cooking Charts BAKED GOODS/ENTREES Food Recommended Cooking Mode OvenTempera- ture Pre- heat Oven Number of Racks RackPosition Time(min.) Pan Size & Type Cakes Angel Food Convect.Bake 325°F Yes Single 1 35-50 10 ˝ tube Bundt Convect.Bake 325°F Yes Single 2 45-65 12-cup bundt Cupcakes Convect.Bak...
Page 47 - Changing the Probe Temperature; Recommended Probe Temperature; Pork; Using the Sabbath Mode
English 4 4 Pastries Cream Puffs Convect.Bake 400°F Yes Single 3 23-33 cookie sheet Convect.Bake 400°F Yes Multiple 3 & 5 23-33 cookie sheet Convect.Bake 400°F Yes Multiple 2, 4, & 6 23-33 cookie sheet Puff Pastry Convect.Bake 375°F Yes Single 3 10-12 cookie sheet Pies 1 Crust Shell Convect....
Page 49 - SMART FUNCTIONS; LG ThinQ Application; LG ThinQ Application Features; Before Using LG ThinQ Application
English 4 6 Pork Chops, 1-inch thick Broil High High 4 4 145°F 160°F Side1: 5-9Side 2: 8-11Side1: 8-10Side 2: 8-9 No 3 min. Sausage, Fresh Broil High 4 160°F Side 1: 3-6 Side 2: 2-4 No none Tenderloin, 2-3 lbs. Convection Roast 425°F 3 145°F160°F 18-28 min./lb.20-27 min./lb. No 5-10 min.3 min. Poult...
Page 50 - Installing the LG ThinQ Application
Page 51 - Smart DiagnosisTM Feature
Table des matières Questions? 1-800-944-2904 www.bosch-home.com Il nous fait toujours plaisir de recevoir vos commentaires! Cet appareil électroménager Bosch est fabriqué par BSH Home Appliances, Corporation 1901 Main Street, Suite 600 Irvine, CA 92614 À propos de ce manuel. . . . . . . . . . . . . ...
Page 52 - MAINTENANCE; Cleaning; General Cleaning Tips; Painted and Decorative Trim
Français 1 À propos de ce manuel Comment ce manuel est organisé Ce manuel contient plusieurs sections :• La section Sécurité décrit des procédures importantes qui visent à assurer votre sécurité pendant l'utilisation de l'appareil. • La section Mise en route décrit les caractéristiques et fonctionna...
Page 54 - Cleaning Burner Heads/Caps; After Cleaning the Burner Heads/Caps
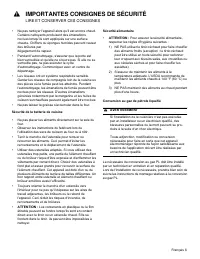
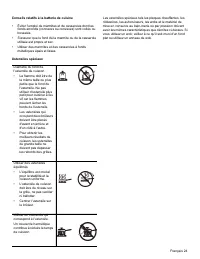
9 IMPORTANTES CONSIGNES DE SÉCURITÉ LIRE ET CONSERVER CES CONSIGNES Français 3 Pour un bon rendement des brûleurs, s'assurer que les allumeurs sont propres et secs. Sécurité-incendie • Ne pas utiliser de papier aluminium pour couvrir une quelconque partie de la table de cuisson. • Régler la commande...
Page 55 - Cleaning the Burner Grates; Cleaning the Cooktop Surface; EasyClean
9 IMPORTANTES CONSIGNES DE SÉCURITÉ LIRE ET CONSERVER CES CONSIGNES Français 4 ATTENTION : Tous les allumeurs font des étincelles lorsqu'on allume un brûleur. Ne pas toucher aux brûleurs lorsque la table de cuisson est en fonctionnement. Si les cheveux ou les vêtements s'enflamment, se laisser tombe...
Page 56 - Benefits of EasyClean; When to Use EasyClean
9 IMPORTANTES CONSIGNES DE SÉCURITÉ LIRE ET CONSERVER CES CONSIGNES Français 5 • Faire attention lors de la cuisson au four d'aliments à forte teneur en alcool (par exemple, le rhum, l'eau de vie, le whisky, etc.) L'alcool s'évapore à des températures élevées. Les vapeurs d'alcool pouvant s'enflamme...
Page 57 - Self Clean
9 IMPORTANTES CONSIGNES DE SÉCURITÉ LIRE ET CONSERVER CES CONSIGNES Français 6 • Ne pas nettoyer l'appareil alors qu'il est encore chaud. Certains nettoyants produisent des émanations nocives lorsqu'ils sont appliqués sur une surface chaude. Chiffons ou éponges humides peuvent causer des brûlures pa...
Page 58 - Before Starting Self Clean
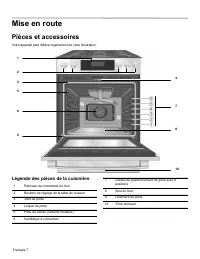
Français 7 Mise en route Pièces et accessoires Votre appareil peut différer légèrement de cette illustration. Légende des pièces de la cuisinière 1 Panneau de commande du four 2 Boutons de réglage de la table de cuisson 3 Joint de porte 4 Loquet de porte 5 Prise de sonde (certains modèles) 6 Ventila...
Page 59 - When to Use Self Clean; Setting Self Clean; Self Clean Soil Guide; Setting Self Clean with a Delayed Start
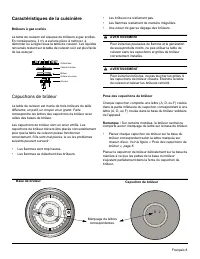
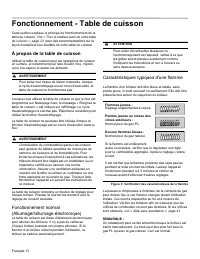
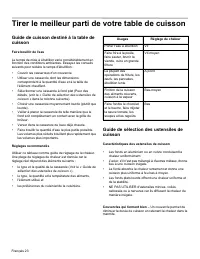
Français 8 Caractéristiques de la cuisinière Brûleurs à gaz scellés La table de cuisson est équipée de brûleurs à gaz scellés. En conséquence, il n'y a aucune pièce à nettoyer, à démonter ou à régler sous la table de cuisson. Les liquides renversés restent sur la table de cuisson où il est plus faci...
Page 60 - Oven Doors; Door Care Instructions; Removing Doors
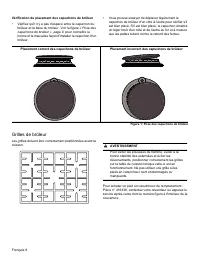
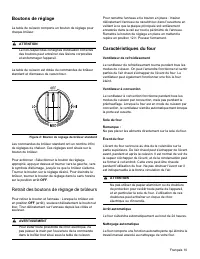
Français 9 Vérification du placement des capuchons de brûleur • Vérifiez qu'il n'y a pas d'espace entre le capuchon du brûleur et la base du brûleur. Voir la figure « Pose des capuchons de brûleur », page 9 , pour connaître la bonne et la mauvaise façon d'installer le capuchon d'un brûleur. • Vous p...
Page 61 - Removing/Assembling Drawers; Removing Drawers; Assembling Drawers; Removing/Assembling the Vent; Removing the Vent Trim
Français 10 Boutons de réglage La table de cuisson comporte un bouton de réglage pour chaque brûleur. La table de cuisson est dotée de commandes de brûleur standard et d'anneaux de caoutchouc. Les commandes de brûleur standard ont un nombre infini de réglages de chaleur. Ces réglages sont situés sur...
Page 62 - Assembling the Vent Trim; Replacing; Changing the Oven Light
Français 11 Indicateurs et autres fonctions Réglages par défaut - Les modes de cuisson sélectionnent automatiquement la température par défaut. Ceux-ci peuvent être modifiés lorsqu'un mode différent est requis. Codes numériques E - Ces codes affichent tout problème identifié concernant la cuisinière...
Page 63 - TROUBLESHOOTING; FAQs; Frequently Asked Questions
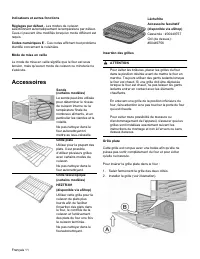
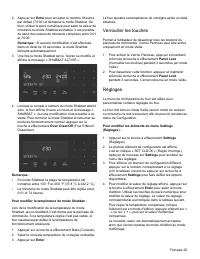
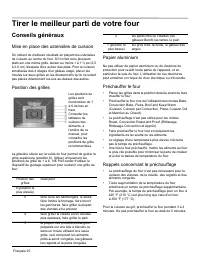
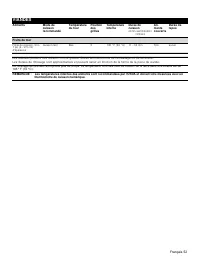
Français 12 3. Incliner la grille vers le haut (A) pour permettre à la partie arrière ascendante inclinée de la grille de glisser sous la butée moulée dans la partie avant du guide de grille comme illustré ci-dessus. 4. Lorsque la partie arrière de la grille a dépassé la butée, abaisser la partie av...
Page 65 - Before Calling for Service; Cooking
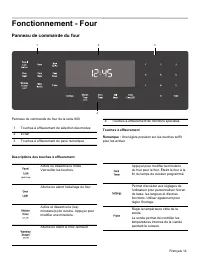
Français 14 Fonctionnement - Four Panneau de commande du four Panneau de commande du four de la série 800 Touches à effleurement Remarque : Une légère pression sur les touches suffit pour les activer. Descriptions des touches à effleurement 2 3 4 1 1 Touches à effleurement de sélection des modes 2 É...
Page 69 - Noises
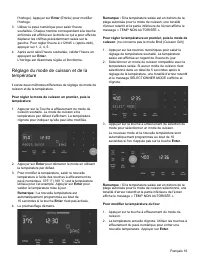
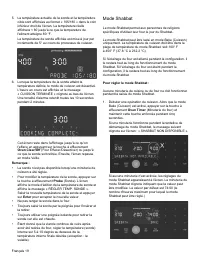
3. Lorsque la minuterie atteint :00, le mode de cuisson s'arrête et le message « MINUTERIE DU FOUR TERMINÉE » s'affiche. L'alarme du four retentit toutes les 10 secondes pendant 2 minutes. Modifier la minuterie du four 1. Si la minuterie du four fonctionne et que la durée restante doive être modifié...
Page 71 - LIMITED WARRANTY; USA; TERMS AND CONDITIONS; THIS LIMITED WARRANTY DOES NOT COVER:
Français 20 2. Appuyer sur Enter pour accepter le nombre d'heures par défaut (74:00) et démarrer le mode Shabbat. Ou bien, utiliser le pavé numérique pour saisir la valeur de minuterie du mode Shabbat souhaitée. Il est possible de saisir des valeurs de minuterie comprises entre 0:01 et 74:00. Remarq...
Page 76 - PROCEDURE FOR RESOLVING DISPUTES:
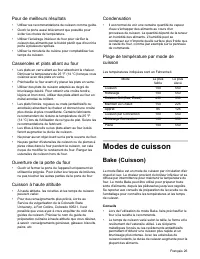
Français 25 Tirer le meilleur parti de votre four Conseils généraux Mise en place des ustensiles de cuisson On obtient de meilleurs résultats en plaçant les ustensiles de cuisson au centre du four. Si l'on fait cuire plusieurs plats sur une même grille, laisser au moins 1 à 1 ½ po (2,5 à 3,8 cm) d'e...
Page 81 - MANUAL DEL PROPIETARIO; COCINA DE GAS; Lea el manual del propietario detenidamente previo a operar el; ESPAÑOL
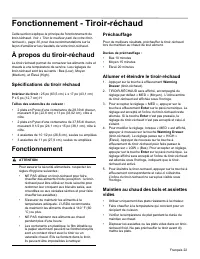
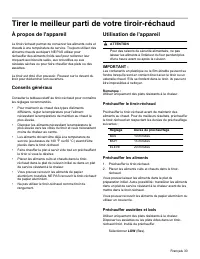
Français 30 Tirer le meilleur parti de votre tiroir-réchaud À propos de l'appareil Le tiroir-réchaud permet de conserver les aliments cuits et chauds à une température de service. Toujours utiliser des aliments chauds au départ. NE PAS utiliser pour réchauffer des aliments froids sauf pour redonner ...
Page 83 - ÍNDICE
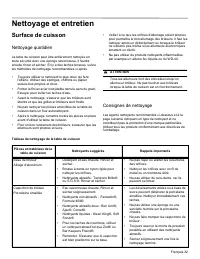
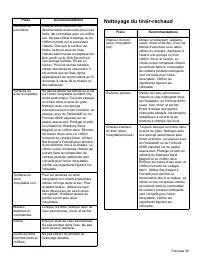
Français 32 Nettoyage et entretien Surface de cuisson Nettoyage quotidien La table de cuisson peut être entièrement nettoyée en toute sécurité avec une éponge savonneuse. Il faudra ensuite rincer et sécher. S'il y a des taches tenaces, suivre les méthodes de nettoyage recommandées ci-après. • Toujou...
Page 84 - 5 FUNCIONES INTELIGENTES; 9 MANTENIMIENTO; 0 GARANTÍA LIMITADA
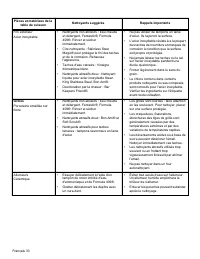
Français 33 Fini extérieurAcier inoxydable • Nettoyants non abrasifs : Eau chaude et détergent, Fantastic®, Formula 409®. Rincer et sécher immédiatement. • Cire nettoyante : Stainless Steel Magic® pour protéger le fini des taches et de la corrosion. Rehausse l'apparence. • Taches d'eau calcaire : Vi...
Page 85 - INSTRUCCIONES IMPORTANTES DE SEGURIDAD; LEA TODAS LAS INSTRUCCIONES ANTES DE UTILIZAR; Mensajes de Seguridad; Dispositivo antivuelco
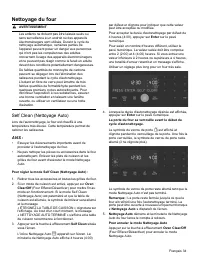
Français 34 Nettoyage du four Self Clean (Nettoyage Auto) Lors de l'autonettoyage, le four est chauffé à une température très élevée. Cette température permet de calciner les salissures. AVIS : • Essuyer les déversements importants avant de procéder à l'autonettoyage du four. • Ne pas nettoyer les p...
Page 86 - Instalación
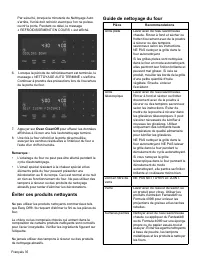
Par sécurité, lorsque la minuterie de Nettoyage Auto s'arrête, l'unité doit refroidir avant que l'on ne puisse ouvrir la porte. Pendant ce délai, le message « REFROIDISSEMENT EN COURS » est affiché. 6. Lorsque la période de refroidissement est terminée, le message « NETTOYAGE AUTO TERMINÉ » s'affich...
Page 87 - Funcionamiento
Français 36 Surfaces en porcelaine Essuyer immédiatement les déversements acides tels que jus de fruits, lait et tomates avec un chiffon sec. Ne pas utiliser d'éponge ou de chiffon humide sur la porcelaine chaude. Dès que la surface est froide, nettoyer avec de l'eau chaude savonneuse ou appliquer d...
Page 88 - Mantenimiento
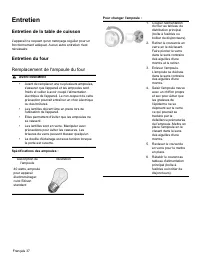
Français 37 Entretien Entretien de la table de cuisson L'appareil ne requiert qu'un nettoyage régulier pour un fonctionnement adéquat. Aucun autre entretien n'est nécessaire. Entretien du four Remplacement de l'ampoule du four Spécifications des ampoules : Pour changer l'ampoule : 9 AVERTISSEMENT • ...
Page 89 - PRECAUCIÓN
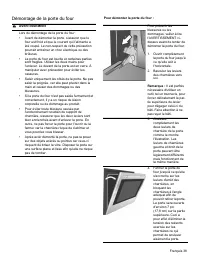
Français 38 Démontage de la porte du four Pour démonter la porte du four : 9 AVERTISSEMENT Lors du démontage de la porte du four :• Avant de démonter la porte, s'assurer que le four est froid et que le courant qui l'alimente a été coupé. Le non-respect de cette précaution pourrait entraîner un choc ...
Page 90 - GUARDE ESTAS INSTRUCCIONES
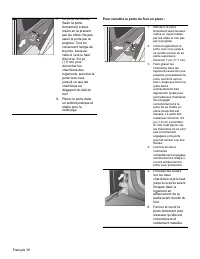
Français 39 Pour remettre la porte du four en place : 5. La porte est lourde. Saisir la porte fermement à deux mains en la prenant par les côtés. Ne pas saisir la porte par la poignée. Tout en conservant l'angle de la porte, soulever celle-ci vers le haut d'environ 3/4 po (1,9 cm) pour décrocher les...
Page 91 - DESCRIPCIÓN GENERAL DEL PRODUCTO; Características del Producto; Interior y exterior
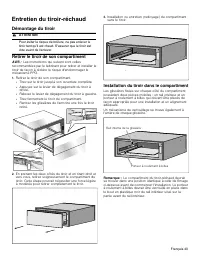
Français 40 Entretien du tiroir-réchaud Démontage du tiroir 9 ATTENTION Pour éviter le risque de brûlure, ne pas enlever le tiroir tant qu'il est chaud. S'assurer que le tiroir est vide avant de l'enlever. Retirer le tiroir de son compartiment AVIS : Les instructions qui suivent sont celles recomman...
Page 92 - Accesorios; Accesorios incluidos; Kit antivuelco; Accesorios opcionales; NOTA
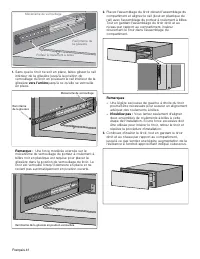
1. Sans que le tiroir ne soit en place, faites glisser le railintérieur de la glissière jusqu'à la position deverrouillage du tiroir en poussant le rail intérieur de laglissière vers l'arrière jusqu'à ce qu'elle se verrouille en place. Remarque : Une force modérée exercée sur le mécanisme de verroui...
Page 93 - INSTALACIÓN; Antes de la Instalación; Herramientas necesarias; Piezas que podría necesitar; En el Commonwealth de
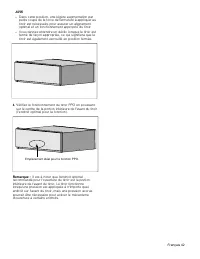
AVIS ▯ Dans cette position, une légère augmentation parpetits coups de la force de fermeture à appliquer autiroir est nécessaire pour assurer un alignementoptimal et un fonctionnement approprié du tiroir. ▯ Vous devriez entendre un déclic lorsque le tiroir estfermé de façon appropriée, ce qui signif...
Page 94 - Elección de la ubicación; Ventilación; Casa móvil
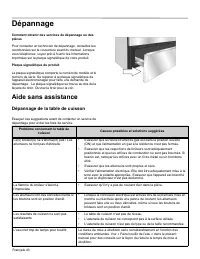
Français 4 3 Dépannage Comment obtenir des services de dépannage ou des pièces Pour contacter un technicien de dépannage, consultez les coordonnées sur la couverture avant du manuel. Lorsque vous téléphonez, soyez prêt à fournir les informations imprimées sur la plaque signalétique de votre produit....
Page 95 - Dimensiones y Espacios
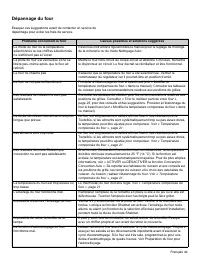
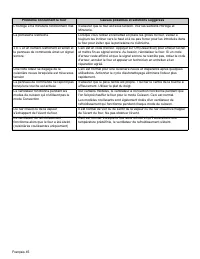
Français 4 4 Dépannage du four Essayez ces suggestions avant de contacter un service de dépannage pour éviter les frais de service. Problème concernant le four Causes possibles et solutions suggérées Le mode du four ou la température sélectionnés ou les chiffres sélectionnés ne s'affichent pas à l'é...
Page 96 - Espacios libres; Nivelando; Nivelación de la cocina
Français 4 5 L'horloge et la minuterie fonctionnent mal. S'assurer que le four est sous tension. Voir les sections Horloge et Minuterie. La porcelaine s'ébrèche Lorsque vous retirez et remettez en place les grilles du four, veillez à toujours les incliner vers le haut et à ne pas forcer pour les int...
Page 97 - Verificación de los ajustes; Conexión de gas; Cómo brindar el suministro
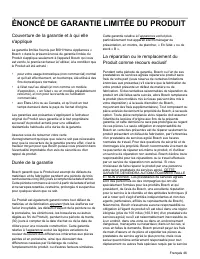
ÉNONCÉ DE GARANTIE LIMITÉE DU PRODUIT Couverture de la garantie et à qui elle s'applique La garantie limitée fournie par BSH Home Appliances « Bosch » dans le présent énoncé de garantie limitée du Produit s'applique seulement à l'appareil Bosch qui vous est vendu, le premier acheteur à l'utiliser, à...
Page 98 - Montaje del conector flexible; Ajuste de los obturadores de aire
de réparation, à supposer qu'il accepte d'effectuer un appel de service. Produit qui n'est plus couvert par la garantie Bosch n'est nullement tenu, en droit ou autrement, de vous offrir toute concession, y compris réparations, tarifs proportionnels ou remplacement de Produit, une fois la garantie ex...
Page 99 - Conexión de electricidad; Requisitos eléctricos; Quemadores de superficie; Ensamblaje de los quemadores de
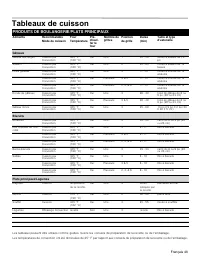
Français 4 8 Tableaux de cuisson PRODUITS DE BOULANGERIE/PLATS PRINCIPAUX Aliments Recommandés Mode de cuisson FourTempérature Pré- chauf- fer le four Nombre de grilles Positionde grille Durée(min) Taille et type d'ustensile Gâteaux Gâteau des anges Cuisson par Convection 325 °F (160 °C) Oui Une 1 3...
Page 100 - Verificación de encendido de los; Encendido eléctrico; Calidad de las llamas; Llamas amarillas; Ajuste del quemador de superficie
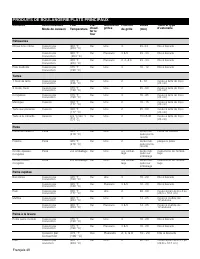
Français 4 9 Pâtisseries Choux à la crème Cuisson par Convection 400 °F (204 °C) Oui Une 3 23–33 tôle à biscuits Cuisson par Convection 400 °F (204 °C) Oui Plusieurs 3 & 5 23 - 33 tôle à biscuits Cuisson par Convection 400 °F (204 °C) Oui Plusieurs 2, 4, & 6 23 - 33 tôle à biscuits Pâte feui...
Page 101 - Relleno trasero opcional; Instalación de la placa trasera; Instalación del dispositivo; Peligro de vuelco
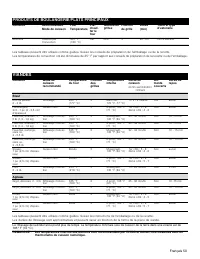
Français 50 Brioches Cuisson par Convection 325 °F (160 °C) Oui Une 3 20 - 25 tôle à biscuits Les tableaux peuvent être utilisés comme guides. Suivez les conseils de préparation de l'emballage ou de la recette.Les températures de convection ont été diminuées de 25° F par rapport aux conseils de prép...
Page 102 - Uso de la plantilla de soporte; Prueba de funcionamiento; Pruebe la cocina antes de usarla; Verificación del funcionamiento de los
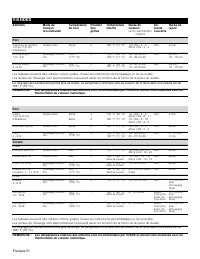
Français 5 1 Porc Tranches de jambon1/2 po (1,3 cm) d'épaisseur Cuisson Gril Élevé 5 160 °F (71 °C) 1er côté : 4 - 52ème côté : 3 - 4 Non aucun Rôti de longe, 1/2 - 3 lb Rôtissage Convec- tion 350 °F (177 °C) 2 145 °F (63 °C)160 °F (71 °C) 16 - 34 min/lb19 - 36 min/lb Non 30 min10 - 15 min Rôti de l...
Page 104 - FUNCIONAMIENTO; Panel de control; Funciones del panel de control
1901 Main Street, Irvine, CA 92614 • 800-944-2904 • www.bosch-home.com 8001150778 • 990 402 • © BSH Home Appliances Corporation, 2019 • All rights reserved