Page 2 - ELECTRO
Page 3 - When the extractor hood is operated; Operating modes; from
3 Appliance description Operating Instructions Operating modes Exhaust-air mode: ❑ The extractor-hood fan extracts the kit-chen vapours and conveys them throughthe grease filter into the atmosphere. ❑ The grease filter absorbs the solid particles in the kitchen vapours. ❑ The kitchen is kept almost ...
Page 4 - The manufacturer of the extractor; should be carried out by
4 Before using for the first time If you encounter a problem If you have any questions or if a faultoccurs, please call Customer Service. (See list of Customer Service representatives).When you call, please quote the following: E-Nr. FD Enter the relevant numbers into the boxabove. The E-Nr. (produc...
Page 5 - Safety instructions; Gas hobs / Gas cookers
5 Safety instructions Do not use the appliance if damaged. The appliance may be connected to the mains by a qualified technician only. The appliance is not intended for use by young children or infirmed persons without supervision.Young children should be supervised toensure they do not play with th...
Page 6 - Filters and maintenance; Cleaning the metal grease filters:; Operating procedure; The most effective method of removing; Switch the ventilator ON; as soon as you begin cooking.; Switch the ventilator OFF; Ventilator settings
6 Filters and maintenance Grease filters: Metal filters are used to trap the greasyelement of the vapours that developduring cooking. The filter mats are made from non-combustible metal. Caution: As the filter becomes more and more saturated with grease, not only does therisk of it catching fire inc...
Page 7 - Activated carbon filter:
7 3. Insert the grease filters (see removal andinstallation of the metal-mesh greasefilters). Removing the filter: The filters are removed in reverse sequence. Replacing the activated carbon filters: ❑ During normal operation (1 to 2 hoursper day) the activated carbon filtersshould be replaced appro...
Page 8 - Replacing the light bulbs; Attach the lamp cover again.; Cleaning and care; Do not clean the extractor hood with; Stainless steel surfaces:; Do not use dry cloths.
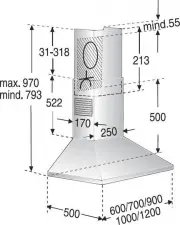
8 Replacing the light bulbs 1. Switch off the extractor hood and pullout the mains plug or switch off the electricity supply at the fuse box. 2. Remove the grease filters (see Filters andMaintenance). 3. Press down the bulb cover and disconnect from the light strip. 4. Replace the bulb (standard fil...
Page 9 - Preparing t h e w a l l; Exhaust air
9 Important information Installation Instructions: Additional information concerning gascookers: When installing gas hotplates, comply with the relevant national statutory regulations (e.g. in Germany: TechnischeRegeln Gasinstallation TRGI). Always comply with the currently valid regulations and ins...
Page 10 - Prior to installation; Exhaust air should neither be directed; which will be needed by the
10 Prior to installation Exhaust-air mode The exhaust air is discharged upwardsthrough a ventilation shaft or directlythrough the outside wall into the open. D Exhaust air should neither be directed into a smoke or exhaust flue that iscurrently used for other purposes, nor intoa shaft that is used f...
Page 11 - Air connector
11 Prior to installation ❑ Flat ducts must have an internal cross- section that equates to that of roundpipes. There should be no sharp bends. For operating in exhaust-air mode, a one-way flap should be mounted inside theextractor hood unless there is already onefitted in the outlet duct or wall ven...
Page 12 - from specialist; The extractor hood; Electrical connection
12 Prior to installation Circulating-air mode ❑ With activated carbon filter if exhaust-airmode is not possible. The complete installation set can be obtained from specialist outlets. The corresponding accessory numbers canbe found at the end of these operatinginstructions. Electrical connection Thi...
Page 13 - Installation; This extractor hood
13 Installation This extractor hood is intended to be mounted onto the kitchen wall. 1. Remove the grease filter (refer to Operating Instructions). 2. Draw a line on the wall from the ceilingto the lower edge of the hood at thecentre of the location where the hood isgoing to be mounted. 3. Using the...
Page 14 - Insert the other 4 screws with washers.; Before the 4 screws are tightened; Connect up the air outlet pipe.; Before tightening the 2 screws,
14 Installation 0 8. Insert the other 4 screws with washers. Before the 4 screws are tightened down, align the extractor hood properly. 0 9. Connect up the air outlet pipe. 10. Connect the hood to the electricitysupply. 11. Stainless steel model: ❑ Remove the protective film from thetwo flue ducts. ...