Page 2 - WARNING; CONTENTS
2 CONTENTS Important safety instructions............................................ ...........3 BMF7645SA product description / dimensions ..........................4 BMF7655SA product description / dimensions ..........................6 BMG7642SA product description / dimensions ....................
Page 3 - IMPORTANT SAFETY INSTRUCTIONS
3 SAFETY Please read the user manuals carefully and store in a handy place for later reference. IMPORTANT Important – check for any damages or marks If you find the barbecue is damaged or marked, you must report it within 7 days if you wish to claim for damage/marks under the manufacturer’s warranty...
Page 4 - PRODUCT DESCRIPTION
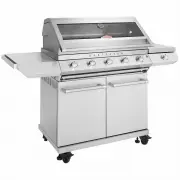
4 PRODUCT DESCRIPTION BMF7645SA PRODUCT DESCRIPTION 1 Warming rack x2 2 Cooking grill x2 3 Cooking plate x1 4 Flame tamer x2 5 Body assy x1 6 Left side shelf x1 7 Side burner assy x1 8 Oil foil box x1 9 Foil box holder x1 10 Drip tray x 1 11 Trolley back panel x1 12 Trolley top panel x1 13 Trolley f...
Page 5 - PRODUCT DIMENSIONS
5 BMF7645SA PRODUCT DIMENSIONS DIMENSIONS 1602 708 1284
Page 12 - GAS SPECIFICATIONS
12 GAS SPECIFICATIONS GAS SPECIFICATIONS Natural Gas Universal LPG Injector orifice diameter - barbecue burner BMG7642SA 1.85 1.10 BMG7652SA 1.85 1.10 BMF7645SA 2.05 1.11 BMF7655SA 2.05 1.11 Injector diameter-side burner BMG7642SA & BMG7652SA 1.87 1.15 Injector diameter-side burner BMF7645SA &...
Page 13 - ASSEMBLY
13 ASSEMBLING THE BARBECUE BMF7645SABMF7655SA BMF7645SA & BMF7655SA ASSEMBLY For BMF7645SA & BMF7655SA M6 x 12mm M4 x 10mm flat head M4 x 10mm countersunk head x4 x15 x60 Tools required: Hexagonal screwdriver Phillips screwdriver Wrench 22mm Wrench 19mm
Page 34 - Leak test procedure
34 ASSEMBLING THE BARBECUE 41 Turn to lock the gas bottle tray Leak test procedure • Ensure all gas valves are in the ‘OFF’ position. • In a small container, mix a solution of water and detergent or soap. • After connection of the hose, turn on the gas supply at the gas bottle. • Using a brush, appl...
Page 53 - NATURAL GAS; INSTALLATION
53 NATURAL GAS INSTALLATION NATURAL GAS INSTALLATION 1 2 Take out the warming rack, cooking plate and cooking grill Disassemble the R latch
Page 59 - • At least 25% of the total wall area is completely open and
59 CONTENTS INSTALLATION INSTALLATION Partial Enclosures (Australia Only) This appliance shall only be used in an above ground, open air situation with natural ventilation, without stagnant areas, where gas leakage and products of combustion are rapidly dispersed by wind and natural convection. Any ...
Page 60 - RAIN BAFFLE; Rain baffle
60 CONTENTS RAIN BAFFLE INSTALLATION 1 2 Remove the hood screw M4 x 10mm (flat head screw 4 PCS) Rain baffle Assemble the rain baffle: M4 x 10mm (flat head screw 4 PCS) BMG7642SA and BMG7652SA BMG7642SA and BMG7652SA
Page 62 - SIDE BURNER; OPERATING INSTRUCTIONS; Manual lighting; LE; ON
62 SIDE BURNER SIDE BURNER OPERATING INSTRUCTIONS Manual lighting In the event of the automatic ignition system not working, the barbecue can be lit manually • Position the manual igniter next to the burner • Depress the knob and rotate to ‘HIGH’ • The burner should light • Do not attempt to manuall...
Page 63 - INSTALLATION WARNINGS; Before You Begin; Check that the gas type is correct for your type of gas.; Mobile Installation - Portable LP Gas/ Propane
63 INSTALLATION WARNINGS INSTALLATION WARNINGS Before You Begin Check that the gas type is correct for your type of gas. You will find the gas type label on the side of your barbecue. If your barbecue is of the incorrect gas type, or if you are unsure, consult your dealer before going any further. T...
Page 64 - Converting the unit to natural gas; NOTE: Refer to page 53-58 for natural gas installation; IMPORTANT; Please note: for SL4000 side burners
Australia only (applies to all gas types) : Where a mobile appliance is to be connected to a fixed gas supply via a flexible hose connection, a retaining tether of adequate strength shall be fixed to the appliance and be suitable to be fixed to the wall within 50mm of each connection point. The leng...
Page 65 - GAS SPECIFICATIONS AND MOBILE RESTRAINT; Turn down adjustment; After leak testing light one burner and set to high.; Secure all joints and leak test
GAS SPECIFICATIONS AND MOBILE RESTRAINT Turn down adjustment • When converting to natural gas the turndown setting will need to be adjusted to give a satisfactory flame on low setting on each burner. • Remove knob from valve shafts. For ignition valve the low flame adjustment screw is located on the...
Page 68 - CARE AND MAINTENANCE
CARE AND MAINTENANCE This appliance should be checked and serviced by an authorised service person every 2 years to ensure the appliance remains in a safe operating condition. (These services are not covered by warranty). Spare parts are available from your retailer or the manufacturer. FREQUENCY SE...
Page 69 - Enclosure construction
MOUNTING ENCLOSURE GUIDELINES Enclosure construction • All materials used for the construction of the enclosure and gas bottle compartment must be non-combustible • A 40mm min. gap between the enclosure and rear wall is required. This allows for venting of the gas bottle compartment. Vents should al...
Page 71 - CAUTION
Reposition the grill plates To achieve the best heat circulation around the food, it is best to remove the hotplate from the barbecue and position the two grill plates in the centre. Reposition the vaporisers from above the 2 outside burners to above the inside burners. This will give unrestricted h...
Page 72 - A clogged burner can lead to a fire beneath the grill.
The cleaning and care instructions are essential for the proper functioning and operation of your appliance over time. Failure to adhere to these care instructions may affect your ability to make a claim under the manufacturer’s warranty. Cleaning Enamel burner box Although porcelain enamel will kee...
Page 73 - LPG; Gas Consumption
TROUBLESHOOTING PROBLEM CAUSE CHECK Barbecue will not light Ignition system not working Check to see visible spark at starter probe - if no spark is present when control knob is turned then the unit may need tobe serviced or replaced. Contact your BeefEater dealer. Check that there is a visible flam...
Page 75 - Warranty; Important Notice; AUSTRALIA; NEW ZEALAND
75 This document sets out the terms and conditions of the product warranties for BeefEater Appliances. It is an important document. Please keep it with your proof of purchase documents in a safe place for future reference should there be a manufacturing defect in your Appliance. This warranty is in ...
Page 76 - Contact us if you need more help; customercare
© 2022 Electrolux Home Products Pty Ltd.ABN 51 004 762 341B_MAN_7000_MOB_Apr22 Contact us if you need more help AUSTRALIA phone: 1300 307 939 email: customercare @ beefeaterbbq.com web: beefeaterbbq.com NEW ZEALAND phone: 0800 436 245 email: customercare @ electrolux.co.nz web: beefeaterbbq.com