Page 3 - Ducting Calculation Sheet; Table of Contents
1 SAFETY NOTICE ................................................................. 2-3 LIST OF MATERIALS ....................................................... 4 INSTALLATION Ducting Calculation Sheet ....................................... 5 Mounting Height & Clearance ............................
Page 4 - Important Safety Notice; READ AND SAVE THESE INSTRUCTIONS
Important Safety Notice READ AND SAVE THESE INSTRUCTIONS 2 www.zephyronline.com WARNING TO REDUCE THE RISK OF FIRE OR ELECTRIC SHOCK, DO NOT USE THIS FAN WITH ANY SOLID-STATE CONTROL DEVICE. WARNING TO REDUCE THE RISK OF FIRE ELECTRIC SHOCK, OR INJURY TO PERSONS, OBSERVE THE FOLLOWING: a. Use this u...
Page 5 - OPERATION; ELECTRICAL REQUIREMENTS; FEDERAL COMMUNICATION COMMISSION INTERFACE STATEMENT
Important Safety Notice 3 OPERATION Always leave safety grilles and filters in place. Without these components, operating blowers could catch onto hair, fingers and loose clothing.The manufacturer declines all responsibility in the event of failure to observe the instructions given here for installa...
Page 6 - PARTS SUPPLIED; PARTS NOT SUPPLIED; List of Materials
4 www.zephyronline.com List of Materials 4 www.zephyronline.com List of Materials 4 www.zephyronline.com MODELS: AK7736AS, AK7742AS, AK7748AS PARTS SUPPLIED 6# x 1” (4) M4 x 8 (14) M4 x 10 (16) 3/16*7/8 (4) 6# x 1-1/2” (4) 6# x 2” (4) 1 - Hood 4 - Duct covers, 2 upper & 2 lower 2 - Support frame...
Page 7 - Installation –
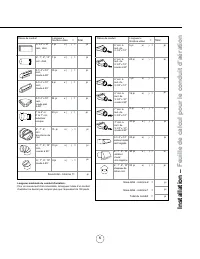
5 Duct pieces Total Equivalent number length x used = 3- 1/ 4” x 10” Rect., straight 1 Ft. x ( ) = Ft. 3- 1/ 4” x 10” Rect. to 6” round transition 5 Ft. x ( ) = Ft. 3- 1/ 4” x 10” Rect. to 6” round transition 90 0 elbow 20 Ft. x ( ) = Ft. 6”, 7”, 8”, 10” Round, 90 0 15 Ft. x ( ) = Ft. 6”, 7”, 8”, 10...
Page 8 - DUCTING; maintain maximum air flow efficiency for single
Installation – Mounting Height & Clearance 6 www.zephyronline.com DUCTING A minimum of 8” round duct must be used to maintain maximum air flow efficiency for single internal blower and 10” round duct for dual internal blower. Always use rigid type metal ducts only. Flexible ducts could restrict ...
Page 9 - WARNING FIRE HAZARD; All exhaust must be ducted to the outside.; Some Ducting Options; side wall cap
7 WARNING FIRE HAZARD NEVER exhaust air or terminate duct work into spaces between walls, crawl spaces, ceiling, attics or garages. All exhaust must be ducted to the outside. Use rigid metal ductwork only. Fasten all connections with sheet metal screws and tape all joints with certified Aluminum Tap...
Page 10 - FRONT
8 www.zephyronline.com Installation – Hood Specifications FRONT SIDE TOP of HOOD TOP SUPPORT FRAME (top view) 35 15/16 ” (36”) 41 15/16” (42”) 47 15/16” (48”) 17 15/16 ” (36”, 42“) 21 5/8” (48”) 4” 3 5/16 ” 16 1/4 ” 27 15/1 6 ” 14 5/16 ” 31 5/8 ” Standard Min. - 33” Max. - 50“ Z1C-0077 (36”, 42“) Z1...
Page 11 - *Hood is intended to be mounted to a finished ceiling.; CAUTION: At least two installers are
9 1 2 Ceiling Joists Wood Blocking Top Support Frame Support Frame Arm Bottom Support Frame Hood Body 3 Mounting Screws (pre-installed) 4 Installation – Mounting the Hood 1. Determine mounting location on ceiling and temporarily tape paper template (included with the hood) to the ceiling. Cut out in...
Page 12 - x 8 screws to secure the diagonal support brackets onto the frame.; Side
10 www.zephyronline.com Duct Cover Standard Frame Assembly Instructions 1. 2. 1/2 bottom to p 3. FIG. F Bottom Support Frame (secures to top of blower housing) Key Holes front - facing controls back FIG. E 3. Attach square support bracket inside the support frame assembly. The placement of the squar...
Page 13 - Top Duct Covers; Cable Lock; A cable locking connector (not; WARNING: Electrical wiring must be done by a qualified person(s) in
11 Installation – Mounting the Hood 1 Top Duct Covers Top Support Frame Bottom Duct Covers Bottom Support Frame 6. Remove tape securing electronics mounting bracket to hood and reposition electronics mounting bracket with (2) M4 x 8 screws (FIG. G). Install electrical and duct work. A cable lock, no...
Page 14 - shown. Be sure to tuck dual blower plate into
12 www.zephyronline.com Installation – PBD-1300A Dual Blower Ducting 5. Position dual blower inside hood body as shown. Be sure to tuck dual blower plate into blower plate tabs. Secure dual blower by (4) screws previously removed from step 2. 6. Attach 10” round blower collar to top of hood body by ...
Page 15 - Electronic LCD Controls
13 Features & Controls - Electronic LCD Controls 1. Power / Delay Off Power Button Function On/Off button will turn power on and off for entire hood (fan and lights). The hood will remember the last speed and light level it was turned off at. Delay Off Button Function With the fan on, press and ...
Page 16 - RF REMOTE MAINTENANCE:; Follow instructions below for replacing battery.; Using a small flat head screwdriver, raise the cover of the battery; RF REMOTE FEATURES:; The RF remote control is equipped with a magnet on the back for easy; Blower On / Speed Selection; Blower On / Power Off; Delay Off; THE RF REMOVE CONTROL IS AN OPTIONAL; Features & Controls –
14 RF REMOTE MAINTENANCE: Clean the remote control using non abrasive detergents Follow instructions below for replacing battery. Using a small flat head screwdriver, raise the cover of the battery door ( A ) in order to access the battery compartment. FIG. 2. Remove the battery and replace with bat...
Page 17 - Maintenance –; Cleaning Stainless Steel; soft terry cloth. Dry grease tray and re-install before using hood.; REPLACING LIGHT BULBS; Directional Lighting
Maintenance – Cleaning, Filter Removal & Lights 15 SURFACE MAINTENANCE: Do not use corrosive detergents, abrasive detergents or oven cleaners. Do not use any product containing chlorine bleach or any product containing chloride. Do not use steel wool or abrasive scrubbing pads which will scratch...
Page 18 - Troubleshooting; TROUBLESHOOTING PROCEDURES; Issue
16 www.zephyronline.com Troubleshooting TROUBLESHOOTING PROCEDURES Issue Cause What to do After installation, the unit doesn’t work. 1. The power source is not turned ON. 1. Make sure the circuit breaker and the unit’s power is ON. 2. The power line and the cable locking connector is not connecting ...
Page 19 - may not be necessary for your installation. Please check your; To enable ACTTM; ACTTM
17 A irflow Control Technology (ACT™) Some local codes limit the maximum amount of CFM a range hood can move. ACT ™ allows you to control the maximum blower CFM of select Zephyr Ventilation range hoods without the need for expensive make up air kits. ACT ™ enables the installer to easily set the max...
Page 20 - iring Diagrams
18 www.zephyronline.com W iring Diagrams ACT 590 CFM - Fan Max. 175W @ 2.6AACT 390 CFM - Fan Max. 94W @ 1.4AACT 290 CFM - Fan Max. 63W @ 0.9A
Page 21 - DESCRIPTION; Replacement Parts; Z0B0040; Optional Accessories; Dual Internal Blower; List of Parts and
19 DESCRIPTION PART# Replacement Parts LED Light Bulb MR16 (GU10) 6W (each) Z0B0040 Baffle Filter (each) 50210036 Optional Accessories Duct Cover Extension (36”, 42”) Z1C-0077 Duct Cover Extension (48”) Z1C-0177 Dual Internal Blower PBD-1300A Make-Up Air Kit (Single Blower) MUA008A Make-Up Air Kit (...
Page 22 - arranty
20 www.zephyronline.com W arranty OCT17.0301 Zephyr Ventilation, LLC (referred to herein as “we” or “us”) warrants to the original consumer purchaser (referred to herein as “you” or “your”) of Zephyr products (the “Products”) that such Products will be free from defects in materials or workmanship a...
Page 23 - PRODUCT REGISTRATION; Prompt registration helps in more ways; IT’S IMPORTANT; Ensures warranty coverage should you
21 PRODUCT REGISTRATION Congratulations on the purchase of your Zephyr product! Please take a moment to register your new Zephyr product at www.zephyronline.com/registration Zephyr Ventilation | 2277 Harbor Bay Pkwy. | Alameda, CA 94502 | 1.888.880.8368 Prompt registration helps in more ways than on...
Page 24 - Guide d’utilisation, d’entretien et d’installation; LISEZ ET CONSERVEZ CES INSTRUCTIONS; Titan Island
Guide d’utilisation, d’entretien et d’installation www.zephyronline.com Numéro de modèle :Numéro de série : Date d’achat : Détaillant: SEP19.0101 © Zephyr Ventilation LLC. LISEZ ET CONSERVEZ CES INSTRUCTIONS Titan Island AK7736AS AK7742AS AK7748AS
Page 26 - Feuille de calcul pour le conduit; Table des matières
1 MISE EN GARDE DE SÉCURITÉ ................................................................. ........... 2-3 LISTE DU MATÉRIEL ............................................................................................................. 4 INSTALLATION Feuille de calcul pour le conduit ................
Page 27 - Mise en garde de sécurité; AVERTISSEMENT
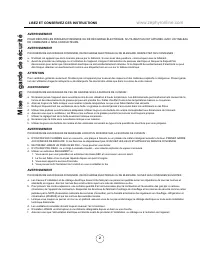
Mise en garde de sécurité LISEZ ET CONSERVEZ CES INSTRUCTIONS 2 www.zephyronline.com AVERTISSEMENT POUR RÉDUIRE LES RISQUES D’INCENDIE OU DE DÉCHARGE ÉLECTRIQUE, N’UTILISEZ PAS CET APPAREIL AVEC UN TABLEAU DE COMMANDE À SEMI-CONDUCTEURS. AVERTISSEMENT POUR RÉDUIRE LES RISQUES D’INCENDIE, DE DÉCHARGE...
Page 28 - ATTENTION; FONCTIONNEMENT; EXIGENCES ÉLECTRIQUES
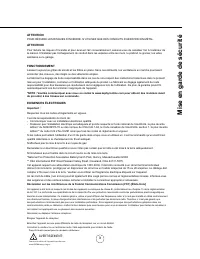
Mise en garde de sécurité 3 ATTENTION POUR RÉDUIRE LES RISQUES D’INCENDIE, N’UTILISEZ QUE DES CONDUITS D’AÉRATION EN MÉTAL. ATTENTION Pour réduire les risques d’incendie et pour évacuer l’air convenablement, assurez-vous de canaliser l’air à l’extérieur de la maison. N’installez pas l’échappement du...
Page 29 - Liste du matériel
Liste du matériel 4 www.zephyronline.com 4 www.zephyronline.com List of Materials 4 www.zephyronline.com MODELS: AK7736AS, AK7742AS, AK7748AS PARTS SUPPLIED 6# x 1” (4) M4 x 8 (14) M4 x 10 (16) 3/16*7/8 (4) 6# x 1-1/2” (4) 6# x 2” (4) 1 - Hood 4 - Duct covers, 2 upper & 2 lower 2 - Support frame...
Page 31 - CONDUIT D’AÉRATION; hautes seront difficiles à atteindre et verront leur; ENDOMMAGEMENT LORS DE LA LIVRAISON/; • Veuillez vous assurer que toutes les pièces
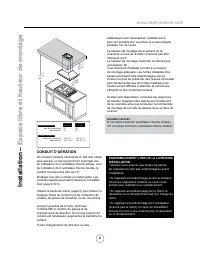
Installation – Espace libre et hauteur de montage 6 www.zephyronline.com CONDUIT D’AÉRATION Un conduit circulaire minimal de 8” doit être utilisé pour assurer un mouvement d’air maximale lors de l’utilisation d’un ventilateur interne simple. Lors de l’utilisation d’un ventilateur interne double, le ...
Page 32 - AVERTISSEMENT DE RISQUE D’INCENDIE; du ruban réflecteur certifié.
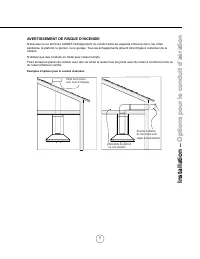
7 AVERTISSEMENT DE RISQUE D’INCENDIE N’évacuez ou ne terminez JAMAIS l’échappement du conduit dans les espaces entre les murs, les vides sanitaires, le plafond, le grenier, ou le garage. Tous les échappements doivent être dirigés à l’extérieur de la maison.N’utilisez que des conduits en métal pour c...
Page 33 - DEVANT
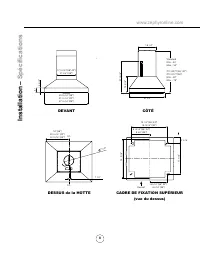
8 www.zephyronline.com Installation – Spécifications DEVANT CÔTÉ DESSUS de la HOTTE CADRE DE FIXATION SUPÉRIEUR (vue du dessus) 35 15/16 ” (36”) 41 15/16” (42”) 47 15/16” (48”) 17 15/16 ” (36”, 42“) 21 5/8” (48”) 4” 3 5/16 ” 16 1/4 ” 27 15/1 6 ” 14 5/16 ” 31 5/8 ” Standard Min. - 33” Max. - 50“ Z1C-...
Page 34 - *La hotte est conçue pour être installée à un plafond fini
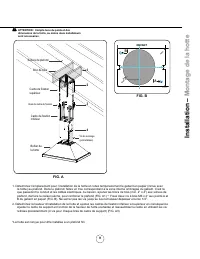
9 Installation – Montage de la hotte ATTENTION : Compte tenu du poids et des dimensions de la hotte, au moins deux installateurs sont nécessaires. ! 1 2 Solives de plafond Bloc de bois Cadre de fixation supérieur Bras du cadre de fixation Cadre de fixation inférieur Boîtier de la hotte 3 Vis de mont...
Page 35 - Devant
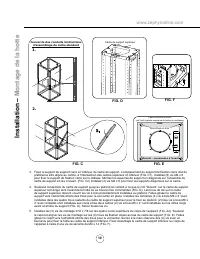
10 www.zephyronline.com 1. 2. 1/2 3. Couvercle des conduits Instructions d'assemblage du cadre standard haut ba s FIG. F Cadre de fixation inférieur (est fixé à la partie supérieure du boîtier du ventilateur) Encoches en trou Devant – commandes à l’avant Dos FIG. E 3. Fixez le support de support car...
Page 36 - adhésif en aluminium.; Raccord de câble
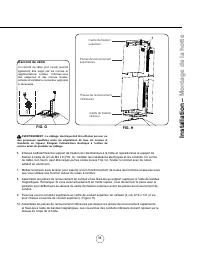
11 Installation – Montage de la hotte 1 Cadre de fixation supérieur Pièces de recouvrement supérieures Pièces de recouvrement inférieures Cadre de fixation inférieur 6. Enlevez l’adhésif fixant le support de fixation de l’électronique à la hotte et repositionnez le support de fixation à l’aide de (2...
Page 37 - ventilateur et branchez les fiches des
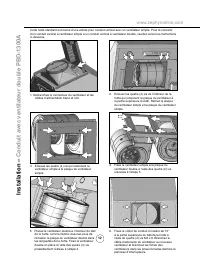
12 www.zephyronline.com Installation – Conduit avec ventilateur double PBD-1300A 2. Enlevez les quatre (4) vis de l’intérieur de la hotte qui retiennent la plaque du ventilateur à la partie supérieure du bâti. Retirez la plaque du ventilateur simple et la plaque du ventilateur simple. 3. Enlevez les...
Page 38 - Commandes –
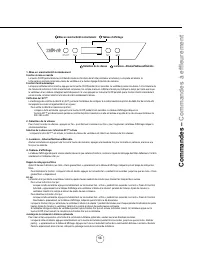
13 1. Mise en marche/Arrêt à retardement Fonction de mise en marche La touche On/Off permet d’allumer et d’éteindre toutes les fonctions de la hotte (ventilateur et lumières). Lorsqu’elle est éteinte, la hotte garde en mémoire la dernière vitesse du ventilateur et le dernier réglage d’intensité des ...
Page 39 - Nettoyez la commande à distance avec des détergents non abrasifs.; Suivez les instructions ci-dessous pour remplacer la pile.; Enlevez la pile et remplacez-la par une pile; Ventilateur Allumer/Choix de vitesses; Ventilateur Marche/Arrêt; Arrêt à retardement
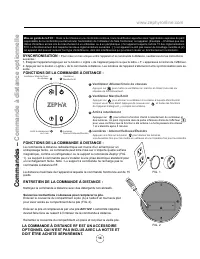
14 www.zephyronline.com Commandes – Commande à distance optionnelle ENTRETIEN DE LA COMMANDE À DISTANCE : Nettoyez la commande à distance avec des détergents non abrasifs. Suivez les instructions ci-dessous pour remplacer la pile. Enlevez le couvercle du compartiment à pile (A) à l’aide d’un tournev...
Page 40 - ENTRETIEN DES SURFACES :; Nettoyage des filtres déflecteurs en inox; selon; Retrait des filtres déflecteurs :; Poussez le filtre vers l’arrière de la hotte à l’aide des poignées.; Nettoyage du bac à graisse; REMPLACEMENT DES AMPOULES; Éclairage directionnel; Commandes –
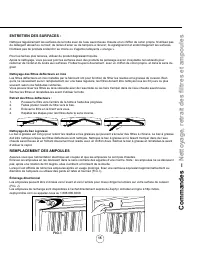
15 ENTRETIEN DES SURFACES : Nettoyez régulièrement les surfaces de la hotte avec de l’eau savonneuse chaude et un chiffon de coton propre. N’utilisez pas de détergent abrasif ou corrosif, de laines d’acier ou de tampons à récurer; ils égratigneront et endommageront les surfaces. N’utilisez pas de pr...
Page 41 - Procédures de Dépannage; Problème; Dépannage
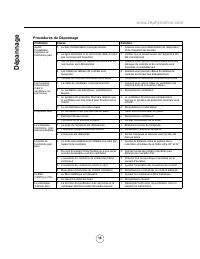
16 www.zephyronline.com Procédures de Dépannage Problème Cause Solution Après l’installation, l’appareil ne fonctionne pas. 1. Le bloc d’alimentation n’est pas allumé 1. Assurez-vous que l’alimentation du disjoncteur et de l’appareil est allumée 2. La ligne électrique et le raccord de câble ne sont ...
Page 42 - Fiche de conversion d’ACT; Technologie de contrôle du débit d’air (ACTTM)
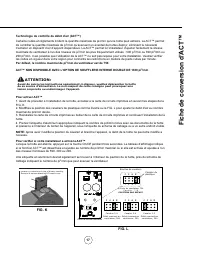
17 Fiche de conversion d’ACT ™ Technologie de contrôle du débit d’air (ACT™) Certains codes et règlements limitent la quantité maximale de pi 3 /min qu’une hotte peut extraire. La ACT™ permet de contrôler la quantité maximale de pi 3 /min qu’évacuent un éventail de hottes Zephyr, éliminant la nécess...
Page 43 - Schéma de câblage; Consommation D’énergie
www.zephyronline.com Schéma de câblage ACT 590 pi 3 /min — Max. du ventilateur : 175W à 2.6 A ACT 390 pi 3 /min — Max. du ventilateur : 94W à 1.4 A ACT 290 pi 3 /min — Max. du ventilateur : 63W à 0.9 A Modèles: AK7736AS, AK7742AS Voltage: 120V 60HZ 4A Consommation D’énergie Total: 286W Ampoule: 13WV...
Page 44 - Pièces de remplacement; Ventilateur interne double; Listes des pièces et des accessoires
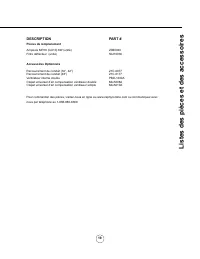
19 DESCRIPTION PART # Pièces de remplacement Ampoule MR16 (GU10) 6W (unité) Z0B0040 Filtre déflecteur (unité) 50210036 Accessoires Optionnels Recouvrement de conduit (36”, 42”) Z1C-0077 Recouvrement de conduit (48”) Z1C-0177 Ventilateur interne double PBD-1300A Clapet universel d’air compensation ve...
Page 45 - AGRAFEZ VOTRE REÇU ICI; Garantie limitée; Garantie
20 www.zephyronline.com AGRAFEZ VOTRE REÇU ICI POUR OBTENIR DU SERVICE SOUS GARANTIE OU POUR TOUTE QUESTION LIÉE À L’ENTRETIEN, veuillez communiquer avec nous au 1-888-880-8368 Zephyr Ventilation, LLC (désigné aux présentes sous le nom de « nous ») garantit au premier acheteur (désigné aux présentes...
Page 46 - ENREGISTRMENT DU PRODUIT; Cet enregistrement rapide est utile à; C’EST IMPORTANT
21 ENREGISTRMENT DU PRODUIT Nous vous félicitons d’avoir acheté une produit Zephyr. Veuillez prendre un moment pour enregistrer votre nouvelle produit au www.zephyronline.com/registration Zephyr Ventilation | 2277 Harbor Bay Pkwy. | Alameda, CA 94502 | 1.888.880.8368 Cet enregistrement rapide est ut...