Page 3 - Table of Contents; Set a Single Call Duration of Mobile Trunk
TG100 User Guide 3/93 Table of Contents ABOUT THIS GUIDE .......................................................................................................................... 9 TG100 GATEWAY OVERVIEW ..................................................................................................
Page 9 - About This Guide; We begin; Safety When Working with Electricity
TG100 User Guide 9/93 About This Guide Thanks for choosing Yeastar TG100 VoIP GSM/3G gateway. This guide will help you learn how to operate and manage your TG gateway. In this guide, we describe every detail on the functionality and configuration of the TG100. We begin by assuming that you are inter...
Page 10 - TG100 Gateway Overview; Front Panel
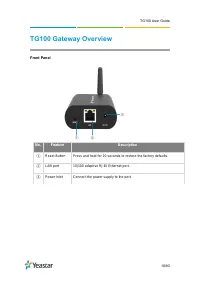
TG100 User Guide 10/93 TG100 Gateway Overview Front Panel No. Feature Description ① Reset Button Press and hold for 10 seconds to restore the factory defaults. ② LAN port 10/100 adapti ve RJ45 Ethernet port. ③ Power Inlet Connect the power suppl y to the port. ① ② ③
Page 12 - Hardware Installation; Package Contents; Safety Disclaimers and Installation Warnings; Power; Use only the power adaptor provided with TG100 gateway.
TG100 User Guide 12/93 Hardware Installation Package Contents Safety Disclaimers and Installation Warnings Insert/Remove SIM Card Connect Antenna Connect Ethernet Line Connect Power Supply Package Contents Item Unit QTY Description TG100 PC 1 TG100 main box Power adaptor PC 1 Power Suppl...
Page 13 - Environment; Insert/Remove SIM Card; Connect Ethernet Line
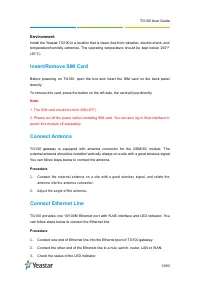
TG100 User Guide 13/93 Environment Install the Yeastar TG100 in a location that is clean, free from vibration, electric shock, and temperature/humidity extremes. The operating temperature should be kept below 104°F (40°C). Insert/Remove SIM Card Before powering on TG100, open the box and insert the ...
Page 14 - Connect Power Supply
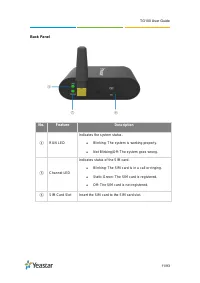
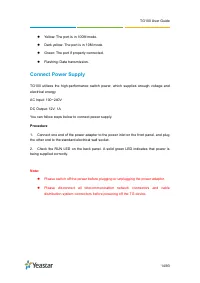
TG100 User Guide 14/93 Yellow: The port is in 100M mode. Dark yellow: The port is in 10M mode. Green: The port if properly connected. Flashing: Data transmission. Connect Power Supply TG100 utilizes the high-performance switch power, which supplies enough voltage and electrical energy. AC In...
Page 15 - Getting Started; Log in Web Interface
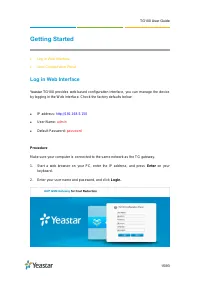
TG100 User Guide 15/93 Getting Started Log in Web Interface Web Configuration Panel Log in Web Interface Yeastar TG100 provides web-based configuration interface, you can manage the device by logging in the W eb interface. Check the factory defaults below: IP address: http://192.168.5.150 Us...
Page 16 - Web Configuration Panel; Manage Mobile Module
TG100 User Guide 16/93 Web Configuration Panel There are 4 main sections on the W eb Configuration Panel for you to check the TG100’s status and configure it. Status : Check Trunk Status, Network Status, System Info, Call Logs and System Logs. System : Configure Network Settings, Security relate...
Page 18 - Enable/Disable Mobile Module; Display Caller’s Mobile Number; Note; Navigate to; click
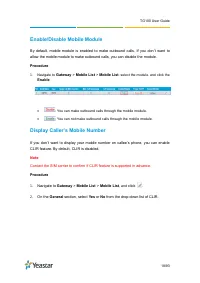
TG100 User Guide 18/93 Enable/Disable Mobile Module By default, mobile module is enabled to make outbound calls. If you don ’t want to allow the mobile module to make outbound calls, you can disable the module. Procedure 1. Navigate to Gateway > Mobile List > Mobile List , select the module, a...
Page 19 - Adjust Mobile Module Volume
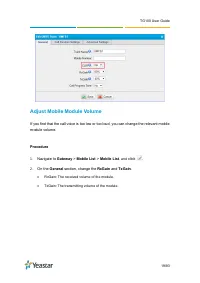
TG100 User Guide 19/93 Adjust Mobile Module Volume If you find that the call voice is too low or too loud, you can change the relevant mobile module volume. Procedure 1. Navigate to Gateway > Mobile List > Mobile List , and click . 2. On the General section, change the RxGain and TxGain . Rx...
Page 20 - Click; Save; Configure Call Progress Tone
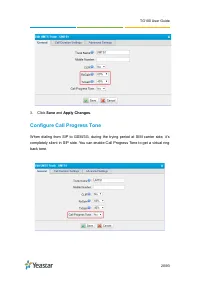
TG100 User Guide 20/93 3. Click Save and Apply Changes . Configure Call Progress Tone When dialing from SIP to GSM/3G, during the trying period at SIM carrier side, it’s completely silent in SIP side. You can enable Call Progress Tone to get a virtual ring back tone.
Page 21 - Configure the Call Duration of Mobile Trunk
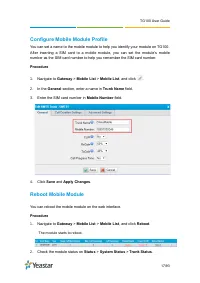
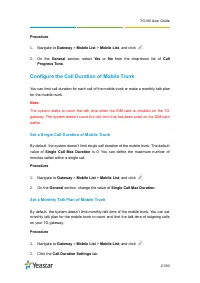
TG100 User Guide 21/93 Procedure 1. Navigate to Gateway > Mobile List > Mobile List , and click . 2. On the General section, select Yes or No from the drop-down list of Call Progress Tone . Configure the Call Duration of Mobile Trunk You can limit call duration for each call of the mobile trun...
Page 22 - Set Talk Time Alarm of Mobile Trunk; : Make sure the port is available to make calls.
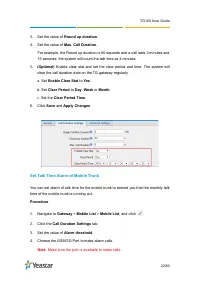
TG100 User Guide 22/93 3. Set the value of Round up duration . 4. Set the value of Max. Call Duration . For example, the Round up duration is 60 seconds and a call lasts 3 minutes and 15 seconds; the system will count the talk time as 4 minutes. 5. (Optional) Enable clear stat and set the clear peri...
Page 23 - Configure Advanced Settings
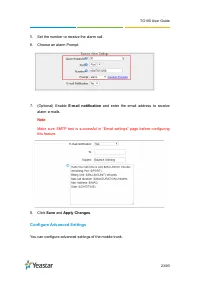
TG100 User Guide 23/93 5. Set the number to receive the alarm call. 6. Choose an alarm Prompt. 7. (Optional) Enable E-mail notification and enter the email address to receive alarm e-mails. Note : Make sure SMTP test is successful in “Email settings” page before configuring this feature. 8. Click Sa...
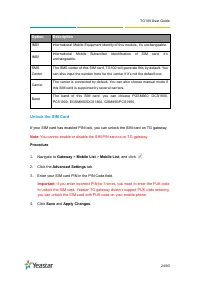
Page 24 - Unlock the SIM Card; : You cannot enable or disable the SIM PIN service on TG gateway.; Important; : If you enter incorrect PIN for 3 times, you need to enter the PUK code
TG100 User Guide 24/93 Option Description IMEI International Mobile Equipment Identity of this module, it’s unchangeable. IMSI International Mobile Subscriber Identification of SIM card, it’s unchangeable. SMS Center The SMS center of this SIM card, TG100 will generate this by default. You can also ...
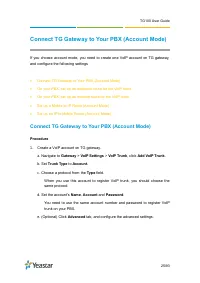
Page 25 - Connect TG Gateway to Your PBX (Account Mode); Connect TG Gateway to Your PBX (Account Mode)
TG100 User Guide 25/93 Connect TG Gateway to Your PBX (Account Mode) If you choose account mode, you need to create one VoIP account on TG gateway, and configure the following settings Connect TG Gateway to Your PBX (Account Mode) On your PBX, set up an outbound route for the VoIP trunk On you...
Page 26 - Use the VoIP account to register a VoIP trunk on your PBX.; Status > System Status; to check the account status on; Option
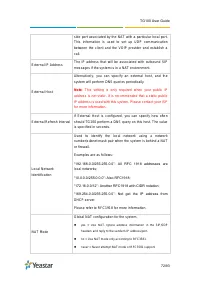
TG100 User Guide 26/93 f. Click Save and Apply Changes . 2. Use the VoIP account to register a VoIP trunk on your PBX. 3. Go to Status > System Status > Trunk Status to check the account status on Option Description NAT Network address translation (NAT) is a method of translating the private (...
Page 27 - Set up a Mobile to IP Route (Account Mode)
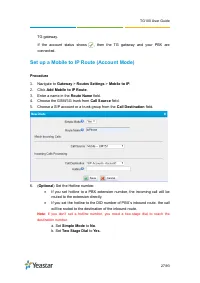
TG100 User Guide 27/93 TG gateway. If the account status shows , then the TG gateway and your PBX are connected. Set up a Mobile to IP Route (Account Mode) Procedure 1. Navigate to Gateway > Routes Settings > Mobile to IP . 2. Click Add Mobile to IP Route . 3. Enter a name in the Route Name fi...
Page 28 - Set up an IP to Mobile Route (Account Mode)
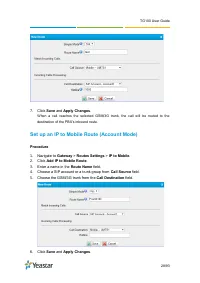
TG100 User Guide 28/93 7. Click Save and Apply Changes . When a call reaches the selected GSM/3G trunk, the call will be routed to the destination of the PBX’s inbound route. Set up an IP to Mobile Route (Account Mode) Procedure 1. Navigate to Gateway > Routes Settings > IP to Mobile . 2. Clic...
Page 29 - Connect TG Gateway to Your PBX (Register; Connect TG Gateway to Your PBX (Register Trunk Mode)
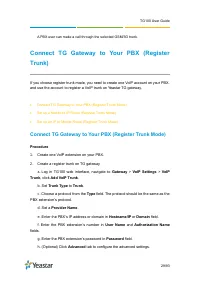
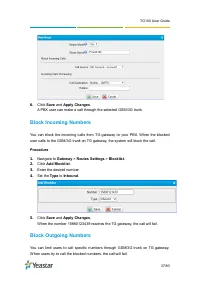
TG100 User Guide 29/93 A PBX user can make a call through the selected GSM/3G trunk. Connect TG Gateway to Your PBX (Register Trunk) If you choose register trunk mode, you need to create one VoIP account on your PBX, and use the account to register a VoIP trunk on Yeastar TG gateway. Connect TG Ga...
Page 31 - Set up a Mobile to IP Route (Register Trunk Mode)
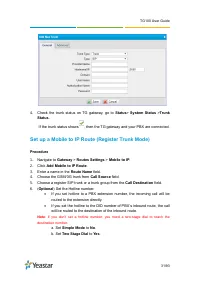
TG100 User Guide 31/93 4. Check the trunk status on TG gateway, go to Status > System Status > Trunk Status . If the trunk status shows , then the TG gateway and your PBX are connected. Set up a Mobile to IP Route (Register Trunk Mode) Procedure 1. Navigate to Gateway > Routes Settings >...
Page 32 - Set up an IP to Mobile Route (Register Trunk Mode)
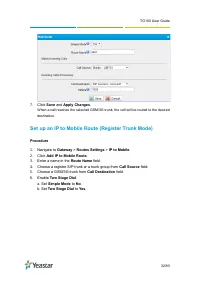
TG100 User Guide 32/93 7. Click Save and Apply Changes . When a call reaches the selected GSM/3G trunk, the call will be routed to the desired destination. Set up an IP to Mobile Route (Register Trunk Mode) Procedure 1. Navigate to Gateway > Routes Settings > IP to Mobile . 2. Click Add IP to ...
Page 33 - Connect TG Gateway to Your PBX (Peer Trunk)
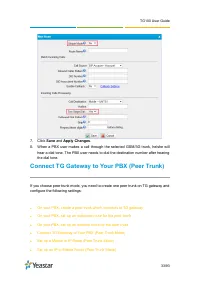
TG100 User Guide 33/93 7. Click Save and Apply Changes . 8. When a PBX user makes a call through the selected GSM/3G trunk, he/she will hear a dial tone. The PBX user needs to dial the destination number after hearing the dial tone. Connect TG Gateway to Your PBX (Peer Trunk) If you choose peer trun...
Page 34 - Connect TG Gateway to Your PBX (Peer Trunk Mode)
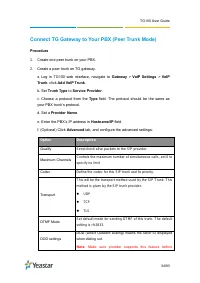
TG100 User Guide 34/93 Connect TG Gateway to Your PBX (Peer Trunk Mode) Procedure 1. Create one peer trunk on your PBX. 2. Create a peer trunk on TG gateway. a. Log in TG100 web interface, navigate to Gateway > VoIP Settings > VoIP Trunk , click Add VoIP Trunk . b. Set Trunk Type to Service Pr...
Page 35 - Set up a Mobile to IP Route (Peer Trunk Mode)
TG100 User Guide 35/93 g. Click Save and Apply Changes . 3. Check the status of the two peer trunks on both your PBX and the TG gateway. If the status of the two peer trunks both indicates connected, then the TG gateway and your PBX are connected. Set up a Mobile to IP Route (Peer Trunk Mode) Proced...
Page 36 - Set up an IP to Mobile Route (Peer Trunk Mode)
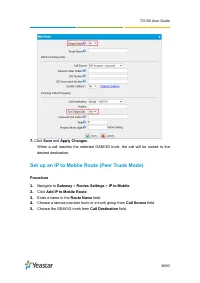
TG100 User Guide 36/93 7. Click Save and Apply Changes . When a call reaches the selected GSM/3G trunk, the call will be routed to the desired destination. Set up an IP to Mobile Route (Peer Trunk Mode) Procedure 1. Navigate to Gateway > Routes Settings > IP to Mobile . 2. Click Add IP to Mobi...
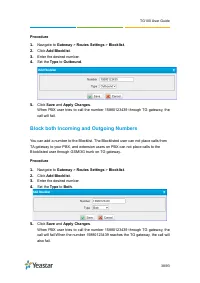
Page 38 - Block both Incoming and Outgoing Numbers
TG100 User Guide 38/93 Procedure 1. Navigate to Gateway > Routes Settings > Blocklist . 2. Click Add Blocklist . 3. Enter the desired number. 4. Set the Type to Outbound . 5. Click Save and Apply Changes . When PBX user tries to call the number 15880123439 through TG gateway, the call will fai...
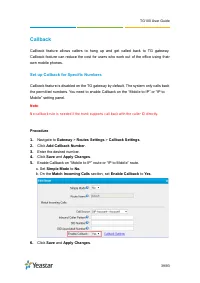
Page 39 - Callback; Set up Callback for Specific Numbers
TG100 User Guide 39/93 Callback Callback feature allows callers to hang up and get called back to TG gateway. Callback feature can reduce the cost for users who work out of the office using their own mobile phones. Set up Callback for Specific Numbers Callback feature is disabled on the TG gateway b...
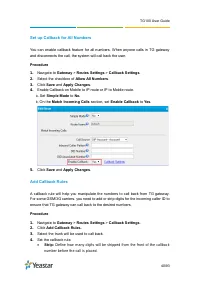
Page 41 - AutoCLIP Route; Set up AutoCLIP Route
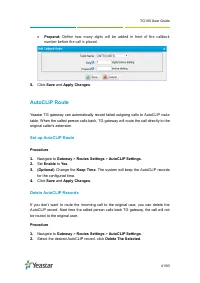
TG100 User Guide 41/93 Prepend: Define how many digits will be added in front of the callback number before the call is placed. 5. Click Save and Apply Changes . AutoCLIP Route Yeastar TG gateway can automatically record failed outgoing calls to AutoCLIP route table. When the called person calls b...
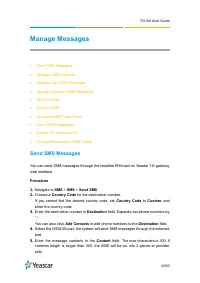
Page 42 - Manage Messages; Send SMS Messages
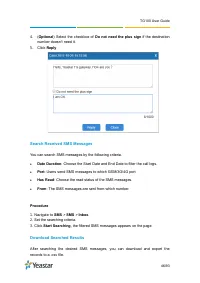
TG100 User Guide 42/93 Manage Messages Send SMS Messages Manage SMS Contacts Manage Sent SMS Messages Manage Received SMS Messages SMS to Email Email to SMS Schedule SMS Clear Tasks Send USSD Messages Enable TG Gateway API Change Password of SMS Center Send SMS Messages You can s...
Page 43 - Manage SMS Contacts; Add an SMS Contact; Delete an SMS Contact; Manage Sent SMS Messages
TG100 User Guide 43/93 6. Click Send . Manage SMS Contacts Add an SMS Contact A contact list allows you to target and text contacts with common interests. Once you have all your contacts created on TG gateway, you can send SMS messages to a single contact or a group or all contacts by quick selectio...
Page 45 - Delete Searched Results; Manage Received SMS Messages; View Received SMS Messages
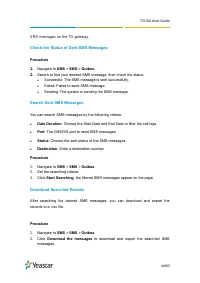
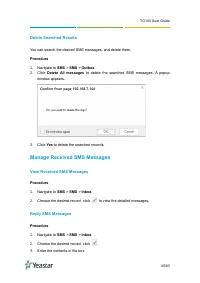
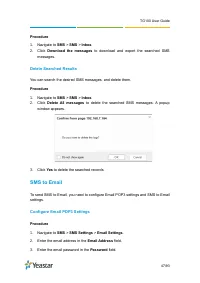
TG100 User Guide 45/93 Delete Searched Results You can search the desired SMS messages, and delete them. Procedure 1. Navigate to SMS > SMS > Outbox . 2. Click Delete All messages to delete the searched SMS messages. A popup window appears. 3. Click Yes to delete the searched records. Manage R...
Page 47 - SMS to Email; Configure Email POP3 Settings
TG100 User Guide 47/93 Procedure 1. Navigate to SMS > SMS > Inbox . 2. Click Download the messages to download and export the searched SMS messages. Delete Searched Results You can search the desired SMS messages, and delete them. Procedure 1. Navigate to SMS > SMS > Inbox . 2. Click Del...
Page 49 - Email to SMS; Configure Email SMTP Settings
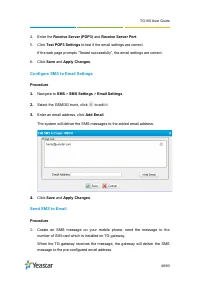
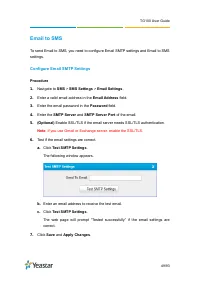
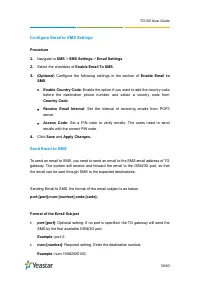
TG100 User Guide 49/93 Email to SMS To send Email to SMS, you need to configure Email SMTP settings and Email to SMS settings. Configure Email SMTP Settings Procedure 1. Navigate to SMS > SMS Settings > Email Settings . 2. Enter a valid email address in the Email Address field. 3. Enter the em...
Page 51 - Schedule SMS Clear Tasks
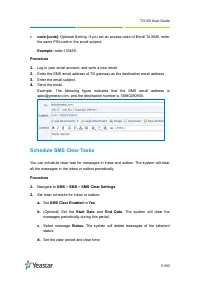
TG100 User Guide 51/93 code:[code] : Optional Setting. If you set an access code of Email To SMS, enter the same PIN code in the email subject. Example : code:125485; Procedure 1. Log in your email account, and write a new email. 2. Enter the SMS email address of TG gateway as the destination emai...
Page 52 - Send USSD Messages; Send a USSD Message
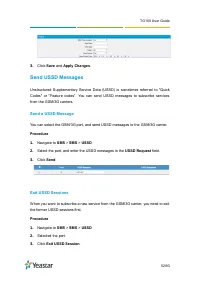
TG100 User Guide 52/93 3. Click Save and Apply Changes . Send USSD Messages Unstructured Supplementary Service Data (USSD) is sometimes referred to "Quick Codes" or "Feature codes". You can send USSD messages to subscribe services from the GSM/3G carriers. Send a USSD Message You can...
Page 53 - Enable TG Gateway API; Change Password of SMS Center
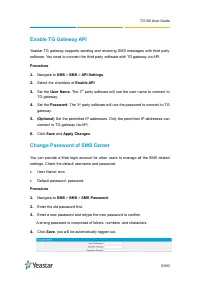
TG100 User Guide 53/93 Enable TG Gateway API Yeastar TG gateway supports sending and receiving SMS messages with third party software. You need to connect the third party software with TG gateway via API. Procedure 1. Navigate to SMS > SMS > API Settings . 2. Select the checkbox of Enable API ...
Page 54 - Configure System Settings; Change Web Login Password; System; Enter the old password first.; Change Date and Time
TG100 User Guide 54/93 Configure System Settings Change Web Login Password Change Date and Time Upload Custom Prompts Set up System Email Update System Firmware Backup and Restore Reboot the System Reset the System Change Web Login Password It is highly recommended that you change th...
Page 55 - : Make sure the system can access the Internet.; Upload Custom Prompts
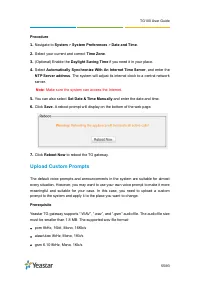
TG100 User Guide 55/93 Procedure 1. Navigate to System > System Preferences > Date and Time . 2. Select your current and correct Time Zone . 3. (Optional) Enable the Daylight Saving Time if you need it in your place. 4. Select Automatically Synchronize With An Internet Time Server , and enter ...
Page 56 - Set up System Email
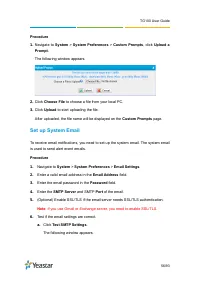
TG100 User Guide 56/93 Procedure 1. Navigate to System > System Preferences > Custom Prompts , click Upload a Prompt . The following window appears. 2. Click Choose File to choose a file from your local PC. 3. Click Upload to start uploading the file. After uploaded, the file name will be disp...
Page 57 - Update System Firmware; Update Firmware through HTTP Server; The HTTP URL should be a; BIN
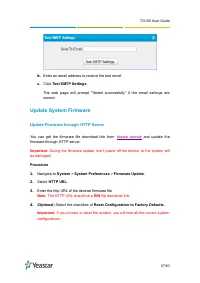
TG100 User Guide 57/93 b. Enter an email address to receive the test email. c. Click Test SMTP Settings . The web page will prompt “Tested successfully” if the email settings are correct. Update System Firmware Update Firmware through HTTP Server You can get the firmware file download link from Yeas...
Page 58 - Upgrade Firmware through TFTP Server
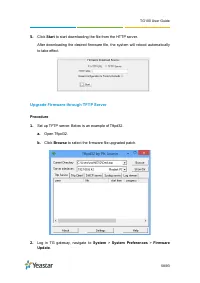
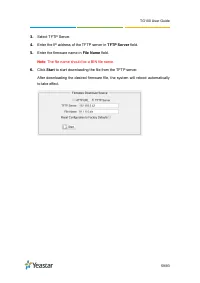
TG100 User Guide 58/93 5. Click Start to start downloading the file from the HTTP server. After downloading the desired firmware file, the system will reboot automatically to take effect. Upgrade Firmware through TFTP Server Procedure 1. Set up TFTP server. Below is an example of Tftpd32. a. Open Tf...
Page 59 - TFTP Server; Enter the firmware name in; File Name; : The file name should be a BIN file name.; Start; to start downloading the file from the TFTP server.
TG100 User Guide 59/93 3. Select TFTP Server. 4. Enter the IP address of the TFTP server in TFTP Server field. 5. Enter the firmware name in File Name field. Note : The file name should be a BIN file name. 6. Click Start to start downloading the file from the TFTP server. After downloading the desir...
Page 60 - Backup and Restore; Create a Backup File
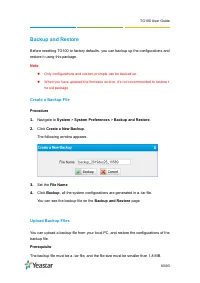
TG100 User Guide 60/93 Backup and Restore Before resetting TG100 to factory defaults, you can backup up the configurations and restore it using this package. Note : Only configurations and custom prompts can be backed up. When you have updated the firmware version, it’s not recommended to restor...
Page 61 - Restore System Configurations
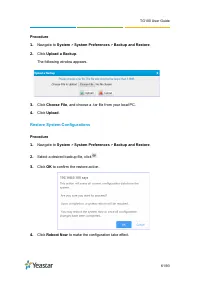
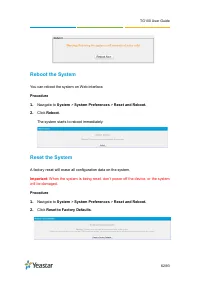
TG100 User Guide 61/93 Procedure 1. Navigate to System > System Preferences > Backup and Restore . 2. Click Upload a Backup . The following window appears. 3. Click Choose File , and choose a .tar file from your local PC. 4. Click Upload . Restore System Configurations Procedure 1. Navigate to...
Page 63 - Configure System Network; Change the IP Address of TG Gateway; Configure LAN settings.
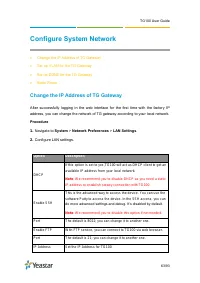
TG100 User Guide 63/93 Configure System Network Change the IP Address of TG Gateway Set up VLAN for the TG Gateway Set up DDNS for the TG Gateway Static Route Change the IP Address of TG Gateway After successfully logging in the web interface for the first time with the factory IP address, y...
Page 64 - Set up VLAN for the TG Gateway
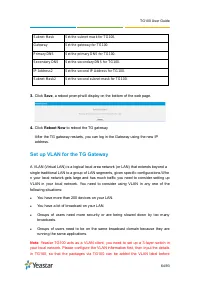
TG100 User Guide 64/93 Subnet Mask Set the subnet mask for TG100. Gateway Set the gateway for TG100. Primary DNS Set the primary DNS for TG100. Secondary DNS Set the secondary DNS for TG100. IP Address2 Set the second IP Address for TG100. Subnet Mask2 Set the second subnet mask for TG100. 3. Click ...
Page 65 - sending to that switch.
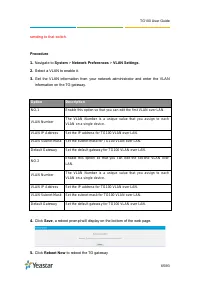
TG100 User Guide 65/93 sending to that switch. Procedure 1. Navigate to System > Network Preferences > VLAN Settings . 2. Select a VLAN to enable it. 3. Get the VLAN information from your network administrator and enter the VLAN information on the TG gateway. Option Description NO.1 Enable thi...
Page 66 - Set up OpenVPN Network; Set up DDNS for the TG Gateway
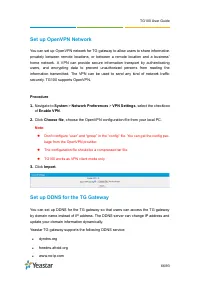
TG100 User Guide 66/93 Set up OpenVPN Network You can set up OpenVPN network for TG gateway to allow users to share information privately between remote locations, or between a remote location and a business' home network. A VPN can provide secure information transport by authenticating users, and e...
Page 67 - Static Route; Set up Static Routes
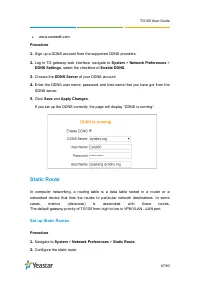
TG100 User Guide 67/93 www.zoneedit.com Procedure 1. Sign up a DDNS account from the supported DDNS providers. 2. Log in TG gateway web interface, navigate to System > Network Preferences > DDNS Settings , select the checkbox of Enable DDNS . 3. Choose the DDNS Server of your DDNS account. 4...
Page 68 - : Leave this field blank if you do not know the information.; Configure VoIP Settings; Group VoIP Trunks
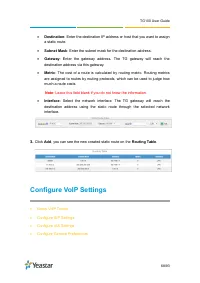
TG100 User Guide 68/93 Destination : Enter the destination IP address or host that you want to assign a static route. Subnet Mask : Enter the subnet mask for the destination address. Gateway : Enter the gateway address. The TG gateway will reach the destination address via this gateway. Metr...
Page 69 - Configure SIP General Settings
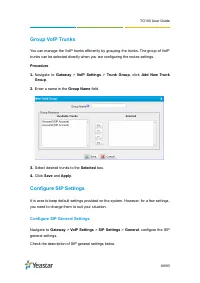
TG100 User Guide 69/93 Group VoIP Trunks You can manage the VoIP trunks efficiently by grouping the trunks. The group of VoIP trunks can be selected directly when you are configuring the routes settings. Procedure 1. Navigate to Gateway > VoIP Settings > Trunk Group , click Add New Trunk Group...
Page 71 - Configure NAT Settings; Gateway; configure the SIP NAT
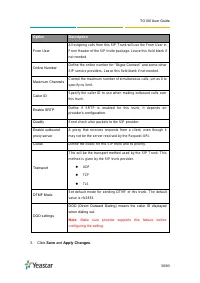
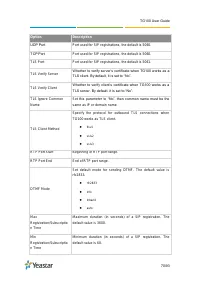
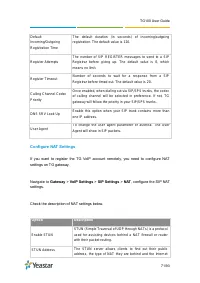
TG100 User Guide 71/93 Default Incoming/Outgoing Registration Time The default duration (in seconds) of incoming/outgoing registration. The default value is 120. Register Attempts The number of SIP REG ISTER messages to send to a SIP Registrar before gi ving up. The default value is 0, which means n...
Page 73 - Configure SIP Codec Settings; Configure QoS Settings; Navigate to
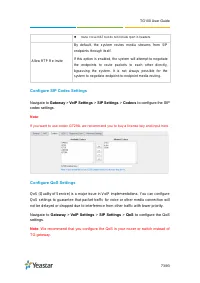
TG100 User Guide 73/93 Configure SIP Codec Settings Navigate to Gateway > VoIP Settings > SIP Settings > Codecs to configure the SIP codec settings. Note : If you want to use codec G729A, we recommend you to buy a license key and input here. Configure QoS Settings QoS (Quality of Service) i...
Page 74 - Configure Response Code Settings; and SIM card carrier before you change the settings.; Configure SIP Advanced Settings
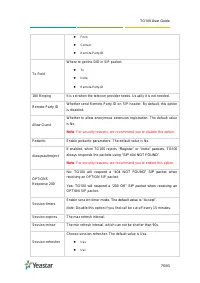
TG100 User Guide 74/93 Configure Response Code Settings You can change the response codes from the SIM card carrier before sending the codes to your PBX. After changing the response codes, the PBX can better understand the exact call status, like busy, no response and others. Navigate to Gateway >...
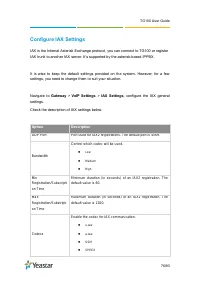
Page 76 - Configure IAX Settings; , configure the IAX general
TG100 User Guide 76/93 Configure IAX Settings IAX is the Internal Asterisk Exchange protocol, you can connect to TG100 or register IAX trunk to another IAX server. It’s supported by the asterisk-based IPPBX. It is wise to keep the default settings provided on the system. However, for a few settings,...
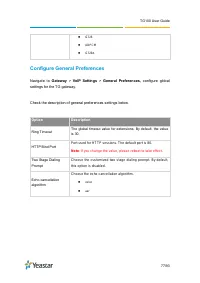
Page 77 - Configure General Preferences; configure global
TG100 User Guide 77/93 G726 ADPCM G729A Configure General Preferences Navigate to Gateway > VoIP Settings > General Preferences, configure global settings for the TG gateway. Check the description of general preferences settings below. Option Description Ring Timeout The global timeout v...
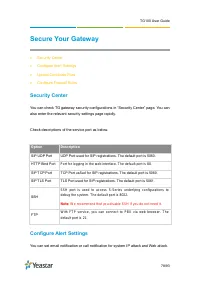
Page 78 - Secure Your Gateway; Security Center; Check descriptions of the service port as below.; Configure Alert Settings
TG100 User Guide 78/93 Secure Your Gateway Security Center Configure Alert Settings Upload Certificate Files Configure Firewall Rules Security Center You can check TG gateway security configurations in “Security Center” page. You can also enter the relevant security settings page rapidly. Ch...
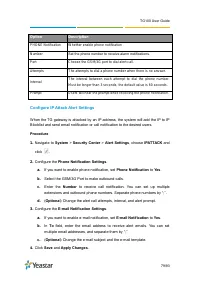
Page 79 - Configure IP Attack Alert Settings
TG100 User Guide 79/93 Option Description PHONE Notification W hether enable phone notification Number Set the phone number to receive alarm notifications. Port Choose the GSM/3G port to dial alert call. Attempts The attempts to dial a phone number when there is no answer. Interval The interval betw...
Page 80 - Configure User Lockout Alert Settings; Upload Certificate Files
TG100 User Guide 80/93 Configure User Lockout Alert Settings The s ystem will lock the user’s IP address after 5 failed web login attempts, and send notification to the desired users. Procedure 1. Navigate to System > Security Center > Alert Settings , choose WEBLOGIN and click . 2. Configure ...
Page 81 - Configure Firewall Rules; Add a Firewall Rule
TG100 User Guide 81/93 certificate. a. Click Upload Certificate , set Type to Trusted Certificate . b. Click Choose File to select the file from your local PC. c. Click Save to start uploading. You can see the certificate appear on Trusted Certificate list. 3. Upload gateway certificate. Gateway cer...
Page 82 - Enable Firewall Function
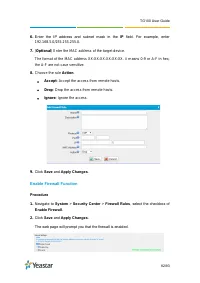
TG100 User Guide 82/93 6. Enter the IP address and subnet mask in the IP field. For example, enter 192.168.5.0/255.255.255.0. 7. ( Optional ) Enter the MAC address of the target device. The format of the MAC address XX:XX:XX:XX:XX:XX. X means 0-9 or A-F in hex, the A-F are not case sensitive. 8. Cho...
Page 83 - Add an IP Blocklist Rule
TG100 User Guide 83/93 Block Pings through Your TG Gateway By default, users can use the ping command from other devices to check if the TG gateway is alive. You can block the pings to place your TG gateway in a more secure environment. Procedure 1. Navigate to System > Security Center > Firew...
Page 84 - Delete Blocked IP Address; System Status; Check Trunk Status
TG100 User Guide 84/93 4. Specify the number of IP packets allowed in IP Packets field. 5. Enter the time interval to receive IP packets in Time Interval field. For example, IP Packets is set to 90, Time Interval is set to 60, which means 90 IP packets are allowed in 60 seconds. 6. Click Save and Ap...
Page 85 - Mobile Trunk Status
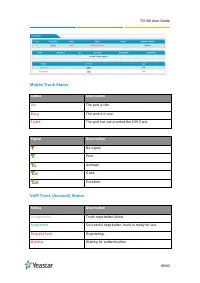
TG100 User Guide 85/93 Mobile Trunk Status Status Description Idle The port is idle Bus y The port is in use. Failed The port has not inserted the SIM Card. Signal Description No signal Poor Average Good Excellent VoIP Trunk (Account) Status Status Description Unregistered T runk registration failed...
Page 86 - Check Network Status; Check System Info
TG100 User Guide 86/93 VoIP Trunk (Service Provider) Status Status Description OK Successful registration, trunk is ready for use. Unreachable The trunk is unreachable. Failed Trunk registration failed. Check Network Status Navigate to Status > System Status > Network Status to check the TG ga...
Page 87 - Reports; Call Logs; You can perform the following operations on the; Call Logs; View call logs; View Call Logs; View
TG100 User Guide 87/93 Reports Call Logs System Logs You can check the detailed call logs and system logs, which is used to debug. Call Logs You can perform the following operations on the Call Logs page. View call logs Search call logs Download searched call logs Delete searched call lo...
Page 88 - Search Call Logs; Download Searched Results
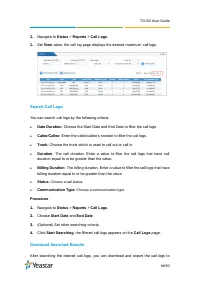
TG100 User Guide 88/93 1. Navigate to Status > Reports > Call Logs . 2. Set View value, the call log page displays the desired maximum call logs. Search Call Logs You can search call logs by the following criteria. Date Duration : Choose the Start Date and End Date to filter the call logs. ...
Page 89 - Trace Hardware Logs
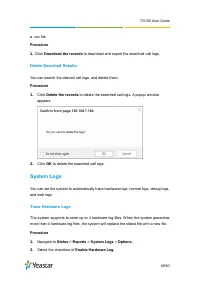
TG100 User Guide 89/93 a .csv file. Procedure 1. Click Download the records to download and export the searched call logs. Delete Searched Results You can search the desired call logs, and delete them. Procedure 1. Click Delete the records to delete the searched call logs. A popup window appears. 2....