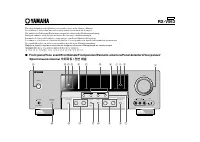
Page 2 - Caution: Read this before operating your unit.; WARNING; Note; IMPORTANT
CAUTION: READ THIS BEFORE OPERATING YOUR UNIT. En 1 To assure the finest performance, please read this manual carefully. Keep it in a safe place for future reference. 2 Install this sound system in a well ventilated, cool, dry, clean place – away from direct sunlight, heat sources, vibration, dust, ...
Page 3 - Using a USB memory device or a USB portable; Contents
1 En English PRE P ARA T ION INTR ODUCTION BAS IC OPERA T ION ADV ANCED OPERA T ION AD DITIONAL INFO RM A T ION APPE NDIX Features ................................................................... 2Getting started ........................................................ 3Quick start guide ...........
Page 4 - Features
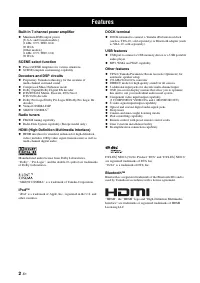
Features 2 En Built-in 7-channel power amplifier ◆ Minimum RMS output power [U.S.A. and Canada models](1 kHz, 0.9% THD, 8 Ω ) 90 W/ch[Other models](1 kHz, 0.9% THD, 6 Ω ) 90 W/ch SCENE select function ◆ Preset SCENE templates for various situations ◆ SCENE template customizing capability Decoders an...
Page 5 - English; Supplied accessories; Check that you received all of the following parts.; Installing batteries in the remote control; Getting started; Notes
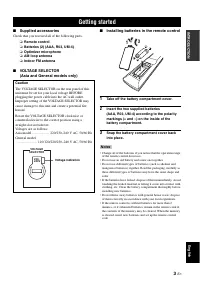
Getting started 3 En English INTR ODUCTION ■ Supplied accessories Check that you received all of the following parts. ❏ Remote control ❏ Batteries (2) (AAA, R03, UM-4) ❏ Optimizer microphone ❏ AM loop antenna ❏ Indoor FM antenna ■ VOLTAGE SELECTOR (Asia and General models only) ■ Installing batterie...
Page 6 - Prepare the following items.; Speakers; Select a monaural RCA cable.; Quick start guide; Step 1: Set up your speakers
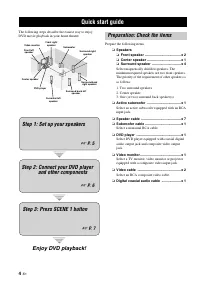
Quick start guide 4 En The following steps describe the easiest way to enjoy DVD movie playback in your home theater. Prepare the following items. ❏ Speakers ❏ Front speaker ..................................... x 2 ❏ Center speaker ................................... x 1 ❏ Surround speaker ...........
Page 7 - Do not let the bare speaker wires touch each other.; Front and center speakers
Quick start guide 5 En English INTR ODUCTION Place your speakers in the room and connect them to this unit. 1 Place your speakers and subwoofer in the room. 2 Connect speaker cables to each speaker. Cables are colored or shaped differently, perhaps with a stripe, groove or ridge. Connect the striped...
Page 8 - Step 2: Connect your DVD player; For further connections
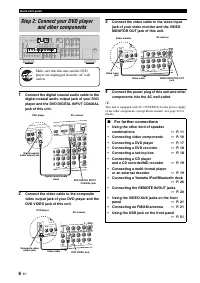
Quick start guide 6 En 1 Connect the digital coaxial audio cable to the digital coaxial audio output jack of your DVD player and the DVD DIGITAL INPUT COAXIAL jack of this unit. 2 Connect the video cable to the composite video output jack of your DVD player and the DVD VIDEO jack of this unit. 3 Con...
Page 9 - SCENE; Rotate; VOLUME; to adjust the volume.; About SCENE function; Step 3: Press SCENE 1 button
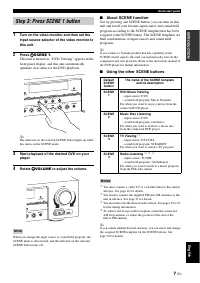
Quick start guide 7 En English INTR ODUCTION 1 Turn on the video monitor and then set the input source selector of the video monitor to this unit. 2 Press T SCENE 1 . This unit is turned on. “DVD Viewing” appears in the front panel display, and this unit automatically optimize own status for the DVD...
Page 10 - Customizing the SCENE templates
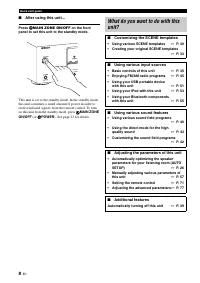
Quick start guide 8 En ■ After using this unit... Press A MAIN ZONE ON/OFF on the front panel to set this unit to the standby mode. This unit is set to the standby mode. In the standby mode, this unit consumes a small amount of power in order to receive infrared signals from the remote control. To t...
Page 11 - Connections; Rear panel
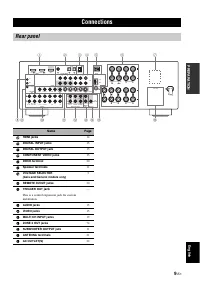
Connections 9 En English PRE P ARA T ION Connections Rear panel L R SURROUND L R FRONT B L R FRONT A CENTER L R SURROUND BACK/BI-AMP SINGLE SWITCHED MONITOR OUT L R DTV/CBL DVR DVD MD/ CD-R OUT (REC) IN (PLAY) OUT IN DTV/CBL DVR DVD OUT OUT +12V 15mA MAX. IN IN MONITOR OUT DTV/CBL DVR DVD OUT S VIDE...
Page 12 - Front left and right speakers (FL and FR); The surround speakers are used for effect and surround sounds.; Surround back left and right speakers (SBL and SBR); Placing speakers
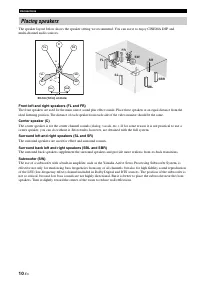
10 En Connections The speaker layout below shows the speaker setting we recommend. You can use it to enjoy CINEMA DSP and multi-channel audio sources. Front left and right speakers (FL and FR) The front speakers are used for the main source sound plus effect sounds. Place these speakers at an equal ...
Page 13 - Connecting speakers; Caution; speakers away from the monitor.
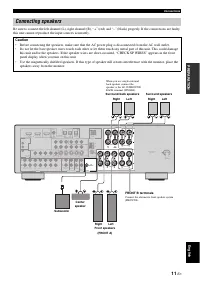
11 En Connections English PRE P ARA T ION Be sure to connect the left channel (L), right channel (R), “+” (red) and “–” (black) properly. If the connections are faulty, this unit cannot reproduce the input sources accurately. Connecting speakers Caution • Before connecting the speakers, make sure th...
Page 14 - Connecting to the FRONT A terminals; Tighten the knob to secure the wire.; Using bi-amplification connections
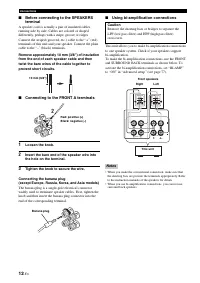
12 En Connections ■ Before connecting to the SPEAKERS terminal A speaker cord is actually a pair of insulated cables running side by side. Cables are colored or shaped differently, perhaps with a stripe, groove or ridges. Connect the striped (grooved, etc.) cable to the “+” (red) terminals of this u...
Page 15 - Audio jacks; Video jacks; ) video signals transmitted on; Information on jacks and cable plugs
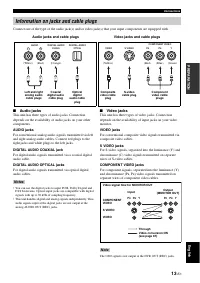
13 En Connections English PRE P ARA T ION Connect one of the type of the audio jack(s) and/or video jack(s) that your input components are equipped with. ■ Audio jacks This unit has three types of audio jacks. Connection depends on the availability of audio jacks on your other components. AUDIO jack...
Page 16 - HDMI compatibility with this unit; Information on HDMITM; • HDCP (High-bandwidth Digital Content Protection
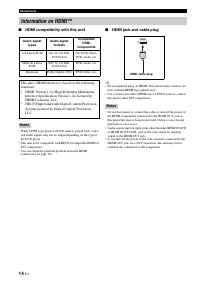
14 En Connections ■ HDMI compatibility with this unit • When CPPM copy-protected DVD audio is played back, video and audio signals may not be output depending on the type of the DVD player. • This unit is not compatible with HDCP-incompatible HDMI or DVI components. • You can check the potential pro...
Page 17 - Audio signal flow; Video signal flow; Audio and video signal flow
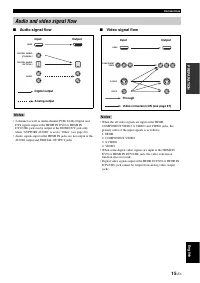
15 En Connections English PRE P ARA T ION ■ Audio signal flow • 2-channel as well as multi-channel PCM, Dolby Digital and DTS signals input at the HDMI IN DVD or HDMI IN DTV/CBL jack can be output at the HDMI OUT jack only when “SUPPORT AUDIO” is set to “Other” (see page 64). • Audio signals input a...
Page 18 - Connecting video components
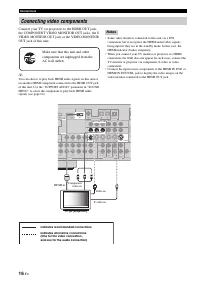
16 En Connections Connect your TV (or projector) to the HDMI OUT jack, the COMPONENT VIDEO MONITOR OUT jacks, the S VIDEO MONITOR OUT jack or the VIDEO MONITOR OUT jack of this unit. y You can choose to play back HDMI audio signals on this unit or on another HDMI component connected to the HDMI OUT ...
Page 19 - Connecting a DVD player; Connecting other components
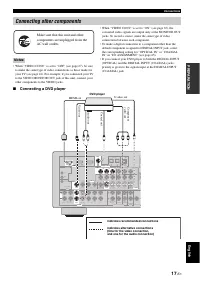
17 En Connections English PRE P ARA T ION • When “VIDEO CONV.” is set to “OFF” (see page 67), be sure to make the same type of video connections as those made for your TV (see page 16). For example, if you connected your TV to the VIDEO MONITOR OUT jack of this unit, connect your other components to...
Page 20 - Connecting a DVD recorder, PVR or VCR
18 En Connections ■ Connecting a DVD recorder, PVR or VCR ■ Connecting a set-top box MONITOR OUT L R DTV/CBL DVR DVD MD/ CD-R OUT (REC) IN (PLAY) OUT IN DTV/CBL DVR DVD OUT OUT +12V 15mA MAX. IN IN MONITOR OUT DTV/CBL DVR DVD OUT S VIDEO IN CD L R SUB WOOFER WO SURROUND CENTER MULTI CH INPUT AUDIO V...
Page 21 - Connect the audio components as follows.; Connecting a multi-format player or an external decoder; Connecting audio components
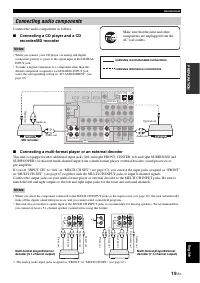
19 En Connections English PRE P ARA T ION Connect the audio components as follows. ■ Connecting a CD player and a CD recorder/MD recorder • When you connect your CD player via analog and digital connection, priority is given to the signal input at the DIGITAL INPUT jack. • To make a digital connecti...
Page 22 - Using REMOTE IN/OUT jacks
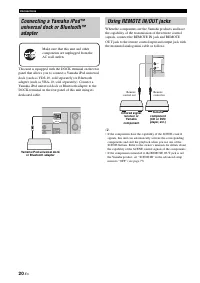
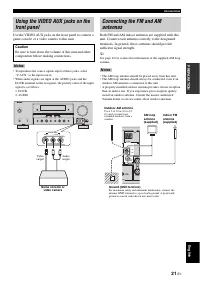
20 En Connections This unit is equipped with the DOCK terminal on the rear panel that allows you to connect a Yamaha iPod universal dock (such as YDS-10, sold separately) or Bluetooth adapter (such as YBA-10, sold separately). Connect a Yamaha iPod universal dock or Bluetooth adapter to the DOCK ter...
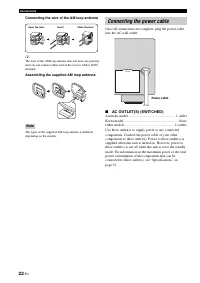
Page 24 - Connecting the wire of the AM loop antenna; Connecting the power cable
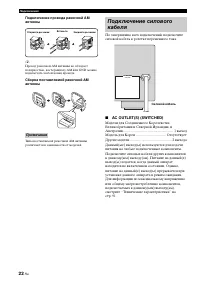
22 En Connections Connecting the wire of the AM loop antenna y The wire of the AM loop antenna does not have any polarity and you can connect either end of the wire to AM or GND terminal. Assembling the supplied AM loop antenna The types of the supplied AM loop antenna is different depending on the ...
Page 25 - Turning on this unit; POWER; to turn on this unit.; Set this unit to the standby mode; Press; STANDBY; ) to set this unit to the standby; Turning on and off the power
23 En Connections English PRE P ARA T ION ■ Turning on this unit Press A MAIN ZONE ON/OFF (or G POWER ) to turn on this unit. y When you turn on this unit, there will be a 4 to 5-second delay before this unit can reproduce sound. ■ Set this unit to the standby mode Press A MAIN ZONE ON/OFF (or H STA...
Page 26 - Front panel display
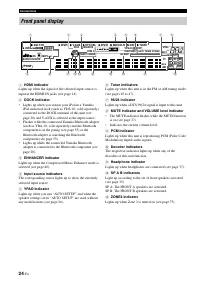
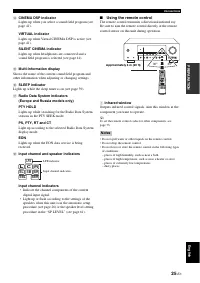
24 En Connections 1 HDMI indicator Lights up when the signal of the selected input source is input at the HDMI IN jacks (see page 14). 2 DOCK indicator • Lights up when you station your iPod in a Yamaha iPod universal dock (such as YDS-10, sold separately) connected to the DOCK terminal of this unit...
Page 27 - • Indicate the channel components of the current; Using the remote control; LFE; L C R
25 En Connections English PRE P ARA T ION D CINEMA DSP indicator Lights up when you select a sound field program (see page 41). VIRTUAL indicator Lights up when Virtual CINEMA DSP is active (see page 41). SILENT CINEMA indicator Lights up when headphones are connected and a sound field program is se...
Page 28 - Make sure of the following check points.; Speakers are connected appropriately.; Optimizing the speaker setting for your listening room; Using AUTO SETUP
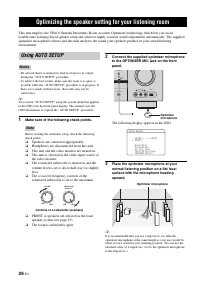
Optimizing the speaker setting for your listening room 26 En This unit employs the YPAO (Yamaha Parametric Room Acoustic Optimizer) technology which lets you avoid troublesome listening-based speaker setup and achieves highly accurate sound adjustments automatically. The supplied optimizer microphon...
Page 29 - ENTER; DISTANCE
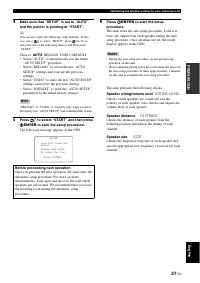
27 En Optimizing the speaker setting for your listening room English PRE P ARA T ION 4 Make sure that “SETUP” is set to “AUTO” and the pointer is pointing at “START”. y You can also select the following setup methods. In this case, press 7 k to select “SETUP”, press 7 l / h to select the one of the ...
Page 30 - The display changes as follows.
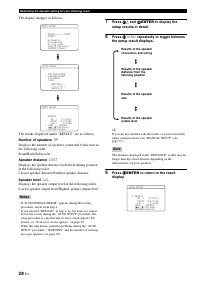
28 En Optimizing the speaker setting for your listening room The display changes as follows. The results displayed under “RESULT” are as follows. Number of speakers SP Displays the number of speakers connected to this unit in the following order:Front/Back/Subwoofer Speaker distance DIST Displays th...
Page 31 - • Select “SET” to confirm the “AUTO SETUP”; If an error screen appears; If “WARNING” appears
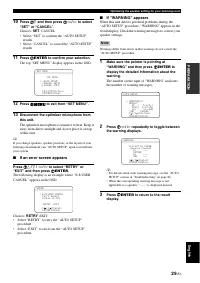
29 En Optimizing the speaker setting for your listening room English PRE P ARA T ION 10 Press 7 n and then press 7 l / h to select “SET” or “CANCEL”. Choices: SET , CANCEL • Select “SET” to confirm the “AUTO SETUP” results. • Select “CANCEL” to cancel the “AUTO SETUP” results. 11 Press 7 ENTER to co...
Page 32 - DVD Movie Viewing; Selecting the SCENE templates; DVD MovieView; DVD Viewing
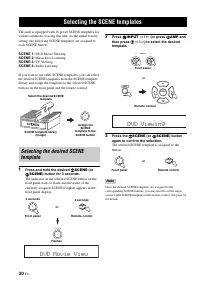
SELECTING THE SCENE TEMPLATES 30 En This unit is equipped with 16 preset SCENE templates for various situations of using this unit. As the initial factory setting, the following SCENE templates are assigned to each SCENE button: SCENE 1: DVD Movie Viewing SCENE 2: Music Disc Listening SCENE 3: TV Vi...
Page 33 - Which SCENE template would you like to select?
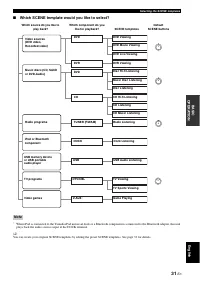
31 En Selecting the SCENE templates English BAS IC OPERA T ION ■ Which SCENE template would you like to select? * When iPod is connected to the Yamaha iPod universal dock or a Bluetooth component is connected to the Bluetooth adapter, this unit plays back the audio sources input at the DOCK terminal...
Page 34 - Preset SCENE templates descriptions
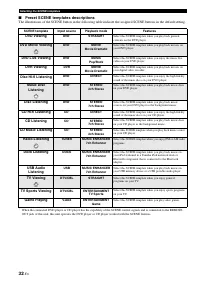
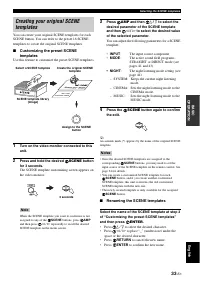
32 En Selecting the SCENE templates ■ Preset SCENE templates descriptions The illustrations of the SCENE button in the following table indicate the assigned SCENE buttons in the default setting. * When the connected DVD player or CD player has the capability of the SCENE control signals and is conne...
Page 35 - Renaming the SCENE templates
33 En Selecting the SCENE templates English BAS IC OPERA T ION You can create your original SCENE templates for each SCENE button. You can refer to the preset 16 SCENE templates to create the original SCENE templates. ■ Customizing the preset SCENE templates Use this feature to customize the preset ...
Page 36 - Press the desired; button on the; button and the; Using remote control on the SCENE feature
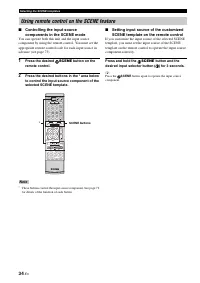
34 En Selecting the SCENE templates ■ Controlling the input source components in the SCENE mode You can operate both this unit and the input source component by using the remote control. You must set the appropriate remote control code for each input source in advance (see page 73). 1 Press the desi...
Page 37 - • Refer to the operating instructions for the source; A quick guide to contents; Playback; Basic operations; Movie Dramatic
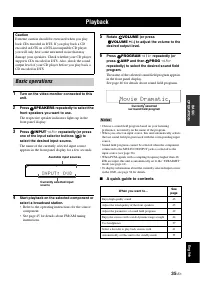
PLAYBACK 35 En English BAS IC OPERA T ION 1 Turn on the video monitor connected to this unit. 2 Press M SPEAKERS repeatedly to select the front speakers you want to use. The respective speaker indicators lights up in the front panel display. 3 Press R INPUT l / h repeatedly (or press one of the inpu...
Page 38 - “MULTI CH” appears in the front panel display.; AUTO
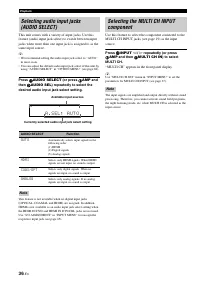
36 En Playback This unit comes with a variety of input jacks. Use this feature (audio input jack select) to switch between input jacks when more than one input jack is assigned to as the same input source. y • We recommend setting the audio input jack select to “AUTO” in most cases. • You can adjust...
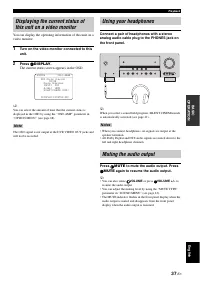
Page 39 - DISPLAY; to mute the audio output. Press; again to resume the audio output.; Using your headphones; Muting the audio output
37 En Playback English BAS IC OPERA T ION You can display the operating information of this unit on a video monitor. 1 Turn on the video monitor connected to this unit. 2 Press M DISPLAY . The current status screen appears in the OSD. y You can select the amount of time that the current status is di...
Page 40 - Audio information
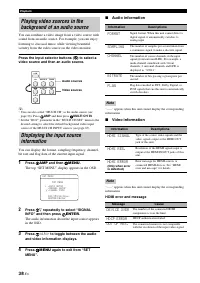
38 En Playback You can combine a video image from a video source with sound from an audio source. For example, you can enjoy listening to classical music while viewing beautiful scenery from the video source on the video monitor. Press the input selector buttons ( 4 ) to select a video source and th...
Page 41 - SLEEP; Each time you press; SLEEP; , the front panel display; Using the sleep timer
39 En Playback English BAS IC OPERA T ION Use this feature to automatically set the main zone to the standby mode after a certain amount of time. Press 4 AMP and then press R SLEEP repeatedly to set the amount of time. Each time you press R SLEEP , the front panel display changes as shown below. The...
Page 42 - PROGRAM; and; PROG; Sound field programs; Sound field program descriptions
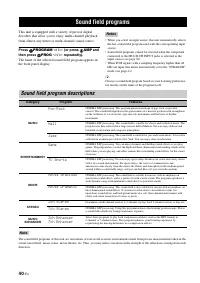
SOUND FIELD PROGRAMS 40 En This unit is equipped with a variety of precise digital decoders that allow you to enjoy multi-channel playback from almost any stereo or multi-channel sound source. Press O PROGRAM l / h (or press 4 AMP and then press A PROG l / h repeatedly). The name of the selected sou...
Page 43 - Pro Logic
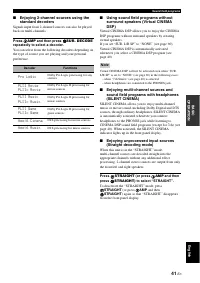
41 En Sound field programs English BAS IC OPERA T ION ■ Enjoying 2-channel sources using the standard decoders Signals input from 2-channel sources can also be played back on multi-channels. Press 4 AMP and then press O SUR. DECODE repeatedly to select a decoder. You can select from the following de...
Page 44 - Editing sound fields parameters; DSP LEVEL
42 En Sound field programs ■ Editing sound fields parameters You can enjoy good quality sound with the factory default parameters. Although you do not have to change the initial settings, you can change some of the parameters to better suit the input source or your listening room. 1 While listening ...
Page 45 - • Press; Using audio features; Enjoying high quality sound; Adjusting the tonal quality; Adjusting the speaker level
USING AUDIO FEATURES 43 En English BAS IC OPERA T ION Use the DIRECT mode to enjoy the high quality sounds of the selected source. When the DIRECT mode is activated, this unit plays back the selected source with the least circuitry. Press Q DIRECT (or press 4 AMP and then C DIRECT ) to select “ DIRE...
Page 46 - Selecting the night listening mode
44 En Using audio features The night listening modes are designed to improve listenability at lower volumes or at night. 1 Press 4 AMP and then P NIGHT repeatedly to select “NIGHT:CINEMA” or “NIGHT:MUSIC”. Choices: NIGHT:CINEMA, NIGHT:MUSIC, OFF• Select “NIGHT:CINEMA” when watching films to reduce t...
Page 47 - Automatic tuning; Manual tuning
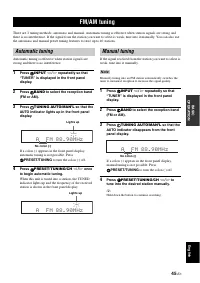
FM/AM TUNING 45 En English BAS IC OPERA T ION There are 2 tuning methods: automatic and manual. Automatic tuning is effective when station signals are strong and there is no interference. If the signal from the station you want to select is weak, tune into it manually. You can also use the automatic...
Page 48 - Automatic preset tuning; Manual preset tuning
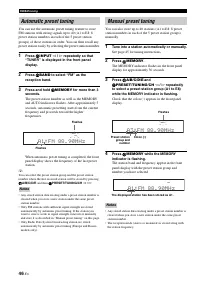
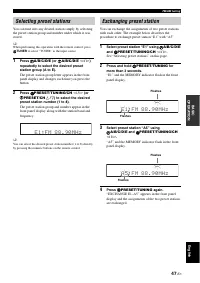
46 En FM/AM tuning You can use the automatic preset tuning feature to store FM stations with strong signals up to 40 (A1 to E8: 8 preset station numbers in each of the 5 preset station groups) of those stations in order. You can then recall any preset station easily by selecting the preset station n...
Page 49 - See “Selecting preset stations” on this page.; Selecting preset stations
47 En FM/AM tuning English BAS IC OPERA T ION You can tune into any desired station simply by selecting the preset station group and number under which it was stored. y When performing this operation with the remote control, press 4 TUNER to select “TUNER” as the input source. 1 Press F A/B/C/D/E (o...
Page 50 - INFO; on the remote control; Radio Data System tuning
RADIO DATA SYSTEM TUNING (EUROPE AND RUSSIA MODELS ONLY) 48 En Radio Data System is a data transmission system used by FM stations in many countries. This unit can receive various Radio Data System data such as PS (program service), PTY (program type), RT (radio text), CT (clock time), and EON (enha...
Page 51 - NEWS
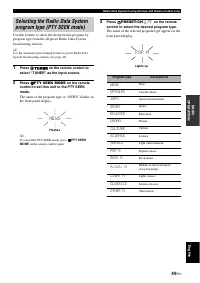
49 En Radio Data System tuning (Europe and Russia models only) English BAS IC OPERA T ION Use this feature to select the desired radio program by program type from the all preset Radio Data System broadcasting stations. y Use the automatic preset tuning feature to preset Radio Data System broadcasti...
Page 52 - PTY SEEK START; on the remote; EON; POP M; PTY HOLD
50 En Radio Data System tuning (Europe and Russia models only) 4 Press 0 PTY SEEK START on the remote control to start searching for all the available Radio Data System preset stations. The name of the selected program type flashes and the PTY HOLD indicator lights up in the front panel display whil...
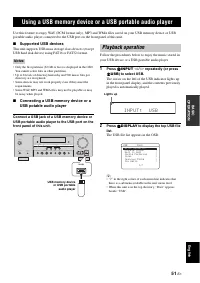
Page 53 - Supported USB devices; repeatedly (or press; to display the top USB file; The USB file list appears in the OSD.; Using a USB memory device or a USB portable audio player; Playback operation
USING A USB MEMORY DEVICE OR A USB PORTABLE AUDIO PLAYER 51 En English BAS IC OPERA T ION Use this feature to enjoy WAV (PCM format only), MP3 and WMA files saved on your USB memory device or USB portable audio player connected to the USB port on the front panel of this unit. ■ Supported USB devices...
Page 54 - to play the selected file.
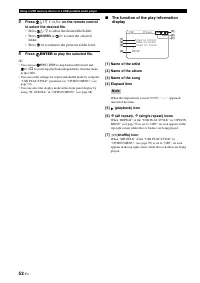
52 En Using a USB memory device or a USB portable audio player 3 Press 7 k / n / l / h on the remote control to select the desired file. • Press 7 k / n to select the desired file/folder. • Press 7 ENTER or 7 h to enter the selected folder. • Press 7 l to return to the previous folder level. 4 Press...
Page 55 - Remote control operation; Using iPodTM; Controlling iPodTM
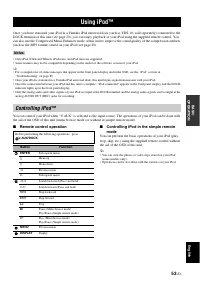
USING IPOD™ 53 En English BAS IC OPERA T ION Once you have stationed your iPod in a Yamaha iPod universal dock (such as YDS-10, sold separately) connected to the DOCK terminal of this unit (see page 20), you can enjoy playback of your iPod using the supplied remote control. You can also use the Comp...
Page 56 - FrankieZipper
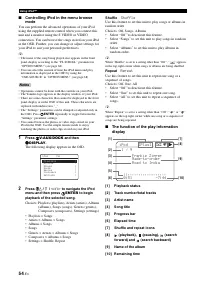
54 En Using iPod™ ■ Controlling iPod in the menu browse mode You can perform the advanced operations of your iPod using the supplied remote control when you connect this unit and a monitor using the S VIDEO or VIDEO connection. You can browse the songs stored on your iPod in the OSD. Further, you ca...
Page 57 - Pairing by using “SET MENU”; Using BluetoothTM components
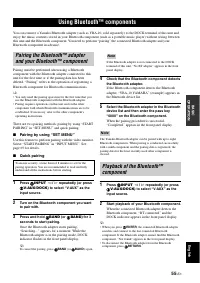
USING BLUETOOTH™ COMPONENTS 55 En English BAS IC OPERA T ION You can connect a Yamaha Bluetooth adapter (such as YBA-10, sold separately) to the DOCK terminal of this unit and enjoy the music contents stored in your Bluetooth component (such as a portable music player) without wiring between this un...
Page 58 - Turn on all the connected components.; Recording
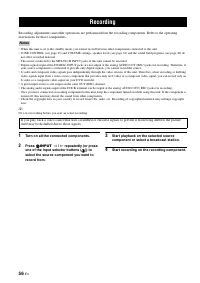
RECORDING 56 En Recording adjustments and other operations are performed from the recording components. Refer to the operating instructions for those components. • When this unit is set to the standby mode, you cannot record between other components connected to this unit.• TONE CONTROL (see page 43...
Page 59 - Auto setup; AUTO SETUP; Manual setup; MANUAL SETUP; Sound menu; SOUND MENU; Input menu; INPUT MENU
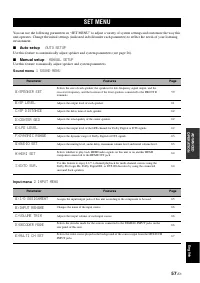
SET MENU 57 En English ADV ANCED OPERA T ION You can use the following parameters in “SET MENU” to adjust a variety of system settings and customize the way this unit operates. Change the initial settings (indicated in bold under each parameter) to reflect the needs of your listening environment. ■ ...
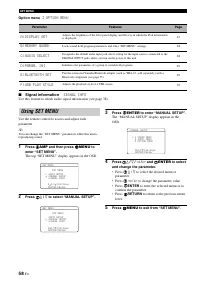
Page 60 - OPTION MENU; Signal information; SIGNAL INFO; Using SET MENU
58 En SET MENU Option menu 3 OPTION MENU ■ Signal information SIGNAL INFO Use this feature to check audio signal information (see page 38). Use the remote control to access and adjust each parameter. y You can change the “SET MENU” parameters while this unit is reproducing sound. 1 Press 4 AMP and t...
Page 61 - Speaker settings; Use this feature to manually adjust any speaker settings.; FRONT SP
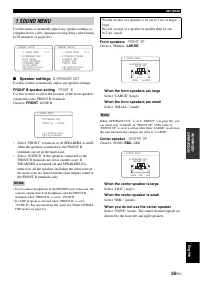
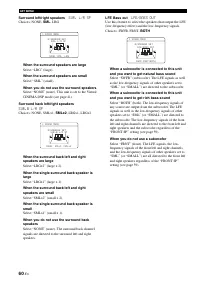
59 En SET MENU English ADV ANCED OPERA T ION Use this menu to manually adjust any speaker settings or compensate for video signal processing delays when using LCD monitors or projectors. ■ Speaker settings A)SPEAKER SET Use this feature to manually adjust any speaker settings. FRONT B speaker settin...
Page 63 - • Select “NORMAL” if you do not want to reverse the; Speaker level
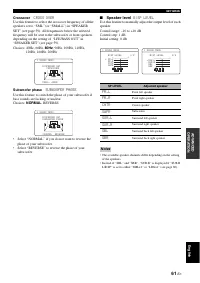
61 En SET MENU English ADV ANCED OPERA T ION Crossover CROSS OVER Use this feature to select the crossover frequency of all the speakers set to “SML” (or “SMALL”) in “SPEAKER SET” (see page 59). All frequencies below the selected frequency will be sent to the subwoofer or front speakers depending on...
Page 64 - Speaker distance
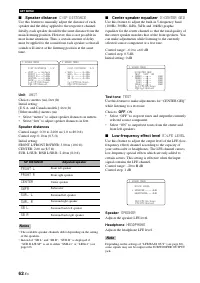
62 En SET MENU ■ Speaker distance C)SP DISTANCE Use this feature to manually adjust the distance of each speaker and the delay applied to the respective channel. Ideally, each speaker should be the same distance from the main listening position. However, this is not possible in most home situations....
Page 65 - Dynamic range; SPEAKER; Audio settings; MUTE TYPE
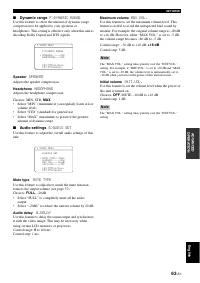
63 En SET MENU English ADV ANCED OPERA T ION ■ Dynamic range F)DYNAMIC RANGE Use this feature to select the amount of dynamic range compression to be applied to your speakers or headphones. This setting is effective only when this unit is decoding Dolby Digital and DTS signals. Speaker SPEAKER Adjus...
Page 66 - HDMI set; Support audio; Extended surround; Extended decoder select mode; • Select “AUTO” if you want this unit to automatically; Extended decoder specifying
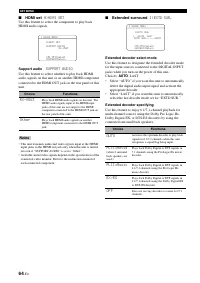
64 En SET MENU ■ HDMI set H)HDMI SET Use this feature to select the component to play back HDMI audio signals. Support audio SUPPORT AUDIO Use this feature to select whether to play back HDMI audio signals on this unit or on another HDMI component connected to the HDMI OUT jack on the rear panel of ...
Page 67 - Input and output assignment; the input selector buttons (
65 En SET MENU English ADV ANCED OPERA T ION Use this menu to reassign the input jacks, select the decoder mode or rename the input source. ■ Input and output assignment A)INPUT ASSIGNMENT Use this feature to assign the input jacks according to the component to be used if the initial settings of thi...
Page 68 - Input rename; MULTI CH IN; Volume trim
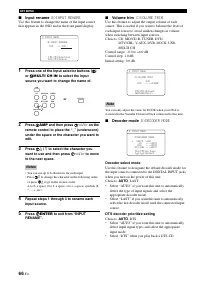
66 En SET MENU ■ Input rename B)INPUT RENAME Use this feature to change the name of the input source that appears in the OSD and in the front panel display. 1 Press one of the input selector buttons ( 3 ) or D MULTI CH IN to select the input source you want to change the name of. 2 Press 4 AMP and t...
Page 69 - Multi channel input setup; BGV; Display settings; DIMMER
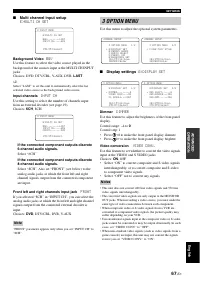
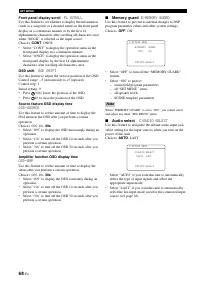
67 En SET MENU English ADV ANCED OPERA T ION ■ Multi channel input setup E)MULTI CH SET Background Video BGV Use this feature to select the video source played in the background of the sources input at the MULTI CH INPUT jacks.Choices: DVD, DTV/CBL, V-AUX, DVR, LAST y Select “LAST” to set this unit ...
Page 70 - FL SCROLL; Memory guard
68 En SET MENU Front panel display scroll FL SCROLL Use this feature to set whether to display the information (such as a song title or a channel name) in the front panel display in a continuous manner or by the first 14 alphanumeric characters after scrolling all characters once when “DOCK” is sele...
Page 71 - Parameter initialization; • Select “NO” to cancel the parameter initialization and; to set all the sound; Bluetooth setting; RETURN; to exit from “START
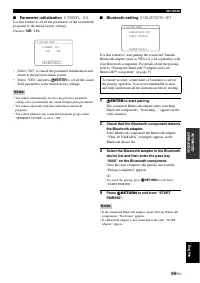
69 En SET MENU English ADV ANCED OPERA T ION ■ Parameter initialization D)PARAM. INI Use this feature to set all the parameters of the sound field programs to the initial factory settings.Choices: NO , YES • Select “NO” to cancel the parameter initialization and return to the previous menu screen. •...
Page 72 - USB playback styles; Repeat; REPEAT; SHUFFLE; OFF
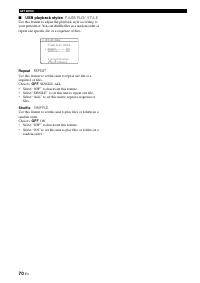
70 En SET MENU ■ USB playback styles F)USB PLAY STYLE Use this feature to adjust the playback style according to your preference. You can shuffle files in a random order or repeat one specific file or a sequence of files. Repeat REPEAT Use this feature to set this unit to repeat one file or a sequen...
Page 73 - Controlling this unit; to control this unit.; Controlling a TV; Remote control features; Controlling this unit, a TV, or other components
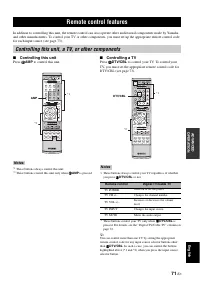
Remote control features 71 En English ADV ANCED OPERA T ION In addition to controlling this unit, the remote control can also operate other audiovisual components made by Yamaha and other manufacturers. To control your TV or other components, you must set up the appropriate remote control code for e...
Page 74 - Controlling other components; Press one of the input selector buttons (
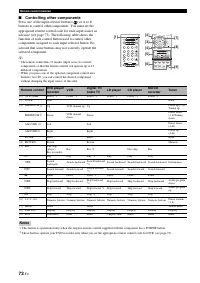
72 En Remote control features ■ Controlling other components Press one of the input selector buttons ( 3 ) or A to D buttons to control other components. You must set the appropriate remote control code for each input source in advance (see page 73). The following table shows the function of each co...
Page 75 - AV POWER; for more than 3; Setting remote control codes
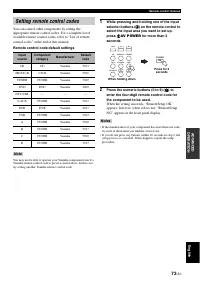
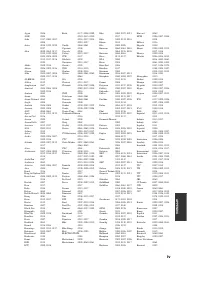
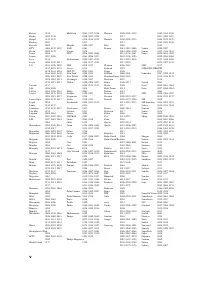
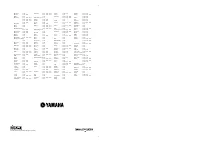
73 En Remote control features English ADV ANCED OPERA T ION You can control other components by setting the appropriate remote control codes. For a complete list of available remote control codes, refer to “List of remote control codes” at the end of this manual. Remote control code default settings...
Page 76 - • An amplifier and speakers in the second zone.; Using the external amplifier; Using multi-zone configuration; Connecting Zone 2
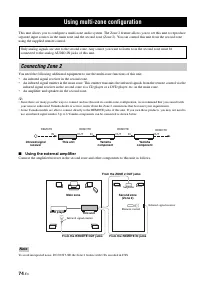
Using multi-zone configuration 74 En This unit allows you to configure a multi-zone audio system. The Zone 2 feature allows you to set this unit to reproduce separate input sources in the main zone and the second zone (Zone 2). You can control this unit from the second zone using the supplied remote...
Page 77 - • Enjoying music stored on your iPod stationed in a; Controlling Zone 2 with the front panel; Turning on Zone 2; Activating the Zone 2 operation mode; ZONE CONTROL; Controlling Zone 2
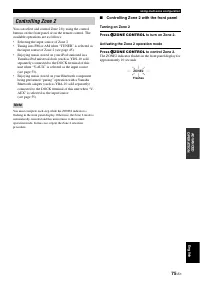
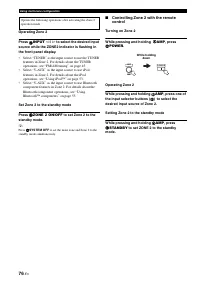
75 En Using multi-zone configuration English ADV ANCED OPERA T ION You can select and control Zone 2 by using the control buttons on the front panel or on the remote control. The available operations are as follows:• Selecting the input source of Zone 2.• Tuning into FM or AM when “TUNER” is selecte...
Page 78 - • Select “TUNER” as the input source to use the TUNER
76 En Using multi-zone configuration Operating Zone 2 Press R INPUT l / h to select the desired input source while the ZONE2 indicator is flashing in the front panel display. • Select “TUNER” as the input source to use the TUNER features in Zone 2. For details about the TUNER operations, see “FM/AM ...
Page 79 - Bi-amplifier setting; SCENE IR; Tuner frequency step; TU; Initializing; Advanced setup
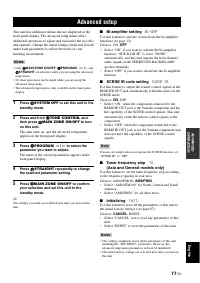
Advanced setup 77 En English ADV ANCED OPERA T ION This unit has additional menus that are displayed in the front panel display. The advanced setup menu offers additional operations to adjust and customize the way this unit operates. Change the initial settings (indicated in bold under each paramete...
Page 80 - General; Troubleshooting
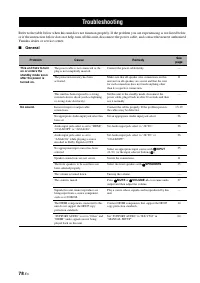
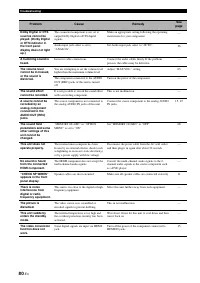
Troubleshooting 78 En Refer to the table below when this unit does not function properly. If the problem you are experiencing is not listed below or if the instruction below does not help, turn off this unit, disconnect the power cable, and contact the nearest authorized Yamaha dealer or service cen...
Page 83 - Tuner
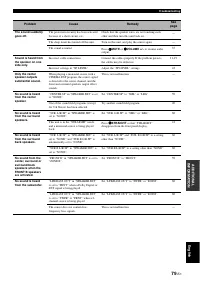
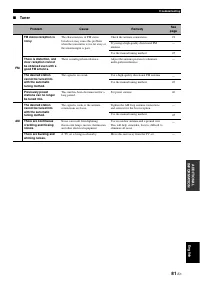
81 En Troubleshooting English AD DITIONAL INFO RM A T ION ■ Tuner Problem Cause Remedy See page FM FM stereo reception is noisy. The characteristics of FM stereo broadcasts may cause this problem when the transmitter is too far away or the antenna input is poor. Check the antenna connections. 21 Try...
Page 84 - Before AUTO SETUP
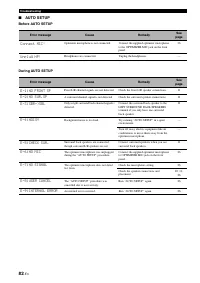
82 En Troubleshooting ■ AUTO SETUP Before AUTO SETUP During AUTO SETUP Error message Cause Remedy See page Connect MIC! Optimizer microphone is not connected. Connect the supplied optimizer microphone to the OPTIMIZER MIC jack on the front panel. 26 Unplug HP! Headphones are connected. Unplug the he...
Page 85 - After AUTO SETUP
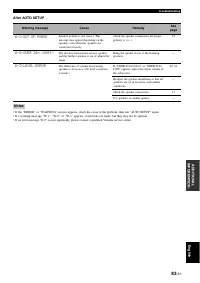
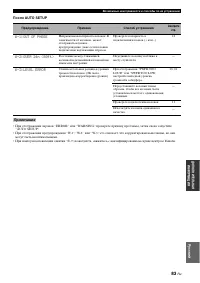
83 En Troubleshooting English AD DITIONAL INFO RM A T ION After AUTO SETUP • If the “ERROR” or “WARNING” screens appears, check the cause of the problem, then run “AUTO SETUP” again.• If a warning message “W-1”, “W-2”, or “W-3” appears, corrections are made, but they may not be optimal.• If an error...
Page 86 - Disconnected
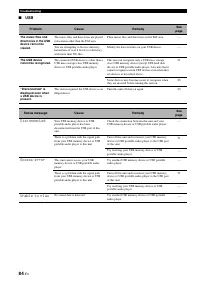
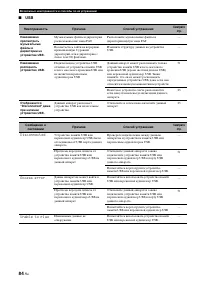
84 En Troubleshooting ■ USB Problem Cause Remedy See page The music files and directories in the USB device cannot be viewed. The music files and directories are placed in locations other than the FAT area. Place music files and directories in the FAT area. — You are attempting to browse directory h...
Page 87 - iPod; Connect error; Unknown iPod
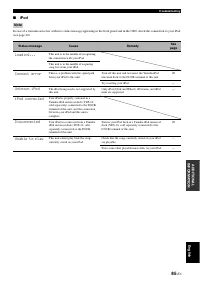
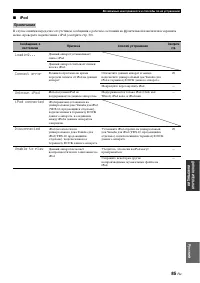
85 En Troubleshooting English AD DITIONAL INFO RM A T ION ■ iPod In case of a transmission error without a status message appearing in the front panel and in the OSD, check the connection to your iPod (see page 20). Note Status message Cause Remedy See page Loading... This unit is in the middle of r...
Page 88 - Bluetooth
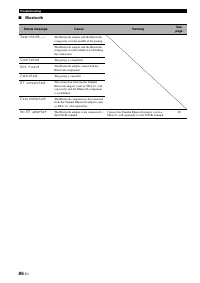
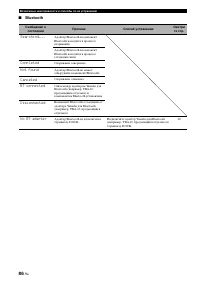
86 En Troubleshooting ■ Bluetooth Status message Cause Remedy See page Searching... The Bluetooth adapter and the Bluetooth component is in the middle of the pairing. The Bluetooth adapter and the Bluetooth component is in the middle of establishing the connection. Completed The paring is completed....
Page 90 - and P; Glossary
Glossary 88 En ■ Bi-amplification connection A bi-amplification connection uses two amplifiers for a speaker. One amplifier is connected to the woofer section of a loudspeaker while the other is connected to the combined mid and tweeter section. With this arrangement each amplifier operates over a r...
Page 91 - Dolby Surround
89 En Glossary English AD DITIONAL INFO RM A T ION ■ Dolby Surround Dolby Surround uses a 4-channel analog recording system to reproduce realistic and dynamic sound effects: 2 front left and right channels (stereo), a center channel for dialog (monaural), and a surround channel for special sound eff...
Page 92 - SILENT CINEMA
90 En Glossary ■ Sampling frequency and number of quantized bits When digitizing an analog audio signal, the number of times the signal is sampled per second is called the sampling frequency, while the degree of fineness when converting the sound level into a numeric value is called the number of qu...
Page 93 - AUDIO SECTION; Specifications
Specifications 91 En English AD DITIONAL INFO RM A T ION AUDIO SECTION • Minimum RMS Output Power for Front, Center, Surround, Surround Back [U.S.A. and Canada models] 1 kHz, 0.9% THD, 8 Ω ...................................................... 90 W [Other models] 1 kHz, 0.9% THD, 6 Ω ..................
Page 94 - Numerics; Index
INDEX 92 En ■ Numerics 1 SOUND MENU, Manual setup ........ 57 2 INPUT MENU, Manual setup .......... 57 2ch Enhancer, Sound field program .... 40 2ch Stereo, Sound field program ......... 40 3 OPTION MENU ............................... 67 3 OPTION MENU, Manual setup ....... 58 7ch Enhancer, Sound fi...
Page 97 - Eng
95 En Eng lish Limited Guarantee for European Economic Area (EEA) and Switzerland Thank you for having chosen a Yamaha product. In the unlikely event that your Yamaha product needs guarantee service, please contact the dealer from whom it was purchased. If you experience any difficulty, please conta...
Page 98 - Предупреждение: Внимательно изучите это перед; ПРЕДУПРЕЖДЕНИЕ
Ru 1 Для обеспечения наилучшего результата, пожалуйста, внимательно изучите данную инструкцию. Храните ее в безопасном месте для будущих справок. 2 Данную систему следует устанавливать в хорошо проветриваемых, прохладных, сухих, чистых местах, не подвергающихся прямому воздействию солнечных лучей, в...
Page 99 - APPE; Оптимизация настройки колонок для; в конце данного руководства; Содер жание; ВВЕДЕНИЕ; О данном руководстве
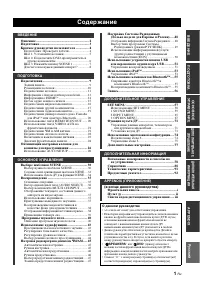
1 Ru ПОДГ О Т ОВК А ВВЕДЕНИ Е ОСНОВН ОЕ УПР АВЛЕНИЕ ДОПОЛНИ ТЕЛЬНО Е УП РА ВЛЕН ИЕ ДОПОЛНИ ТЕЛЬНА Я И Н Ф О РМАЦИЯ Русс кий APPE NDIX Описание ................................................................ 2Подготовка ............................................................ 3Краткое руководств...
Page 100 - iPodTM; Описание
Îïèñàíèå 2 Ru Встроенный 7-канальный усилитель мощности ◆ Минимальное среднеквадратическое выходное напряжение [Модели для США и Канады] (1 кГц, 0,9% ОНИ, 8 Ω ) 90 Ватт/канал [Другие модели] (1 кГц, 0,9% ОНИ, 6 Ω ) 90 Ватт/канал Функция выбора SCENE ◆ Предустановленные шаблоны SCENE для различных си...
Page 101 - кий; Поставляемые аксессуары; Убедитесь в наличии всех следующих деталей.; Установка батареек в пульт ДУ; Подготовка; Общая модель; Примечания
Ïîäãîòîâêà 3 Ru Русс кий ВВЕДЕНИ Е ■ Поставляемые аксессуары Убедитесь в наличии всех следующих деталей. ❏ Пульт ДУ ❏ Батарейки (2) (AAA, R03, UM-4) ❏ Микрофон оптимизатора ❏ Рамочная АМ антенна ❏ Внутренняя ЧМ антенна ■ VOLTAGE SELECTOR (Только модель для Азии и общая модель) ■ Установка батареек в...
Page 102 - Подготовьте следующие детали.; Колонки; Выберите монофонический RCA кабель.; Краткое руководство пользователя; Наслаждайтесь просмотром
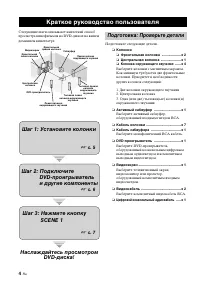
Êðàòêîå ðóêîâîäñòâî ïîëüçîâàòåëÿ 4 Ru Следующие шаги описывают наилегкий способ просмотра кинофильмов на DVD-дисках на вашем домашнем кинотеатре. Подготовьте следующие детали. ❏ Колонки ❏ Фронтальная колонка ....................х 2 ❏ Центральная колонка ..................... x 1 ❏ Колонка окружающег...
Page 103 - Шаг 1: Установите колонки
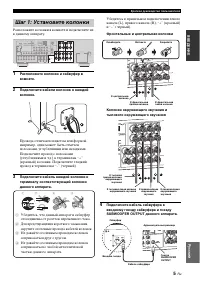
Краткое руководство пользователя 5 Ru Русс кий ВВЕДЕНИ Е Расположите колонки в комнате и подключите их к данному аппарату. 1 Расположите колонки и сабвуфер в комнате. 2 Подключите кабели колонок к каждой колонке. Провода отличаются цветом или формой, например, один может быть отмечен полосками, углу...
Page 104 - Дополнительные подключения
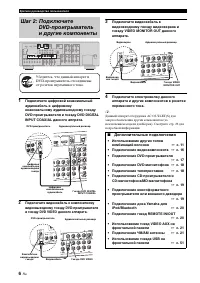
Краткое руководство пользователя 6 Ru 1 Подключите цифровой коаксиальный аудиокабель к цифровому коаксиальному аудиовыходному гнезду DVD-проигрывателя и гнезду DVD DIGITAL INPUT COAXIAL данного аппрата. 2 Подключите видеокабель к композитному видеовыходному гнезду DVD-проигрывателя и гнезду DVD VIDE...
Page 105 - Поворачивайте; для; О функции SCENE; Шаг 3: Нажмите кнопку; Примечание
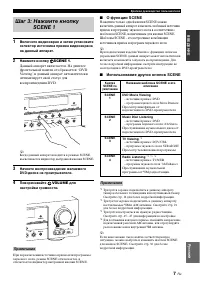
Краткое руководство пользователя 7 Ru Русс кий ВВЕДЕНИ Е 1 Включите видеоэкран и затем установите селектор источника приема видеоэкрана на данный аппарат. 2 Нажмите кнопку T SCENE 1 . Данный аппарат включается. На дисплее фронтальной панели отображается “DVD Viewing”, и данный аппарат автоматически ...
Page 106 - Настройка шаблонов SCENE
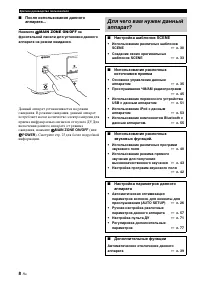
Краткое руководство пользователя 8 Ru ■ После использования данного аппарата... Нажмите A MAIN ZONE ON/OFF на фронтальной панели для установки данного аппарата на режим ожидания. Данный аппарат устанавливается на режим ожидания. В режиме ожидания, данный аппарат потребляет малое количество электроэн...
Page 107 - Подключения; Задняя панель
Ïîäêëþ÷åíèÿ 9 Ru Русс кий ПОДГ О Т ОВК А Подключения Задняя панель L R SURROUND L R FRONT B L R FRONT A CENTER L R SURROUND BACK/BI-AMP SINGLE SWITCHED MONITOR OUT L R DTV/CBL DVR DVD MD/ CD-R OUT (REC) IN (PLAY) OUT IN DTV/CBL DVR DVD OUT OUT +12V 15mA MAX. IN IN MONITOR OUT DTV/CBL DVR DVD OUT S V...
Page 108 - Фронтальные левая и правая колонки (FL и; Размещение колонок
10 Ru Подключения На схеме ниже отображено рекомендуемое расположение колонок. Данное расположение позволяет прослушивать сигналы CINEMA DSP и многоканальные аудиоисточники. Фронтальные левая и правая колонки (FL и FR ) Фронтальные колонки предназначены для воспроизведения основного исходящего звуча...
Page 109 - Подключение колонок; Предупреждение
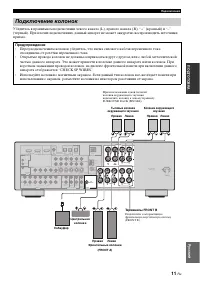
11 Ru Подключения Русс кий ПОДГ О Т ОВК А Убедитесь в правильном подключении левого канала (L), правого канала (R), “+” (красный) и “–” (черный). При плохих подключениях, данный аппарат не может аккуратно воспроизводить источники приема. Подключение колонок Предупреждение • Перед подключением колоно...
Page 110 - Подключение к терминалам FRONT A; Закрутите головку для закрепления провода.
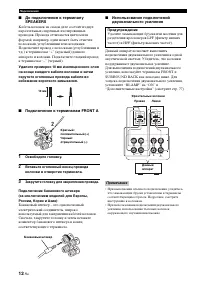
12 Ru Подключения ■ До подключения к терминалу SPEAKERS Кабель колонок на самом деле состоит из двух параллельных спаренных изолированных проводов. Провода отличаются цветом или формой, например, один может быть отмечен полосками, углублениями или складками. Подключите провод с полосками (углубления...
Page 111 - Аудиогнезда; Для компонентных сигналов, разделенных на; Информация о гнездах и штекерах кабелей
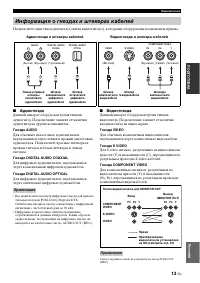
13 Ru Подключения Русс кий ПОДГ О Т ОВК А Подключите один тип аудиогнезд(а) и/или видеогнезд(а), которыми оборудованы компоненты приема. ■ Аудиогнезда Данный аппарат оборудован тремя типами аудиогнезд. Подключение зависит от наличия аудиогнезд на других компонентах. Гнезда AUDIO Для обычных аналогов...
Page 112 - Гнездо и штекер кабеля HDMI; Информация о HDMITM
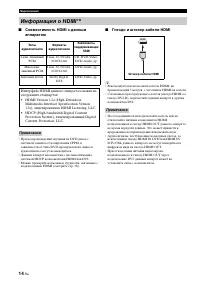
14 Ru Подключения ■ Совместимость HDMI с данным аппаратом • При воспроизведении звучания на DVD-диске с системой защиты от копирования CPPM, в зависимости от типа DVD-проигрывателя, видео и аудиосигналы могут не выводиться. • Данный аппарат несовместим с несовместимыми с системой HDCP компонентами H...
Page 113 - Поток аудиосигнала; Поток аудио и видео сигнала
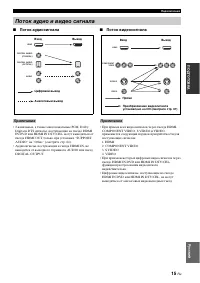
15 Ru Подключения Русс кий ПОДГ О Т ОВК А ■ Поток аудиосигнала • 2-канальные, а также многоканальные РСМ, Dolby Digital и DTS сигналы, поступающие на гнездо HDMI IN DVD или HDMI IN DTV/CBL, могут выводиться от гнезда HDMI OUT только при установке “SUPPORT AUDIO” на “Other” (смотрите стр. 64). • Ауди...
Page 114 - Подключение видеокомпонентов
16 Ru Подключения Подключите телевизор (или проектор) к гнезду HDMI OUT, гнездам COMPONENT VIDEO MONITOR OUT, гнезду S VIDEO MONITOR OUT или гнезду VIDEO MONITOR OUT данного аппарата. y Можно выбрать воспроизведение аудиосигналов HDMI на данном аппарате или на другом компоненте HDMI, подключенном к ...
Page 115 - Подключение DVD-проигрывателя; Подключение других компонентов
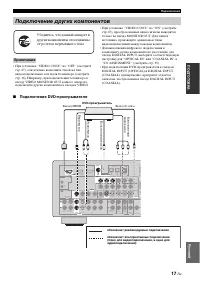
17 Ru Подключения Русс кий ПОДГ О Т ОВК А • При установке “VIDEO CONV.” на “OFF” (смотрите стр. 67), обязательно выполните такой же тип видеоподключения, как и для телевизора (смотрите стр. 16). Например, при подключении телевизора к гнезду VIDEO MONITOR OUT данного аппарата, подключите другие компо...
Page 116 - Подключение телеприставки
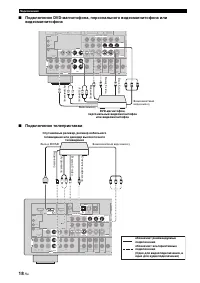
18 Ru Подключения ■ Подключение DVD-магнитофона, персонального видеомагнитофона или видеомагнитофона ■ Подключение телеприставки MONITOR OUT L R DTV/CBL DVR DVD MD/ CD-R OUT (REC) IN (PLAY) OUT IN DTV/CBL DVR DVD OUT OUT +12V 15mA MAX. IN IN MONITOR OUT DTV/CBL DVR DVD OUT S VIDEO IN CD L R SUB WOOF...
Page 117 - Подключите аудиокомпонент следующим образом.; Подключение аудиокомпонентов
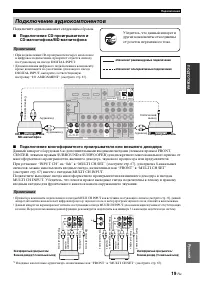
19 Ru Подключения Русс кий ПОДГ О Т ОВК А Подключите аудиокомпонент следующим образом. ■ Подключение CD-проигрывателя и CD-магнитофона/MD-магнитофона • При подключении CD-проигрывателя через аналоговое и цифровое подключение, приоритет отдается сигналу, поступающему на гнездо DIGITAL INPUT. • Для вы...
Page 121 - Включение данного аппарата; Для включения данного аппарата, нажмите; Нажмите; ) для установки данного
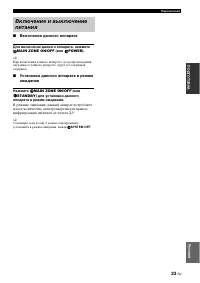
23 Ru Подключения Русс кий ПОДГ О Т ОВК А ■ Включение данного аппарата Для включения данного аппарата, нажмите A MAIN ZONE ON/OFF (или G POWER ). y При включении данного аппарата, до воспроизведения звучания от данного аппарата, будет 4-5-секундная задержка. ■ Установка данного аппарата в режим ожид...
Page 122 - Дисплей фронтальной панели
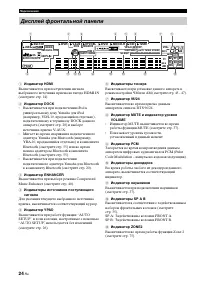
24 Ru Подключения 1 Индикатор HDMI Высвечивается при поступлении сигнала выбранного источника приема на гнезда HDMI IN (смотрите стр. 14). 2 Индикатор DOCK • Высвечивается при подключении iPod к универсальному доку Yamaha для iPod (например, YDS-10, продающийся отдельно), подключенному к терминалу D...
Page 123 - Использование пульта ДУ
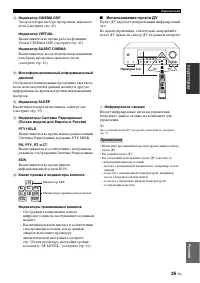
25 Ru Подключения Русс кий ПОДГ О Т ОВК А D Индикатор CINEMA DSP Загорается при выборе программы звукового поля (смотрите стр. 41). Индикатор VIRTUAL Высвечивается во время работы функции Virtual CINEMA DSP (смотрите стр. 41). Индикатор SILENT CINEMA Высвечивается, когда подключены наушники и выбран...
Page 124 - Проверьте следующие пункты.; Колонки правильно подключены.; Оптимизация настройки колонок для комнаты для; Использование AUTO SETUP
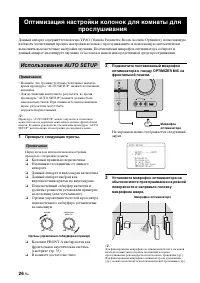
Îïòèìèçàöèÿ íàñòðîéêè êîëîíîê äëÿ êîìíàòû äëÿ ïðîñëóøèâàíèÿ 26 Ru Данный аппарат содержит технологию YPAO (Yamaha Parametric Room Acoustic Optimizer), позволяющую избежать хлопотливый процесс настройки колонок с прослушиванием, и помогающую автоматически выполнить высокоточные настройки звучания. По...
Page 126 - Дисплей переключается следующим образом.
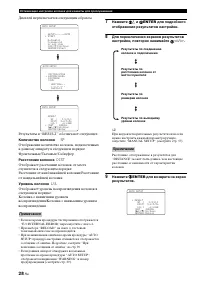
28 Ru Оптимизация настройки колонок для комнаты для прослушивания Дисплей переключается следующим образом. Результаты в “RESULT” обозначают следующее. Количество колонок SP Отображение количества колонок, подключенных к данному аппарату в следующем порядке:Фронтальные/Тыловые/Сабвуфер Расстояние кол...
Page 127 - При появлении сообщения об ошибке; RETRY; При отображении “WARNING”
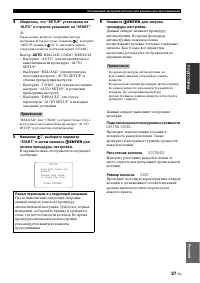
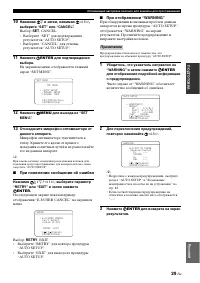
29 Ru Оптимизация настройки колонок для комнаты для прослушивания Русс кий ПОДГ О Т ОВК А 10 Нажимая 7 n и затем, нажимая 7 l / h , выберите “SET” или “CANCEL”. Выбор: SET , CANCEL • Выберите “SET” для подтверждения результатов “AUTO SETUP”. • Выберите “CANCEL” для отмены результатов “AUTO SETUP”. 1...
Page 128 - Нажимая; Выборе шаблонов SCENE; Выбор нужного шаблона SCENE
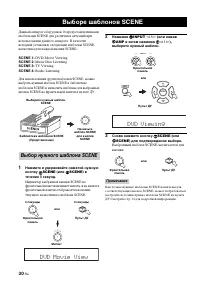
ÂÛÁÎÐÅ ØÀÁËÎÍÎÂ SCENE 30 Ru Данный аппарат оборудован 16 предустановленными шаблонами SCENE для различных ситуаций при использовании данного аппарата. В качестве исходной установки, следующие шаблоны SCENE назначены для каждой кнопки SCENE: SCENE 1: DVD Movie Viewing SCENE 2: Music Disc Listening SC...
Page 129 - Какой шаблон SCENE хотите выбрать?
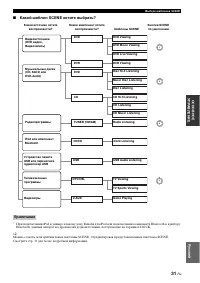
31 Ru Выборе шаблонов SCENE Русс кий ОСНОВН ОЕ УПР АВЛЕНИЕ ■ Какой шаблон SCENE хотите выбрать? * При подключении iPod к универсальному доку Yamaha для iPod или подключении компонента Bluetooth к адаптеру Bluetooth, данный аппарат воспроизводит аудиоисточники, поступающие на терминал DOCK. y Можно с...
Page 130 - Описание предустановленных шаблонов SCENE
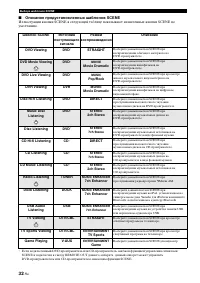
32 Ru Выборе шаблонов SCENE ■ Описание предустановленных шаблонов SCENE Иллюстрации кнопки SCENE в следующей таблице показывают назначенные кнопки SCENE по умолчанию. * Если подключенный DVD-проигрыватель или CD-проигрыватель снабжен функцией управления сигналами SCENE и подключен к гнезду REMOTE OU...
Page 131 - Переименование шаблонов SCENE
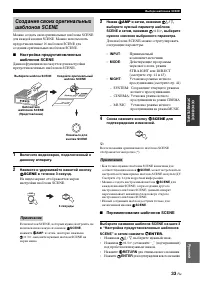
33 Ru Выборе шаблонов SCENE Русс кий ОСНОВН ОЕ УПР АВЛЕНИЕ Можно создать свои оригинальные шаблоны SCENE для каждой кнопки SCENE. Можно использовать предустановленные 16 шаблонов SCENE для создания оригинальных шаблонов SCENE. ■ Настройка предустановленных шаблонов SCENE Данная функция используется ...
Page 132 - Нажмите нужную кнопку; на; нужную селекторную кнопку источника (; Использование пульта ДУ для функции SCENE
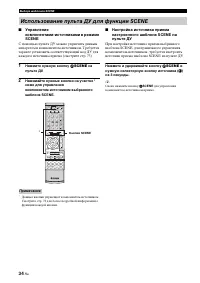
34 Ru Выборе шаблонов SCENE ■ Управление компонентами-источниками в режиме SCENE С помощью пульта ДУ можно управлять данным аппаратом и компонентом-источником. Требуется заранее установить соответствующий код ДУ для каждого источника приема (смотрите стр. 73). 1 Нажмите нужную кнопку 5 SCENE на пуль...
Page 133 - Краткий справочник по содержанию; Воспроизведение; Основные операции
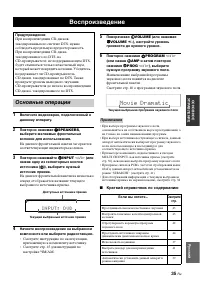
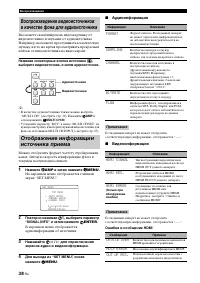
ÂÎÑÏÐÎÈÇÂÅÄÅÍÈÅ 35 Ru Русс кий ОСНОВН ОЕ УПР АВЛЕНИЕ 1 Включите видеоэкран, подключенный к данному аппарату. 2 Повторно нажимая M SPEAKERS , выберите желаемые фронтальные колонки для использования. На дисплее фронтальной панели загораются соответствующие индикаторы колонок. 3 Повторно нажимайте R IN...
Page 135 - для приглушения вывода; Использование наушников
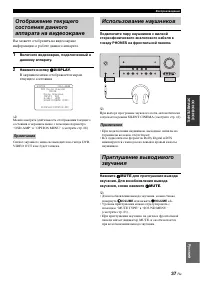
37 Ru Воспроизведение Русс кий ОСНОВН ОЕ УПР АВЛЕНИЕ Вы можете отобразить на видеоэкране информацию о работе данного аппарата. 1 Включите видеоэкран, подключенный к данному аппарату. 2 Нажмите кнопку M DISPLAY . В экранном меню отображается экран текущего состояния. y Можно выбрать длительность отоб...
Page 136 - Аудиоинформация
38 Ru Воспроизведение Вы можете скомбинировать видеокартинку от видеоисточника и звучание от аудиоисточника. Например, вы можете прослушивать классическую музыку, и в то же время просматривать прекрасный пейзаж от видеоисточника на видеоэкране. Нажимая селекторные кнопки источника ( 4 ), выберите ви...
Page 137 - Применение таймера сна
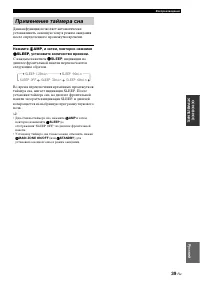
39 Ru Воспроизведение Русс кий ОСНОВН ОЕ УПР АВЛЕНИЕ Данная функция позволяет автоматически устанавливать основную зону в режим ожидания после определенного промежутка времени. Нажмите 4 AMP , и затем, повторно нажимая R SLEEP , установите количество времени. С каждым нажатием R SLEEP , индикации на...
Page 138 - и затем повторно нажимайте; Программы звукового поля; Описание программ звукового поля
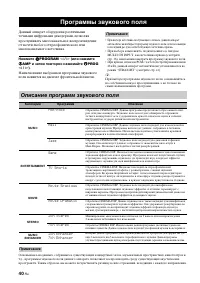
ÏÐÎÃÐÀÌÌÛ ÇÂÓÊÎÂÎÃÎ ÏÎËŸ 40 Ru Данный аппарат оборудован различными точными цифровыми декодерами, позволяя прослушивать многоканальное воспроизведение от почти любого стереофонического или многоканального источника. Нажмите O PROGRAM l / h (или нажмите 4 AMP и затем повторно нажимайте A PROG l / h )...
Page 140 - MID; EFFECT LEVEL; DIMENSION
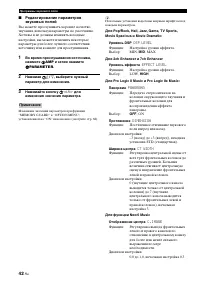
42 Ru Программы звукового поля ■ Редактирование параметров звуковых полей Вы можете прослушивать хорошее качество звучания, используя параметры по умолчанию. Хотя вы и не должны изменять исходные настройки, вы можете изменить некоторые параметры для более лучшего соответствия источнику или комнате д...
Page 141 - Для увеличения значения, нажимайте; Использование аудиофункций
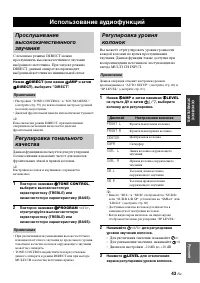
ÈÑÏÎËÜÇÎÂÀÍÈÅ ÀÓÄÈÎÔÓÍÊÖÈÉ 43 Ru Русс кий ОСНОВН ОЕ УПР АВЛЕНИЕ С помощью режима DIRECT можно прослушивать высококачественное звучание выбранного источника. При запуске режима DIRECT, данный аппарат воспроизводит выбранный источник на минимальной схеме. Нажав Q DIRECT (или нажав 4 AMP и затем C DIRE...
Page 142 - Нажав; , и затем повторно нажимая; NIGHT; Для настройки уровня эффекта, нажимайте; Выберите “MIN” для минимального сжатия.
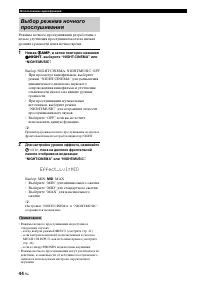
44 Ru Использование аудиофункций Режимы ночного прослушивания разработаны с целью улучшения прослушиваемости на низких уровнях громкости или в ночное время. 1 Нажав 4 AMP , и затем повторно нажимая P NIGHT , выберите “NIGHT:CINEMA” или “NIGHT:MUSIC”. Выбор: NIGHT:CINEMA, NIGHT:MUSIC, OFF • При просм...
Page 143 - Настройка радиопрограмм диапазона ЧМ/AM; Автоматическая настройка; Ручная настройка
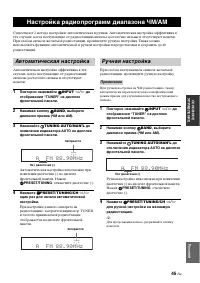
ÍÀÑÒÐÎÉÊÀ ÐÀÄÈÎÏÐÎÃÐÀÌÌ ÄÈÀÏÀÇÎÍÀ ×Ì/AM 45 Ru Русс кий ОСНОВН ОЕ УПР АВЛЕНИЕ Существуют 2 метода настройки: автоматическая и ручная. Автоматическая настройка эффективна в тех случаях, когда поступающие от радиостанций сигналы достаточно сильны и отсутствуют помехи. При слабом сигнале желаемой радиос...
Page 144 - Автоматическая предустановка; Ручная предустановка
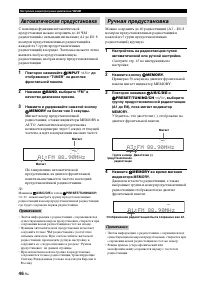
46 Ru Настройка радиопрограмм диапазона ЧМ/AM С помощью функции автоматической предустановки можно сохранить до 40 ЧМ радиостанций с сильными сигналами (А1 до Е8: 8 номеров предустановленных радиостанций в каждой из 5 групп предустановленных радиостанций) в порядке. Затем вы сможете легко вызвать лю...
Page 145 - Повторно нажимая
47 Ru Настройка радиопрограмм диапазона ЧМ/AM Русс кий ОСНОВН ОЕ УПР АВЛЕНИЕ Вы можете легко настроиться на любую желаемую радиостанцию, выбрав группу и номер предустановленной радиостанции, под которым она была сохранена. y При выполнении данной операции от пульта ДУ, нажав кнопку 4 TUNER , выберит...
Page 146 - Настройка Системы Радиоданных
ÍÀÑÒÐÎÉÊÀ ÑÈÑÒÅÌÛ ÐÀÄÈÎÄÀÍÍÛÕ (ÒÎËÜÊÎ ÌÎÄÅËÈ ÄËŸ ÅÂÐÎÏÛ È ÐÎÑÑÈÈ) 48 Ru Система Радиоданных – это система передачи информации, используемая ЧМ радиостанциями многих стран. При приеме радиостанций Системы Радиоданных, данный аппарат может принимать различную информацию Системы Радиоданных, как PS (на...
Page 148 - PTY
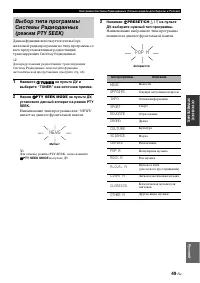
50 Ru Настройка Системы Радиоданных (Только модели для Европы и России) 4 Для начала поиска всех предустановленных радиостанций Системы Радиоданных, нажмите 0 PTY SEEK START на пульте ДУ. Во время поиска радиостанций данным аппаратом, на дисплее фронтальной панели мигает название выбранного типа про...
Page 149 - Поддерживаемые устройства USB; нажав; для отображения; Использование устройства памяти USB или
ÈÑÏÎËÜÇÎÂÀÍÈÅ ÓÑÒÐÎÉÑÒÂÀ ÏÀÌŸÒÈ USB ÈËÈ ÏÅÐÅÍÎÑÍÎÃÎ ÀÓÄÈÎÏËÅÅÐÀ USB 51 Ru Русс кий ОСНОВН ОЕ УПР АВЛЕНИЕ Данная функция используется для прослушивания файлов WAV (только формат PCM), MP3 и WMA, сохраненных на устройстве памяти USB или переносном аудиоплеере USB, подключенном к порту USB на фронтальн...
Page 150 - или; для воспроизведения
52 Ru Использование устройства памяти USB или переносного аудиоплеера USB 3 Нажимая 7 k / n / l / h на пульте ДУ, выберите нужный файл. • Нажимая 7 k / n , выберите нужный файл/папку. • Нажав 7 ENTER или 7 h , войдите в выбранную папку. • Для возврата на предыдущий уровень папки, нажмите 7 l . 4 Наж...
Page 151 - Управление от пульта ДУ; Использование iPodTM; Управление iPodTM
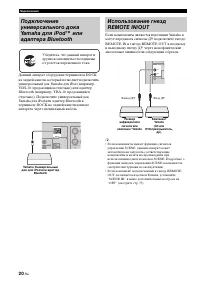
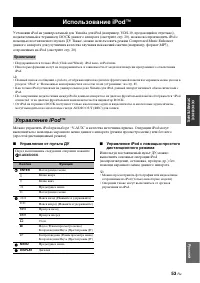
ÈÑÏÎËÜÇÎÂÀÍÈÅ IPOD™ 53 Ru Русс кий ОСНОВН ОЕ УПР АВЛЕНИЕ Установив iPod на универсальный док Yamaha для iPod (например, YDS-10, продающийся отдельно), подключенный к терминалу DOCK данного аппарата (смотрите стр. 20), можно воспроизводить iPod с помощью поставляемого пульта ДУ. Также, можно использо...
Page 152 - Управление iPod в режиме просмотра меню
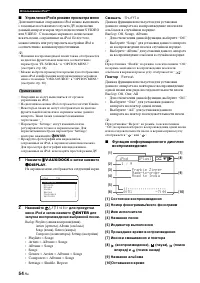
54 Ru Использование iPod™ ■ Управление iPod в режиме просмотра меню Дополнительные операции на iPod можно выполнять с помощью поставляемого пульта ДУ, подключив данный аппарат и экран через подключение S VIDEO или VIDEO. С помощью экранного меню можно искать песни, сохраненные на iPod. Более того, м...
Page 153 - Спаривание с помощью “SET MENU”; Использование компонентов BluetoothTM
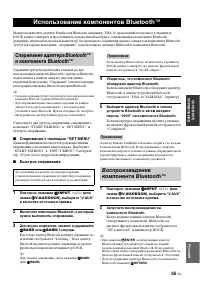
ÈÑÏÎËÜÇÎÂÀÍÈÅ ÊÎÌÏÎÍÅÍÒÎÂ BLUETOOTH™ 55 Ru Русс кий ОСНОВН ОЕ УПР АВЛЕНИЕ Можно подключить адаптер Yamaha для Bluetooth (например, YBA-10, продающийся отдельно) к терминалу DOCK данного аппарата и прослушивать музыкальный материал, сохраненный на компоненте Bluetooth (например, переносной музыкальны...
Page 154 - Запись
ÇÀÏÈÑÜ 56 Ru Настройки записи и другие операции выполняются на компонентах записи. Смотрите инструкции по эксплуатации, приложенные к таким компонентам. • Когда данный аппарат находится в режиме ожидания, запись между компонентами, подключенными к данному аппарату, невозможна. • Настройки TONE CONTR...
Page 155 - Звуковое меню; Меню приема
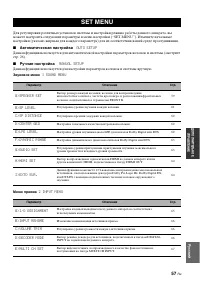
SET MENU 57 Ru Русс кий ДОПОЛНИ ТЕЛЬНО Е УП РА ВЛЕН ИЕ Для регулировки различных установок системы и настройки режима работы данного аппарата, вы можете настроить следующие параметры в меню настройки (“SET MENU”). Измените начальные настройки (указано жирным для каждого параметра) для их соответстви...
Page 156 - Информация сигнала; Использование SET MENU
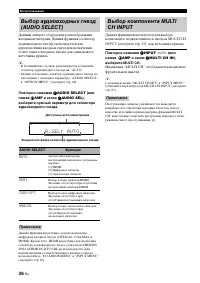
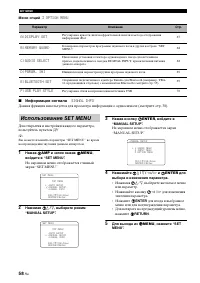
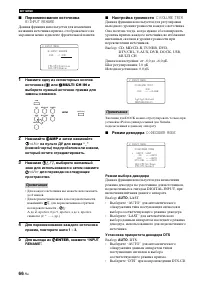
58 Ru SET MENU Меню опций 3 OPTION MENU ■ Информация сигнала SIGNAL INFO Данная функция используется для просмотра информации о аудиосигнале (смотрите стр. 38). Для открытия и настройки каждого параметра, пользуйтесь пультом ДУ. y Вы можете изменить параметры “SET MENU” во время воспроизведения звуч...
Page 157 - Параметры колонок; FRONT B
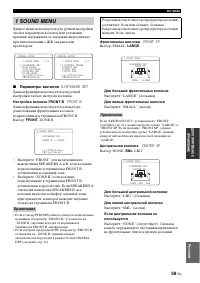
59 Ru SET MENU Русс кий ДОПОЛНИ ТЕЛЬНО Е УП РА ВЛЕН ИЕ Данное меню используется для ручной настройки любых параметров колонок или установки времени задержки из-за задержки видеосигнала при использовании с ЖК экраном или проектором. ■ Параметры колонок A)SPEAKER SET Данная функция используется для ру...
Page 159 - Уровень колонок
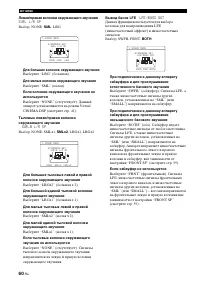
61 Ru SET MENU Русс кий ДОПОЛНИ ТЕЛЬНО Е УП РА ВЛЕН ИЕ Кроссовер CROSS OVER Данная функция используется для выбора частоты кроссовера всех колонок, установленных на “SML” (или на “SMALL”) в “SPEAKER SET” (смотрите стр. 59). Все частоты ниже выбранной частоты будут направляться на сабвуфер или фронта...
Page 160 - Расстояние колонок; дБ
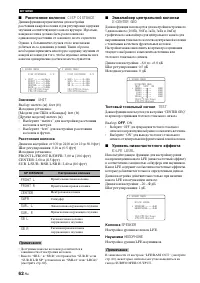
62 Ru SET MENU ■ Расстояние колонок C)SP DISTANCE Данная функция предназначена для настройки расстояния каждой колонки и для регулировки задержки звучания соответствующего канала вручную. Идеально, каждая колонка должна быть расположена на одинаковом расстоянии от основного места слушателя. Однако, ...
Page 161 - Динамический диапазон; Настройки звучания
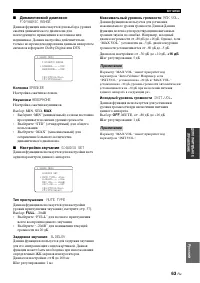
63 Ru SET MENU Русс кий ДОПОЛНИ ТЕЛЬНО Е УП РА ВЛЕН ИЕ ■ Динамический диапазон F)DYNAMIC RANGE Данная функция используется для выбора уровня сжатия динамического диапазона для последующего применения к колонкам или наушникам. Данная настройка действительна только во время декодирования данным аппара...
Page 162 - Настройка HDMI; Поддержка звучания; Расширенное окружающее звучание; Режим селектора дополнительного декодера; Other; PLIIxMusic
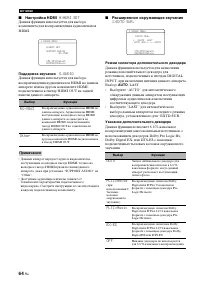
64 Ru SET MENU ■ Настройка HDMI H)HDMI SET Данная функция используется для выбора компонента для воспроизведения аудиосигналов HDMI. Поддержка звучания S.AUDIO Данная функция используется для выбора воспроизведения аудиосигналов HDMI на данном аппарате или на другом компоненте HDMI, подключенном к г...
Page 163 - Назначение входных и выходных гнезд
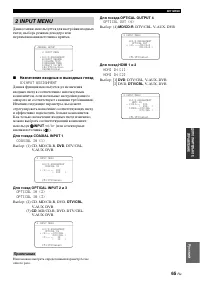
65 Ru SET MENU Русс кий ДОПОЛНИ ТЕЛЬНО Е УП РА ВЛЕН ИЕ Данное меню используется для настройки входных гнезд, выбора режима декодера или переименования источника приема. ■ Назначение входных и выходных гнезд A)INPUT ASSIGNMENT Данная функция используется дл назначения входных гнезд в соответствии с и...
Page 164 - Переименование источника; Настройка громкости; Выберите “DTS” при воспроизведении DTS-CD.
66 Ru SET MENU ■ Переименование источника B)INPUT RENAME Данная функция используется для изменения названия источника приема, отображаемого на экранном меню и дисплее фронтальной панели. 1 Нажмите одну из селекторных кнопок источника ( 3 ) или D MULTI CH IN и выберите нужный источник приема для заме...
Page 165 - Настройка многоканального приема; Настройки дисплея
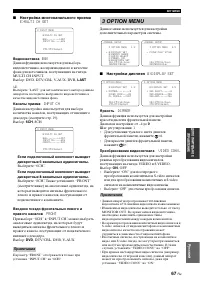
67 Ru SET MENU Русс кий ДОПОЛНИ ТЕЛЬНО Е УП РА ВЛЕН ИЕ ■ Настройка многоканального приема E)MULTI CH SET Видеозаставка BGV Данная функция используется для выбора видеоисточника, воспроизводимого в качестве фона для источников, поступающих на гнезда MULTI CH INPUT.Выбор: DVD, DTV/CBL, V-AUX, DVR, LAS...
Page 166 - Прокрутка дисплея фронтальной панели; CONT; OSD SHIFT; Защита памяти; Выбор звучания
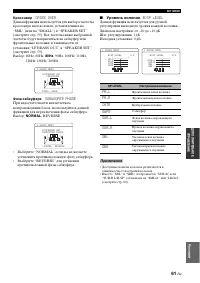
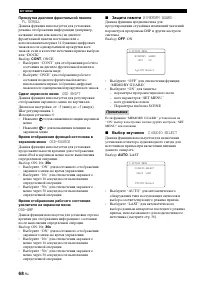
68 Ru SET MENU Прокрутка дисплея фронтальной панели FL SCROLL Данная функция используется для установки режима отображения информации (например, название песни или канала) на дисплее фронтальной панели постоянно или с использованием первых 14 буквенно-цифровых знаков после одновременной прокрутки вс...
Page 167 - Инициализация параметра; Выберите “YES” и нажимайте; Bluetooth параметр; для запуска спаривания.; Для выхода из
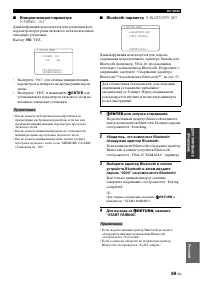
69 Ru SET MENU Русс кий ДОПОЛНИ ТЕЛЬНО Е УП РА ВЛЕН ИЕ ■ Инициализация параметра D)PARAM. INI Данная функция используется для установки всех параметров программ звукового поля на исходные заводские установки.Выбор: NO , YES • Выберите “NO” для отмены инициализации параметров и возврата на предыдущий...
Page 168 - Стили воспроизведения USB; Повтор
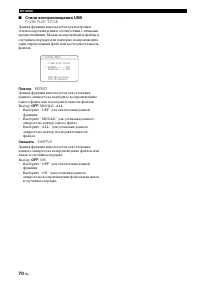
70 Ru SET MENU ■ Стили воспроизведения USB F)USB PLAY STYLE Данная функция используется для настройки стиля воспроизведения в соответствии с личными предпочтениями. Можно воспроизводить файлы в случайном порядке или повторно воспроизводить один определенный файл или последовательность файлов. Повтор...
Page 169 - Управление данным аппаратом; для управления данным; Управление телевизором; Функции пульта ДУ
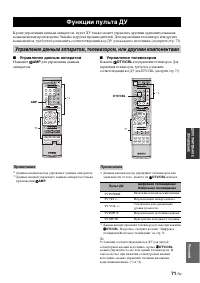
Ôóíêöèè ïóëüòà ÄÓ 71 Ru Русс кий ДОПОЛНИ ТЕЛЬНО Е УП РА ВЛЕН ИЕ Кроме управления данным аппаратом, пульт ДУ также может управлять другими аудиовизуальными компонентами производства Yamaha и других производителей. Для управления телевизора или других компонентов, требуется установить соответствующий ...
Page 170 - Управление другими компонентами; до
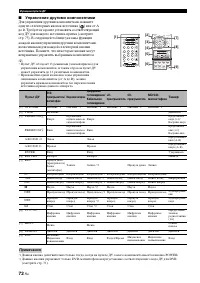
72 Ru Функции пульта ДУ ■ Управление другими компонентами Для управления другими компонентами, нажмите одну из селекторных кнопок источника ( 3 ) или от A до D . Требуется заранее установить соответствующий код ДУ для каждого источника приема (смотрите стр. 73). В следующей таблице указаны функции к...
Page 171 - Установка кодов ДУ
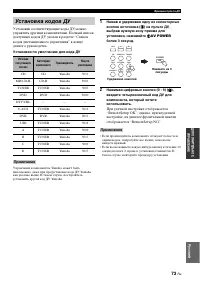
73 Ru Функции пульта ДУ Русс кий ДОПОЛНИ ТЕЛЬНО Е УП РА ВЛЕН ИЕ Установив соответствующие коды ДУ, можно управлять другими компонентами. Полный список доступных кодов ДУ указан в разделе “Список кодов дистанционного управления” в конце данного руководства. Установки по умолчанию для кода ДУ Управлен...
Page 172 - Инфракрасный приемник сигнала во второй зоне.; Использование внешнего усилителя; Использование многозонной конфигурации; Подключение Zone 2
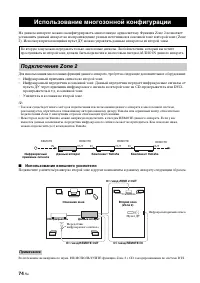
Èñïîëüçîâàíèå ìíîãîçîííîé êîíôèãóðàöèè 74 Ru На данном аппарате можно сконфигурировать многозонную аудиосистему. Функция Zone 2 позволяет установить данный аппарат на воспроизведение разных источников в основной зоне и второй зоне (Zone 2). Используя прилагающийся пульт ДУ, можно управлять данным ап...
Page 173 - Выбор источника приема Zone 2.; Включение Zone 2; Управление Zone 2
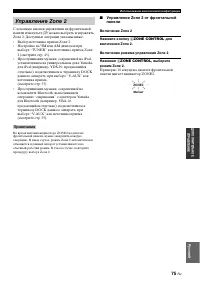
75 Ru Использование многозонной конфигурации Русс кий ДОПОЛНИ ТЕЛЬНО Е УП РА ВЛЕН ИЕ С помощью кнопок управления на фронтальной панели или пульте ДУ, можно выбрать и управлять Zone 2. Доступные операции указаны ниже: • Выбор источника приема Zone 2. • Настройка на ЧМ или АМ диапазон при выборе “TUNE...
Page 174 - Управление Zone 2 от пульта ДУ
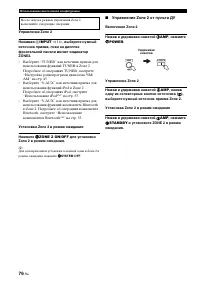
76 Ru Использование многозонной конфигурации Управление Zone 2 Нажимая R INPUT l / h , выберите нужный источник приема, пока на дисплее фронтальной панели мигает индикатор ZONE2. • Выберите “TUNER” как источник приема для использования функций TUNER в Zone 2. Подробнее об операциях TUNER, смотрите “...
Page 175 - Настройка двойного усиления; Шаг частоты тюнера; Инициализация; Дополнительные настройки
Äîïîëíèòåëüíûå íàñòðîéêè 77 Ru Русс кий ДОПОЛНИ ТЕЛЬНО Е УП РА ВЛЕН ИЕ Данный аппарат оборудован дополнительными меню, отображаемыми на дисплее фронтальной панели. Меню дополнительных настроек содержит дополнительные операции регулировки и настройки работы данного аппарата. Измените начальные настро...
Page 176 - Общая часть; Возможные неисправности и способы по их устранению
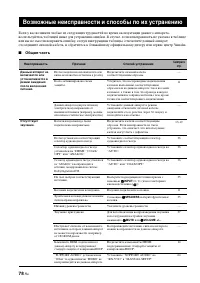
Âîçìîæíûå íåèñïðàâíîñòè è ñïîñîáû ïî èõ óñòðàíåíèþ 78 Ru Если у вас возникли любые из следующих трудностей во время эксплуатации данного аппарата, воспользуйтесь таблицей ниже для устранения ошибки. В случае, если неисправность не указана в таблице или вы не смогли исправить ошибку, следуя инструкци...
Page 179 - Тюнер
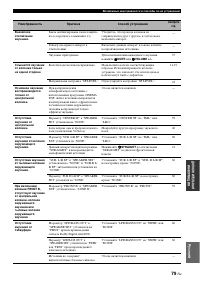
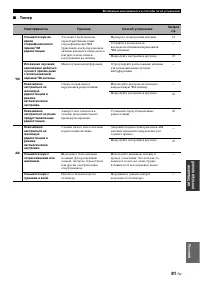
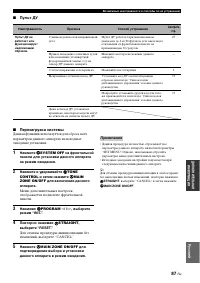
81 Ru Возможные неисправности и способы по их устранению Русс кий ДОПОЛНИ ТЕЛЬНА Я И Н Ф О РМАЦИЯ ■ Тюнер Неисправность Причина Способ устранения Смотрите стр. ЧМ Слышится шум во время стереофонического приема ЧМ радиостанции. Это может быть вызвано характеристиками самих стереофонических ЧМ трансля...
Page 180 - До AUTO SETUP
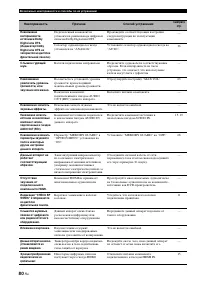
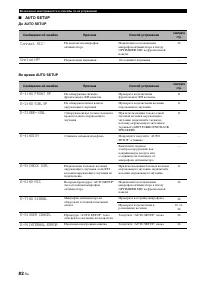
82 Ru Возможные неисправности и способы по их устранению ■ AUTO SETUP До AUTO SETUP Во время AUTO SETUP Сообщение об ошибке Причина Способ устранения Смотрите стр. Connect MIC! Не подключен микрофон оптимизатора. Подключите поставляемый микрофон оптимизатора к гнезду OPTIMIZER MIC на фронтальной пан...
Page 186 - и P; Справочник
Ñïðàâî÷íèê 88 Ru ■ Подключение двухканального усиления Подключение двухканального усиления использует два усилителя для колонки. Один усилитель подключен к разделу низких частот колонки, в то время как другой подключен к разделу средних и высоких частот. В таком виде, каждый усилитель работает в пре...
Page 189 - Технические характеристики
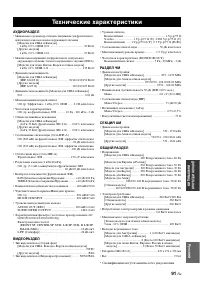
Òåõíè÷åñêèå õàðàêòåðèñòèêè 91 Ru Русс кий ДОПОЛНИ ТЕЛЬНА Я И Н Ф О РМАЦИЯ АУДИОРАЗДЕЛ • Минимальное среднеквадр. выходное напряжение для фронтального, центрального канала и каналов окружающего звучания [Модели для США и Канады] 1 кГц, 0,9% ОНИ, 8 Ω .............................................. 90 В...
Page 190 - Обозначения; Предметный указател
Предметный указател 92 Ru ■ Обозначения 1 SOUND MENU, ручная настройка .... 57 2 INPUT MENU, ручная настройка ... 57 2ch Enhancer, программа звукового поля ............................. 40 2ch Stereo, программа звукового поля ................................................ 40 3 OPTION MENU ...........
Page 191 - ТЕЛЬНА
Предметный указател 93 Ru ДОПОЛНИ ТЕЛЬНА Я И Н Ф О РМАЦИЯ Русс кий МD-магнитофон, подключение ...... 19 ■ Н Назначение приема, меню приема ..... 65 Назначение COAXIAL INPUT, назначение приема ...................... 65 Назначение OPTICAL INPUT, назначение приема ...................... 65 Настройка АМ...
Page 194 - Фронтальная панель; BC
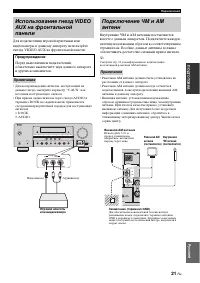
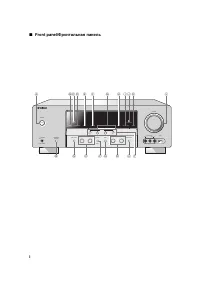
i ■ Front panel/ Фронтальная панель SPEAKERS PHONES SILENT CINEMA A/B/OFF l PRESET/TUNING/CH h A/B/C/D/E BAND ZONE 2ON/OFF EDIT PRESET/TUNING MEMORY ZONE CONTROL TUNING AUTO/MAN'L OPTIMIZER MIC AUDIO SELECT DIRECT STRAIGHT EFFECT TONE CONTROL l INPUT h l PROGRAM h VOLUME SCENE 1 2 3 4 MAIN ZONE SYST...
Page 195 - ii; APPENDIX
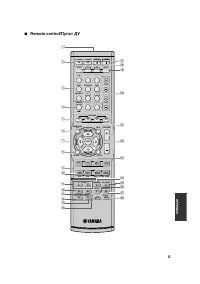
ii APPENDIX ■ Remote control/ Пульт ДУ REC SUR. DECODE NIGHT STRAIGHT DIRECT PARAMETER MULTI CH IN AUDIO SEL SLEEP ENHANCER l PROG h TV MUTE TV INPUT TV VOL TV CH POWER AMP STANDBY POWER MUTE POWER 8 10 7 0 9 6 5 4 3 2 1 ENT DVD V-AUX/DOCK C D DTV/CBL DVR CD MD/CD-R TUNER MENU VOLUME TITLE ENTER BAN...
Page 197 - iv
iv APPENDIX Agazi 0206 AGB 0204 Aiko 0127, 0200, 0207, 0208 Aiwa 0028, 0139, 0229, 0237 Akai 0059, 0065, 0127, 0129, 0130, 0200, 0204, 0208, 0209, 0213, 0217, 0218, 0255 Akiba 0209, 0218 Akura 0206, 0209, 0218 Alaron 0200 Alba 0200, 0207, 0208, 0209, 0217, 0218 ALBIRAL 0212 Allstar 0213 Amplivision ...
Page 201 - 前部面板; 전변; B C
The circled numbers and alphabets correspond to those in the Owner’s Manual.Les nombres et lettres dans un cercle correspondent à ceux du mode d’emploi.Die umkreisten Zahlen und Buchstaben entsprechen denen in der Bedienungsanleitung.Inringade nummer och bokstäver motsvarar de som anges i bruksanvis...
Page 202 - 遥控器; 리모콘
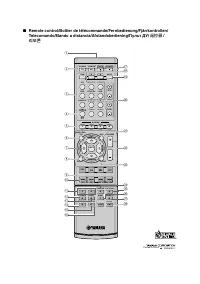
■ Remote control/Boîtier de télécommande/Fernbedienung/Fjärrkontrollen/Telecomando/Mando a distancia/Afstandsbediening/ Пульт ДУ / 遥控器 / 리모콘 REC SUR. DECODE NIGHT STRAIGHT DIRECT PARAMETER MULTI CH IN AUDIO SEL SLEEP ENHANCER l PROG h TV MUTE TV INPUT TV VOL TV CH POWER AMP STANDBY POWER MUTE POWER ...