Workforce L1355 - User Manual

Workforce L1355 Grease Gun – User Manual, read for free online in PDF format. We hope this helps you resolve any issues you may have. If you have further questions, please contact us through the contact form.


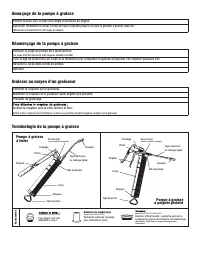
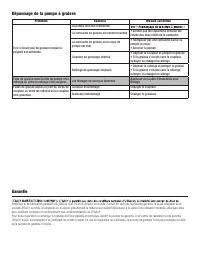
Table of Contents:
- Page 2 – Attachments; Lever Action; Unscrew barrel approximately 2 revolutions.
- Page 3 – Problem
- Page 5 – Instructivo del propietario; Pistolas graseras operadas manualmente; Cómo cargar la pistola grasera; Instalación del cartucho; No cargue la pistola con una bomba
- Page 6 – Accesorios; Pistola grasera; Desenrosque el cilindro aproximadamente 2 vueltas.
- Page 7 – Problema
- Page 8 – Instructions d’utilisation; Manually Operated Grease Guns; Chargement de la pompe à graisse; Chargement de la cartouche; Ne pas charger le pistolet à l'aide
- Page 9 – Accessoires; Pompe à graisse; Dévisser le corps de pompe de 2 tours environ.
- Page 10 – Problème
Loading Your Grease Gun
L1320
L1325
L1310
L1350, L1355
L1355FZ
Cartridge Loading
Suction Loadng
Filler Pump Loading
Pull follower rod from barrel
and lock into place.
Pull follower rod from barrel
and lock into place.
WARNING:
Do not load gun with air operated
grease pump. Damage to unit
will occur and warranty
will be voided.
Unscrew barrel from head.
Unscrew barrel from head.
Wipe bulk filler nipple until clean.
Remove cap from end
of grease cartridge
Insert open end of gun barrel
two inches below surface of grease.
Insert bulk filler nipple
into loader pump receptacle.
Insert cartridge into barrel,
open end down.
Slowly pull back follower rod
to draw in grease. Pull follower rod
back all the way and lock into place.
Pump grease until 8 inches of follower rod
is exposed.
(Between the follower rod handle and barrel
cap)
Remove pull tab from top
of grease cartridge.
Make sure cartridge is pushed
down completely.
Screw barrel back into head.
Pump grease until barrel is full.
(When barrel is full, rod can be pulled out
without spring tension)
Screw barrel into head until snug.
Unlock follower rod and push into barrel.
Release follower rod.
Unscrew barrel slightly.
(Approximately two revolutions)
If no bleeder valve is installed,
unscrew barrel slightly.
(Approximately two revolutions)
(Skip this step if bleeder valve is installed)
Push follower rod into barrel.
Release follower rod.
Release follower rod.
Prime.
(see “Priming Your Grease Gun”)
Push follower rod into barrel.
Push follower rod into barrel.
Screw barrel into head.
Depress bleeder valve to release air.
(If bleeder valve is installed)
Prime.
(see “Priming Your Grease Gun”)
Prime.
(see “Priming Your Grease Gun”)
Begin greasing.
Begin greasing.
Begin greasing.
Owner’s Instructions
Manually Operated Grease Guns
Part No. : L1320, L1325, L1310, L1350, L1355, L1355FZ
Legacy Manufacturing Company
Marion, IA, U.S.A.
Ph: 319.373.7305
Fx: 319.373.7309
[email protected]
legacymfg.com
INS1000
Published 11/15/2013 Revised 5/27/2016
"Loading the manual" means you need to wait until the file loads and becomes available for online reading. Some manuals are very large, and the time they take to appear depends on your internet speed.
Summary
Priming Your Grease Gun Re-Priming Your Grease Gun Greasing a Zerk (Grease Fitting) Grease Gun Terms Attachments Lever Action Grease Gun Pistol Grip Grease Gun Point outlet up at least 45 degrees.Using slow, complete strokes, stroke handle repeatedly until grease flows without air. (Should require 1...
Troubleshooting Your Grease Gun Warranty Problem Cause(s) Remedy Grease does not flow when handle is stroked. Gun needs to be re-primed See “Re-Priming Your Grease Gun” Grease cartridge is still capped • Check to ensure caps have been removedfrom both ends of cartridge Grease cartridge or barrel is ...
Instructivo del propietario Pistolas graseras operadas manualmente Componente Núm. : L1320, L1325, L1310, L1350, L1355, L1355FZ Legacy Manufacturing Company Marion, IA, EE.UU. Tel: 319.373.7305 Fx: 319.373.7309 [email protected]legacymfg.com INS1000 Published 11/15/2013 Revisado 5/27/2016 Cómo carga...