Whirlpool WUI75X15HB - Installation Manual
Whirlpool WUI75X15HB Ice Maker – Installation Manual, read for free online in PDF format. We hope this helps you resolve any issues you may have. If you have further questions, please contact us through the contact form.


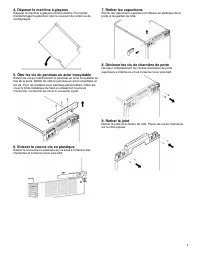
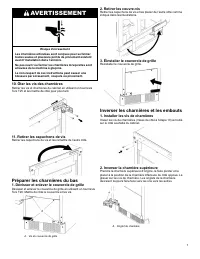
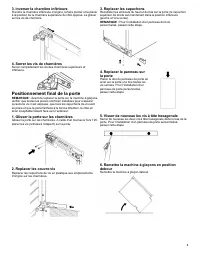
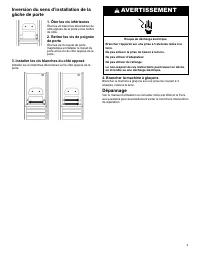


Table of Contents:
- Page 2 – WARNING; Remove screws and hinges; Preparing the Bottom Hinges; Unscrew and remove grill cover
- Page 3 – Reversing the Hinges and End Caps; Final Door Placement
- Page 4 – Reverse Door Catch; Troubleshooting
- Page 5 – AVERTISSEMENT; Retirer les vis du couvercle de charnières
- Page 7 – Préparer les charnières du bas; Inverser les charnières et les embouts
- Page 8 – Positionnement final de la porte; Glisser la porte sur les charnières; Visser de nouveau les vis à tête hexagonale
- Page 9 – Brancher la machine à glaçons; Dépannage
- Page 10 – ADVERTENCIA; Quite los tornillos de la cubierta de la bisagra; Quite las cubiertas de la bisagra; Voltee la fábrica de hielo
- Page 12 – Cómo preparar las bisagras inferiores
- Page 13 – Apriete los tornillos de la bisagra; Colocación final de la puerta; Deslice la puerta por las bisagras
- Page 14 – Cómo invertir el seguro de la puerta; Quite los tornillos blancos; Enchufe la fábrica de hielo; Solución de problemas
1
IIC
CE
E M
MA
AK
KE
ER
R D
DO
OO
OR
R R
RE
EV
VE
ER
RS
SA
AL
L IIN
NS
ST
TR
RU
UC
CT
TIIO
ON
NS
S
WARNING
Electrical Shock Hazard
Disconnect power before servicing.
Replace all parts and panels before operating.
Failure to do so can result in death or electrical shock.
1. Disconnect power to ice maker
Unplug ice maker or disconnect power.
WARNING
Crush Hazard
Articulated hinges are self closing and many pinch points
exist prior to cabinet installation.
Do not remove hinge covers until product is ready to be
installed.
Failure to follow these instructions can result in crush, cut,
or pinch injuries.
2. Remove hinge cover screws
Remove the screws attaching top and bottom hinge covers using a
3/16ʺ hex driver.
A. Hinge cover
3. Remove hinge covers
Using pliers, remove the hinge covers from the top and bottom
hinges.
NOTE:
Save the hinge covers for future use. Reinstall the hinge
covers if product is removed from cabinet installation.
4. Lay down ice maker
Lay down the ice maker as shown in the illustration. Be sure to
cover the floor with cardboard or hardboard to avoid damaging
the floor.
5. Remove stainless steel panel screws
Remove the screws holding the stainless steel panel from the
bottom of the door. Set the stainless steel panel and screws
aside. For custom panel model, remove the screws and the top
metal bracket using the Phillips screwdriver. Set the screws and
bracket aside.
"Loading the manual" means you need to wait until the file loads and becomes available for online reading. Some manuals are very large, and the time they take to appear depends on your internet speed.
Was this manual helpful?
About this manual
- Brand
- Whirlpool
- Model
- WUI75X15HB
- Document type
- Installation Manual
- Category
- Ice Maker
- Language(s)
- English, Spanish, French
- Pages
- 16
- File size
- 1.3 MB
- Format
Other Manuals for Whirlpool WUI75X15HB
Summary
2 6. Remove plastic screw cover Remove the plastic screw cover from the inside of the hinges andset aside. 7. Remove end caps Remove the top and bottom plastic end caps from the door andset them aside. 8. Unscrew door hinge screws Unscrew the door hinge screws completely from top and bottomhinges an...
3 2. Remove screw covers Remove the screw covers and place them on the other side asshown in the illustrations. 3. Reinstall grill cover Reinstall the grill cover. Reversing the Hinges and End Caps 1. Install hinge screws Install the hinge screws (previously set aside in step 10) halfway onthe desir...
4 3. Reinstall end caps Reinstall the top and bottom end caps on the door (the top-rightend cap is now the bottom-left end cap and vice versa). NOTE: For custom wood installation, skip this step. 4. Place panel back on door Place the steel door panel back onthe door once all screws aretightened. For...
Ask a question
Related manuals
More Whirlpool Ice Makers models
Other Whirlpool appliances
 Whirlpool 1 Manual
 Whirlpool 1CWTW4815EW1 Installation Manual
- Whirlpool 1CWTW4845EW1 Installation Manual
 Whirlpool 3 Manual
 Whirlpool 3LER5436EQ0 Manual
 Whirlpool 3LWED4815FW0 Installation Manual
 Whirlpool 3LWTW4740YQ Manual
 Whirlpool 3RGSC9400 Manual
 Whirlpool 4 Manual
 Whirlpool 4KWFE7685EW0 Installation Manual
 Whirlpool 8 Manual
 Whirlpool 015-0005 Manual
- Whirlpool 22 Manual
 Whirlpool 30 Manual
 Whirlpool 33 Manual
 Whirlpool 48" Manual
 Whirlpool 51 Manual