Whirlpool WMMS3330RV - User Manual

Whirlpool WMMS3330RV – User Manual, read for free online in PDF format. We hope this helps you resolve any issues you may have. If you have further questions, please contact us through the contact form.


Table of Contents:
- Page 2 – MICROWAVE OVEN SAFETY; Your safety and the safety of others are very important.; DANGER
- Page 4 – General Cleaning; MICROWAVE OVEN DOOR EXTERIOR; GREASE FILTERS; Tools and Parts; Tools Needed
- Page 5 – Parts Supplied
- Page 6 – Location Requirements; Special Requirements; Product Dimensions
- Page 7 – Electrical Requirements; GROUNDING INSTRUCTIONS; INSTALLATION; WARNING
- Page 8 – Separate Cardboard Template; Installation Types
- Page 9 – Possible Wall Stud Configurations
- Page 10 – Mark and Drill Upper Cabinet
- Page 11 – Mark and Drill Rear Wall; Attach Mounting Plate to Wall
- Page 12 – Rotate Blower Motor; Rotate Blower Motor for Wall Venting Installation
- Page 14 – Rotate Blower Motor for Roof Venting Installation
- Page 15 – Install Damper Assembly
- Page 16 – Install the Microwave Oven
- Page 17 – Complete Installation
- Page 20 – SEGURIDAD DEL HORNO MICROONDAS; Su seguridad y la de los demás son muy importantes.; PELIGRO; INSTRUCCIONES DE SEGURIDAD IMPORTANTES; CONSERVE ESTAS INSTRUCCIONES
- Page 22 – Limpieza general; CAVIDAD DEL HORNO MICROONDAS; FILTROS DE GRASA; Herramientas y piezas; Herramientas necesarias
- Page 23 – Piezas suministradas
- Page 24 – Requisitos de ubicación; Requisitos especiales; Dimensiones del producto
- Page 25 – Dimensiones de instalación; Requisitos eléctricos; ADVERTENCIA
- Page 26 – GUARDE ESTAS INSTRUCCIONES; INSTALACIÓN; Plantilla de cartón separada; Tipos de instalación
- Page 27 – Encuentre las vigas de pared
- Page 28 – Posibles configuraciones de las vigas de pared
- Page 30 – Marcar y perforar la pared trasera
- Page 31 – Fije la placa de montaje a la pared
- Page 32 – Gire el motor del soplador
- Page 35 – Instale el conjunto de la compuerta; Instalar la compuerta (para ventilación de pared); Instalar la compuerta (para ventilación de techo); Instalación del horno microondas
- Page 36 – Complete la instalación
- Page 39 – NOTES
MICROWAVE OVEN HOOD COMBINATION
OWNER’S MANUAL
MANUAL DEL PROPIETARIO DE LA COMBINACIÓN
DE HORNO MICROONDAS Y CAMPANA
Table of Contents/Índice
MICROWAVE OVEN SAFETY
. . . . . . . . . . . . . . . . . . . . . . . . . . . . . . . . . . . . . . . . . . . . . 2
Microwave Oven Safety . . . . . . . . . . . . . . . . . . . . . . . . . . . . . . . . . . . . . . . . . . . . . . . . . . 2
MICROWAVE OVEN MAINTENANCE AND CARE
. . . . . . . . . . . . . . . . . . 4
General Cleaning . . . . . . . . . . . . . . . . . . . . . . . . . . . . . . . . . . . . . . . . . . . . . . . . . . . . . . . . . . . 4
INSTALLATION INSTRUCTIONS
. . . . . . . . . . . . . . . . . . . . . . . . . . . . . . . . . . . . . . . . 4
REQUIREMENTS
. . . . . . . . . . . . . . . . . . . . . . . . . . . . . . . . . . . . . . . . . . . . . . . . . . . . . . . . . . . . . 4
Tools and Parts . . . . . . . . . . . . . . . . . . . . . . . . . . . . . . . . . . . . . . . . . . . . . . . . . . . . . . . . . . . . . 4
Parts Supplied. . . . . . . . . . . . . . . . . . . . . . . . . . . . . . . . . . . . . . . . . . . . . . . . . . . . . . . . . . . . . . . 5
Location Requirements . . . . . . . . . . . . . . . . . . . . . . . . . . . . . . . . . . . . . . . . . . . . . . . . . . . 6
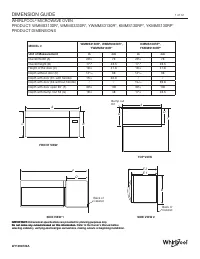
Product Dimensions . . . . . . . . . . . . . . . . . . . . . . . . . . . . . . . . . . . . . . . . . . . . . . . . . . . . . . . 6
Installation Dimensions . . . . . . . . . . . . . . . . . . . . . . . . . . . . . . . . . . . . . . . . . . . . . . . . . . . 6
Electrical Requirements . . . . . . . . . . . . . . . . . . . . . . . . . . . . . . . . . . . . . . . . . . . . . . . . . . 7
INSTALLATION
. . . . . . . . . . . . . . . . . . . . . . . . . . . . . . . . . . . . . . . . . . . . . . . . . . . . . . . . . . . . . . . 7
Prepare Microwave Oven Hood Combination . . . . . . . . . . . . . . . . . . . . . . . 7
Separate Cardboard Template . . . . . . . . . . . . . . . . . . . . . . . . . . . . . . . . . . . . . . . . . . 8
Installation Types . . . . . . . . . . . . . . . . . . . . . . . . . . . . . . . . . . . . . . . . . . . . . . . . . . . . . . . . . . . 8
Find the Wall Stud(s) . . . . . . . . . . . . . . . . . . . . . . . . . . . . . . . . . . . . . . . . . . . . . . . . . . . . . . 9
Mark and Drill Upper Cabinet . . . . . . . . . . . . . . . . . . . . . . . . . . . . . . . . . . . . . . . . . . 10
Mark and Drill Rear Wall . . . . . . . . . . . . . . . . . . . . . . . . . . . . . . . . . . . . . . . . . . . . . . . . 11
Attach Mounting Plate to Wall . . . . . . . . . . . . . . . . . . . . . . . . . . . . . . . . . . . . . . . . . 11
Rotate Blower Motor . . . . . . . . . . . . . . . . . . . . . . . . . . . . . . . . . . . . . . . . . . . . . . . . . . . . . 12
Install Damper Assembly . . . . . . . . . . . . . . . . . . . . . . . . . . . . . . . . . . . . . . . . . . . . . . . 15
Install the Microwave Oven . . . . . . . . . . . . . . . . . . . . . . . . . . . . . . . . . . . . . . . . . . . . 16
Complete Installation . . . . . . . . . . . . . . . . . . . . . . . . . . . . . . . . . . . . . . . . . . . . . . . . . . . . 17
VENTING DESIGN SPECIFICATIONS
. . . . . . . . . . . . . . . . . . . . . . . . . . . . . . . . 17
SEGURIDAD DEL HORNO MICROONDAS
. . . . . . . . . . . . . . . . . . . . . . . . . 20
Seguridad del horno microondas . . . . . . . . . . . . . . . . . . . . . . . . . . . . . . . . . . . . . 20
MANTENIMIENTO Y CUIDADO DEL HORNO
MICROONDAS
. . . . . . . . . . . . . . . . . . . . . . . . . . . . . . . . . . . . . . . . . . . . . . . . . . . . . . . . . . . . . . 22
Limpieza general . . . . . . . . . . . . . . . . . . . . . . . . . . . . . . . . . . . . . . . . . . . . . . . . . . . . . . . . . 22
INSTRUCCIONES DE INSTALACIÓN
. . . . . . . . . . . . . . . . . . . . . . . . . . . . . . . . 22
REQUISITOS
. . . . . . . . . . . . . . . . . . . . . . . . . . . . . . . . . . . . . . . . . . . . . . . . . . . . . . . . . . . . . . . . . 22
Herramientas y piezas . . . . . . . . . . . . . . . . . . . . . . . . . . . . . . . . . . . . . . . . . . . . . . . . . . 22
Piezas suministradas . . . . . . . . . . . . . . . . . . . . . . . . . . . . . . . . . . . . . . . . . . . . . . . . . . . . 23
Requisitos de ubicación . . . . . . . . . . . . . . . . . . . . . . . . . . . . . . . . . . . . . . . . . . . . . . . . 24
Dimensiones del producto . . . . . . . . . . . . . . . . . . . . . . . . . . . . . . . . . . . . . . . . . . . . . 24
Dimensiones de instalación . . . . . . . . . . . . . . . . . . . . . . . . . . . . . . . . . . . . . . . . . . . . 25
Requisitos eléctricos. . . . . . . . . . . . . . . . . . . . . . . . . . . . . . . . . . . . . . . . . . . . . . . . . . . . . 25
INSTALACIÓN
. . . . . . . . . . . . . . . . . . . . . . . . . . . . . . . . . . . . . . . . . . . . . . . . . . . . . . . . . . . . . . . 26
Prepare la combinación de horno microondas y campana. . . . . 26
Plantilla de cartón separada . . . . . . . . . . . . . . . . . . . . . . . . . . . . . . . . . . . . . . . . . . . 26
Tipos de instalación . . . . . . . . . . . . . . . . . . . . . . . . . . . . . . . . . . . . . . . . . . . . . . . . . . . . . . 26
Encuentre las vigas de pared . . . . . . . . . . . . . . . . . . . . . . . . . . . . . . . . . . . . . . . . . 27
Marcar y perforar el gabinete superior . . . . . . . . . . . . . . . . . . . . . . . . . . . . . . 29
Marcar y perforar la pared trasera. . . . . . . . . . . . . . . . . . . . . . . . . . . . . . . . . . . . 30
Fije la placa de montaje a la pared . . . . . . . . . . . . . . . . . . . . . . . . . . . . . . . . . . . 31
Gire el motor del soplador . . . . . . . . . . . . . . . . . . . . . . . . . . . . . . . . . . . . . . . . . . . . . . 32
Instale el conjunto de la compuerta . . . . . . . . . . . . . . . . . . . . . . . . . . . . . . . . . . 35
Instalación del horno microondas . . . . . . . . . . . . . . . . . . . . . . . . . . . . . . . . . . . . 35
Complete la instalación . . . . . . . . . . . . . . . . . . . . . . . . . . . . . . . . . . . . . . . . . . . . . . . . . 36
ESPECIFICACIONES PARA EL DISEÑO DE LA
VENTILACIÓN
. . . . . . . . . . . . . . . . . . . . . . . . . . . . . . . . . . . . . . . . . . . . . . . . . . . . . . . . . . . . . . . 37
W11698718A
IMPORTANT:
Save for local electrical inspector
’
s use.
IMPORTANTE:
Guarde para tener a disposición del inspector de electricidad local.
"Loading the manual" means you need to wait until the file loads and becomes available for online reading. Some manuals are very large, and the time they take to appear depends on your internet speed.
Was this manual helpful?
About this manual
- Brand
- Whirlpool
- Model
- WMMS3330RV
- Document type
- User Manual
- Language(s)
- English, Spanish
- Pages
- 40
- File size
- 2.7 MB
- Format
Other Manuals for Whirlpool WMMS3330RV
Summary
2 MICROWAVE OVEN SAFETY Your safety and the safety of others are very important. We have provided many important safety messages in this manual and on your appliance. Always read and obey all safetymessages. This is the safety alert symbol. This symbol alerts you to potential hazards that can kill o...
4 MICROWAVE OVENMAINTENANCE AND CARE General Cleaning IMPORTANT: Before cleaning, make sure all controls are off and the microwave oven is cool. Always follow label instructions oncleaning products. Soap, water, and a soft cloth or sponge are suggested first, unlessotherwise noted. STAINLESS STEEL A...
5 Parts Supplied Part Drawing Description Qty Where can find? Screw Pack 3/16-24 x 3" round-headbolts 2 A A. Outer foam in the carton box 1/4-20 x 3" flat-head bolts 2 Washers 2 3/16" toggle nuts 2 1/4" x 2" lag screws 2 #6 x 3/8" Sheet metalscrews 2 Power supply cordbushing ...
Ask a question
Related manuals
Popular Whirlpool Other






More Whirlpool Other models
 Whirlpool WMMF7530RZ User Manual
 Whirlpool WMMS3130RB User Manual
 Whirlpool WMMS3130RS User Manual
- Whirlpool WMMS3130RW User Manual
 Whirlpool WMMS3130RZ User Manual
- Whirlpool WMMS3330RB User Manual
 Whirlpool WMMS3330RW User Manual
- Whirlpool WMMS3330RZ Manual
 Whirlpool WOC54EC0AS Manual
- Whirlpool WOC54EC7AB Manual
- Whirlpool WOC54EC7AS Manual
 Whirlpool WOC54EC7AS00 User Manual