Page 2 - WASHER SAFETY
2 Table of Contents WASHER SAFETY .................................................................. 2OPERATING INSTRUCTIONS ............................................... 3 ACCESSORIES................................................................ 3CONTROL PANEL AND FEATURES ........................
Page 3 - FACTORY CERTIFIED PARTS; Accessories designed for your appliance:; Accessories; OPERATING INSTRUCTIONS; Stack Kit
3 Customize your new washer and dryer with the following genuine Whirlpool accessories. For more information on options and ordering, call 1-866-698-2538 or visit us at: www.whirlpool.com/accessories . In Canada, call 1-800-688-2002 or visit us at www.whirlpool.ca . INSTALLATION & MAINTENANCE AC...
Page 4 - Control Panel and Features; POWER BUTTON
4 Control Panel and Features POWER BUTTON Touch and hold until the indicator above the Program button lights up. The indicators above all the buttons will scroll from left to right as the washer turns on. Symbols appear on the control panel and sounds are played. Touch and hold POWER to cancel a cyc...
Page 8 - Adding HE detergent to dispenser; Using the Dispenser Drawer; About Detergent Concentration
8 Adding HE detergent to dispenser Pour a measured amount of HE detergent into detergent compartment. Do not overfill; adding too much detergent may cause detergent to be dispensed into the washer too early. IMPORTANT: n Do not add single-dose laundry packet to dispenser drawer. n Use powdered deter...
Page 9 - Using Your Washer; Sort and prepare your laundry
9 Single-dose laundry packets, Oxi-type boosters, or fabric softener crystals can be added to the drum prior to adding laundry. NOTES: n Always follow manufacturer’s instructions. n Do not use chlorine bleach. Using Your Washer Sort items by recommended cycle, water temperature, and colorfastness. S...
Page 10 - Add liquid fabric softener; Touch and hold POWER button to turn
10 4. Add HE detergent* NOTE: Do not add single-dose laundry packets, Oxi-type boosters, or fabric softener crystals to dispensers. They will not dispense correctly. Liquid HE detergent Pour a measured amount of liquid fabric softener into liquid fabric softener compartment. Always follow manufactur...
Page 11 - Change temperature or spin speed,; Detergent
11 8. Select options, if desired † 9. Setting a delayed wash, if desired † If you do not want to begin a cycle immediately, you may choose the Delay Wash option. This will delay the start of the wash cycle by up to 24 hours. To set a Delayed Wash:1. Touch the DELAY WASH button to set the desired del...
Page 13 - Washer Maintenance; WASHER CARE; Recommendations to Help Keep Your Washer Clean; WATER INLET HOSE
13 Washer Maintenance WASHER CARE Recommendations to Help Keep Your Washer Clean and Performing at Its Best 1. Always use High Efficiency (HE) detergents and follow the HE detergent manufacturer’s instructions regarding the amount of HE detergent to use. Never use more than the recommended amount be...
Page 15 - REINSTALLING/USING WASHER AGAIN
15 REINSTALLING/USING WASHER AGAIN To reinstall washer after non-use, vacation, winter storage, or moving: 1. Refer to “Installation Instructions” to locate, level, and connect washer. 2. Before using again, run washer through the following recommended procedure: To use washer again:1. Flush water p...
Page 17 - Installation Requirements; Tools and Parts; INSTALLATION INSTRUCTIONS
17 Alternate parts: (Not supplied with washer) Your installation may require additional parts. To order, please refer to toll-free numbers on the back page of this manual. Available accessories: n A Stack Kit is available to stack your washer and dryer. n An optional matching pedestal is available t...
Page 18 - Location Requirements; Custom under counter installation:
18 Location Requirements Proper installation is your responsibility. You will need: n A grounded electrical outlet located within 5.4 ft (1.7 m) of power cord on back of washer. n Water faucet located within 4 ft (1.2 m) of water fill valve on washer, and water pressure of 20–100 psi (137.9–689.6 kP...
Page 19 - Drain System
19 Floor drain system requires a Siphon Break Kit (Part Number 285834), two Connector Kits (Part Number 285835), and an Extension Drain Hose (Part Number 285863) that may be purchased separately. See “Alternate Parts.” Minimum siphon break height: 28" (710 mm) from bottom of washer. (Additional ...
Page 20 - Installation Instructions; Move washer; Electrical Requirements; Remove transport bolts from
20 Installation Instructions NOTE: To avoid floor damage, set washer onto cardboard before moving it. 48" (1.2 m) 1. Move washer It is necessary to remove all shipping materials for proper operation and to avoid excessive noise from washer. Move washer to within 48" (1.2 m) of its final loca...
Page 21 - Route Drain Hose
21 Remove power cord from clips and place over top of washer to allow free access to back of washer. NOTE: If washer is transported at later date, call your local service center. To avoid suspension and structural damage, a certified technician must properly set up washer for relocation. IMPORTANT: ...
Page 22 - Connect Inlet Hose; Connect inlet hose to washer
22 Run water for a few seconds through hose into a laundry tub, drainpipe, or bucket to avoid clogs. Water should run until clear. 9. Clear water line 8. Connect inlet hose to water faucet Place hose into standpipe (shown in picture) or over side of laundry tub. IMPORTANT: Only 4 1 ⁄ 2 " (114 mm...
Page 23 - Level Washer; Check levelness of washer; Secure drain hose
23 Level Washer Leveling your washer properly reduces excess noise and vibration. Remove cardboard from beneath washer. Place a level on top edges of washer, checking each side and front. If not level, tip washer and adjust feet up or down as shown in steps 15 and 16, repeating as necessary. 13. Che...
Page 24 - Plug into a grounded 3 prong outlet; Complete Installation Checklist; Tighten leveling feet
24 17. Plug into a grounded 3 prong outlet Complete Installation Checklist q Check electrical requirements. Be sure you have correct electrical supply and recommended grounding method. q Check that all parts are now installed. If there is an extra part, go back through steps to see what was skipped....
Page 25 - TROUBLESHOOTING
25 If you experience Possible Causes Solution Error Code Appears in Display Once any possible issues are corrected, touch the POWER button once to clear the code. Re-select and restart the cycle. (Water tap closed) No or not sufficient water supply because: n Water faucet is closed. n There are kink...
Page 26 - If you experience
26 TROUBLESHOOTING If you experience Possible Causes Solution Error Code Appears in Display (cont.) (service) F20 or F60 Failure of an electronic component. Turn off and unplug the washer. Close the water faucet. See the “Assistance or Service” section to contact a service representative. (service) ...
Page 34 - HOW TO OPEN DOOR
34 HOW TO OPEN DOOR IN CASE OF POWER FAILURE Before opening the door as described below, refer to the failure “Door will not unlock” in the “Troubleshooting” section. The door may unlock by itself after the failure condition no longer exists; however, if you want to take out your laundry immediately...
Page 36 - SÉCURITÉ DE LA LAVEUSE
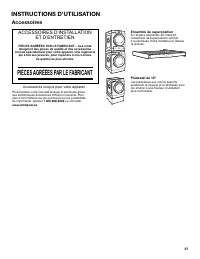
Page 37 - Accessoires; ACCESSOIRES D’INSTALLATION; PIÈCES AGRÉÉES PAR LE FABRICANT; Accessoires conçus pour votre appareil :; INSTRUCTIONS D’UTILISATION; Ensemble de superposition
37 Accessoires Personnaliser votre nouvelle laveuse et sécheuse grâce aux authentiques accessoires Whirlpool suivants. Pour plus d’informations sur les options et sur les possibilités de commande, appeler 1 800 688-2002 ou consulter www.whirlpool.ca . ACCESSOIRES D’INSTALLATION ET D’ENTRETIEN PIÈCES...
Page 38 - Tableau de commande et caractéristiques; BOUTON DE MISE SOUS/HORS TENSION
38 Tableau de commande et caractéristiques BOUTON DE MISE SOUS/HORS TENSION Maintenir enfoncé jusqu’à ce que les témoins au-dessus du bouton de programme s’allument. Les témoins au-dessus des boutons clignoteront de gauche à droite pendant le fonctionnement de la laveuse. Des symboles s’affichent à ...
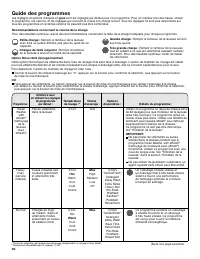
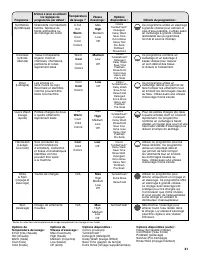
Page 40 - Guide des programmes
40 Guide des programmes Les réglages et options indiqués en gras sont les réglages par défaut pour ce programme. Pour un meilleur soin des tissus, choisir le programme, les options, et les réglages qui convient le mieux à la charge à laver. Tous les réglages ne sont pas disponibles sur tous les prog...
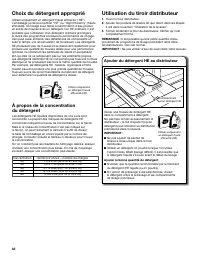
Page 42 - Ajouter du détergent HE au distributeur; Utilisation du tiroir distributeur; À propos de la concentration
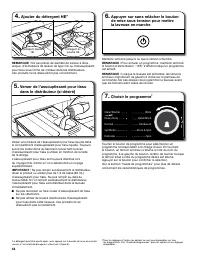
42 Ajouter du détergent HE au distributeur Verser une mesure de détergent HE dans le compartiment à détergent. Ne pas faire remplir excessivement le distributeur – le fait d’ajouter trop de détergent peut entraîner sa distribution prématurée dans la laveuse. IMPORTANT : n Ne pas ajouter de sachet de...
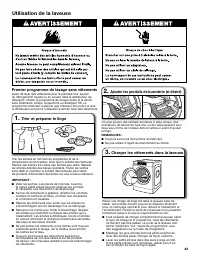
Page 43 - Utilisation de la laveuse; Trier et préparer le linge
43 On peut ajouter des sachets de lessive à dose unique, des activateurs de lessive de type Oxi, ou de l’assouplissant pour tissu sous forme de cristaux dans le tambour avant d’ajouter le linge. REMARQUES : n Toujours suivre les instructions du fabricant. n Ne pas utiliser d’agent de blanchiment au ...
Page 45 - Pour régler une delayed wash; Modifier la température ou la vitesse
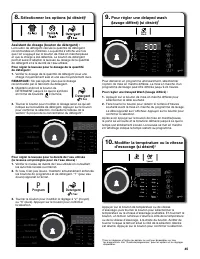
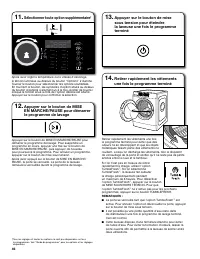
45 8. Sélectionner les options (si désiré) † 9. Pour régler une delayed wash (lavage différé) (si désiré) † Pour démarrer un programme ultérieurement, sélectionner l’option de mise en marche différée. La mise en marche d’un programme de lavage peut être différée jusqu’à 24 heures. Pour régler une De...
Page 47 - Entretien de la laveuse; ENTRETIEN DE LA LAVEUSE; Recommandations pour le maintien de la propreté; TUYAUX D’ARRIVÉE D’EAU
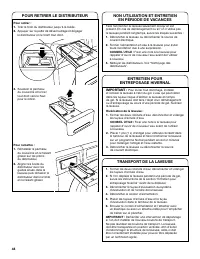
47 Entretien de la laveuse ENTRETIEN DE LA LAVEUSE Recommandations pour le maintien de la propreté de la laveuse et du niveau de performance optimal 1. Utiliser toujours un détergent HE (Haute efficacité) et employer la quantité de détergent recommandée par le fabricant du détergent HE. Ne jamais ut...
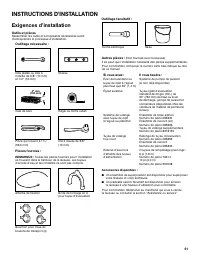
Page 51 - Outillage facultatif :; Outillage nécessaire :; Exigences d’installation; Outils et pièces; INSTRUCTIONS D’INSTALLATION
51 Autres pièces : (Non fournies avec la laveuse) Il se peut que l’installation nécessite des pièces supplémentaires. Pour commander, composer le numéro sans frais indiqué au dos de ce manuel. Outillage facultatif : Pièces fournies : REMARQUE : Toutes les pièces fournies pour l’installation se trouv...
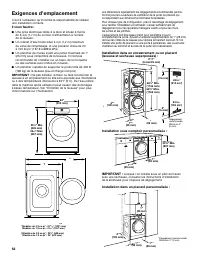
Page 52 - Exigences d’emplacement; Installation sous comptoir personnalisée :
52 Exigences d’emplacement C’est à l’utilisateur qu’incombe la responsabilité de réaliser une installation correcte. Il vous faudra : n Une prise électrique reliée à la terre et située à moins de 5,4 pi (1,7 m) du cordon d’alimentation à l’arrière de la laveuse. n Un robinet d’eau froide situé à 4 p...
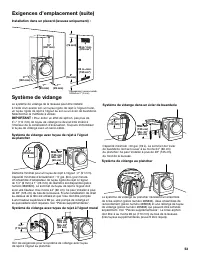
Page 53 - Système de vidange
53 Le système de vidange au plancher nécessite un ensemble de brise-siphon (pièce numéro 285834), deux ensembles de raccordement (pièce numéro 285835) et une rallonge de tuyau de vidange (pièce numéro 285863) qui peuvent être achetés séparément. Voir “Pièces supplémentaires”. Le brise-siphon doit êt...
Page 54 - Spécifications électriques
54 Spécifications électriques n Chaque appareil doit être alimenté par un circuit 120 volts, CA seulement, 60 Hz protégé par un fusible de capacité 15 A ou 20 A. Il est recommandé d’utiliser un fusible ou un disjoncteur temporisé. Il est recommandé de raccorder l’appareil sur un circuit distinct exc...
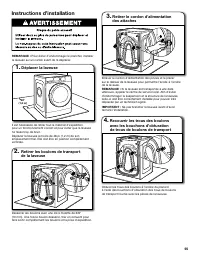
Page 55 - Instructions d’installation
55 Instructions d’installation REMARQUE : Pour éviter d’endommager le plancher, installer la laveuse sur un carton avant de la déplacer. 48" (1.2 m) 1. Déplacer la laveuse Il est nécessaire de retirer tout le matériel d’expédition pour un fonctionnement correct et pour éviter que la laveuse ne f...
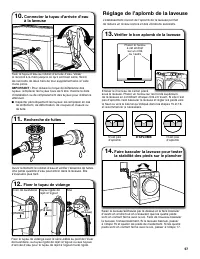
Page 56 - Raccorder la tuyau d’arrivée; Acheminer le tuyau d’évacuation
56 Faire couler de l’eau dans le tuyau de l’évier de buanderie, le tuyau rigide de rejet à l’égout ou le seau pendant quelques secondes pour éviter toute obstruction. On doit laisser couler l’eau jusqu’à ce qu’elle soit limpide. 9. Purger la canalisation d’eau 8. Raccorder les tuyaux d’arrivée d’eau...
Page 57 - Réglage de l’aplomb de la laveuse
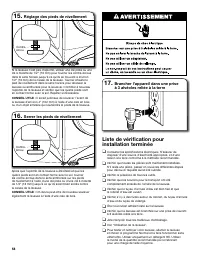
57 Réglage de l’aplomb de la laveuse L’établissement correct de l’aplomb de la laveuse permet de réduire un niveau sonore et des vibrations excessifs. Enlever le morceau de carton placé sous la laveuse. Placer un niveau sur les bords supérieurs de la laveuse en contrôlant chaque côté et l’avant. Si ...
Page 58 - Liste de vérification pour; Réglage des pieds de nivellement; Serrer les pieds de nivellement
58 17. Brancher l’appareil dans une prise à 3 alvéoles reliée à la terre Liste de vérification pour installation terminée q Consulter les spécifications électriques. S’assurer de disposer d’une source d’électricité appropriée, et d’une liaison à la terre conforme à la méthode recommandée. q Vérifier...
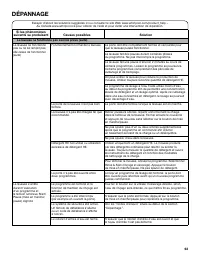
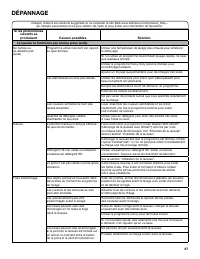
Page 59 - DÉPANNAGE
59 Si les phénomènes suivants se produisent Causes possibles Solution Un code d’erreur apparaît sur l’affichage Une fois que tout problème éventuel a été résolu, appuyer sur le bouton de mise sous tension pour effacer le code. Appuyer de nouveau sur le bouton de mise sous tension pour redémarrer la ...
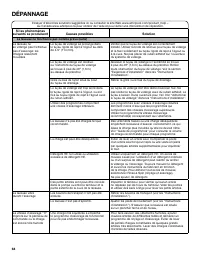
Page 60 - Si les phénomènes
60 DÉPANNAGE Si les phénomènes suivants se produisent Causes possibles Solution Un code d’erreur apparaît sur l’affichage (suite) (service) F20 ou F60 Défaillance d’une composante électronique. Arrêter et débrancher la laveuse. Fermer le robinet d’entrée. Consulter la section “Assistance ou service”...
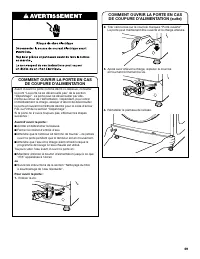
Page 69 - COMMENT OUVRIR LA PORTE EN CAS
69 COMMENT OUVRIR LA PORTE EN CAS DE COUPURE D’ALIMENTATION Avant d’ouvrir la porte comme décrit ci-dessous, consulter le point “La porte ne se déverrouille pas” de la section “Dépannage”. La porte peut se déverrouiller par elle- même au retour de l’alimentation. Cependant, pour retirer immédiatemen...
Page 72 - Assistance or Service; Our consultants provide assistance with; To locate FSP; Assistance ou Service; Pour commander des pièces de rechange ou des accessoires; Pour trouver des pièces de rechange FSP; Pour plus d’assistance
Assistance or Service Before calling for assistance or service, please check “Troubleshooting” or visit www.whirlpool.com/help. It may save you the cost of a service call. If you still need help, follow the instructions below. When calling, please know the purchase date and the complete model and se...