Whirlpool WFC682CLW - User Manual
Whirlpool WFC682CLW Washing Machine – User Manual, read for free online in PDF format. We hope this helps you resolve any issues you may have. If you have further questions, please contact us through the contact form.
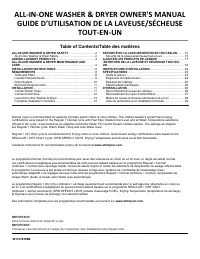


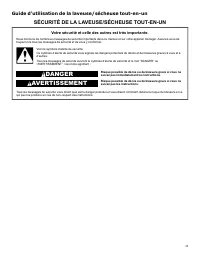
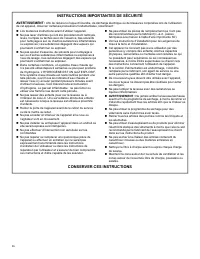
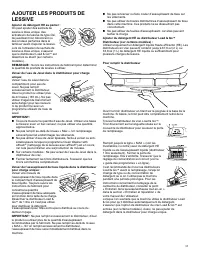
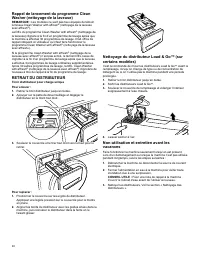
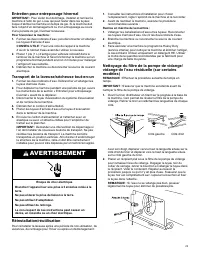
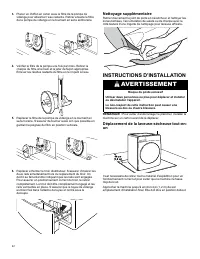
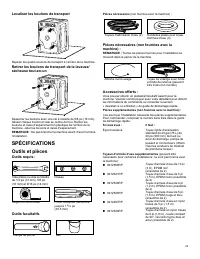
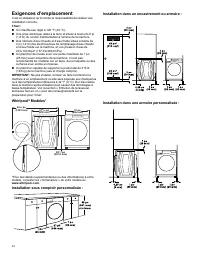
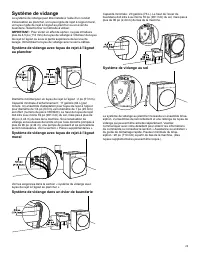
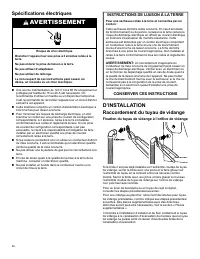
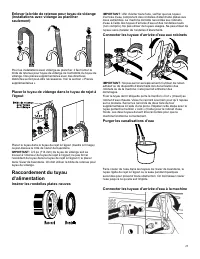
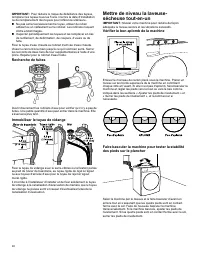
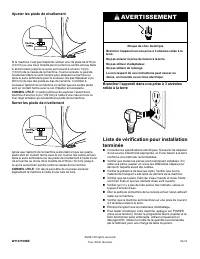
Table of Contents:
- Page 2 – Your safety and the safety of others are very important.; DANGER; IMPORTANT SAFETY INSTRUCTIONS
- Page 3 – ADDING LAUNDRY PRODUCTS
- Page 4 – Water Inlet Hoses
- Page 5 – Clean Washer Cycle Reminder
- Page 6 – WARNING; Reinstalling/Using Again
- Page 7 – Additional Cleaning
- Page 8 – INSTALLATION INSTRUCTIONS; Locate transport bolts; REQUIREMENTS; Tools and Parts; Optional tool
- Page 9 – Available accessories:; Location Requirements; Whirlpool
- Page 10 – Custom cabinet installation:; Drain System; Floor standpipe drain system; Laundry tub drain System
- Page 11 – Electrical Requirements; GROUNDING INSTRUCTIONS; SAVE THESE INSTRUCTIONS; INSTALLATION; Connect Drain Hose; Attach drain hose to drain port; Place drain hose in standpipe
- Page 12 – Connect Inlet Hose
- Page 13 – Check levelness of machine; Tighten leveling feet
- Page 14 – Plug into a grounded 3 prong outlet; Complete Installation Checklist
- Page 15 – Votre sécurité et celle des autres est très importante.
- Page 16 – INSTRUCTIONS IMPORTANTES DE SÉCURITÉ; CONSERVER CES INSTRUCTIONS
- Page 18 – Tuyaux d’arrivée d’eau
- Page 20 – RETRAIT DU DISTRIBUTEUR
- Page 21 – Entretien pour entreposage hivernal; AVERTISSEMENT; Réinstallation/réutilisation
- Page 22 – Nettoyage supplémentaire; INSTRUCTIONS D’INSTALLATION
- Page 23 – Localiser les boulons de transport; SPÉCIFICATIONS; Outils et pièces; Outils facultatifs; Accessoires offerts :
- Page 24 – Exigences d’emplacement; Installation sous comptoir personnalisée :
- Page 25 – Système de vidange; Système de vidange dans un évier de buanderie
- Page 26 – Spécifications électriques; INSTRUCTIONS DE LIAISON À LA TERRE; D’INSTALLATION; Raccordement du tuyau de vidange; Fixation du tuyau de vidange à l’orifice de vidange
- Page 27 – Insérer les rondelles plates neuves; Connecter les tuyaux d’arrivée d’eau aux robinets; Purger les canalisations d’eau
- Page 28 – Recherche de fuites; Vérifier le bon aplomb de la machine
- Page 29 – Ajuster les pieds de nivellement; Serrer les pieds de nivellement
ALL-IN-ONE WASHER & DRYER OWNER'S MANUAL
GUIDE D’UTILISATION DE LA LAVEUSE/SÉCHEUSE
TOUT-EN-UN
Table of Contents/Table des matières
ALL-IN-ONE WASHER & DRYER SAFETY
. . . . . . . . . . . . . . . . . . . . . . . . . . . 2
. . . . . . . . . . . . . . . . . . . . . . . . . . . . . . . . . . . . . . . . 3
ALL-IN-ONE WASHER & DRYER MAINTENANCE AND
CARE
. . . . . . . . . . . . . . . . . . . . . . . . . . . . . . . . . . . . . . . . 8
Tools and Parts . . . . . . . . . . . . . . . . . . . . . . . . . . . . . . . . . . . . . . . . . . . . . . . . . . . . . . . . . . . . . 8
Location Requirements . . . . . . . . . . . . . . . . . . . . . . . . . . . . . . . . . . . . . . . . . . . . . . . . . . . 9
Drain System . . . . . . . . . . . . . . . . . . . . . . . . . . . . . . . . . . . . . . . . . . . . . . . . . . . . . . . . . . . . . . 10
Electrical Requirements . . . . . . . . . . . . . . . . . . . . . . . . . . . . . . . . . . . . . . . . . . . . . . . . 11
Connect Drain Hose . . . . . . . . . . . . . . . . . . . . . . . . . . . . . . . . . . . . . . . . . . . . . . . . . . . . . 11
Connect Inlet Hose . . . . . . . . . . . . . . . . . . . . . . . . . . . . . . . . . . . . . . . . . . . . . . . . . . . . . . . 12
Level All-In-One Washer & Dryer . . . . . . . . . . . . . . . . . . . . . . . . . . . . . . . . . . . . . 13
Complete Installation Checklist . . . . . . . . . . . . . . . . . . . . . . . . . . . . . . . . . . . . . . . 14
SÉCURITÉ DE LA LAVEUSE/SÉCHEUSE TOUT-EN-UN
Sécurité de la laveuse/sécheuse tout-en-un. . . . . . . . . . . . . . . . . . . . . . . 15
AJOUTER LES PRODUITS DE LESSIVE
. . . . . . . . . . . . . . . . . . . . . . . . . . . 17
ENTRETIEN DE LA LAVEUSE ET SÉCHEUSE TOUT-EN-
. . . . . . . . . . . . . . . . . . . . . . . . . . . . . . . . . . . 22
Outils et pièces . . . . . . . . . . . . . . . . . . . . . . . . . . . . . . . . . . . . . . . . . . . . . . . . . . . . . . . . . . . . 23
Exigences d’emplacement . . . . . . . . . . . . . . . . . . . . . . . . . . . . . . . . . . . . . . . . . . . . . 24
Système de vidange . . . . . . . . . . . . . . . . . . . . . . . . . . . . . . . . . . . . . . . . . . . . . . . . . . . . . 25
Spécifications électriques . . . . . . . . . . . . . . . . . . . . . . . . . . . . . . . . . . . . . . . . . . . . . . 26
Raccordement du tuyau de vidange . . . . . . . . . . . . . . . . . . . . . . . . . . . . . . . . . 26
Raccordement du tuyau d’alimentation . . . . . . . . . . . . . . . . . . . . . . . . . . . . . 27
Mettre de niveau la laveuse-sécheuse tout-en-un . . . . . . . . . . . . . . . 28
Liste de vérification pour installation terminée . . . . . . . . . . . . . . . . . . . . 29
Normal cycle is recommended for washing normally soiled cotton or linen clothes. This clothes washer’s government energy
certifications were based on the Regular + Normal cycle with Fast Spin, Medium Soil Level and all Wash Temperature selections
offered in the cycle. It was tested as an Adaptive Automatic Water Fill Control System clothes washer. The settings as shipped
are Regular + Normal cycle, Warm Wash Temp and Auto Water level.
Regular + Dry Only cycle is recommended for drying cotton or linen clothes. Government energy certifications were based on the
REGULAR + DRY ONLY Cycle, SPIN SPEED 5 LED’S, Drying Temperature and Dryness Level Non-Selectable.
Complete instructions for recommended cycles can be found at
www.whirlpool.com
.
W11475196B
IMPORTANT:
Save for local electrical inspector’s use.
IMPORTANT :
Conserver ces instructions à l’usage de l’inspecteur des installations électriques local.
Le programme Normal (normal) est recommandé pour laver des vêtements en coton ou en lin avec un degré de saleté normal.
Les certifications énergétiques gouvernementales de cette laveuse étaient basées sur le programme Regular + Normal
(ordinaire + normal) avec essorage rapide, niveau de saleté moyen et toutes les sélections de température de lavage offertes dans
le programme. La laveuse a été testée en tant que laveuse à linge avec système de commande de remplissage d’eau
automatique adaptatif. Les réglages tels que livrés sont les programmes Regular + Normal (ordinaire + normal), température de
lavage Warm (tiède) et niveau Auto Water (eau automatique).
Le programme Regular + Dry Only (ordinaire + séchage seulement) est recommandé pour le séchage des vêtements en coton ou
en lin. Les certifications énergétiques du gouvernement étaient basées sur le programme REGULAR + DRY ONLY
(ordinaire + sécher seulement), SPIN SPEED 5 LED'S (vitesse d’essorage 5 DEL), Drying Temperature (température de séchage)
et Dryness Level (niveau de séchage) non sélectionnables.
Des instructions complètes pour les programmes recommandés se trouvent sur
www.whirlpool.com.
"Loading the manual" means you need to wait until the file loads and becomes available for online reading. Some manuals are very large, and the time they take to appear depends on your internet speed.
Other Manuals for Whirlpool WFC682CLW
Summary
2 ALL-IN-ONE WASHER & DRYER SAFETY Your safety and the safety of others are very important. We have provided many important safety messages in this manual and on your appliance. Always read and obey all safetymessages. This is the safety alert symbol. This symbol alerts you to potential hazards ...
3 ADDING LAUNDRY PRODUCTS Adding HE detergent to basket: Single-dose laundry packets, Oxi-type boosters, color-safe bleach, orscented crystals can be added tothe drum prior to adding laundry.When using single-dose laundrypackets, make sure that the Load &Go ™ Bulk Dispenser option is disabled (o...
4 ALL-IN-ONE WASHER & DRYERMAINTENANCE AND CARE Water Inlet Hoses Replace inlet hoses after five years of use to reduce the risk ofhose failure. Periodically inspect and replace inlet hoses if bulges,kinks, cuts, wear, or leaks are found. When replacing your inlet hoses: Mark the date of replace...