Whirlpool WEE510S0FS - Installation Manual
Whirlpool WEE510S0FS Range – Installation Manual, read for free online in PDF format. We hope this helps you resolve any issues you may have. If you have further questions, please contact us through the contact form.


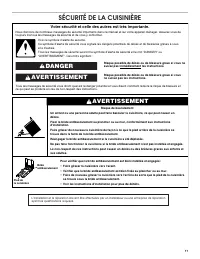
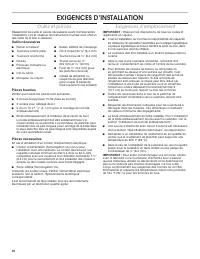
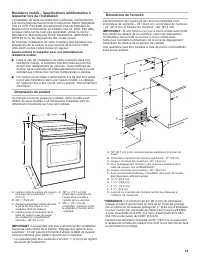
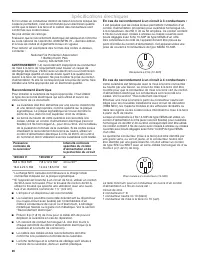
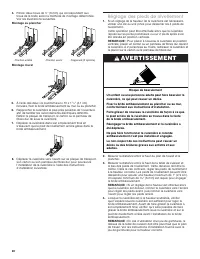
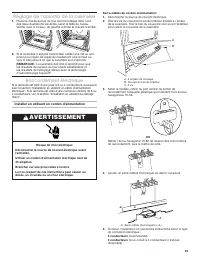
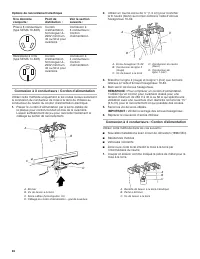
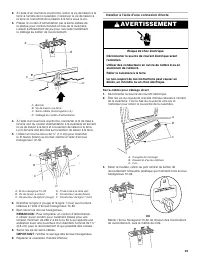
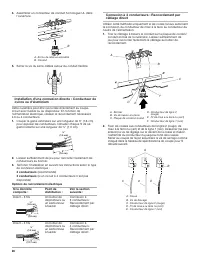

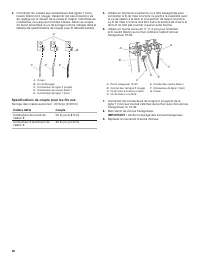
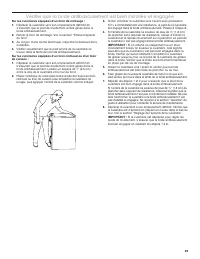
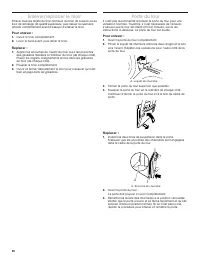


Table of Contents:
- Page 2 – RANGE SAFETY; Your safety and the safety of others are very important.; DANGER; WARNING
- Page 3 – INSTALLATION REQUIREMENTS; Tools and Parts; Tools Needed; Location Requirements
- Page 4 – Mobile Home - Additional Installation Requirements; Product Dimensions
- Page 5 – Electrical Requirements; Electrical Connection
- Page 6 – INSTALLATION INSTRUCTIONS; Unpack Range
- Page 7 – Adjust Leveling Legs
- Page 8 – Install Using a Power Supply Cord
- Page 10 – Install Using Direct Wire
- Page 11 – Direct Wire Installation: Copper or Aluminum Wire
- Page 12 – Bare Wire Torque Specifications
- Page 14 – Verify Anti-Tip Bracket Is Installed and Engaged
- Page 16 – Complete Installation; If You Need Assistance or Service:
- Page 17 – SÉCURITÉ DE LA CUISINIÈRE; Votre sécurité et celle des autres est très importante.; AVERTISSEMENT
- Page 18 – EXIGENCES D’INSTALLATION; Outils et pièces; Outils nécessaires; Exigences d’emplacement
- Page 19 – Dimensions du produit
- Page 20 – Spécifications électriques; Raccordement électrique
- Page 21 – INSTRUCTIONS D’INSTALLATION; Déballage de la cuisinière
- Page 22 – Réglage des pieds de nivellement
- Page 23 – Installer en utilisant un cordon d’alimentation
- Page 24 – Connexion à 3 conducteurs : Cordon d’alimentation; Connexion à 4 conducteurs : Cordon d’alimentation
- Page 25 – Installer à l’aide d’une connexion directe
- Page 27 – Spécifications de couple pour les fils nus; Connexion à 4 conducteurs : Raccordement par
- Page 31 – Terminer l’installation; Pour obtenir de l’assistance ou une visite de service :
- Page 32 – SEGURIDAD DE LA ESTUFA; Su seguridad y la seguridad de los demás es muy importante.; ADVERTENCIA
- Page 33 – REQUISITOS DE INSTALACIÓN; Herramientas y piezas; Herramientas necesarias; Requisitos de ubicación
- Page 34 – Dimensiones del producto
- Page 35 – Requisitos eléctricos; Conexión eléctrica
- Page 36 – INSTRUCCIONES DE INSTALACIÓN; Desembale la estufa
- Page 37 – Regule las patas niveladoras
- Page 38 – Instalación con un cable de suministro eléctrico
- Page 39 – Conexión de 3 hilos: Cable de suministro eléctrico
- Page 40 – Instalación con un cable directo
- Page 41 – Instalación de cable directo: Hilo de cobre o aluminio; Conexión de 3 hilos: Cable directo
- Page 42 – Especificaciones de torsión para hilos desnudos; Conexión de 4 hilos: Cable directo
- Page 43 – Verifique que el soporte antivuelco esté instalado y enganchado
- Page 44 – Quite/vuelva a colocar el cajón; Para volver a colocarlo:; Puerta del horno; Para volver a colocarla:; Complete la instalación; Si necesita ayuda o servicio técnico:
W11256507A
INSTALLATION INSTRUCTIONS
FRONT CONTROL ELECTRIC RANGES
Table of Contents
Table des matières
Índice
INSTRUCTIONS D’INSTALLATION DES CUISINIÈRES
ÉLECTRIQUES À COMMANDES FRONTALES
INSTRUCCIONES DE INSTALACIÓN ESTUFAS ELÉCTRICAS
CON CONTROL FRONTAL
RANGE SAFETY ..................................... 2
INSTALLATION REQUIREMENTS ......... 3
Tools and Parts .......................................3
Location Requirements ..........................3
Electrical Requirements .........................5
INSTALLATION INSTRUCTIONS ........... 6
Unpack Range........................................6
Install Anti-Tip Bracket ...........................6
Adjust Leveling Legs ..............................7
Level Range ............................................8
Electrical Connection .............................8
Verify Anti-Tip Bracket Is Installed and
Engaged .............................................. 14
Remove/Replace Drawer .................... 15
Oven Door ........................................... 15
Complete Installation .......................... 16
SÉCURITÉ DE LA CUISINIÈRE ........... 17
EXIGENCES D’INSTALLATION ........... 18
Outils et pièces .................................... 18
Exigences d’emplacement .................. 18
Spécifications électriques ................... 20
INSTRUCTIONS D’INSTALLATION ..... 21
Déballage de la cuisinière ................... 21
Installation de la bride
antibasculement .................................. 21
Réglage des pieds de nivellement ...... 22
Réglage de l’aplomb de la cuisinière .. 23
Raccordement électrique .................... 23
Vérifier que la bride antibasculement est
bien installée et engagée .................... 29
Enlever/replacer le tiroir ...................... 30
Porte du four ....................................... 30
Terminer l’installation ........................... 31
SEGURIDAD DE LA ESTUFA............... 32
REQUISITOS DE INSTALACIÓN ......... 33
Herramientas y piezas ......................... 33
Requisitos de ubicación ...................... 33
Requisitos eléctricos ........................... 35
INSTALACIÓN ....................................... 36
Desembale la estufa ............................ 36
Instalación del soporte antivuelco ...... 36
Regule las patas niveladoras .............. 37
Nivelación de la estufa ........................ 38
Conexión eléctrica .............................. 38
Verifique que el soporte antivuelco
esté instalado y enganchado .............. 43
Quite/vuelva a colocar el cajón ........... 44
Puerta del horno .................................. 44
Complete la instalación ....................... 44
IMPORTANT:
Save for local electrical inspector’s use.
IMPORTANT :
Conserver ces instructions à l’usage de l’inspecteur des installations électriques local.
IMPORTANTE:
Guarde para tener a disposición del inspector de electricidad local.
"Loading the manual" means you need to wait until the file loads and becomes available for online reading. Some manuals are very large, and the time they take to appear depends on your internet speed.
Was this manual helpful?
About this manual
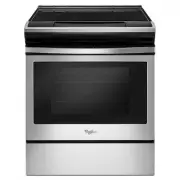
- Brand
- Whirlpool
- Model
- WEE510S0FS
- Document type
- Installation Manual
- Category
- Range
- Language(s)
- English, Spanish, French
- Pages
- 44
- File size
- 3.8 MB
- Format
Other Manuals for Whirlpool WEE510S0FS
Summary
2 RANGE SAFETY Installation and Service must be performed by a qualified installer or service agency. You can be killed or seriously injured if you don't immediately You can be killed or seriously injured if you don't follow All safety messages will tell you what the potential hazard is, tell you ho...
3 INSTALLATION REQUIREMENTS Tools and Parts Gather the required tools and parts before starting installation. Read and follow the instructions provided with any tools listed here. Tools Needed ■ Tape measure ■ Flat-blade screwdriver ■ Phillips screwdriver ■ Level ■ Hand or electric drill ■ Wrench or...
4 Mobile Home - Additional Installation Requirements The installation of this range must conform to the Manufactured Home Construction and Safety Standard, Title 24 CFR, Part 3280 (formerly the Federal Standard for Mobile Home Construction and Safety, Title 24, HUD Part 280). When such standard is n...
Ask a question
Related manuals
Popular Whirlpool Ranges
More Whirlpool Ranges models
 Whirlpool WFG775H0HZ User Manual
 Whirlpool WFG975H0HZ User Manual
 Whirlpool WGE745C0FS User Manual
 Whirlpool WGG745S0FS User Manual
 Whirlpool WEC310S0LS User Manual
 Whirlpool WEE515S0LS User Manual
 Whirlpool WEE515S0LZ User Manual
 Whirlpool WEE515SALS User Manual
 Whirlpool WEE745H0LZ User Manual
 Whirlpool WEE750H0HZ User Manual
 Whirlpool WEG515S0LS User Manual
 Whirlpool WEG745H0LZ User Manual
 Whirlpool WEG750H0HZ User Manual
 Whirlpool WFC150M0JS User Manual
 Whirlpool WFC150M0JW User Manual
 Whirlpool WFC315S0JS User Manual
 Whirlpool WFC315S0JW User Manual