Page 2 - Contents
Contents About This Guide 1 Chapter 1 Get to Know About Your Router 3 1. 1. Product Overview. . . . . . . . . . . . . . . . . . . . . . . . . . . . . . . . . . . . . . . . . . . . . . . . . . . . . . . . . . . . 41. 2. Panel Layout. . . . . . . . . . . . . . . . . . . . . . . . . . . . . . . . . . ....
Page 5 - About This Guide; Conventions; Convention
1 About This Guide This guide is a complement of Quick Installation Guide. The Quick Installation Guide instructs you on quick internet setup, and this guide provides details of each function and shows you the way to configure these functions appropriate to your needs. Note: Features available in th...
Page 6 - More Info
2 *Any revision to a supported game may influence Game Accelerator’s ability to support it. Please refer to our product page for the full list of supported games.**2.5 Gbps Internet speeds require compatible service plans and equipment. The 2.5 Gbps and Gigabit port cannot be concurrently configured...
Page 7 - Chapter; Get to Know About Your Router
Chapter 1 Get to Know About Your Router This chapter introduces what the router can do and shows its appearance. It contains the following sections:• Product Overview • Panel Layout
Page 8 - 1 Product Overview
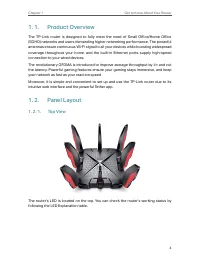
4 Chapter 1 Get to Know About Your Router 1 1 Product Overview The TP-Link router is designed to fully meet the need of Small Office/Home Office (SOHO) networks and users demanding higher networking performance. The powerful antennas ensure continuous Wi-Fi signal to all your devices while boosting ...
Page 9 - LED Explanation; Name; 2 2 The Side and Back Panel; Item
5 Chapter 1 Get to Know About Your Router LED Explanation Name Status Indication Pulsing orange The system is starting up. Solid white The router is working normally. Solid red No internet connection. Pulsing Red The Wi-Fi is off and there is no internet connection. Solid orange The router is connec...
Page 10 - Button Description
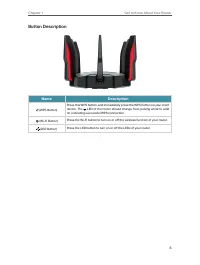
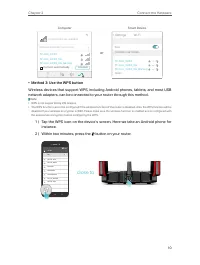
6 Chapter 1 Get to Know About Your Router Button Description Name Description (WPS Button) Press this WPS button, and immediately press the WPS button on your client device. The LED of the router should change from pulsing white to solid on, indicating successful WPS connection. (Wi-Fi Button) Press...
Page 11 - Connect the Hardware; This chapter contains the following sections:
Chapter 2 Connect the Hardware This chapter contains the following sections: • Position Your Router • Connect Your Router
Page 12 - 1 Position Your Router; 2 Connect Your Router
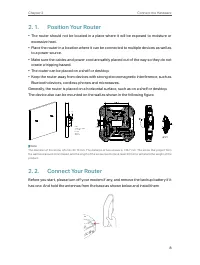
8 Chapter 2 Connect the Hardware 2 1 Position Your Router • The router should not be located in a place where it will be exposed to moisture or excessive heat. • Place the router in a location where it can be connected to multiple devices as well as to a power source. • Make sure the cables and powe...
Page 14 - close to
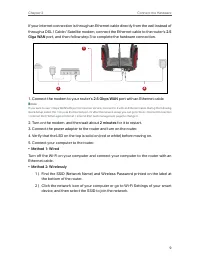
10 Chapter 2 Connect the Hardware Computer Smart Device or Connections are available Wireless Network Connection Connect automatically Connect √ TP-Link_XXXXTP-Link_XXXX_5GTP-Link_XXXX_5G_Gaming Wi-Fi Wi-Fi TP-Link_XXXX CHOOSE A NETWORK... Other... < Settings TP-Link_XXXX_5GTP-Link_XXXX_5G_Gaming...
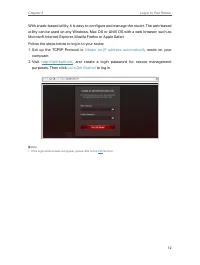
Page 15 - Log In to Your Router
Page 17 - Set Up Internet Connection; your ISP provides IPv6 service.
Chapter 4 Set Up Internet Connection This chapter introduces how to connect your router to the internet. The router is equipped with a web-based Quick Setup wizard. It has necessary ISP information built in, automates many of the steps and verifies that those steps have been successfully completed. ...
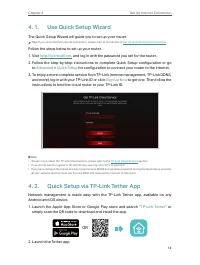
Page 18 - 1 Use Quick Setup Wizard; 2 Quick Setup via TP-Link Tether App; OR
14 Chapter 4 Set Up Internet Connection 4 1 Use Quick Setup Wizard The Quick Setup Wizard will guide you to set up your router. Tips: If you need the IPv6 internet connection, please refer to the section of Set Up an IPv6 Internet Connection . Follow the steps below to set up your router.1. Visit ht...
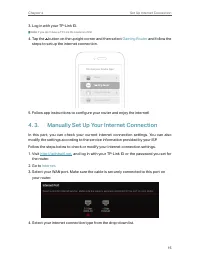
Page 19 - 3 Manually Set Up Your Internet Connection
15 Chapter 4 Set Up Internet Connection 3. Log in with your TP-Link ID. Note: If you don’t have a TP-Link ID, create one first. 4. Tap the button on the upright corner and then select Gaming Router and follow the steps to set up the internet connection. Choose your device type Router Range Extender ...
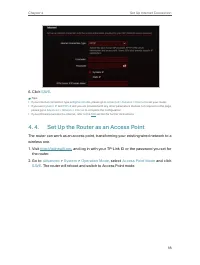
Page 22 - 4 Set Up the Router as an Access Point
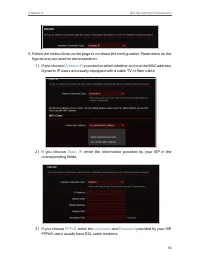
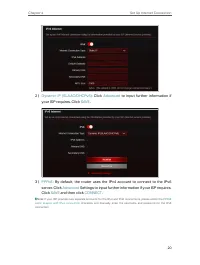
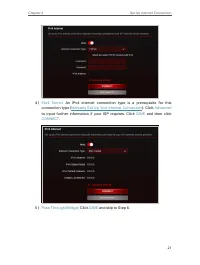
18 Chapter 4 Set Up Internet Connection 6. Click SAVE . Tips: • If your internet connection type is BigPond Cable , please go to Advanced > Network > Internet to set your router. • If you use Dynamic IP and PPPoE and you are provided with any other parameters that are not required on the page,...
Page 23 - 5 Set Up an IPv6 Internet Connection
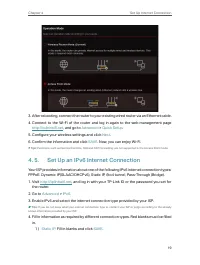
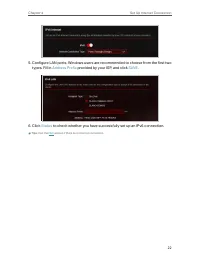
19 Chapter 4 Set Up Internet Connection 3. After rebooting, connect the router to your existing wired router via an Ethernet cable.4. Connect to the Wi-Fi of the router and log in again to the web management page http://tplinkwifi.net , and go to Advanced > Quick Setup . 5. Configure your wireles...
Page 27 - TP-Link Cloud Service
Chapter 5 TP-Link Cloud Service TP-Link Cloud service provides a better way to manage your cloud devices. Log in to your router with a TP-Link ID, and you can easily monitor and manage your home network when you are out and about via the Tether app. To ensure that your router stays new and gets bett...
Page 28 - 1 Register a TP-Link ID; 2 Change Your TP-Link ID Information; • To change your email address
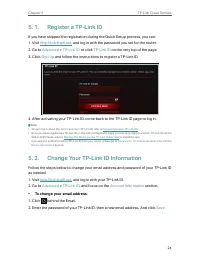
24 Chapter 5 TP-Link Cloud Service 5 1 Register a TP-Link ID If you have skipped the registration during the Quick Setup process, you can:1. Visit http://tplinkwifi.net , and log in with the password you set for the router. 2. Go to Advanced > TP-Link ID or click TP-Link ID on the very top of the...
Page 29 - • To change your password:
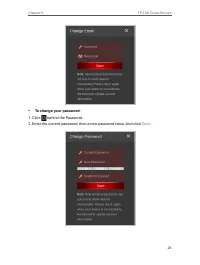
25 Chapter 5 TP-Link Cloud Service • To change your password: 1. Click behind the Password.2. Enter the current password, then a new password twice. And click Save .
Page 30 - 3 Manage the User TP-Link IDs; 3 1 Add TP-Link ID to Manage the Router
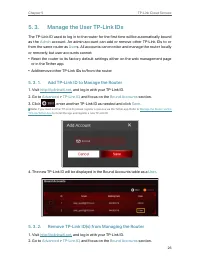
26 Chapter 5 TP-Link Cloud Service 5 3 Manage the User TP-Link IDs The TP-Link ID used to log in to the router for the first time will be automatically bound as the Admin account. An admin account can add or remove other TP-Link IDs to or from the same router as User s. All accounts can monitor and ...
Page 31 - 4 Manage the Router via the TP-Link Tether App
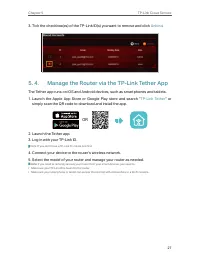
27 Chapter 5 TP-Link Cloud Service 3. Tick the checkbox(es) of the TP-Link ID(s) you want to remove and click Unbind . 5 4 Manage the Router via the TP-Link Tether App The Tether app runs on iOS and Android devices, such as smartphones and tablets.1. Launch the Apple App Store or Google Play store a...
Page 32 - Guest Network; network options to ensure network security and privacy.
Chapter 6 Guest Network This function allows you to provide Wi-Fi access for guests without disclosing your main network. When you have guests in your house, apartment, or workplace, you can create a guest network for them. In addition, you can customize guest network options to ensure network secur...
Page 33 - 1 Create a Network for Guests; 2 Customize Guest Network Options
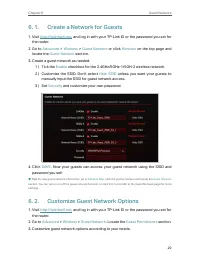
29 Chapter 6 Guest Network 6 1 Create a Network for Guests 1. Visit http://tplinkwifi.net , and log in with your TP-Link ID or the password you set for the router. 2. Go to Advanced > Wireless > Guest Network or click Wireless on the top page and locate the Guest Network section. 3. Create a g...
Page 35 - USB Settings
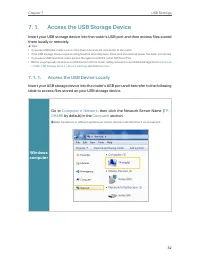
Chapter 7 USB Settings This chapter describes how to use the USB ports to share files and media from the USB storage devices over your home network locally, or remotely through the internet.The router supports USB external flash drives and hard drives.It contains the following sections:• Access the ...
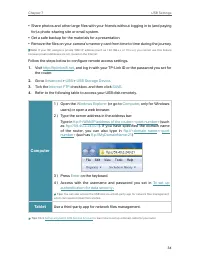
Page 36 - 1 Access the USB Storage Device; 1 1 Access the USB Device Locally; Windows
32 Chapter 7 USB Settings 7 1 Access the USB Storage Device Insert your USB storage device into the router’s USB port and then access files stored there locally or remotely. Tips: • If you use USB hubs, make sure no more than 4 devices are connected to the router.• If the USB storage device requires...
Page 37 - 1 2 Access the USB Device Remotely
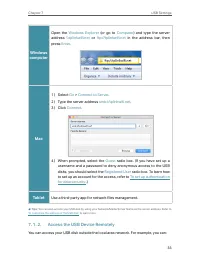
33 Chapter 7 USB Settings Windows computer Open the Windows Explorer (or go to Computer ) and type the server address \\tplinkwifi.net or ftp://tplinkwifi.net in the address bar, then press Enter . Mac 1 ) Select Go > Connect to Server . 2 ) Type the server address smb://tplinkwifi.net . 3 ) Clic...
Page 38 - Tablet
34 Chapter 7 USB Settings • Share photos and other large files with your friends without logging in to (and paying for) a photo-sharing site or email system. • Get a safe backup for the materials for a presentation.• Remove the files on your camera’s memory card from time to time during the journey....
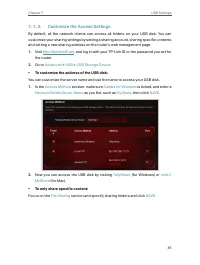
Page 39 - 1 3 Customize the Access Settings; • To customize the address of the USB disk:
35 Chapter 7 USB Settings 7 1 3 Customize the Access Settings By default, all the network clients can access all folders on your USB disk. You can customize your sharing settings by setting a sharing account, sharing specific contents and setting a new sharing address on the router’s web management ...
Page 40 - • To set up authentication for data security:; 2 Media Sharing
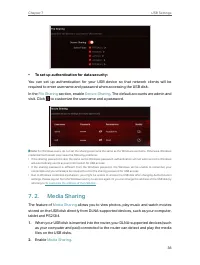
36 Chapter 7 USB Settings • To set up authentication for data security: You can set up authentication for your USB device so that network clients will be required to enter username and password when accessing the USB disk.In the File Sharing section, enable Secure Sharing . The default accounts are ...
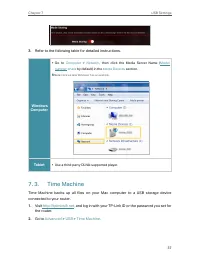
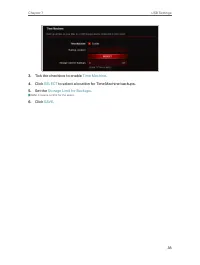
Page 41 - 3 Time Machine
37 Chapter 7 USB Settings 3 Refer to the following table for detailed instructions. Windows Computer • Go to Computer > Network , then click the Media Server Name ( Model number-share by default) in the Media Devices section. Note: Here we take Windows 7 as an example. Tablet • Use a third-party ...
Page 43 - HomeCare; – Parental; powered by Trend Micro; provides a kit of features to
Chapter 8 HomeCare TM – Parental Controls, QoS, Antivirus TP-Link HomeCare TM powered by Trend Micro TM provides a kit of features to help you create a personalized network that caters for the whole family. You can ensure appropriate internet access for everyone with Parental Controls, save bandwidt...
Page 44 - 1 Parental Controls; 1 1 Scenario 1: Setting Up Access Restrictions
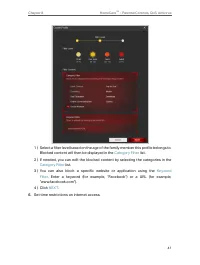
40 Chapter 8 HomeCare TM – Parental Controls, QoS, Antivirus 8 1 Parental Controls Parental Controls allows you to set up unique restrictions on internet access for each member of your family. You can block inappropriate content, set daily limits for the total time spent online and restrict internet...
Page 46 - 1 2 Scenario 2: Monitoring Internet Usage
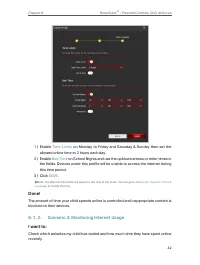
42 Chapter 8 HomeCare TM – Parental Controls, QoS, Antivirus 1 ) Enable Time Limits on Monday to Friday and Saturday & Sunday then set the allowed online time to 2 hours each day. 2 ) Enable Bed Time on School Nights and use the up/down arrows or enter times in the fields. Devices under this pro...
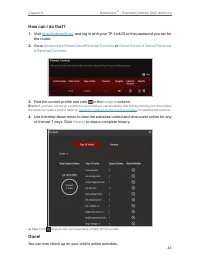
Page 48 - How can I do that
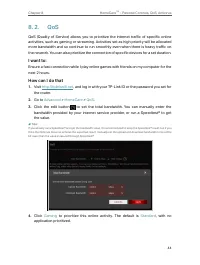
44 Chapter 8 HomeCare TM – Parental Controls, QoS, Antivirus 8 2 QoS QoS (Quality of Service) allows you to prioritize the internet traffic of specific online activities, such as gaming or streaming. Activities set as high priority will be allocated more bandwidth and so continue to run smoothly eve...
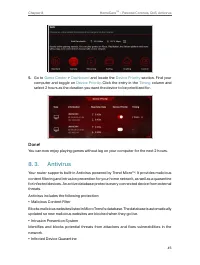
Page 49 - 3 Antivirus
45 Chapter 8 HomeCare TM – Parental Controls, QoS, Antivirus 5 Go to Game Center > Dashboard and locate the Device Priority section. Find your computer and toggle on Device Priority . Click the entry in the Timing column and select 2 hours as the duration you want the device to be prioritized for...
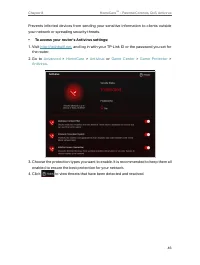
Page 50 - • To access your router’s Antivirus settings:
46 Chapter 8 HomeCare TM – Parental Controls, QoS, Antivirus Prevents infected devices from sending your sensitive information to clients outside your network or spreading security threats. • To access your router’s Antivirus settings: 1. Visit http://tplinkwifi.net , and log in with your TP-Link ID...
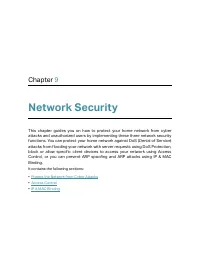
Page 51 - Network Security
Chapter 9 Network Security This chapter guides you on how to protect your home network from cyber attacks and unauthorized users by implementing these three network security functions. You can protect your home network against DoS (Denial of Service) attacks from flooding your network with server re...
Page 52 - 1 Protect the Network from Cyber Attacks
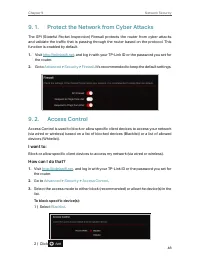
48 Chapter 9 Network Security 9 1 Protect the Network from Cyber Attacks The SPI (Stateful Packet Inspection) Firewall protects the router from cyber attacks and validate the traffic that is passing through the router based on the protocol. This function is enabled by default. 1 Visit http://tplinkw...
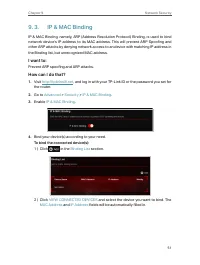
Page 55 - 3 IP & MAC Binding
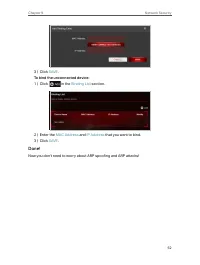
51 Chapter 9 Network Security 9 3 IP & MAC Binding IP & MAC Binding, namely, ARP (Address Resolution Protocol) Binding, is used to bind network device’s IP address to its MAC address. This will prevent ARP Spoofing and other ARP attacks by denying network access to an device with matching IP...
Page 57 - NAT Forwarding; communicate with a specified device on the local network.
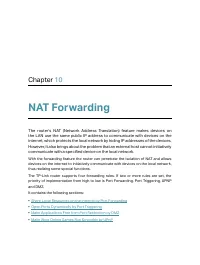
Chapter 10 NAT Forwarding The router’s NAT (Network Address Translation) feature makes devices on the LAN use the same public IP address to communicate with devices on the internet, which protects the local network by hiding IP addresses of the devices. However, it also brings about the problem that...
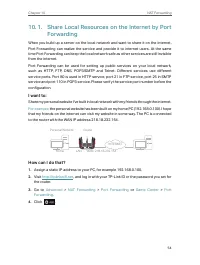
Page 58 - 0 1 Share Local Resources on the Internet by Port
54 Chapter 10 NAT Forwarding 10 1 Share Local Resources on the Internet by Port Forwarding When you build up a server on the local network and want to share it on the internet, Port Forwarding can realize the service and provide it to internet users. At the same time Port Forwarding can keep the loc...
Page 60 - 0 2 Open Ports Dynamically by Port Triggering
56 Chapter 10 NAT Forwarding 10 2 Open Ports Dynamically by Port Triggering Port Triggering can specify a triggering port and its corresponding external ports. When a host on the local network initiates a connection to the triggering port, all the external ports will be opened for subsequent connect...
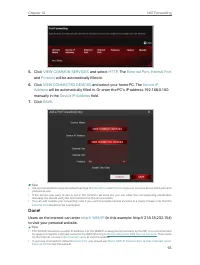
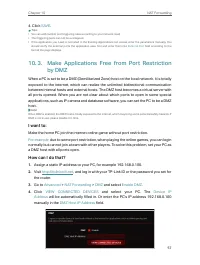
Page 61 - 0 3 Make Applications Free from Port Restriction
57 Chapter 10 NAT Forwarding 4. Click SAVE . Tips: • You can add multiple port triggering rules according to your network need.• The triggering ports can not be overlapped.• If the application you need is not listed in the Existing Applications list, please enter the parameters manually. You should ...
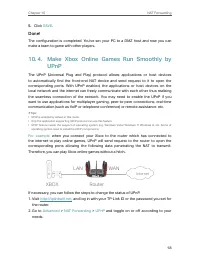
Page 62 - 0 4 Make Xbox Online Games Run Smoothly by; XBOX
58 Chapter 10 NAT Forwarding 5 Click SAVE . Done! The configuration is completed. You’ve set your PC to a DMZ host and now you can make a team to game with other players. 10 4 Make Xbox Online Games Run Smoothly by UPnP The UPnP (Universal Plug and Play) protocol allows applications or host devices ...
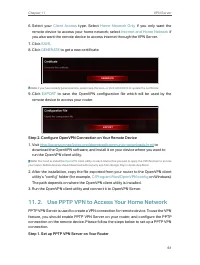
Page 63 - VPN Server; connection type as needed.
Chapter 11 VPN Server The VPN (Virtual Private Networking) Server allows you to access your home network in a secured way through internet when you are out of home. The router offers two ways to setup VPN connection: OpenVPN and PPTP (Point to Point Tunneling Protocol) VPN. It contains the following...
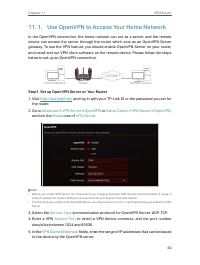
Page 64 - 1 1 Use OpenVPN to Access Your Home Network
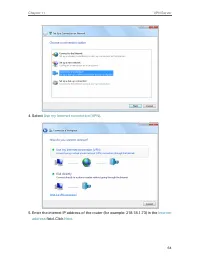
60 Chapter 11 VPN Server 11 1 Use OpenVPN to Access Your Home Network In the OpenVPN connection, the home network can act as a server, and the remote device can access the server through the router which acts as an OpenVPN Server gateway. To use the VPN feature, you should enable OpenVPN Server on y...
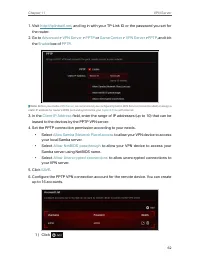
Page 65 - 1 2 Use PPTP VPN to Access Your Home Network
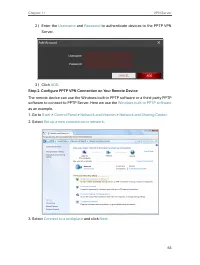
61 Chapter 11 VPN Server 6. Select your Client Access type. Select Home Network Only if you only want the remote device to access your home network; select Internet and Home Network if you also want the remote device to access internet through the VPN Server. 7. Click SAVE . 8. Click GENERATE to get...
Page 71 - Customize Your Network
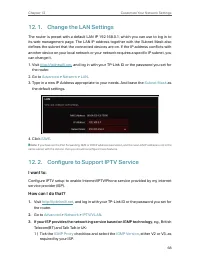
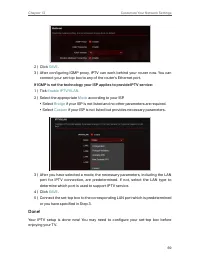
Chapter 12 Customize Your Network Settings This chapter guides you on how to configure advanced network features. It contains the following sections:• Change the LAN Settings • Configure to Support IPTV Service • Specify DHCP Server Settings • Set Up a Dynamic DNS Service Account • Create Static Rou...
Page 72 - 2 1 Change the LAN Settings
68 Chapter 12 Customize Your Network Settings 12 1 Change the LAN Settings The router is preset with a default LAN IP 192.168.0.1, which you can use to log in to its web management page. The LAN IP address together with the Subnet Mask also defines the subnet that the connected devices are on. If th...
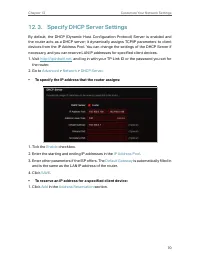
Page 74 - 2 3 Specify DHCP Server Settings; • To specify the IP address that the router assigns:
70 Chapter 12 Customize Your Network Settings 12 3 Specify DHCP Server Settings By default, the DHCP (Dynamic Host Configuration Protocol) Server is enabled and the router acts as a DHCP server; it dynamically assigns TCP/IP parameters to client devices from the IP Address Pool. You can change the s...
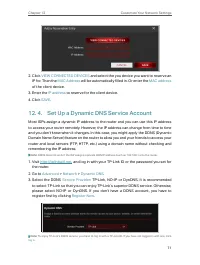
Page 75 - 2 4 Set Up a Dynamic DNS Service Account
71 Chapter 12 Customize Your Network Settings 2. Click VIEW CONNECTED DEVICES and select the you device you want to reserve an IP for. Then the MAC Address will be automatically filled in. Or enter the MAC address of the client device. 3. Enter the IP address to reserve for the client device. 4. Cli...
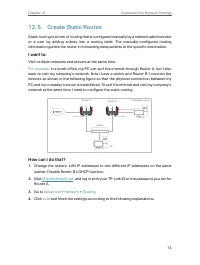
Page 77 - 2 5 Create Static Routes
73 Chapter 12 Customize Your Network Settings 12 5 Create Static Routes Static routing is a form of routing that is configured manually by a network administrator or a user by adding entries into a routing table. The manually-configured routing information guides the router in forwarding data packet...
Page 79 - 2 6 Specify Wireless Settings; • To enable or disable the wireless function:
75 Chapter 12 Customize Your Network Settings Open a web browser on your PC. Enter the company server’s IP address to visit the company network. 12 6 Specify Wireless Settings The router’s wireless network name (SSID) and password, and security option are preset in the factory. The preset SSID and p...
Page 80 - • To use the smart connect function:
76 Chapter 12 Customize Your Network Settings • To use the smart connect function: The smart connect function lets you to enjoy a more high-speed network by assigning your devices to best wireless bands based on actual conditions to balance network demands.1. Go to Wireless or Advanced > Wireless...
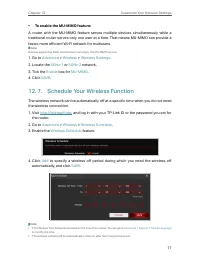
Page 81 - 2 7 Schedule Your Wireless Function
77 Chapter 12 Customize Your Network Settings • To enable the MU-MIMO feature: A router with the MU-MIMO feature serves multiple devices simultaneously while a traditional router serves only one user at a time. That means MU-MIMO can provide a faster, more efficient Wi-Fi network for multiusers. Not...
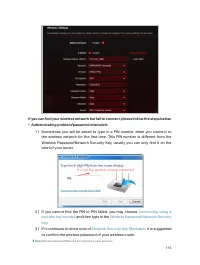
Page 82 - 2 8 Use WPS for Wireless Connection; 2 8 1 Connect via the Client’s PIN
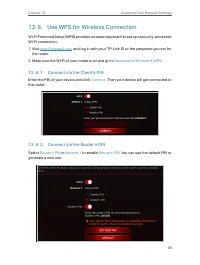
78 Chapter 12 Customize Your Network Settings 12 8 Use WPS for Wireless Connection Wi-Fi Protected Setup (WPS) provides an easier approach to set up a security-protected Wi-Fi connection.1. Visit http://tplinkwifi.net , and log in with your TP-Link ID or the password you set for the router. 2. Make ...
Page 83 - 2 8 3 Push the WPS Button; 2 9 Advanced Wireless Settings
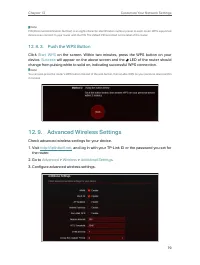
79 Chapter 12 Customize Your Network Settings Note: PIN (Personal Identification Number) is an eight-character identification number preset to each router. WPS supported devices can connect to your router with the PIN. The default PIN is printed on the label of the router. 12 8 3 Push the WPS Button...
Page 85 - Manage the Router
Chapter 13 Manage the Router This chapter will show you the configuration for managing and maintaining your router.It contains the following sections:• Upgrade the Firmware • Backup and Restore Configuration Settings • Change the Login Password • Backup and Restore Configuration Settings • Password ...
Page 86 - 3 1 Upgrade the Firmware
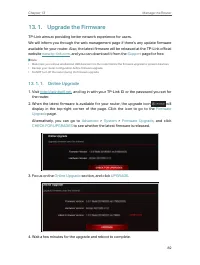
82 Chapter 13 Manage the Router 13 1 Upgrade the Firmware TP-Link aims at providing better network experience for users. We will inform you through the web management page if there’s any update firmware available for your router. Also, the latest firmware will be released at the TP-Link official web...
Page 87 - 3 2 Backup and Restore Configuration Settings
83 Chapter 13 Manage the Router Tips: If there’s a new and important firmware update for your router, you will see the notification (similar as shown below) on your computer as long as a web browser is opened. Click UPGRADE , and log into the web management page with the username and password you se...
Page 88 - • To backup configuration settings:; • To reset the router except your login password and TP-Link ID:
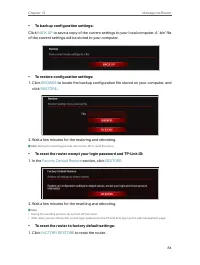
84 Chapter 13 Manage the Router • To backup configuration settings: Click BACK UP to save a copy of the current settings to your local computer. A ‘.bin’ file of the current settings will be stored to your computer. • To restore configuration settings: 1. Click BROWSE to locate the backup configurat...
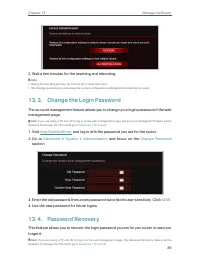
Page 89 - 3 3 Change the Login Password; 3 4 Password Recovery
85 Chapter 13 Manage the Router 2. Wait a few minutes for the resetting and rebooting. Note: • During the resetting process, do not turn off or reset the router. • We strongly recommend you backup the current configuration settings before resetting the router. 13 3 Change the Login Password The acco...
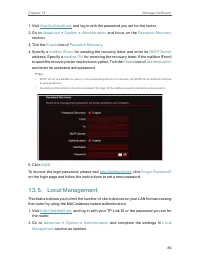
Page 90 - 3 5 Local Management
86 Chapter 13 Manage the Router 1. Visit http://tplinkwifi.net , and log in with the password you set for the router. 2. Go to Advanced > System > Administration and focus on the Password Recovery section. 3. Tick the Enable box of Password Recovery . 4. Specify a mailbox (From) for sending th...
Page 92 - 3 6 Remote Management
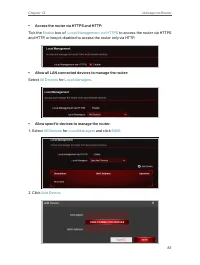
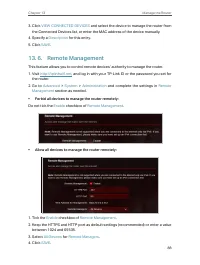
88 Chapter 13 Manage the Router 3. Click VIEW CONNECTED DEVICES and select the device to manage the router from the Connected Devices list, or enter the MAC address of the device manually. 4. Specify a Description for this entry. 5. Click SAVE . 13 6 Remote Management This feature allows you to cont...
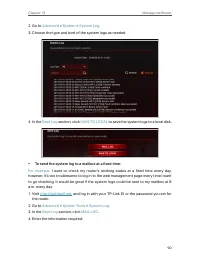
Page 95 - 3 8 Test the Network Connectivity
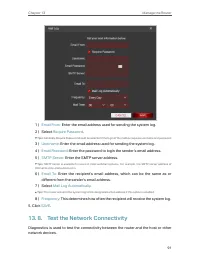
91 Chapter 13 Manage the Router 1 ) Email From: Enter the email address used for sending the system log. 2 ) Select Require Password . Tips: Generally, Require Password should be selected if the login of the mailbox requires username and password. 3 ) Username: Enter the email address used for sendi...
Page 97 - 3 9 Set Up System Time; • To get time from the internet:
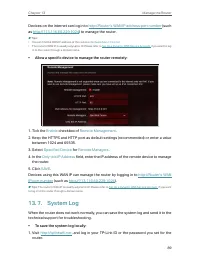
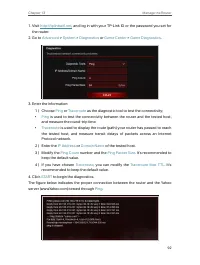
93 Chapter 13 Manage the Router The figure below indicates the proper connection between the router and the Yahoo server (www.Yahoo.com) tested through Traceroute . 13 9 Set Up System Time System time is the time displayed while the router is running. The system time you configure here will be used ...
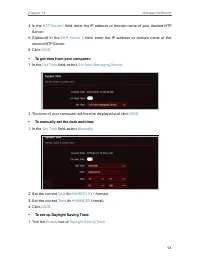
Page 98 - • To get time from your computer:; • To manually set the date and time:
94 Chapter 13 Manage the Router 4. In the NTP Server I field, enter the IP address or domain name of your desired NTP Server. 5. (Optional) In the NTP Server II field, enter the IP address or domain name of the second NTP Server. 6. Click SAVE . • To get time from your computer: 1. In the Set Time f...
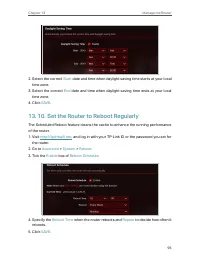
Page 99 - 3 10 Set the Router to Reboot Regularly
95 Chapter 13 Manage the Router 2. Select the correct Start date and time when daylight saving time starts at your local time zone. 3. Select the correct End date and time when daylight saving time ends at your local time zone. 4. Click SAVE . 13 10 Set the Router to Reboot Regularly The Scheduled R...
Page 102 - 4 1 Check Key Parameters through Dashboard
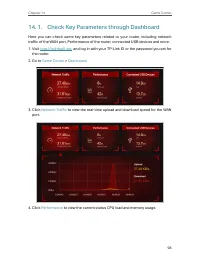
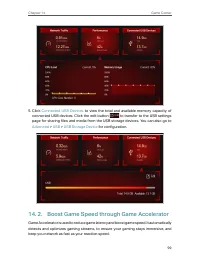
98 Chapter 14 Game Center 14 1 Check Key Parameters through Dashboard Here you can check some key parameters related to your router, including network traffic of the WAN port, Performance of the router, connected USB devices and more.1. Visit http://tplinkwifi.net , and log in with your TP-Link ID o...
Page 103 - 4 2 Boost Game Speed through Game Accelerator
99 Chapter 14 Game Center 5. Click Connected USB Devices to view the total and available memory capacity of connected USB devices. Click the edit button to transfer to the USB settings page for sharing files and media from the USB storage devices. You can also go to Advanced > USB > USB Storag...
Page 104 - 4 3 Game Protector
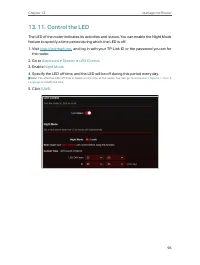
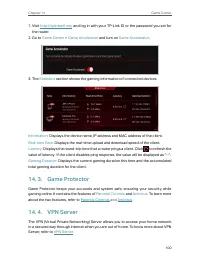
100 Chapter 14 Game Center 1. Visit http://tplinkwifi.net , and log in with your TP-Link ID or the password you set for the router. 2. Go to Game Center > Game Accelerator and turn on Game Accelerator . 3. The Statistics section shows the gaming information of connected devices. Information: Disp...
Page 105 - 4 5 Port Forwarding; 4 6 Game Diagnostics
101 Chapter 14 Game Center 14 5 Port Forwarding Port Forwarding enables you to build up a server on the local network and want to share it on the internet. Please refer to Share Local Resources on the Internet by Port Forwarding to get the detailed information about Port Forwarding. 14 6 Game Diagno...
Page 106 - OneMesh with Seamless
Chapter 15 OneMesh with Seamless Roaming This chapter introduces the TP-Link OneMesh TM feature. It contains the following sections:• Set Up a OneMesh Network • Manage Devices in the OneMesh Network
Page 107 - Unified Wi-Fi Network; 5 1 Set Up a OneMesh Network
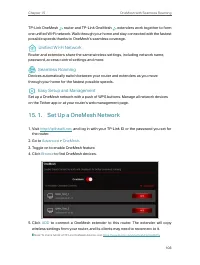
103 Chapter 15 OneMesh with Seamless Roaming TP-Link OneMesh router and TP-Link OneMesh extenders work together to form one unified Wi-Fi network. Walk through your home and stay connected with the fastest possible speeds thanks to OneMesh’s seamless coverage. Unified Wi-Fi Network Router and extend...
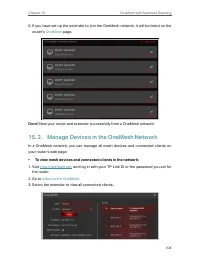
Page 108 - 5 2 Manage Devices in the OneMesh Network; • To view mesh devices and connected clients in the network:
104 Chapter 15 OneMesh with Seamless Roaming 6. If you have set up the extender to join the OneMesh network, it will be listed on the router’s OneMesh page. Done! Now your router and extender successfully form a OneMesh network! 15 2 Manage Devices in the OneMesh Network In a OneMesh network, you ca...
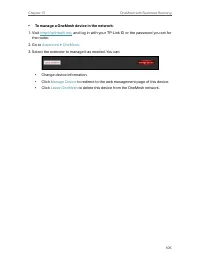
Page 109 - • To manage a OneMesh device in the network:
105 Chapter 15 OneMesh with Seamless Roaming • To manage a OneMesh device in the network: 1. Visit http://tplinkwifi.net , and log in with your TP-Link ID or the password you set for the router. 2. Go to Advanced > OneMesh . 3. Select the extender to manage it as needed. You can: • Change device ...
Page 110 - TP-Link Router Skill for
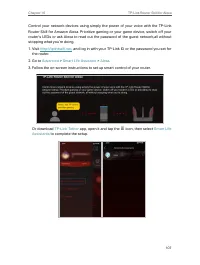
Chapter 16 TP-Link Router Skill for Alexa This chapter introduces how to set up Alexa control for your TP-Link router.
Page 112 - FAQ; Q1 What should I do if I forget my wireless password?; Q3 What should I do if I cannot log in to the router’s web management
108 FAQ Q1 What should I do if I forget my wireless password? The default wireless password is printed on the label of the router. If the password has been altered:1. Connect your computer to the router using an Ethernet cable. 2. Visit http://tplinkwifi.net , and log in with your TP-Link ID or the ...
Page 114 - Q4 What should I do if I cannot access the internet even though the
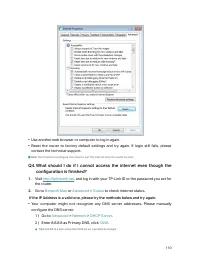
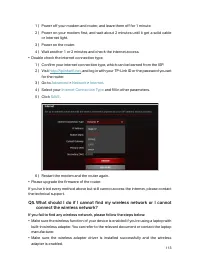
110 • Use another web browser or computer to log in again.• Reset the router to factory default settings and try again. If login still fails, please contact the technical support. Note : You’ll need to reconfigure the router to surf the internet once the router is reset. Q4 What should I do if I can...
Page 117 - Q5 What should I do if I cannot find my wireless network or I cannot
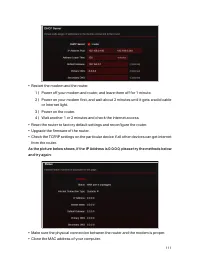
113 1 ) Power off your modem and router, and leave them off for 1 minute.2 ) Power on your modem first, and wait about 2 minutes until it get a solid cable or Internet light. 3 ) Power on the router.4 ) Wait another 1 or 2 minutes and check the internet access. • Double check the internet connection...
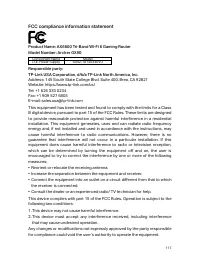
Page 121 - FCC compliance information statement; Model Number: Archer GX90; the receiver is connected.
117 FCC compliance information statement Product Name: AX6600 Tri-Band Wi-Fi 6 Gaming Router Model Number: Archer GX90 Component Name Model I.T.E. Power Supply S042-1A120330VU Responsible party: TP-Link USA Corporation, d/b/a TP-Link North America, Inc Address: 145 South State College Blvd. Suite 40...
Page 122 - could void the user’s authority to operate the equipment.; FCC RF Radiation Exposure Statement; equipment is properly maintained and operated.
118 Note: The manufacturer is not responsible for any radio or TV interference caused by unauthorized modifications to this equipment. Such modifications could void the user’s authority to operate the equipment. FCC RF Radiation Exposure Statement This equipment complies with FCC RF radiation exposu...
Page 123 - Product Name: I T E Power Supply
119 FCC compliance information statement Product Name: I T E Power Supply Model Number: S042-1A120330VU Responsible party: TP-Link USA Corporation, d/b/a TP-Link North America, Inc Address: 145 South State College Blvd. Suite 400, Brea, CA 92821 Website: http://www.tp-link.com/us/ Tel: +1 626 333 02...
Page 125 - Canadian Compliance Statement; sont strictement interdits pour l’exploitation de l’émetteur.
121 Canadian Compliance Statement This device contains licence-exempt transmitter(s)/receiver(s) that comply with Innovation, Science and Economic Development Canada’s licence-exempt RSS(s). Operation is subject to the following two conditions:(1) This device may not cause interference.(2) This devi...
Page 126 - topoint operation as appropriate and; Radiation Exposure Statement:; with minimum distance 20cm between the radiator & your body.; Déclaration d’exposition aux radiations:; 당해 무선설비는 운용중 전파혼신 가능성이 있음.
122 complies with the e.i.r.p. limits specified for point-to-point and non-point- topoint operation as appropriate; and DFS (Dynamic Frequency Selection) products that operate in the bands 5250- 5350 MHz, 5470-5600MHz, and 5650-5725MHz. Avertissement: 1. Le dispositif fonctionnant dans la bande 5150...
Page 128 - 天線; Safety Information
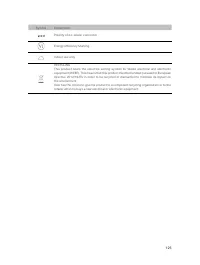
124 電 源 供 應 器 − ○ ○ ○ ○ ○ 天線 ○ ○ ○ ○ ○ ○ 備考1. "超出0.1 wt %" 及 "超出0.01 wt %" 系指限用物質之百分比含量超出百分 比含量基準值。備考2. "○"系指該項限用物質之百分比含量未超出百分比含量基準值。備考3. " − " 系指該項限用物質為排除項目。 Продукт сертифіковано згідно с правилами системи УкрСЕПРО на відповідність вимогам нормативних документів та ...