Page 3 - TABLE OF CONTENTS
3 TABLE OF CONTENTS Equipment Safety 4-5 Location of Parts 6 Installation Instructions 7-12 Installing the Cooktop 7 The Burner Flames 7 Overhead Cabinets 7 Dimensions Chart 8 Sealing the Cooktop 9 Room Ventilation 9 Gas Connection 10 Natural and Propane Gas 11 Electrical Connection 11 Electrical Gr...
Page 4 - EQUIPMENT SAFETY
4 EQUIPMENT SAFETY Your safety and the safety of others are very important. We have provided many important safety messages in this manual and on your unit. Always read and obey all safety messages. If the information in this manual is not followed exactly, a fire or explosion may result causing pro...
Page 5 - WARNING
5 • The use of a gas cooking appliance produces heat and moisture in the room in which it is installed. The room must be well ventilated. • Intensive and lengthy use of the appliance may require additional ventilation. This can be achieved by opening a window or by increasing the power of the mechan...
Page 6 - LOCATION OF PARTS
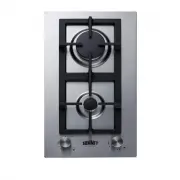
6 LOCATION OF PARTS MODEL: GCJ1SS MODEL: GCJ2SS MODEL: GCJ4SS MODEL: GCJ5SS MODEL: GCJ536SS Number Description Heat Supplied 1 Ultra-rapid burner 11,900 – 12,700 Btu/h 2 Rapid burner 10,000 Btu/h 3 Semi-rapid burner 6,000 Btu/h 4 Auxiliary burner 3,400 Btu/h 5-6 Grate 7 Burner No. 3 control knob 8 B...
Page 7 - INSTALLATION INSTRUCTIONS; Installing the Cooktop
7 INSTALLATION INSTRUCTIONS Installation, adjustment of controls and maintenance must only be carried out by qualified personnel. Incorrect installation may cause damage to persons, animals or property for which the manufacturer will not be considered responsible. During the life of the system, the ...
Page 9 - Sealing the Cooktop; Room Ventilation
9 Sealing the Cooktop The cooktop has a special seal which prevents liquid from infiltrating into the cabinet. Strictly comply with the following instructions in order to apply this seal correctly: - Take off all the movable parts of the cooktop. - Detach the seals from their backing, checking that ...
Page 10 - Gas Connection
10 Gas Connection • Connect a manual shut-off valve to the gas supply in an accessible location for turning on or shutting off gas to the appliance. • Leak testing of the appliance shall be conducted by the installer according to the instructions given. • Issues arising from a failure to do so will ...
Page 11 - Natural Gas and Propane Gas; Electrical Connection
11 Natural Gas and Propane Gas • Natural gas installations require the connection of a gas regulator to the cooktop. You will find this regulator among the accessories supplied with the appliance. • Assemble the regulator (noting the direction of gas flow) and transition pieces (supplied) in accorda...
Page 12 - Electrical Grounding
12 Electrical Grounding This appliance is equipped with a (three-prong) (four-prong) grounding plug for your protection against shock hazard and should be plugged directly into a properly grounded receptacle. Do not cut or remove the grounding prong from this plug.
Page 13 - ADJUSTMENTS; Taps
13 ADJUSTMENTS Always disconnect the appliance from the electrical power source before making any adjustments. All seals must be replaced by the technician when any adjustments are completed. Taps "Reduced rate" adjustment: 1. Switch on the burner and turn the relative knob to the “Reduced r...
Page 14 - CONVERSIONS; Replacing Nozzles
14 CONVERSIONS CAUTION: Shut off the gas supply prior to disconnecting the electrical power, before proceeding with the conversion. Replacing Nozzles • The burners can be adapted to suit different types of gas by fitting the nozzles that correspond to the gas used. To do this, it is necessary to rem...
Page 16 - OPERATING THE COOKTOP; Lighting the Burners
16 OPERATING THE COOKTOP Lighting the Burners A diagram is screened beside each knob on the control panel of your cooktop. This diagram indicates to which burner the knob in question corresponds. After having opened the gas main or bottled gas tap, light the burners as described below: The knobs of ...
Page 17 - The “Dual” Burner
17 The “Dual” Burner Separate regulation of the inner and outer rings (in practical terms, a dual burner controlled by a single knob), offering very flexible use thanks to the possibility to light either the inner flame only or the whole burner (inner and outer flames at the same time). Lighting and...
Page 18 - CLEANING; Before Remounting Parts
18 CLEANING CAUTION: Always disconnect the appliance from the gas and electricity supplies before carrying out any cleaning operation. Continuous use can cause the burners to change color due to the high temperature. To properly clean your appliance, follow these steps: • Periodically wash the hot p...
Page 19 - SERVICING; Replacing Components
19 SERVICING Always disconnect the appliance from the electric and gas supplies before proceeding with any servicing operation. Replacing Components • To replace the components housed inside the appliance, remove the trivets and the burners from the upper part of the cooktop. Remove the fixing screw...
Page 20 - LIMITED WARRANTY; DISCLAIMER OF IMPLIED WARRANTIES LIMITATION OF REMEDIES
20 LIMITED WARRANTY Within the 48 contiguous United States, for one year from the date of purchase, when this appliance is operated and maintained according to instructions attached to or furnished with the product, warrantor will pay for factory-specified parts and repair labor to correct defects i...
Page 21 - Manuel de l'Utilisateur; SÉCURITÉ ET D'UTILISATION RÈGLES
21 LA TABLE DE CUISSON AU GAZ ENCASTRABLE Manuel de l'Utilisateur Des modèles : GCJ1SS LCG1S SGC1SS GCJ2SS LCG2S SGC2SS GCJ4SS LCG4S SGC4SS GCJ5SS LCG5S SGC5SS GCJ536SS LCG536S SGC536SS AVANT UTILISATION, VEUILLEZ LIRE ET SUIVRE TOUTES LES INSTRUCTIONS DE SÉCURITÉ ET D'UTILISATION RÈGLES Write Model...
Page 23 - TABLE DES MATIÈRES
23 TABLE DES MATIÈRES Sécurité des Equipmentes 24-25 Position des Composants 26 Instructions d’Installation 27-32 Installation de la Table de Cuisson 27 Les Flammes Debruleur 27 Unités Murales 27 Fixation de la Table de Cuisson 29 Ventilation de la Piece 29 Raccordement au Gaz 30 Gaz Naturel et Gaz ...
Page 24 - SECURITE DES EQUIPEMENTS
24 SECURITE DES EQUIPEMENTS Votre sécurité et celle des autres sont très importantes. Le non- respect des instructions du présent manuel peut être à l’origine d’un incendie ou explosion causant des dommages matériels, corporels ou le décès. • Le produit doit être installé conformément à la déclarati...
Page 26 - POSITION DES COMPOSANTS; Modèle
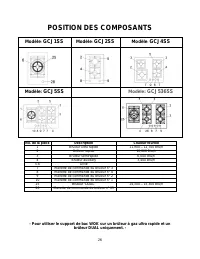
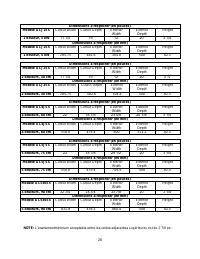
26 POSITION DES COMPOSANTS Modèle : GCJ1SS Modèle : GCJ2SS Modèle : GCJ4SS Modèle : GCJ5SS Modèle : GCJ536SS No. de la pièce Description Chaleur fournie 1 Brûleur ultra rapide 11,900 – 12,700 Btu/h 2 Brûleur rapide 10,000 Btu/h 3 Brûleur semirapide 6,000 Btu/h 4 Brûleur auxiliary 3,400 Btu/h 5-6 Gri...
Page 27 - INSTRUCTIONS D'INSTALLATION; Installation de la table de cuisson; Les flammes du brûleur
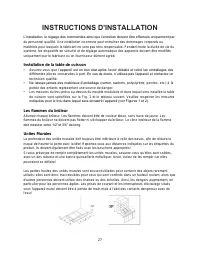
27 INSTRUCTIONS D'INSTALLATION L’installation, le réglage des commandes ainsi que l’entretien doivent être effectués uniquement par du personnel qualifié. Une installation incorrecte peut entraîner des dommages corporels ou matériels pour lesquels le fabricant ne sera pas tenu responsable. Pendant t...
Page 29 - Fixation de la table de cuisson; Ventilation de la pièce
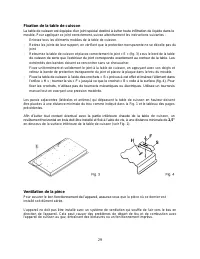
29 Fixation de la table de cuisson La table de cuisson est équipée d’un joint spécial destiné à éviter toute infiltration de liquide dans le meuble. Pour appliquer ce joint correctement, suivez attentivement les instructions suivantes : - Enlevez tous les éléments mobiles de la table de cuisson. - R...
Page 30 - Raccordement au Gaz; ATTENTION
30 Raccordement au Gaz • Raccordez au tuyau de gaz, un robinet de fermeture qui soit facile d’accès pour ouvrir ou fermer l’arrivée de gaz à l’appareil. • La vérification de fuites de l’appareil doit être effectuée par l’installateur selon les instructions données. • Les problèmes résultant d’une om...
Page 31 - Gaz naturel et Gaz propane; Branchement électrique
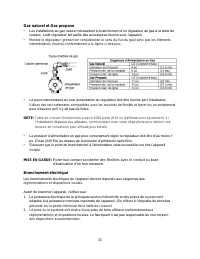
31 Gaz naturel et Gaz propane • Les installations au gaz naturel nécessitent le branchement d’un régulateur de gaz à la table de cuisson. Ledit régulateur fait partie des accessoires fournis avec l’appareil. • Montez le régulateur (prenant en considération le sens du flux du gaz) ainsi que les éléme...
Page 32 - Mise à la terre Electrique
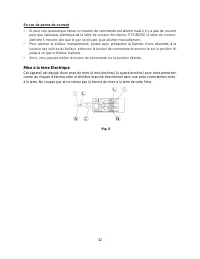
32 En cas de panne de courant • Si pour une quelconque raison un bouton de commande est allumé mais il n’y a pas de courant pour que l’allumeur électrique de la table de cuisson fonctionne, ÉTEINDRE la table de cuisson, attendre 5 minutes afin que le gaz se dissipe, puis allumer manuellement. • Pour...
Page 33 - RÉGLAGES; Robinets
33 RÉGLAGES Débranchez l’appareil du réseau d’alimentation électrique avant d’intervenir pour des réglages. Tous les joints doivent être changés par le technicien une fois les réglages terminés. Robinets Réglage du “débit réduit” : 1. Allumez le brûleur et tournez la manette correspondante sur la po...
Page 34 - Remplacement des buses
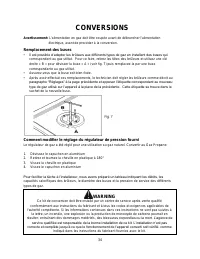
34 CONVERSIONS Avertissement: L'alimentation en gaz doit être coupée avant de débrancher l'alimentation électrique, avant de procéder à la conversion. Remplacement des buses • Il est possible d’adapter les brûleurs aux différents types de gaz en installant des buses qui correspondent au gaz utilisé....
Page 36 - UTILISATION DE LA TABLE DE CUISSON; Allumage des brûleurs
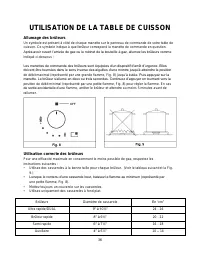
36 UTILISATION DE LA TABLE DE CUISSON Allumage des brûleurs Un symbole est présent à côté de chaque manette sur le panneau de commande de votre table de cuisson. Ce symbole indique à quel brûleur correspond la manette de commande en question. Après avoir ouvert l’arrivée de gaz ou le robinet de la b...
Page 37 - Brûleurs « DUAL »
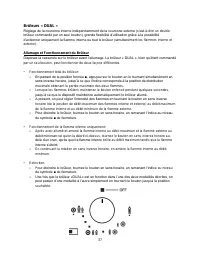
37 Brûleurs « DUAL » Réglage de la couronne interne indépendamment de la couronne externe (c’est-à-dire un double brûleur commandé par un seul bouton), grande flexibilité d’utilisation grâce à la possibilité d’actionner uniquement la flamme interne ou tout le brûleur (simultanément les flammes inter...
Page 38 - NETTOYAGE; Avant de remonter des pièces
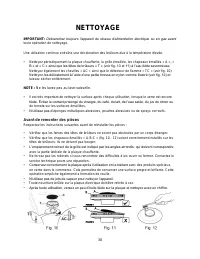
38 NETTOYAGE IMPORTANT: Débranchez toujours l’appareil du réseau d’alimentation électrique ou en gaz avant toute opération de nettoyage. Une utilisation continue entraîne une décoloration des brûleurs due à la température élevée. • Nettoyez périodiquement la plaque chauffante, la grille émaillée, le...
Page 39 - ENTRETIEN; Remplacement des composants; Graissage des robinets
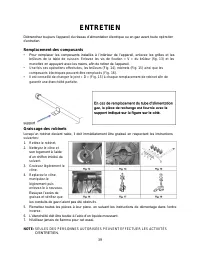
39 ENTRETIEN Débranchez toujours l’appareil du réseau d’alimentation électrique ou en gaz avant toute opération d’entretien. Remplacement des composants • Pour remplacer les composants installés à l’intérieur de l’appareil, enlevez les grilles et les brûleurs de la table de cuisson. Enlevez les vis ...
Page 40 - GARANTIE LIMITÉE; EXCLUSION DE GARANTIES TACITES LIMITATION DE RECOURS
40 GARANTIE LIMITÉE Dans les États- Unis contigus, pendant un an à compter de la date d’achat, si l’appareil est utilisé et entretenu conformément aux présentes instructions ou celles fournies avec le produit. Le garant s’engage à payer les pièces de rechange spécifiées par l’usine et la main-d’œuvr...