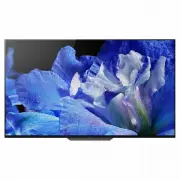
Sony KD65A8F - User Manual
Sony KD65A8F TV – User Manual, read for free online in PDF format. We hope this helps you resolve any issues you may have. If you have further questions, please contact us through the contact form.


Table of Contents:
- Page 2 – Table of Contents; Caution
- Page 4 – Installed with stand; Prohibited Usage
- Page 5 – Wireless Function of the unit
- Page 7 – Parts and Controls; Press; Controls and Indicators
- Page 8 – Using Remote Control; Switch between digital and analogue mode.; Number buttons; Display text information.; Remote Control Parts Description; TV
- Page 10 – Connection Diagram; on the remote control.
- Page 11 – HOME
- Page 12 – Installing the TV to the Wall; To Sony Dealers and Contractors:
- Page 13 – Installing the TV to the Wall from Table-Top Stand; Remove the stand cover and terminal covers.
- Page 14 – * Bracket positioning is below the screen centre point.; Model Name
- Page 17 – Troubleshooting; Refer to the Help menu by pressing; Troubles and Solutions
- Page 18 – A white line appears on the screen.; Specifications; System
- Page 19 – Trademark Information
- Page 22 – 目錄
- Page 24 – 使用限制; 不使用時
- Page 26 – 組件及控件; 遙控器感應器; 控件及指示燈
- Page 27 – 使用遙控器; (電視待機); 開啟或關閉電視機 (待機模式)。; 數字按鈕; 顯示資訊。; (文字); 顯示文字資訊。; 遙控器組件說明
- Page 29 – 連接圖; 有關連接的更多資訊,請按遙控器上的 HELP 以參閱說明指南。
- Page 30 – VIDEO IN; 如需完成複合連接,請使用模擬延長纜線; AUDIO OUT; 僅支援 3 極立體聲聲迷你插孔。
- Page 31 – 將電視機安裝在牆上; 本電視機使用說明書僅提供將電視機安裝到牆上前準備電視機進行壁掛式安裝的步驟。
- Page 32 – 從桌面底座將電視機安裝至牆上; 移除底座罩以及終端罩。
- Page 34 – 安裝壁掛式支架的附件組件。參閱壁掛式支架安裝指南之 “1”,檢查附件組件。; 簡易安裝; 將必要的連接線連接至電視機。; 從電視機拆卸桌面底座。
- Page 36 – 故障排除; 故障及解決方案
- Page 37 – 規格; 系統
- Page 38 – 其他; 尺寸 (大約)(寬 × 高 × 深); 商標資訊
- Page 40 – © 2018 Sony Visual Products Inc.
4-733-074-
11
(1)
Television
Reference Guide
GB
CT
KD-65A8F / 55A8F
"Loading the manual" means you need to wait until the file loads and becomes available for online reading. Some manuals are very large, and the time they take to appear depends on your internet speed.
Was this manual helpful?
About this manual
- Brand
- Sony
- Model
- KD65A8F
- Document type
- User Manual
- Category
- TV
- Language(s)
- English
- Pages
- 40
- File size
- 1.7 MB
- Format
Summary
2 GB Table of Contents Safety Information . . . . . . . . . . . . . . . . . . . . . 2Precautions . . . . . . . . . . . . . . . . . . . . . . . . . . . 5Protecting the TV Screen (OLED TV) . . . . . . . 6 Parts and Controls . . . . . . . . . . . . . . . . . . . 7 Controls and Indicators . . . . . . . ...
4 GB Installed with stand • To ensure proper ventilation and prevent the collection of dirt or dust: Do not lay the TV set flat, install upside down, backwards, or sideways. Do not place the TV set on a shelf, rug, bed or in a closet. Do not cover the TV set with a cloth, such as curtains, or ...
5 GB GB When not in use • If you will not be using the TV set for several days, the TV set should be disconnected from the AC power (mains) for environmental and safety reasons. • As the TV set is not disconnected from the AC power (mains) when the TV set is just turned off, pull the plug from the A...
Ask a question
Related manuals
Popular Sony TVs
More Sony TVs models
 Sony KD55X8000G User Manual
 Sony KD55X8000H User Manual
 Sony KD55X8500D User Manual
 Sony KD55X8500G User Manual
 Sony KD55X9500G User Manual
 Sony KD55X9500H User Manual
 Sony KD65A8G User Manual
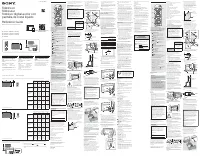 Sony KD65X77L User Manual
 Sony KD65X80K User Manual
 Sony KD65X81J User Manual
 Sony KD65X85K User Manual
 Sony KD65X85TJ User Manual