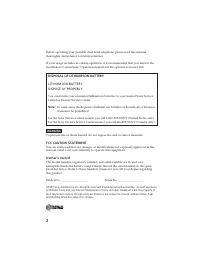
Page 2 - FCC CAUTION STATEMENT
2 Before operating your portable dual band telephone, please read this manualthoroughly and retain it for future reference. If your usage includes in-vehicle operation, it is recommended that you refer to theInstallation/Connections/Operation manual for the optional accessory kits. WARNING To preven...
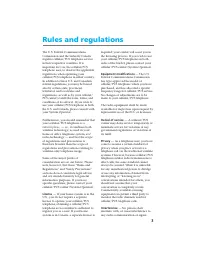
Page 3 - Rules and regulations
3 Rules and regulations The U.S. Federal CommunicationsCommission and the Industry Canadaregulate cellular/PCS telephone servicein their respective countries. It isimportant for you, the cellular/PCStelephone user, to observe the applicableregulations when operating yourcellular/PCS telephone in eit...
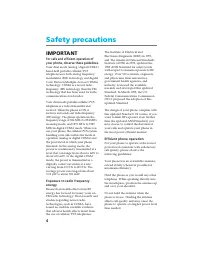
Page 4 - Efficient phone operation; Safety precautions; IMPORTANT
4 The Institute of Electrical andElectronics Engineers (IEEE) in 1991,and The American National StandardsInstitute (ANSI) in 1992, updated the1982 ANSI Standard for safety levelswith respect to human exposure to RFenergy. Over 120 scientists, engineers,and physicians from universities,government hea...
Page 6 - Potentially explosive atmospheres
6 Potentially explosive atmospheres Turn your phone OFF when in any areawith a potentially explosiveatmosphere. It is rare, but your phone orits accessories could generate sparks.Sparks in such areas could cause anexplosion or fire resulting in bodilyinjury or even death. Areas with a potentially ex...
Page 7 - Table of contents; Getting Started
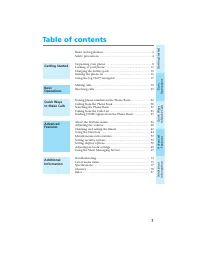
7 Basic Operations Getting Started Quick W ays to Make Calls Advanced Features Additional Information Table of contents Rules and regulations ................................................................ 3Safety precautions ...................................................................... 4 ...
Page 8 - Portable Dual Band; Unpacking your phone
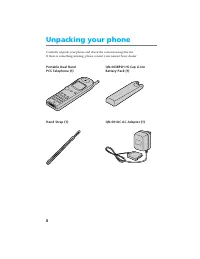
8 Carefully unpack your phone and check the contents using this list.If there is something missing, please contact your nearest Sony dealer. Portable Dual Band QN-003BPLH Hi-Cap Li-Ion PCS Telephone (1) Battery Pack (1) Hand Strap (1) QN-001AC AC Adapter (1) Unpacking your phone
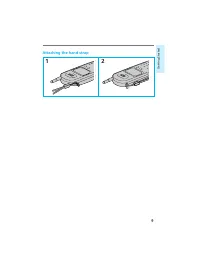
Page 9 - Attaching the hand strap
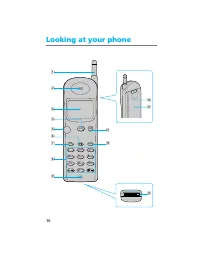
Page 10 - Looking at your phone
10 Looking at your phone 1 !£ !¢ !¡ 0 2 ABC 3 DEF 5 JKL 6 MNO 8 TUV 0 OPER 4 GHI 7 PQ RS 9 WX YZ 1 PWR CLR SEND 9 2 8 6 7 END !™ 5 3 4
Page 11 - Microphone; Telephone; Earpiece
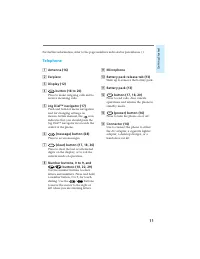
11 Getting Started For further information, refer to the page numbers indicated in parentheses ( ). 9 Microphone 0 Battery pack release tab (13) Slide up to remove the battery pack. !¡ Battery pack (13) !™ END button (17, 18, 20) Press to end calls. Also cancelsoperations and returns the phone tosta...
Page 12 - Character display; Display; Short character display
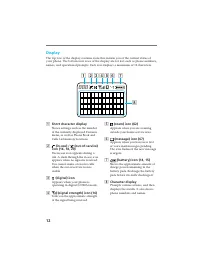
12 5 (roam) icon (62) Appears when you are roamingoutside your home service area. 6 (message) icon (67) Appears when you have new textor voice mail messages pending.The icon flashes if the new messageis urgent. 7 (battery) icon (14, 15) Shows the approximate amount ofcharge power remaining in thebat...
Page 13 - Attaching the battery pack; To remove the battery pack; Charging the battery pack
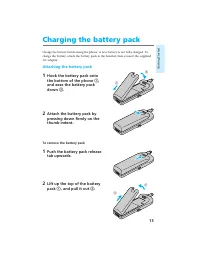
13 Getting Started Charge the battery before using the phone. A new battery is not fully charged. Tocharge the battery, attach the battery pack to the handset, then connect the suppliedAC adapter. Attaching the battery pack 1 Hook the battery pack ontothe bottom of the phone 1 , and ease the battery...
Page 14 - Charging the battery; When the power is turned on; When the power is turned off
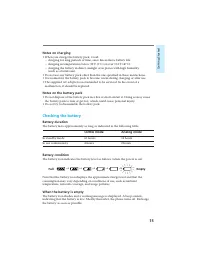
14 Charging the battery Connect the AC adapter to the phone and the other end to a standard 120V AC outletas illustrated below. The charging time is about 5 hours.You can charge the battery pack with the phone turned on, but charging will takelonger. When the power is turned on The letters “CH” are ...
Page 15 - Checking the battery
15 Getting Started Notes on charging • When you charge the battery pack, avoid: – charging for long periods of time, since this reduces battery life.– charging in temperatures below 32°F (0°C) or over 104°F (40°C).– charging the battery in direct sunlight or in places with high humidity (such as a b...
Page 16 - Extending the antenna; To retract the antenna; Turning the power on; To check the signal strength; Turning the power off; Turning the phone on
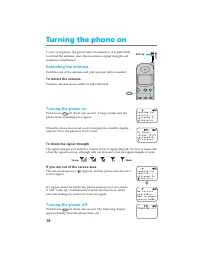
16 To use your phone, the power must be turned on. It is preferableto extend the antenna, since this maximizes signal strength andminimizes interference. Extending the antenna Hold the end of the antenna and pull up until fully extended. To retract the antenna Push the antenna down until it is fully...
Page 17 - Choosing a menu item; To go back; Scrolling through menu items; Using the Jog DialTM navigator
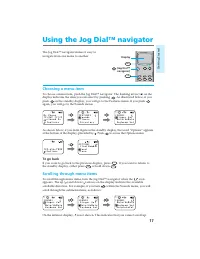
17 Getting Started The Jog Dial™ navigator makes it easy tonavigate from one menu to another. Choosing a menu item To choose a menu item, push the Jog Dial™ navigator. The flashing arrow ( ) on thedisplay indicates the item you can select by pushing . As illustrated below, if you push on the standby...
Page 18 - to back up. To clear all entered digits,; or hold down; to return to the standby; Press; to end the call when you are; The standby display automatically reappears.; Making calls
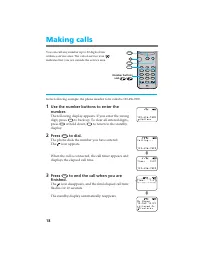
18 You can call any number up to 32 digits fromwithin a service area. The out-of-service icon ( ) indicates that you are outside the service area. In the following example, the phone number to be called is 123-456-7890. 1 Use the number buttons to enter thenumber. The following display appears. If y...
Page 19 - To adjust the earpiece volume during a call; To mute/unmute the microphone during a call; To redial the last number
19 Basic Operations Tips • When dialing, you can insert a pause to attach a DTMF (Dual Tone Multiple Frequency) number to the number you are calling (see page 35 for a description of DTMF). • If Auto-Hyphen is turned on, the phone number is hyphenated automatically as you enter the digits (see page ...
Page 20 - Receiving calls
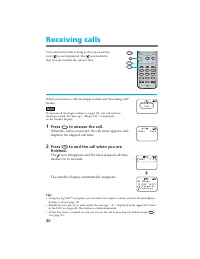
20 You can receive calls as long as the out-of-serviceicon ( ) is not displayed. The icon indicates that you are outside the service area. When you receive a call, the ringer sounds and “Incoming Call”flashes. Note If you turn off the ringer volume (see page 38), you will not hearthe ringer sound. T...
Page 21 - If the caller has caller ID
21 Basic Operations If the caller has caller ID The caller’s phone number appears on the display when youreceive a call, if both the caller and the carrier support thisfeature. If the caller has caller ID and the number matches a Phone Bookentry, the name that you stored with the number (if any) isd...
Page 22 - Push; The Options menu appears.; Turn; or; to clear the character highlighted by the cursor.; Storing phone numbers in the Phone Book
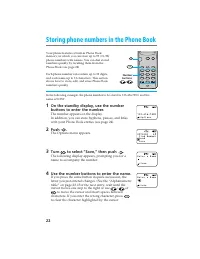
22 Your phone features a built-in Phone Bookmemory, in which you can store up to 99 (01–99)phone numbers with names. You can dial storednumbers quickly by recalling them from thePhone Book (see page 28) Each phone number can contain up to 32 digits,and each name up to 12 characters. This sectionshow...
Page 23 - To enter “SONY”; If you want to store it in another location, turn; Alphanumeric table
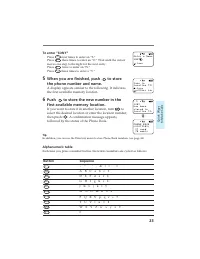
23 Quick W ays to Make Calls To enter “SONY” Press 7 RS PQ four times to enter an “S.” Press 6 MNO three times to enter an “O.” Wait until the cursor moves one step to the right for the next entry.Press 6 MNO twice to enter an “N.” Press 9 YZ WX three times to enter a “Y.” 5 When you are finished, p...
Page 24 - While entering digits, push; To enter; Editing stored information
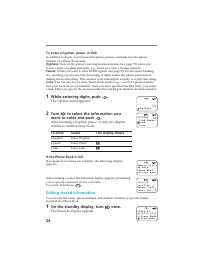
24 To enter a hyphen, pause, or link In addition to digits, you can insert hyphens, pauses, and links into the phonenumber of a Phone Book entry. Hyphens: Turn off the phone’s autohyphenation feature (see page 59) when you want to enter a hyphen manually, e.g., when you store a foreign number. Pause...
Page 25 - The first entry in the Phone Book appears.; To change
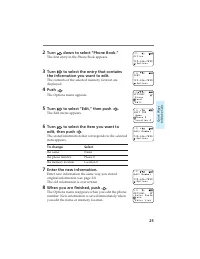
25 Quick W ays to Make Calls 2 Turn down to select “Phone Book.” The first entry in the Phone Book appears. 3 Turn to select the entry that contains the information you want to edit. The contents of the selected memory location aredisplayed. 4 Push . The Options menu appears. 5 Turn to select “Edit,...
Page 26 - Erasing a phone number; The first Phone Book entry is displayed.
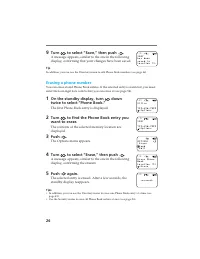
26 9 Turn to select “Save,” then push . A message appears, similar to the one in the followingdisplay, confirming that your changes have been saved. Tip In addition, you can use the Directory menu to edit Phone Book numbers (see page 46). Erasing a phone number You can erase stored Phone Book entrie...
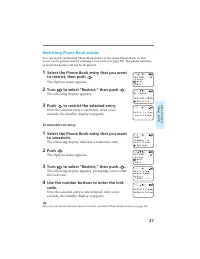
Page 27 - Restricting Phone Book entries; To unrestrict an entry; The following display indicates a restricted entry.
27 Quick W ays to Make Calls Restricting Phone Book entries You can restrict individual Phone Book entries or the entire Phone Book, so thataccess can be gained only by entering a lock code (see page 54). The phone numbersof restricted entries will not be displayed. 1 Select the Phone Book entry tha...
Page 28 - Calling from the Phone Book
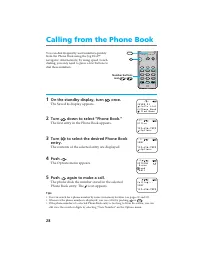
28 You can dial frequently used numbers quicklyfrom the Phone Book using the Jog Dial™navigator. Alternatively, by using speed/touchdialing, you only need to press a few buttons todial these numbers. 1 On the standby display, turn once. The Saved #s display appears. 2 Turn down to select “Phone Book...
Page 29 - To release a pause or link during a call; Speed dialing; Touch dialing
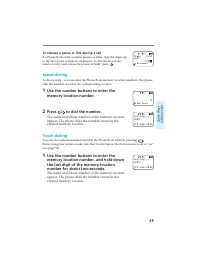
29 Quick W ays to Make Calls To release a pause or link during a call If a Phone Book entry contains pauses or links, only the digits upto the first pause or link are displayed. To dial the rest of theselected entry (and release the pause or link), push . Speed dialing To dial quickly, you can enter...
Page 30 - The Search display appears.; Searching the Phone Book
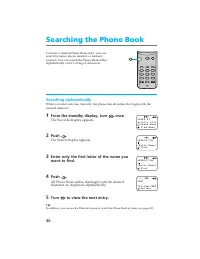
30 To locate a desired Phone Book entry, you cansearch by name, phone number, or memorylocation. You can search the Phone Book eitheralphabetically or for a string of characters. Searching alphabetically When you enter only one character, the phone lists all entries that begin with theentered charac...
Page 31 - Searching for a string of characters; Searching by memory location
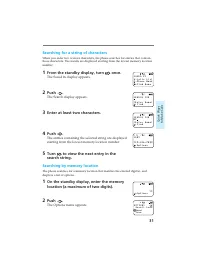
31 Quick W ays to Make Calls Searching for a string of characters When you enter two or more characters, the phone searches for entries that containthose characters. The results are displayed starting from the lowest memory locationnumber. 1 From the standby display, turn once. The Saved #s display ...
Page 32 - Searching for a phone number
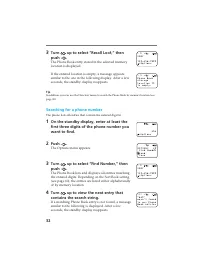
32 3 Turn up to select “Recall Loc#,” then push . The Phone Book entry stored in the selected memorylocation is displayed. If the entered location is empty, a message appearssimilar to the one in the following display. After a fewseconds, the standby display reappears. Tip In addition, you can use t...
Page 33 - Calling from the Calls List; The contents of the selected entry are displayed.
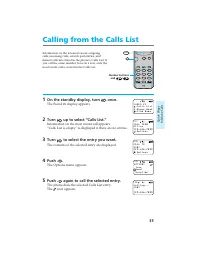
33 Quick W ays to Make Calls Calling from the Calls List Information on the ten most recent outgoingcalls, incoming calls, scratch pad entries, andmissed calls are stored in the phone’s Calls List. Ifyou call the same number twice in a row, only themost recent call is stored in the Calls List. 1 On ...
Page 34 - To view detailed information of Calls List entries; To save the number to the Phone Book
34 Tips • In addition, you can dial by pressing SEND after selecting the entry in step 3 on page 33. • If the selected entry contains a pause or a link, only the digits up to the pause or link are dialed. To release pauses and links, see page 29. • In addition, you can use the Directory menu to view...
Page 35 - If you try to send a DTMF signal in standby mode; Sending DTMF signals from the Phone Book
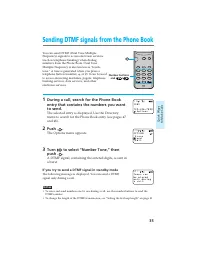
35 Quick W ays to Make Calls You can send DTMF (Dual Tone MultipleFrequency) signals to access electronic services(such as telephone banking) when dialingnumbers from the Phone Book. Dual ToneMultiple Frequency is also known as “touch-tone.” A tone is generated when you press atelephone button (numb...
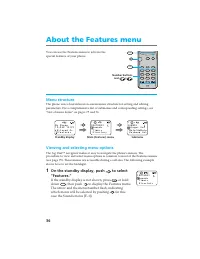
Page 36 - If the standby display is not shown, press; or hold; to display the Features menu.; About the Features menu
36 You can use the Features menu to activate thespecial features of your phone. Menu structure The phone uses a hierarchical on-screen menu structure for setting and editingparameters. For a comprehensive list of submenus and corresponding settings, see“List of menu items” on pages 75 and 76. Viewin...
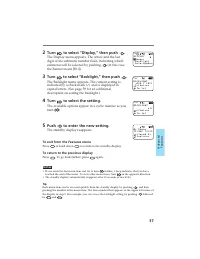
Page 37 - ) and is displayed in; To exit from the Features menu; To return to the previous display
37 Advanced Features 2 Turn to select “Display,” then push . The Display menu appears. The arrow and the lastdigit of the submenu number flash, indicating whichsubmenu will be selected by pushing (in this case the Banner menu [F61]). 3 Turn to select “Backlight,” then push . The Backlight menu appea...
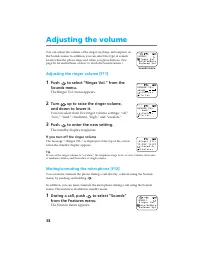
Page 38 - The standby display reappears.; If you turn off the ringer volume; The Sounds menu appears.; Adjusting the volume
38 You can adjust the volume of the ringer, keybeep, and earpiece onthe Sounds menu. In addition, you can select the type of soundsheard when the phone rings and when you press buttons. (Seepage 36 for instructions on how to reach the Sounds menu.) Adjusting the ringer volume [F11] 1 Push to select ...
Page 39 - The Keybeep Vol menu appears.
39 Advanced Features 2 Push to select “Mute/UnMute.” The following display appears. Now the microphone ismuted. 3 To unmute the microphone, push and hold for one second. The Features menu appears for a moment and themicrophone is now unmuted. Adjusting the keybeep volume [F13] You can adjust the vol...
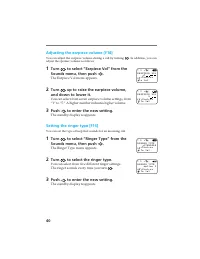
Page 40 - The Earpiece Vol menu appears.; The Ringer Type menu appears.
40 Adjusting the earpiece volume [F14] You can adjust the earpiece volume during a call by turning . In addition, you can adjust the speaker volume as follows: 1 Turn to select “Earpiece Vol” from the Sounds menu, then push . The Earpiece Vol menu appears. 2 Turn up to raise the earpiece volume, and...
Page 42 - The All Calls display appears.; Checking and resetting the duration of recent calls [F22]; The Recent Calls display appears.; Checking and setting the timers
42 You can check call durations on the Timers menu. In addition,you can set the phone to alert you every minute of a call, andmake the phone turn itself off automatically. Checking the duration of all calls [F21] You can view the total duration of all calls. This information cannot be reset. 1 Turn ...
Page 43 - The Minute Alert menu appears.; Setting the phone to automatically turn off [F24]
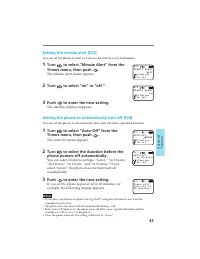
43 Advanced Features Setting the minute alert [F23] You can set the phone to alert you ten seconds before every full minute. 1 Turn to select “Minute Alert” from the Timers menu, then push . The Minute Alert menu appears. 2 Turn to select “on” or “off.” 3 Push to enter the new setting. The standby d...
Page 44 - to clear the character highlighted by the; Using the Directory
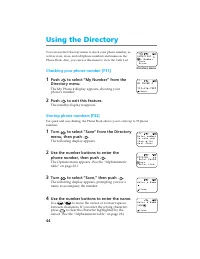
44 You can use the Directory menu to check your phone number, aswell as store, erase, and edit phone numbers and names in thePhone Book. Also, you can use this menu to view the Calls List. Checking your phone number [F31] 1 Push to select “My Number” from the Directory menu. The My Phone # display a...
Page 45 - A display similar to the following appears.
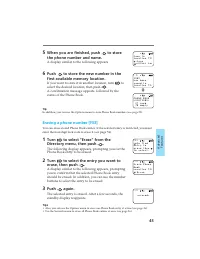
45 Advanced Features 5 When you are finished, push to store the phone number and name. A display similar to the following appears. 6 Push to store the new number in the first available memory location. If you want to store it in another location, turn to select the desired location, then push . A co...
Page 47 - To search alphabetically
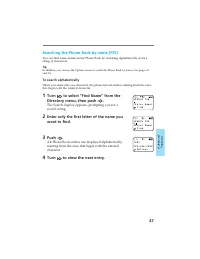
47 Advanced Features Searching the Phone Book by name [F35] You can find name entries in the Phone Book by searching alphabetically or for astring of characters. Tip In addition, you can use the Options menu to search the Phone Book by names (see pages 30and 31). To search alphabetically When you en...
Page 48 - To search for a string of characters; Searching the Phone Book by memory location [F36]
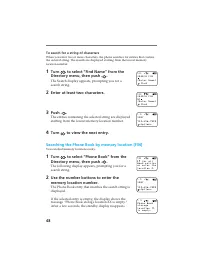
48 To search for a string of characters When you enter two or more characters, the phone searches for entries that containthe entered string. The results are displayed starting from the lowest memorylocation number. 1 Turn to select “Find Name” from the Directory menu, then push . The Search display...
Page 49 - To place a call
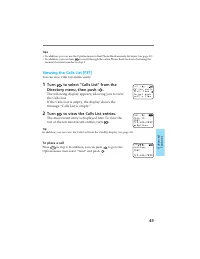
49 Advanced Features Tips • In addition, you can use the Options menu to find Phone Book memory locations (see page 31).• In addition, you can turn to scroll through the entire Phone Book instead of entering the memory location number in step 2. Viewing the Calls List [F37] You can view Calls List e...
Page 50 - Miscellaneous extra features; The following message appears.; To unlock the keypad; To answer an incoming call when the keypad is locked; The Touch Dial menu appears.
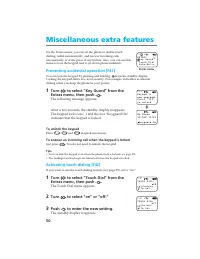
50 Miscellaneous extra features On the Extras menu, you can set the phone to enable touchdialing, redial automatically, and answer incoming callsautomatically or at the press of any button. Also, you can use thismenu to lock the keypad and to jot down phone numbers. Preventing accidental operation [...
Page 51 - Setting the phone to redial automatically [F43]; Setting the phone to answer automatically [F44]
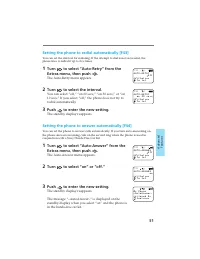
51 Advanced Features Setting the phone to redial automatically [F43] You can set the interval for redialing. If the attempt to dial is not successful, thephone tries to redial it up to five times. 1 Turn to select “Auto-Retry” from the Extras menu, then push . The Auto-Retry menu appears. 2 Turn to ...
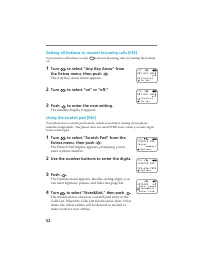
Page 52 - Setting all buttons to answer incoming calls [F45]; The Any Key Answ menu appears.
52 Setting all buttons to answer incoming calls [F45] You can have all buttons (except PWR ) answer incoming calls by turning this feature on. 1 Turn to select “Any Key Answ” from the Extras menu, then push . The Any Key Answ menu appears. 2 Turn to select “on” or “off.” 3 Push to enter the new sett...
Page 53 - Preventing others from using your phone [F51]; The Lock Phone menu appears.; To unlock the phone; Setting security options
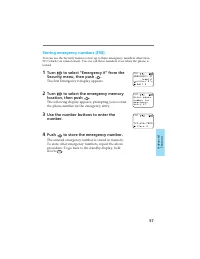
53 Advanced Features You can restrict unauthorized access to your phone and theinformation it holds. Additionally, on the Security menu, you canreset menu settings to default and store emergency numbers.Unlike other items on the Features menu, accessing the Securitymenu requires a lock code when you...
Page 54 - Now the selected entry is restricted.
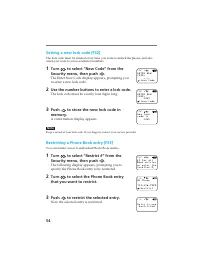
54 Setting a new lock code [F52] The lock code must be entered every time you want to unlock the phone, and alsowhen you want to access restricted numbers. 1 Turn to select “New Code” from the Security menu, then push . The Enter New Code display appears, prompting youto enter a new lock code. 2 Use...
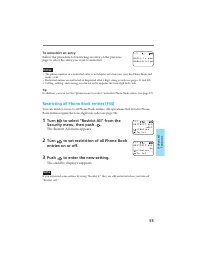
Page 55 - The Restrict All menu appears.
55 Advanced Features To unrestrict an entry Follow the procedure for restricting an entry on the previouspage to select the entry you want to unrestrict. Notes • The phone number of a restricted entry is not displayed when you view the Phone Book and make a call. • Restricted entries are not listed ...
Page 56 - The Master Reset display appears.; The Erase Book display appears.; The Erase Calls display appears.
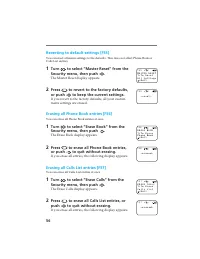
56 Reverting to default settings [F55] You can reset all menu settings to the defaults. This does not affect Phone Book orCalls List entries. 1 Turn to select “Master Reset” from the Security menu, then push . The Master Reset display appears. 2 Press 1 to revert to the factory defaults, or push to ...
Page 58 - Setting display options
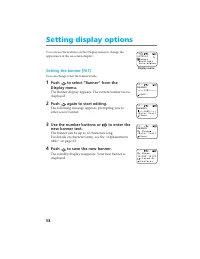
58 Setting display options You can use the features on the Display menu to change theappearance of the on-screen display. Setting the banner [F61] You can change what the banner reads. 1 Push to select “Banner” from the Display menu. The Banner display appears. The current banner text isdisplayed. 2...
Page 59 - The Backlight menu appears.
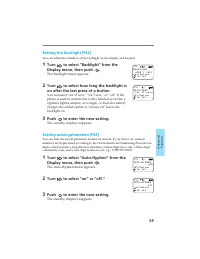
59 Advanced Features Setting the backlight [F62] You can adjust the duration of the backlight on the display and keypad. 1 Turn to select “Backlight” from the Display menu, then push . The Backlight menu appears. 2 Turn to select how long the backlight is on after the last press of a button. You can...
Page 61 - The Menu Length menu appears.; Items on the short menu; To return to the long menu
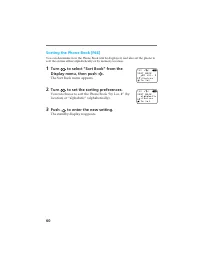
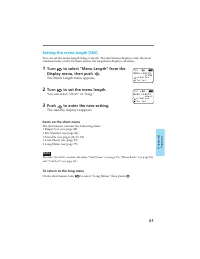
61 Advanced Features Setting the menu length [F65] You can set the menu length (long or short). The short menu displays only the mostcommon items on the Features menu; the long menu displays all items. 1 Turn to select “Menu Length” from the Display menu, then push . The Menu Length menu appears. 2 ...
Page 62 - Adjusting network settings; The Roam Alert menu appears.; When you enter another service area; If you leave any valid service area
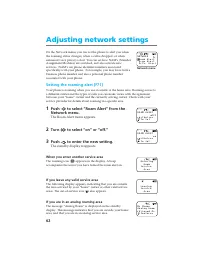
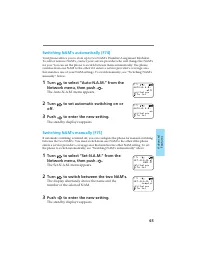
62 Adjusting network settings On the Network menu, you can set the phone to alert you whenthe roaming status changes, when a call is dropped, or whenenhanced voice privacy is lost. You can set how NAM’s (NumberAssignment Modules) are switched, and also activate newservices. NAM’s are phone identifie...
Page 63 - The Drop Alert menu appears.; When a call is dropped
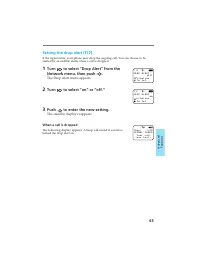
63 Advanced Features Setting the drop alert [F72] If the signal fades, your phone may drop the ongoing call. You can choose to bealerted by an audible alarm when a call is dropped. 1 Turn to select “Drop Alert” from the Network menu, then push . The Drop Alert menu appears. 2 Turn to select “on” or ...
Page 64 - If enhanced voice privacy is lost
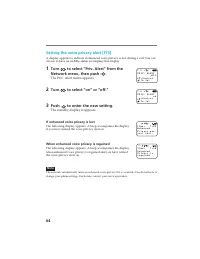
64 Setting the voice privacy alert [F73] A display appears to indicate if enhanced voice privacy is lost during a call. You canchoose to have an audible alarm accompany this display. 1 Turn to select “Priv. Alert” from the Network menu, then push . The Priv. Alert menu appears. 2 Turn to select “on”...
Page 66 - The Activation menu appears.; activation and return to the standby display, press; The phone calls up a service provider.; If activation fails
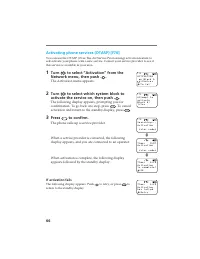
66 Activating phone services (OTASP) [F76] You can use the OTASP (Over-The-Air Service Provisioning) activation feature toself-activate your phone with a new service. Contact your service provider to see ifthis service is available in your area. 1 Turn to select “Activation” from the Network menu, t...
Page 67 - Receiving messages; When you receive a message; If the memory becomes full; Using the Short Messaging Service
67 Advanced Features This section contains information on the ShortMessaging Service (SMS). This feature lets youreceive “text” messages, which are stored in yourphone as long as there are enough memorylocations available. Contact your service provider to see if thisservice is available in your area...
Page 68 - Accessing messages; • Text messages and pagings that you have already; Reading text messages; To read new messages; The first message is displayed.
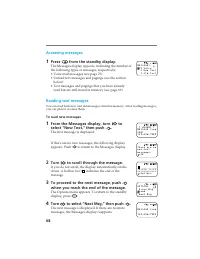
68 Accessing messages 1 Press from the standby display. The Messages display appears, indicating the number ofthe following types of messages, respectively:• Voice mail messages (see page 73).• Unread text messages and pagings (see the section below). • Text messages and pagings that you have alread...
Page 69 - To read old messages; The selected message is displayed.; To return to the Messages display, press
69 Advanced Features To read old messages 1 From the Messages display, turn to select “Old Text,” then push . A list of old messages is displayed. An asterisk (*)indicates an urgent message. A lock icon ( ) indicatesthat the message is locked (see page 70). If a number istoo long to fit, an ellipsis...
Page 70 - To protect a text message; To respond to a text message
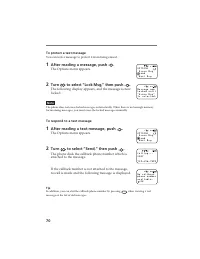
70 To protect a text message You can lock a message to protect it from being erased. 1 After reading a message, push . The Options menu appears. 2 Turn to select “Lock Msg,” then push . The following display appears, and the message is nowlocked. Note The phone does not erase locked messages automat...
Page 71 - To save the callback number
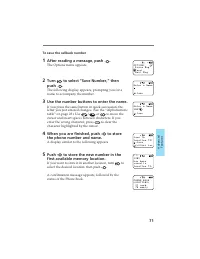
71 Advanced Features To save the callback number 1 After reading a message, push . The Options menu appears. 2 Turn to select “Save Number,” then push . The following display appears, prompting you for aname to accompany the number. 3 Use the number buttons to enter the name. If you press the same b...
Page 72 - To erase a text message; To erase all old text messages; If the Messages display is not shown, press
72 To erase a text message 1 After reading a text message, push . The Options menu appears. 2 Turn to select “Erase Msg,” then push . The message is erased. To erase all old text messages 1 Turn down to select “Erase Old” from the Messages display, then push . If the Messages display is not shown, p...
Page 73 - Reading voice mail notification messages; to go back to the Messages display.; To dial a callback number; To erase a voice message
73 Advanced Features Reading voice mail notification messages 1 From the Messages display, turn to select “Voice,” then push . The following display appears, indicating the numberof voice messages stored in your voice mailbox. Press CLR to go back to the Messages display. 2 Turn to scroll through th...
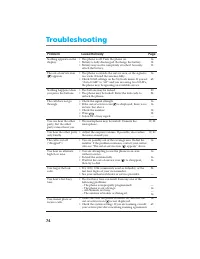
Page 74 - Troubleshooting; Problem; Page
74 Troubleshooting Problem 161413 16 65 5054 1616 1818— 19, 38 19, 40 16 16 1616 54 — —16—16 16 62 • The phone is off. Turn the phone on.• Battery is fully discharged. Recharge the battery.• Battery may not be completely attached. Securely attach the battery. • The phone is outside the service area,...
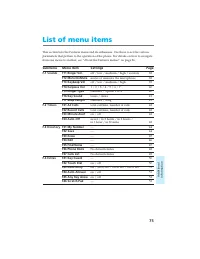
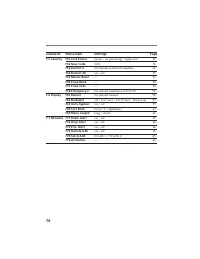
Page 75 - Submenu; List of menu items
75 Additional Information This section lists the Features menu and its submenus. Use these to set the variousparameters that pertain to the operation of the phone. For details on how to navigatefrom one menu to another, see “About the Features menus” on page 36. Submenu Menu Item Settings Page F-1 S...
Page 77 - Specifications
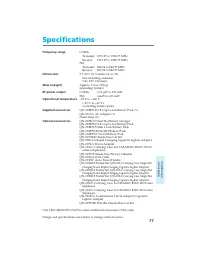
77 Additional Information Specifications Frequency range CDMA Transmit: 1851.25 to 1908.75 MHzReceive: 1931.25 to 1988.75 MHz FM Transmit: 824.04 to 848.97 MHzReceive: 869.04 to 893.97 MHz Dimensions 5.7 × 2.0 × 1.5 inches (h/w/d) (not including antenna)(146 × 50 × 37 mm) Mass (weight) Approx. 7.2 o...
Page 78 - Glossary
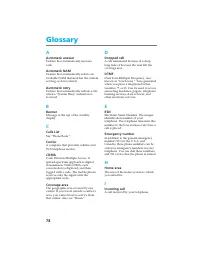
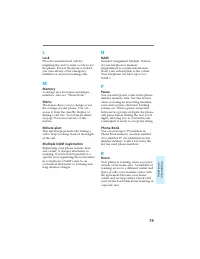
78 A Automatic answer Feature that automatically answerscalls. Automatic NAM Feature that automatically selects anavailable NAM that matches the currentserving system (carrier). Automatic retry Feature that automatically redials a callwhen a “System Busy” indication isreceived. B Banner Message at t...
Page 81 - Index
81 Additional Information A AC adapter 8, 14Antenna 16Automatic Answer 51Hyphenation 59Retry 51 Redial 51 B Backlight 59Banner 58Battery pack Charging 14 Checking 15 Attaching/removing 13 Battery charge contacts 14 Battery pack release tab 13 Battery icon 14, 15 C Calling Calls List 33, 49 Dropped c...