Smeg CR321A - Manual
Smeg CR321A Refrigerator – Manual, read for free online in PDF format. We hope this helps you resolve any issues you may have. If you have further questions, please contact us through the contact form.


Table of Contents:
- Page 2 – Before Putting Into Use; Instructions for Use; We Care for the Environment
- Page 3 – Important
- Page 4 – Storing Time During Power Supply Interruption
- Page 5 – Placing and Installation; Choosing the Right Place; Connection to Power Supply
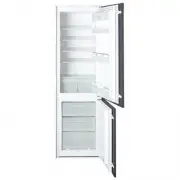
- Page 6 – Description of the Appliance
- Page 7 – Bottle rack
- Page 8 – Door Liner
- Page 9 – Operation Control; Temperature Selection
- Page 10 – Use; Storing Fresh Foods
- Page 11 – Fresh Food Storage Time in the Refrigerator; Freezing Fresh Foods; Freezing Procedure
- Page 12 – Storing Frozen Foods; Commercially Frozen Foods
- Page 13 – Approximate Storage Time for Frozen Foods; Defrosting Frozen Food
- Page 14 – Maintenance and Cleaning; Automatic Defrosting of the Refrigerator
- Page 15 – Switch Off the Appliance When Not In Use
- Page 16 – Trouble-Shooting Guide; Continuous Operation of the Refrigerating System
- Page 18 – Bulb Replacement; WE RESERVE THE RIGHT TO ALTER THE
- Page 19 – Mounting Instructions; Mounting the Appliance
- Page 21 – Reversing the door opening
- Page 23 – WARNING
Instructions for Use
57
Instructions for Use
Refrigerator - Freezer
Thank you for your trust and for buying this appliance. We hope it will
successfully serve the purpose for many years.
Refrigerator with freezer
is for domestic use only.
The upper part of the appliance is refrigerator
and is used for
storing fresh foods at the temperature of 0°C and higher.
The lower part is freezer
and is used for freezing fresh foods and
storing frozen foods for longer periods of time (up to one year,
depending on the kind of foods you store). The compartment is marked
with four stars.
Before Putting Into Use
58-60
Placing and Installation
61
Description of the Appliance
62-64
Operation Control
65
Use
66-69
Maintenance and Cleaning
70-71
Trouble-Shooting Guide
72-74
"Loading the manual" means you need to wait until the file loads and becomes available for online reading. Some manuals are very large, and the time they take to appear depends on your internet speed.
Was this manual helpful?
About this manual
- Brand
- Smeg
- Model
- CR321A
- Document type
- Manual
- Category
- Refrigerator
- Language(s)
- English
- Pages
- 24
- File size
- 639.8 KB
- Format
Other Manuals for Smeg CR321A
Summary
Instructions for Use 58 Before Putting Into Use • Before connecting the appliance to the mains supply, leave it standfor about 2 hours, which will reduce a possibility of malfunctions inthe cooling system due to transport handling. • Clean the appliance, and be thorough, especially in the interior (...
Instructions for Use 59 • Never use continuous operation unless unnecessarily required;switch the operation mode selection switch to the setting forautomatic operation as soon as possible. • Before loading the appliance with packages of fresh foods, makesure they are cooled to ambient temperature. •...
Instructions for Use 60 • If the supply cord is damaged, it must be replaced by themanufacturer or his service agent or a qualified person in order toavoid hazard. • The rating plate is inside the appliance or outside on the rear wall. Storing Time During Power Supply Interruption Do not open the fr...
Ask a question
Related manuals
Popular Smeg Refrigerators
More Smeg Refrigerators models
 Smeg FQ60XPA User Manual
 Smeg SABI256BM User Manual
 Smeg C8194TNE User Manual
 Smeg CB300UI User Manual
 Smeg CB2485U User Manual
 Smeg CVI129B3 User Manual
 Smeg FAB28LG1 User Manual
 Smeg FAB28LNE1 User Manual
 Smeg FAB28LR1 User Manual
 Smeg FAB28RNE1 User Manual
 Smeg FAB28RP1 User Manual
 Smeg FAB30LNE1 User Manual
 Smeg FAB30RP1 User Manual
 Smeg FAB30RR1 User Manual
 Smeg FAB30RV1 User Manual
 Smeg FAB32RNEN1 User Manual
 Smeg FAB32RPN1 User Manual
 Smeg FAB32RRN1 User Manual
 Smeg FC20UXDNE User Manual