Page 2 - Welcome; INTRODUCTION; SINGER
2 2 Welcome INTRODUCTION Welcome to the SINGER ® family and CONGRATULATIONS on purchasing a brand new SINGER ® sewing machine! The SINGER ® brand has stood for quality in sewing for over 160 years. We design our machines for sewists of all skill levels so that the joy of sewing, creating, do-it-your...
Page 3 - Important Safety Instructions
3 Important Safety Instructions INTRODUCTION This household sewing machine is designed to comply with IEC/EN 60335-2-28 and UL1594. IMPORTANT SAFETY INSTRUCTIONS When using an electrical appliance, basic safety precautions should always be followed, including the following: Read all instructions bef...
Page 4 - supervised to ensure that they do not play with the sewing machine.; SERVICING OF DOUBLE INSULATED PRODUCTS; the words “DOUBLE INSULATION” or “DOUBLE INSULATED”.
2 4 Important Safety Instructions INTRODUCTION - If the supply cord connected with the foot control is damaged, it must be replaced by the manufacturer or its service agent or a similarly qualified person, in order to avoid a hazard. - This sewing machine is provided with double insulation. Use only...
Page 5 - Table of Contents
5 INTRODUCTION Table of Contents INTRODUCTION ............................................................................................................. 2-5 Welcome .......................................................................................................................................
Page 6 - ABOUT YOUR MACHINE; Main Parts of the Machine Front
2 6 ABOUT YOUR MACHINE Main Parts of the Machine Front 1. REVERSE SEWING BUTTON reverses stitching direction, for example, when securing the beginning and ending of a seam. (See Page 20) 2. THREAD TAKE-UP LEVER controls the flow of the upper thread while sewing. (See Page 13) 3. THREAD TENSION DIAL ...
Page 7 - Main Parts of the Machine Back
7 Main Parts of the Machine Back ABOUT YOUR MACHINE 1 2 34 5 6 7 8 9 10 11 12 13 1. HORIZONTAL SPOOL PIN holds the thread spool and spool cap for the upper thread. You will need to raise it to the vertical upward position when sewing. 2. BOBBIN WINDING SPINDLE holds bobbin as it winds. (See Page 11)...
Page 8 - Needle and Presser Foot Area
2 8 Needle and Presser Foot Area ABOUT YOUR MACHINE 1. THREAD GUIDE controls movement of upper thread. 2. NEEDLE THREADER LEVER is used to engage the automatic needle threader mechanism. 3. NEEDLE THREADER GUIDE holds thread securely before placing it in hook pin. 4. PRESSER FOOT SCREW secures the p...
Page 9 - Removable Storage Compartment and Accessories
9 Removable Storage Compartment and Accessories ABOUT YOUR MACHINE Hold the Removable Storage Compartment horizontally, then pull toward the left to remove it from the machine. Doing this, you will have access to the free arm, which makes it easy to sew tubular projects like pant hems or sleeves. Ad...
Page 10 - Powering Your Machine; GETTING READY TO SEW
2 10 Powering Your Machine GETTING READY TO SEW Connect the machine to a power source as illustrated. This machine is equipped with a polarized plug which must be used with the appropriate polarized outlet. (a and b) ⚠ Unplug power cord when machine is not in use. Foot Control The foot control regul...
Page 11 - Winding the Bobbin
11 GETTING READY TO SEW Winding the Bobbin → This machine uses SINGER ® Class 15 metal bobbins. Use only this style of bobbin when purchasing additional bobbins for your machine. Do not substitute with plastic bobbins. 1. Place thread spool and corresponding size spool holder onto spool pin. Spool h...
Page 12 - Inserting the Bobbin
2 12 Inserting the Bobbin ⚠ Turn power switch off before inserting or removing the bobbin. 1. Take off the removable storage compartment. 2. Open the hinged cover. 3. Pull the bobbin case latch to remove the bobbin case from the bobbin holder. 4. Hold the bobbin case in one hand, then insert the bob...
Page 13 - Threading the Upper Thread
13 Threading the Upper Thread ⚠ For safety, turn off the power before threading the machine. 1. Start by turning the handwheel (A) toward you to raise the needle (B) and the thread take up lever (C). You should be able to see the take up lever. 2. → Raise the presser foot lifter. This is necessary i...
Page 14 - Automatic Needle Threader
2 14 Automatic Needle Threader → Pull about 6-8” of thread to the back beyond the eye of the needle. This will help prevent the needle from becoming unthreaded when you start to sew. ⚠ For safety, turn off the power before using the automatic needle threader. 1. Raise the needle to its highest posit...
Page 15 - Drawing Up the Bobbin Thread
15 Drawing Up the Bobbin Thread ⚠ For safety, turn off the power before threading the machine. 1. Hold the upper thread tail with the left hand (A). Turn the handwheel toward you (B), first lowering (C) and then raising the needle (D). 2. As you turn the handwheel, gently pull the upper thread, whic...
Page 16 - Before You Start Sewing; START SEWING
2 16 Before You Start Sewing START SEWING Now that your machine is threaded, we will show how to set up the machine for basic sewing techniques such as: sewing a straight stitch, sewing a decorative stitch, sewing a stretch stitch, sewing a buttonhole and sewing a button. With each technique, you ha...
Page 17 - Stitch Formation
17 Stitch Formation START SEWING 1. How Stitches Form Stitches are formed when the upper thread and the bobbin thread interlock between the fabric layers. Stitching is well balanced when the needle thread appears on the top and the bobbin thread appears on the bottom. 2. Thread Tension Dial The Thre...
Page 18 - LCD Display and Function Buttons
2 18 LCD Display and Function Buttons START SEWING For examples of stitch patterns and further instruction, see the Stitch Reference Guide at www.singerco.com. 2 1 5 8 3 4 6 7 1. REVERSE/AUTO-LOCK BUTTON sews reverse stitches when pressed for straight and zigzag stitches. Sews 3 locking stitches whe...
Page 19 - Stitch Selection
19 Stitch Selection START SEWING Choosing Utility and Decorative stitch patterns: The machine is automatically set to stitch 00 (Straight Stitch) when turned on. Press the stitch selection buttons (A) to set desired stitch number. Left button sets the left digit on the LCD display, right button sets...
Page 20 - Sewing a Straight Stitch
2 20 Sewing a Straight Stitch START SEWING SEW ALONG: 1. Set the machine to straight stitch 00. The machine will automatically default to straight stitch when it is turned on. 2. The Stitch Length is automatically set to 2.5. This is an average stitch length setting for regular sewing. 3. Place the ...
Page 21 - Sewing a Decorative Stitch
21 START SEWING SEW ALONG: Scallop Stitch 1. Set the stitch selection buttons to 39. 2. Set the Stitch Length to number 0.5. 3. Set the Stitch Width to 6.0. 4. Place the fabric under the All-Purpose Foot with the right-hand edge of the fabric lined up with the desired seam guide line on the right si...
Page 22 - Sewing a Stretch Stitch
2 22 SEW ALONG: Overedge Stitch 1. Set the stitch selection buttons to 22. 2. Set the Stitch Length to number 2.5. 3. Set the Stitch Width to 6.0. 4. Place the fabric under the All-Purpose Foot with the right-hand edge of the fabric lined up with the desired seam guide line on the right side of the ...
Page 23 - Sewing a 1-Step Buttonhole
23 SEW ALONG: Buttonhole Stitch 1. Mark position and length of buttonhole on the fabric. Place the button at the back of the buttonhole foot. 2. Remove the All-Purpose Foot and attach the Buttonhole Foot (See Page 26). Pass upper thread through the hole of the foot and bring thread to the left. 3. S...
Page 24 - Sewing a Button
2 24 SEW ALONG: Attaching a Button 1. Attach the Darning Plate to the needle plate directly below the presser foot. To do this line up the prongs on the underside of the Darning Plate with the holes in the needle plate. Push down to snap it in place. 2. Set the Stitch Selection buttons to 90. 3. Set...
Page 25 - Inserting and Changing Needles
25 Inserting and Changing Needles START SEWING ⚠ Turn the machine off before changing the needle. Change the needle regularly, especially if it is showing signs of wear resulting in sewing problems. Needles can show signs of wear when you see snags in the fabric or hear a slight popping sound as you...
Page 26 - Changing the Presser Foot; Sew Easy Foot
2 26 Changing the Presser Foot START SEWING Before changing the presser foot, raise the presser foot lifter. The presser foot holder (b) is attached to the presser bar (a). The presser foot (e) has a presser foot pin (d) that connects to the presser foot holder, sometimes called a shank (b). The sha...
Page 27 - Zipper Foot; Helpful LCD Display Messages
27 If an incorrect operation is made, a helpful message will be displayed. When a helpful message is displayed, fix the problem following the instructions below. Bobbin winder is moved to right (operating position) during sewing. Solution: Check bobbin winder and move it to left. Buttonhole lever is...
Page 28 - Troubleshooting; TROUBLESHOOTING AND MAINTENANCE
2 28 2. BOBBIN THREAD SHOWING ON TOP OF FABRIC Possible Cause: Top thread tension too tight. Solution: Reduce upper thread tension. (See Page 17) Possible Cause: Thread path is obstructed, putting extra tension on top thread. Solution: Check that the top thread path is not obstructed and thread is m...
Page 29 - THREAD IS SHREDDING
29 TROUBLESHOOTING AND MAINTENANCE Troubleshooting 4. THREAD IS SHREDDING Possible Cause: Thread is old or poor quality. Solution: Rethread the top of the machine and bobbin with good quality thread. (See Page 13) Possible Cause: The needle is either worn or old, or it is the wrong style or size for...
Page 30 - BOBBIN THREAD BREAKING; BOBBIN WINDING DIFFICULTIES
2 30 8. BOBBIN THREAD BREAKING Possible Cause: Bobbin threaded incorrectly. Solution: Check that bobbin is placed correctly in the bobbin case. (See Page 12) Possible Cause: Bobbin wound too full or unevenly. Solution: Bobbin thread may not have been correctly placed into bobbin winding tension disk...
Page 32 - NEEDLE THREADER NOT WORKING; LOUD NOISE WHEN SEWING
2 32 14. NEEDLE THREADER NOT WORKING (for models with built-in automatic needle threader) Possible Cause: Needle not in correct position. Solution: Raise needle to its highest position by turning hand wheel toward you. (See Page 14) Possible Cause: Needle inserted incorrectly. Solution: Needle all t...
Page 33 - Maintenance
33 Cleaning the Feed Teeth and Hook Area ⚠ Before cleaning the machine, disconnect the power supply by removing the plug from the electrical outlet. Turn the hand wheel to raise the needle to its highest position. Raise the presser foot lifter. Sewing Light This appliance is equipped with a durable ...
Page 34 - Glossary of Key Sewing Terms
2 34 Backstitch Backstitching is most commonly used at the beginning and ending of seams to lock the stitching so it does not come undone. Start sewing the beginning of the seam about 3-4 stitches, then sew in reverse for 3-4 stitches. Start sewing forward again and continue sewing the seam to the e...
Page 35 - MANUAL DE INSTRUCCIONES
Page 36 - Bienvenido; INSTRUCCIÓN; Un manual de instrucciones con gráficas fáciles de entender e
2 2 Bienvenido INSTRUCCIÓN Bienvenido(a) a la familia SINGER ® y ¡FELICITACIONES por la adquisición de su nueva máquina de coser SINGER ® ! La marca SINGER ® tiene una posición de calidad en el área de costura por más de 160 años. Diseñamos máquinas para entusiastas de la costura de todos los nivele...
Page 37 - Instrucciones Importantes de Seguridad; - Para reducir el riesgo de descarga eléctrica:; ADVERTENCIA; - Para reducir el riesgo de quemadoras,
3 Instrucciones Importantes de Seguridad INSTRUCCIÓN Esta máquina de coser doméstica ha sido diseñada de conformidad con las normas IEC/EN 60335-2-28 y UL1594. INSTRUCCIONES DE SEGURIDAD IMPORTANTES Cuando utilice un aparato eléctrico, debe respetar siempre las precauciones de seguridad básicas, inc...
Page 38 - los aparatos provistos de doble aislamiento.; GUARDE ESTAS INSTRUCCIONES; PARA EUROPA SOLAMENTE:; realizados por niños sin supervisión.; MANTENIMIENTO DE PRODUCTOS CON DOBLE
2 4 Instrucciones Importantes de Seguridad INSTRUCCIÓN - Si el cable de alimentación conectado con el pedal está dañado, debe ser reemplazado por el fabricante o su agente de servicio o una persona igualmente cualificada, para evitar riesgos. - Esta máquina de coser está provista de un doble aislami...
Page 39 - Tabla de Contenido
5 INSTRUCCIÓN Tabla de Contenido INSTRUCCIÓN ................................................................................................................ 2-5 Bienvenido ..................................................................................................................................
Page 40 - ACERCA DE SU MÁQUINA; Partes Principales del Frente
2 6 ACERCA DE SU MÁQUINA Partes Principales del Frente 1. COSTURA DE BOTÓN INVERSA dirección de costura en reversa, por ejemplo cuando se asegura el comienzo y final de una costura. (ver página 20) 2. PALANCA TIRA HILO controla el flujo del hilo superior mientras de cose (ver página 13) 3. BOTÓN DE ...
Page 41 - Partes Principales de la Parte de Atrás
7 Partes Principales de la Parte de Atrás ACERCA DE SU MÁQUINA 1 2 34 5 6 7 8 9 10 11 12 13 1. PORTA CARRETE HORIZONTAL sostiene el carrete de hilo y tapa carrete del hilo superior. Va a necesitar elevarlo de la posición de almacenamiento cuando cosa. 2. EJE DEVANADOR DE BOBINA sostiene la bobina mi...
Page 42 - Área del Prensatelas y Aguja
2 8 Área del Prensatelas y Aguja ACERCA DE SU MÁQUINA 1. GUÍA HILO controla el movimiento del hilo superior. 2. PALANCA ENSARTADOR AGUJA se usa para accionar el ensartador automático. 3. GUÍA ENSARTADOR AGUJA sostiene el hilo con firmeza antes de colocarlo en el gancho. 4. TORNILLO SUJETA AGUJA aseg...
Page 43 - Compartimiento Removible y Accesorios
9 Compartimiento Removible y Accesorios ACERCA DE SU MÁQUINA Sostenga horizontalmente el compartimiento, luego jale hacia la izquierda para removerlo de la máquina. Al hacerlo, tendrá acceso al brazo libre, que le facilita coser proyectos tubulares como dobladillos o mangas. Adicionalmente, hallará ...
Page 44 - Encendiendo su Máquina; PREPARÁNDOSE PARA COSER
2 10 Encendiendo su Máquina PREPARÁNDOSE PARA COSER Conecte la máquina a una fuente de poder. Esta máquina tiene un enchufe polarizado que debe entrar en un tomacorriente polarizado. (a y b) ⚠ Desconecte el cable de energía cuando la máquina no esté en uso. Pedal Controlador El pedal controlador reg...
Page 45 - Devanando la Bobina
11 PREPARÁNDOSE PARA COSER Devanando la Bobina → Esta máquina usa bobinas metal SINGER ® Clase 15. Use sólo este tipo de bobina cuando compre bobinas adicionales para su máquina. No substituya con bobinas plásticas. 1. Coloque el carrete de hilo y el sujeta carrete correspondiente en el poste. El po...
Page 46 - Insertando la bobina
2 12 Insertando la bobina ⚠ Apague la máquina antes de insertar o remover la bobina. 1. Saque el compartimiento removible. 2. Abra la cubierta abatible. 3. Saque la caja bobina para quitar la caja bobina del porta bobina. 4. Sostenga la caja bobina con una mano, luego inserte la bobina de modo que e...
Page 47 - Ensartando el Hilo Superior
13 Ensartando el Hilo Superior ⚠ Por seguridad, apague la alimentación antes de ensartar la máquina. 1. Comience girando el volante (A) hacia usted para levantar la aguja (B) y la palanca tira hilo (C). Debe poder ver la palanca tira hilo. 2. → Levante el alza prensatelas. Esto es necesario para que...
Page 48 - Ensartador Automático de Aguja
2 14 Ensartador Automático de Aguja → Jale cerca de 6-8 pulg. hacia atrás más allá del ojo de la aguja. Esto ayudará a evitar que la aguja se desensarte cuando comience a coser. ⚠ Por seguridad, apague la máquina antes de usar el ensartador automático. 1. Levante la aguja a su posición más alta gira...
Page 49 - Jalando el Hilo Bobina
15 Jalando el Hilo Bobina ⚠ Por seguridad, apague la máquina antes de ensartar la máquina. 1. Sostenga el extremo del hilo superior con la mano izquierda (A). Gire el volante hacia usted (B), bajando primero (C) y luego levantando la aguja (D). 2. Conforme gira el volante, jale suavemente el hilo su...
Page 50 - Antes de Comenzar a Coser; COMENZANDO A COSER
2 16 Antes de Comenzar a Coser COMENZANDO A COSER Ahora que su máquina está ensartada, le mostraremos como configurar la máquina para las técnicas básicas de costura, tales como: coser puntada recta, coser puntada decorativa, coser puntada stretch, hacer un ojal y pegar un botón. Con cada técnica, t...
Page 51 - Como se forman la Puntadas
17 Como se forman la Puntadas COMENZANDO A COSER 1. Cómo se forman las puntadas Las puntadas se forman cuando el hilo superior y el hilo bobina se enganchan entre las capas de tela. La puntada está bien balanceada cuando el hilo aguja aparece en la parte superior y el hilo bobina aparece en la parte...
Page 52 - Pantalla LCD y Función de Botones
2 18 Pantalla LCD y Función de Botones COMENZANDO A COSER Para ejemplos de patrones de puntada y más instrucciones, consulte las Guías de Referencia de Puntadas en visite www.singerco.com. 2 1 5 8 3 4 6 7 1. REVERSA/BOTON DE BLOQUEO AUTOMATICO Cose puntadas inversas cuando se presiona para recto y e...
Page 53 - Selección de puntadas
19 Selección de puntadas COMENZANDO A COSER Selección de utilidad y puntada decorativa patrones: La máquina se ajusta automáticamente a la costura 00 (Puntada recta) cuando se enciende. Pulse los botones de selección de puntadas (A) para número de puntada deseada. El botón izquierdo ajusta el dígito...
Page 54 - Cosiendo una Puntada Recta
2 20 Cosiendo una Puntada Recta COMENZANDO A COSER COSIENDO: 1. Ajuste la máquina a la puntada recta 00. El equipo automáticamente por defecto se ajusta a la puntada recta cuando se enciende. 2. La largura de puntada se ajusta automáticamente a 2,5. Este es un ajuste de largo de puntada promedio par...
Page 55 - Cosiendo una puntada Decorativa
21 COMENZANDO A COSER COSIENDO: Puntada Media Luna 1. Ajuste los botones de selección a puntada en 39. 2. Ajuste la largura de puntada a 0,5. 3. Ajuste el ancho de puntada a 6,0. 4. Coloque la tela debajo del Pie Multipropósito con el borde derecho de la tela alineado con la guía de costura deseado ...
Page 56 - Cosiendo una Puntada Stretch
2 22 COSIENDO: Puntada Sobre borde 1. Ajuste los botones de selección a puntada en 22. 2. Ajuste la largura de puntada a 2,5. 3. Ajuste el ancho de puntada a 6,0. 4. Coloque la tela debajo del pie multipropósito con el borde derecho de la tela alineado con la línea guía de costura deseado en el lado...
Page 57 - Coser un ojal en un solo paso
23 COSIENDO: Puntada de Ojal 1. Coloque el botón en la parte de atrás del prensatelas de ojal. Marque la posición y el largo del ojal en la tela. 2. Retire el prensatelas universal y coloque el prensatelas de ojal (ver página 26). Pase el hilo superior a través del orificio del prensatelas y jale el...
Page 58 - Pegando un Botón
2 24 COSIENDO: Pegando un Botón 1. Coloque la Placa de Zurcido a la placa aguja directamente bajo el prensatelas. Para hacerlo alinee las puntas debajo de la Placa de Zurcido con los orificios en la placa aguja. Empuje para asegurarla en su sitio. 2. Ajuste los botones de selección a puntada en 90. ...
Page 59 - Insertando y Cambiando Agujas
25 Insertando y Cambiando Agujas COMENZANDO A COSER ⚠ Apague la máquina antes de cambiar la aguja. Cambie la aguja con regularidad, especialmente si muestra signos de desgaste que resultan en problemas. Las agujas pueden mostrar signos de desgaste cuando ve rasgones en la tela o escucha un ligero so...
Page 60 - Cambiando el Prensatelas; Pie De Costura Fácil
2 26 Cambiando el Prensatelas COMENZANDO A COSER Antes de cambiar el prensatelas, levante el alza prensatelas. El sujeta prensatelas (b) está sujeto a la barra presionadora (a). El prensatelas (e) tiene un perno (d) que une con el sujeta prensatelas, algunas veces llamado zanco (b). El zanco tiene u...
Page 61 - Prensatelas para Cremallera; Mensajes de pantalla LCD útiles
27 Si se realiza una operación incorrecta, se mostrará un mensaje útil. Cuando aparezca un mensaje útil, solucione el problema siguiendo las instrucciones siguientes. La bobinadora se mueve a la derecha (posición de funcionamiento) durante la costura. Solución: Compruebe la devanadora de la bobina y...
Page 62 - EL HILO BOBINA SE VE EN LA PARTE DE ARRIBA DE LA TELA; EL HILO HACE BUCLES POR DEBAJO DE LA TELA; Consejos de Corrección de Fallas
2 28 2. EL HILO BOBINA SE VE EN LA PARTE DE ARRIBA DE LA TELA Causa Posible: Demasiada tensión en el hilo superior. Solución: Reduzca la tensión del hilo superior. (ver página 17) Causa Posible: La ruta del hilo está obstruida, agregándole tensión extra al hilo. Solución: Revise que la ruta del hilo...
Page 63 - EL HILO SE DESHILACHA
29 CORRECCIÓN DE FALLAS Y MANTENIMIENTO Consejos de Corrección de Fallas CORRECCIÓN DE FALLAS Y MANTENIMIENTO 4. EL HILO SE DESHILACHA Causa Posible: El hilo es viejo o de mala calidad. Solución: Ensarte de nuevo la parte superior de la máquina y bobina con hilo de calidad. (ver página 13) Causa Pos...
Page 64 - SE ROMPE EL HILO BOBINA; SE ROMPE LA AGUJA
2 30 8. SE ROMPE EL HILO BOBINA Causa Posible: Hilo bobina mal ensartado. Solución: Revise que la bobina se coloque correctamente en el porta bobina. (ver página 12) Causa Posible: La bobina se devana mucho o dispareja. Solución: El hilo bobina puede no estar bien colocado en el disco de tensión de ...
Page 65 - CORRECCIÓN DE FALLAS Y MANTENIMIENTO
31 11. LA TELA SE FRUNCE Causa Posible: Demasiada tensión en hilo superior. Solución: Reduzca la tensión del hilo superior. (ver página 17) Causa Posible: El largo puntada es demasiado corto para la tela a coser. Solución: Aumente el largo puntada. (visite www.singerco.com para información Guía de R...
Page 66 - EL ENSARTADOR NO ESTÁ FUNCIONANDO; MUCHO RUIDO CUANDO COSE
2 32 14. EL ENSARTADOR NO ESTÁ FUNCIONANDO (para modelos con ensartador automático de aguja integrado) Causa Posible: La aguja no está en la posición correcta. Solución: Levante la aguja a su posición más alta girando el volante hacia usted. (ver página 15) Causa Posible: Aguja insertada de forma in...
Page 68 - Glosario de Términos Usados
2 34 Costura de refuerzo La costura de refuerzo se usa al comienzo y final de la costura para asegurar que las puntadas no se suelten. Al inicio de la costura realice 3-4 puntadas, luego cosa en reversa otras 3-4 puntadas. Comience a coser hacia adelante de nuevo y continúe la costura hasta el final...
Page 69 - MANUEL D’INSTRUCTION
Page 70 - Bienvenue
2 2 Bienvenue INTRODUCTION Bienvenue à la famille SINGER ® et nos FÉLICITATIONS pour votre achat d’une toute nouvelle machine à coudre SINGER ® ! La marque SINGER ® représente la qualité depuis 160 ans. Nous créons nos machines pour tous niveau de couture pour que la joie de la couture et la créatio...
Page 71 - Importantes Consignes de Sécurité; – Pour réduire le risque d’électrocution :; AVERTISSEMENT; – Pour réduire le risque de brûlures,
3 Importantes Consignes de Sécurité INTRODUCTION Cette machine à coudre à usage domestique est conçue pour répondre aux normes IEC/EN 60335-2-28 et UL1594. CONSIGNES DE SÉCURITÉ IMPORTANTES Lors de l’utilisation d’un appareil électrique, les précautions de sécurité essentielles doivent toujours être...
Page 72 - - N’utilisez pas la machine si elle est mouillée.; CONSERVER CES INSTRUCTIONS; POUR L’EUROPE UNIQUEMENT :; Le niveau sonore en conditions normales est inférieur à 72 dB(A).; POUR LES PAYS HORS EUROPE :; enfants jouer avec la machine à coudre.; ENTRETIEN DES PRODUITS ÉQUIPÉS D’UNE
2 4 Importantes Consignes de Sécurité INTRODUCTION - N’utilisez pas la machine si elle est mouillée. - Si le voyant LED est endommagé ou cassé, il doit être remplacé par le fabricant ou son agent de service, ou toute autre personne qualifiée, afin d’éviter les risques. - Si le cordon de la pédale es...
Page 73 - Table des Matières
5 INTRODUCTION Table des Matières INTRODUCTION ............................................................................................................. 2-5 Bienvenue ....................................................................................................................................
Page 74 - À PROPOS DE VOTRE MACHINE; Parties Avant Principales de la Machine
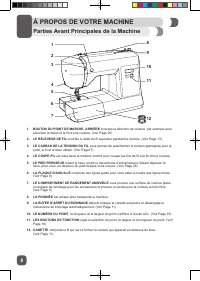
2 6 À PROPOS DE VOTRE MACHINE Parties Avant Principales de la Machine 1. BOUTON DU POINT DE MARCHE- ARRIÈRE inverses la direction de couture, par exemple pour sécuriser le début et la fin d’une couture. (Voir Page 20) 2. LE RELEVEUR DE FIL contrôle le débit du fil supérieur pendant la couture. (Voir...
Page 75 - Parties Arrière Principales de la Machine
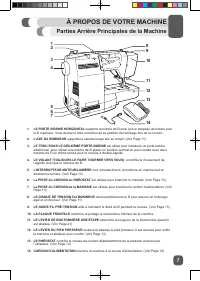
7 Parties Arrière Principales de la Machine À PROPOS DE VOTRE MACHINE 1. LE PORTE-BOBINE HORIZONTAL supporte la bobine de fil ainsi que le chapeau de bobine pour le fil supérieur. Vous devrez le faire remontez de sa position de remisage lors de la couture. 2. L’AXE DU BOBINEUR supporte la canette lo...
Page 76 - La Surface de l’Aiguille et du Pied presseur
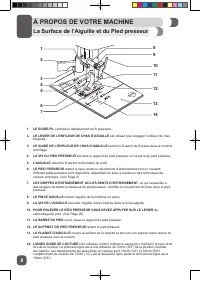
2 8 La Surface de l’Aiguille et du Pied presseur À PROPOS DE VOTRE MACHINE 1. LE GUIDE-FIL contrôle le déplacement du fil supérieur. 2. LE LEVIER DE L’ENFILEUR DE CHAS D’AIGUILLE est utilisez pour engager l’enfileur de chas d’aiguille. 3. LE GUIDE DE L’ENFILEUR DE CHAS D’AIGUILLE retient le fil avan...
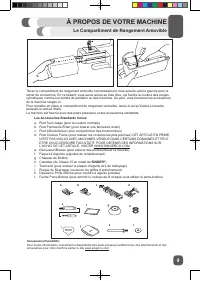
Page 77 - Le Compartiment de Rangement Amovible
9 Le Compartiment de Rangement Amovible À PROPOS DE VOTRE MACHINE Tenez le compartiment de rangement amovible horizontalement, tirez ensuite vers la gauche pour le retirer de la machine. En ce faisant, vous aurez accès au bras libre, qui facilite la couture des projets cylindriques comme les ourlets...
Page 78 - Mettre en Marche votre Machine; PRÉPARATIFS DE LA COUTURE
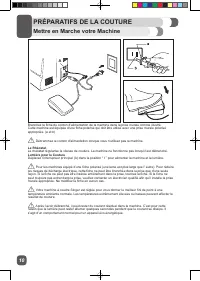
2 10 Mettre en Marche votre Machine PRÉPARATIFS DE LA COUTURE Branchez la fiche du cordon d’alimentation de la machine dans la prise murale comme illustré. Cette machine est équipée d’une fiche polarisé qui doit être utilisé avec une prise murale polarisé appropriée. (a et b) ⚠ Débranchez le cordon ...
Page 79 - Remplissage de la Canette
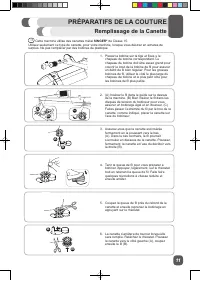
11 PRÉPARATIFS DE LA COUTURE Remplissage de la Canette → Cette machine utilise des canettes métal SINGER ® de Classe 15. Utilisez seulement ce type de canette, pour votre machine, lorsque vous désirez en achetés de surplus. Ne pas remplacer par des bobines de plastique. 1. Placez la bobine sur la ti...
Page 80 - Mise en Place de la Canette
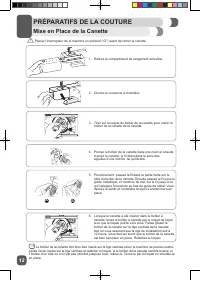
2 12 Mise en Place de la Canette ⚠ Placez l’interrupteur de la machine en position (“O”) avant de retirer la canette. 1. Retirez le compartiment de rangement amovible. 2. Ouvrez le couvercle à charnière. 3. Tirez sur le loquet du boîtier de la canette pour retirer le boîtier de la canette de la nave...
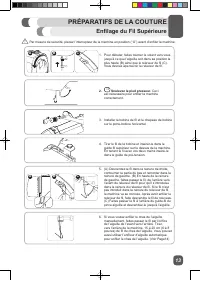
Page 81 - Enfilage du Fil Supérieure
13 Enfilage du Fil Supérieure ⚠ Par mesure de sécurité, placez l’interrupteur de la machine en position (“O”) avant d’enfiler la machine. 1. Pour débuter, faites tourner le volant vers vous jusqu’à ce que l’aiguille soit dans sa position la plus haute (B) ainsi que le releveur de fil (C). Vous devri...
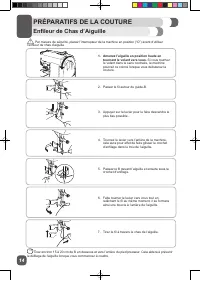
Page 82 - Enfileur de Chas d’Aiguille
2 14 Enfileur de Chas d’Aiguille → Tirez environ 15 à 20 cm de fil en dessous et vers l’arrière du pied presseur. Cela aidera à prévenir le défilage de l’aiguille lorsque vous commencez à coudre. ⚠ Par mesure de sécurité, placez l’interrupteur de la machine en position (“O”) avant d’utiliser l’enfil...
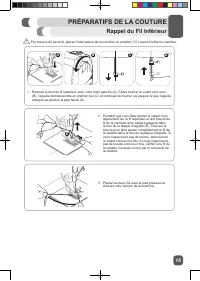
Page 83 - Rappel du Fil Inférieur
15 Rappel du Fil Inférieur ⚠ Par mesure de sécurité, placez l’interrupteur de la machine en position (“O”) avant d’enfiler la machine. 1. Retenez le bout du fil supérieur avec votre main gauche (A). Faites tourner le volant vers vous (B), l’aiguille doit descendre en premier lieu (C) et continuer de...
Page 84 - Avant de Débuter la Couture; DÉBUTER LA COUTURE
2 16 Avant de Débuter la Couture DÉBUTER LA COUTURE Maintenant que votre machine est enfilée, nous expliquerons comment faire les réglages de la machine pour les techniques de couture de base telle: la couture au point droit, la couture de point décoratif, la couture de point extensible, la confecti...
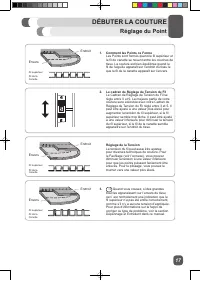
Page 85 - Réglage du Point
17 Réglage du Point DÉBUTER LA COUTURE 1. Comment les Points ce Forme Les Points sont formés quand le fil supérieur et le fil de canette se nouent entre les couches de tissu. La couture est bien équilibrée quand le fil de l’aiguille apparaît sur l’endroit du tissu le que le fil de la canette apparaî...
Page 86 - Écran ACL et Boutons de Fonction
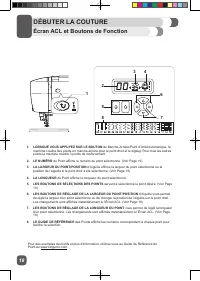
2 18 Écran ACL et Boutons de Fonction DÉBUTER LA COUTURE Pour des exemples de motifs et plus d’information, référez-vous au Guide de Référence de Point au www.singerco.com. 2 1 5 8 3 4 6 7 1. LORSQUE VOUS APPUYEZ SUR LE BOUTON de Marche-Arrière/Point d’Arrêt Automatique, la machine coudra des points...
Page 87 - Sélection d’un Point
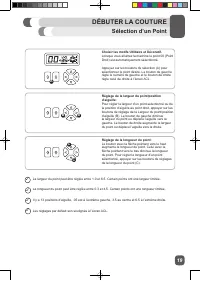
19 Sélection d’un Point DÉBUTER LA COUTURE Choisir les motifs Utilitaire et Décoratif. Lorsque vous allumez la machine le point 00 (Point Droit) est automatiquement sélectionné. Appuyez sur les boutons de sélection (A) pour sélectionner le point désiré. Le bouton de gauche règle le numéro de gauche ...
Page 88 - La Couture au Point Droit
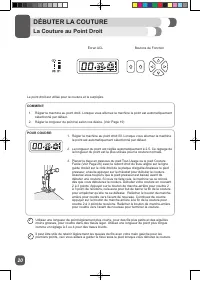
2 20 La Couture au Point Droit DÉBUTER LA COUTURE POUR COUDRE: 1. Régler la machine au point droit 00. Lorsque vous allumez la machine le point est automatiquement sélectionné par défaut. 2. La longueur du point est réglée automatiquement à 2.5. Ce réglage de la longueur du point est la plus utilisé...
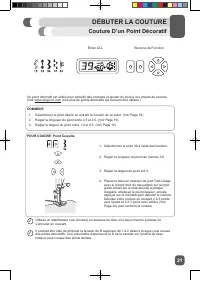
Page 89 - Couture D’un Point Décoratif
21 DÉBUTER LA COUTURE POUR COUDRE: Point Coquille 1. Sélectionner le point 39 à l’aide des boutons. 2. Régler la longueur du point au numéro 0.5. 3. Régler la largeur du point à 6.0. 4. Placez le tissu en dessous du pied Tout-Usage avec le rebord droit du tissu aligné sur la ligne guide choisit sur ...
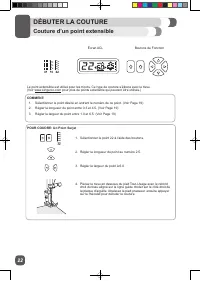
Page 90 - Couture d’un point extensible
2 22 POUR COUDRE: Un Point Surjet 1. Sélectionner le point 22 à l’aide des boutons. 2. Régler la longueur du point au numéro 2.5. 3. Régler la largeur du point à 6.0. 4. Placez le tissu en dessous du pied Tout-Usage avec le rebord droit du tissu aligné sur la ligne guide choisit sur le côté droit de...
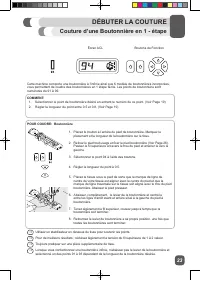
Page 91 - Couture d’une Boutonnière en 1 - étape
23 POUR COUDRE: Boutonnière 1. Placez le bouton à l’arrière du pied de boutonnière. Marquez le placement et la longueur de la boutonnière sur le tissu. 2. Retirez le pied tout usage et fixer le pied boutonnière (Voir Page 26). Passez le fil supérieure à travers le trou du pied et amener le vers la g...
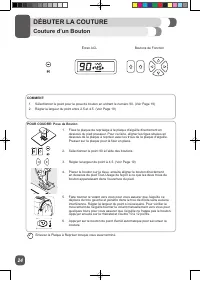
Page 92 - Couture d’un Bouton
2 24 POUR COUDRE: Pose de Bouton 1. Fixez la plaque de reprisage à la plaque d’aiguille directement en dessous du pied presseur. Pour ce faire, aligner les tiges situées en dessous de la plaque à repriser avec les trous de la plaque d’aiguille. Presser sur la plaque pour la fixer en place. 2. Sélect...
Page 93 - Insérez et Remplacez une Aiguille
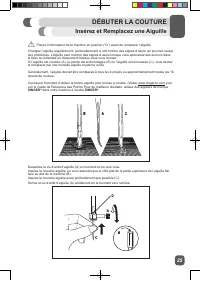
25 Insérez et Remplacez une Aiguille DÉBUTER LA COUTURE ⚠ Placez l’interrupteur de la machine en position (“O”) avant de remplacer l’aiguille. Changez l’aiguille régulièrement, particulièrement si elle montre des signes d’usure qui pourrait causer des problèmes. L’aiguille peut montrer des signes d’...
Page 94 - Remplacement du Pied Presseur; Pied Couture Facile
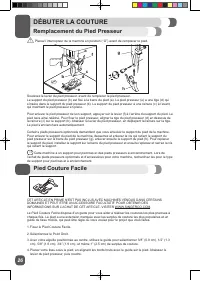
2 26 Remplacement du Pied Presseur DÉBUTER LA COUTURE Soulevez le levier du pied presseur, avant de remplacer le pied presseur. Le support du pied presseur (b) est fixé à la barre du pied (a). Le pied presseur (e) a une tige (d) qui s’insère dans le support du pied presseur (b). Le support du pied p...
Page 95 - Pied Fermeture à Glissière.; Messages d’Aide à l’Écran ACL
27 Si une opération ne se fait pas correctement, un message d’aide apparaîtra. Lorsque le message d’aide apparaît, résoudre le problème en suivant les instructions ci-dessous. Le bobineur se déplace vers la droite (position activée) pendant la couture. Solution: Vérifier le bobineur et déplacer le v...
Page 96 - LE FIL DE LA CANETTE APPARAIT SUR LE DESSUS DU TISSU; Dépannage; DÉPANNAGE & ENTRETIEN
2 28 2. LE FIL DE LA CANETTE APPARAIT SUR LE DESSUS DU TISSU Cause Possible: la tension du fi l supérieur est trop grande. Solution: réduire la tension du fi l supérieur. (Voir Page 17) Cause Possible: le chemin du fi l est obstrué, ce qui augmente la tension du fi l supérieur. Solution: vérifi ez q...
Page 97 - LE FIL S’EFFILOCHE; LE FIL S’EMMÊLE AU DÉBUT
29 DÉPANNAGE & ENTRETIEN Dépannage 4. LE FIL S’EFFILOCHE Cause Possible: Le fil est trop vieux ou de mauvaise qualité. Solution: réenfilez le fil supérieur et de la canette avec du fil de bonne qualité. (Voir Page 13) Cause Possible: l’aiguille est ou bien usée ou trop veille, il se peut que le ...
Page 98 - LE FIL DE LA CANETTE CASSE; LES AIGUILLES SE CASSENT; DIFFICULTÉ A BOBINER UNE CANETTE
2 30 8. LE FIL DE LA CANETTE CASSE Cause Possible: la canette n’est pas enfiler correctement. Solution: vérifiez que la canette a été mise en place correctement dans le boîtier de la canette. (Voir Page 12) Cause Possible: la canette est trop pleine ou n’a pas été enfiler également. Solution: le fil...
Page 99 - LE TISSU FORME UN “TUNNEL” EN DESSOUS DES POINTS
31 11. LE TISSU FRONCE Cause Possible: la tension du fil supérieur est trop serrée. Solution: réduisez la tension du fil supérieur. (Voir Page 17) Cause Possible: la longueur du point est réglée à un point trop court pour le type de tissu à coudre. Solution: augmentez la longueur du point. (Voir le ...
Page 100 - L’ENFILEUR DE CHAS D’AIGUILLE NE FONCTIONNE PAS; BRUIT FORT LORS DE LA COUTURE; LA MACHINE NE FONCTIONNE PAS
2 32 14. L’ENFILEUR DE CHAS D’AIGUILLE NE FONCTIONNE PAS (Pour les modèles qui ont un enfileur de chas d’aiguille automatique incorporé) Cause Possible: l’aiguille n’est pas à la bonne position. Solution: élevez l’aiguille le plus haut possible en tournant le volant vers vous. (Voir Page 14) Cause P...
Page 101 - Entretient
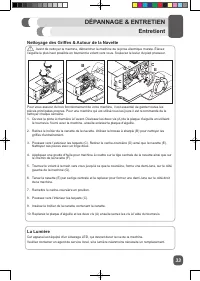
33 Nettoyage des Griffes & Autour de la Navette ⚠ Avant de nettoyer la machine, débrancher la machine de la prise électrique murale. Élevez l’aiguille le plus haut possible en tournant le volant vers vous. Soulevez le levier du pied presseur. La Lumière Cet appareil est équipé d’un éclairage LED...
Page 102 - Lexique des Termes de Machine à coudre
2 34 Point de marche-arrière Le Point de marche-arrière est généralement utilisé au début et à la fin d’une couture pour empêcher qu’elle ne se défasse. Commencez à coudre le début de la couture environ 3-4 points, coudre ensuite en marche-arrière 3-4 points. Coudre vers l’avant de nouveau pour term...