Page 2 - Index
Page 2 Index 1. Welcome 3 Your State Regulatory Authority 3 2. Your Safety 4 Before Installation 5 Product Use 6 Electrical Cord 6 3. Description 7 Rangehood 7 4. Operation 8 Push Button Control Panel 8 Speed Control 8 5. Cleaning & Maintenance 9 Cleaning the Interior 9 Cleaning the Oil Drip Tra...
Page 3 - Welcome; Your State Regulatory Authority
Page 3 1. Welcome Thank you for purchasing your new Schweigen rangehood. To get the maximum output from this unit, please read through this guide before use. The guide contains important information on the use and maintenance of the unit, as well as important safety notes. This will ensure your pers...
Page 4 - Your Safety; WARNING
Page 4 2. Your Safety WARNING Please read this section thoroughly before attempting to operate the appliance. Inspect your product upon receipt. Any damage or defects MUST be reported within 48 hours, or no claim will be recognised. DO NOT INSTALL THIS APPLIANCE IF YOU FIND IT DAMAGED. If this produ...
Page 5 - Before Installation
Page 5 2. Your Safety Before Installation 1. We recommend this appliance be installed or repaired by an experienced Home Appliances technician. 2. Please see our website www.schweigen.com.au for experienced installers. 3. It is dangerous to modify any part of this appliance. Modification of any kind...
Page 6 - Product Use; Electrical Cord
Page 6 2. Your Safety Product Use This product is designed for household use and should not be used for commercial applications. After use, always ensure that all controls are in the “OFF” position. When frying with a gas flame, take particular care not to allow the oil or grease in the pan to catch...
Page 7 - Description; Rangehood
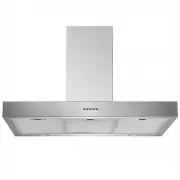
_n_. _RH Section_ Page 7 3. Description Note: Please make sure that all plastic protection on the rangehood and filters are removed before use. Rangehood 1. Mounting Bracket 2. Extension Flue Piece 3. Main Flue 4. Main Power Cord 5. Single Outlet 150mm 6. Filters 7. Light 8. Oil Drip Tray NOTE: Filt...
Page 8 - Operation; Push Button Control Panel; Speed Control
_n_. _LH Section_ Page 8 4. Operation Push Button Control Panel Turn on/off the rangehood Low speed setting Medium speed setting High speed setting Turn on/off the lamp Speed Control This undermount is equipped with a 3 speed mechanical control. Speed control usage suggestions: • Low speed for simme...
Page 9 - Cleaning & Maintenance; Cleaning the Interior; OK; Warning
Page 9 5. Cleaning & Maintenance Cleaning the Interior Clean the interior of the rangehood with a damp cloth and a neutral detergent. NOTE: Do not use denatured alcohol on the exterior of the rangehood. Do not clean the electric parts or the motor with liquids or solvents Cleaning the Oil Drip T...
Page 10 - Filters
Page 10 To remove the filter press handle and remove it through the front guide; bend it slightly and remove filter. To replace, perform the same operation but in reverse. 5. Cleaning & Maintenance Filters For this appliance to function effectively, regular maintenance is a must. • The function ...
Page 11 - Danger
_n_. _RH Section_ Page 11 5. Cleaning & Maintenance Danger Always switch off and disconnect the power cord before replacing any light. Failure to do so may cause serious injury. Please be aware that the light will retain heat for a short period of time after being switched off. Replacing the Lig...
Page 12 - Installation; Rangehood Size vs Cooktop Size
_n_. _LH Section_ Page 12 6. Installation Rangehood Size vs Cooktop Size In addition to the size, the height of the rangehood above the cooktop is important to obtain the best performance. INADEQUATE Rangehood smaller than cooking zone ADEQUATE Rangehood same size as cooking zone OPTIMAL Rangehood l...
Page 13 - Mounting Instructions; In addition to the information in this manual,
_n_. _RH Section_ Page 13 6. Installation Mounting Instructions It is STRONGLY RECOMMENDED that the rangehood be installed centrally over the cooktop. This will greatly improve its performance. Minimum height from the hob top surface to the underside face of the rangehood:• 650mm electric cooktop• 6...
Page 14 - Wall Mount Installation; DANGER
_n_. _LH Section_ Page 14 6. Installation Wall Mount Installation There are two primary mounting points and several secondary mounting points to firmly fix the rangehood in place. Suitable fixing screws must be used to mount the appliance on a secure surface. Please ensure that the holes for the two...
Page 15 - Installation Example
_n_. _RH Section_ Page 15 6. Installation Step 1 There are 2 suspension points ( 2 ) to suspend the appliance to the wall. Secure rangehood to the wall using only primary mounting points ( 1 ). Check the level of the rangehood and adjust accordingly if necessary ( 2 ). Once level, continue to secure...
Page 16 - IMPORTANT; The ducting diameter MUST be 150mm. The overall length; Ducting
Page 16 6. Installation IMPORTANT Please ensure all plastic protection on the rangehood and filters is removed before use. Step 4 Attach the exterior flue wall mounting bracket to the wall. Slide the inside extension flue piece up to the wall mounting bracket and secure. 1 2 3 The ducting diameter M...
Page 18 - Ducting Advice
Page 18 6. Installation Ducting Advice Never reduce flue diameter right next to the rangehood outlet fitting. Avoid excessive reduction of the flue size, as this drastically reduces extraction capacity. Keep the curves or bends to a minimum. If they do exist, try to keep the angles as open as possib...
Page 19 - Roof Cowls / Roof Seal Kit; NOTE; Faulty Installation
_n_. _RH Section_ Page 19 6. Installation WARNING All electrical wiring should be kept inside the roof space. Roof Cowls / Roof Seal Kit 1 2 3 4 1. Roof Cowls (Not supplied)* 2. Ducting must be pulled taut. DO NOT crush or kink the ducting. 3. Connect ducting to the outlet on rangehood using a ring ...
Page 20 - Condensation Information; Cooking with Induction Cooktops
_n_. _LH Section_ Page 20 7. Condensation Information Cooking with Induction Cooktops Cooking with an induction or similar cooktop, may produce condensation on the rangehood. Unlike basic electric or gas cooking, induction cooktops heat food and liquid instantly, which in turn, produces vapours rapi...
Page 21 - Troubleshooting; Service
_n_. _RH Section_ Page 21 8. Troubleshooting Troubleshooting If the product does not work: Before you contact the technical service department, make sure that the product is plugged in, and electric wiring is connected. Weak air suction may be caused by back draft fins remaining closed. Do not take ...
Page 22 - Specifications; Technical Specifications; Dimensions
Page 22 9. Specifications Technical Specifications Model TSH-900 / TSH-900B Feeding Voltage 220-240V 50Hz Lamp Power — LED (W) 2 x 3W 900 500 540-1030 263 263 80 Dimensions 265 265
Page 23 - Disclaimer
Page 23 10. Disclaimer Disclaimer Under our policy of continuous product development, product specifications may change without notice. Prospective purchasers should therefore check with the retailer to ensure this publication correctly describes the products being offered for sale. All information ...