Page 2 - Index; Tips and Suggestions
Page 2 Index 1. Welcome ____________________________________________________________________________________________________ 3 2. Your Safety Safety Advice ____________________________________________________________________________ 4 Before Installation _____________________________________________...
Page 4 - WARNING; MUST; DO NOT INSTALL THIS APPLIANCE IF YOU FIND IT DAMAGED.
Page 4 2. Your Safety WARNING Please read this section thoroughly before attempting to operate the appliance. Inspect your product upon receipt. Any damage or defects MUST be reported within 48 hours, or no claim will be recognised. DO NOT INSTALL THIS APPLIANCE IF YOU FIND IT DAMAGED. If this produ...
Page 5 - Before Installation; ground connection; Before installing the electrical connections, you should:
Page 5 2. Your Safety Before Installation 1. We recommend this appliance be installed or repaired by a qualified Schweigen Home Appliances technician. 2. Please see our website www.schweigen.com.au for recommended installers. 3. It is dangerous to modify any part of this appliance. Modification of a...
Page 6 - Product Use; Maintenance and Service
Page 6 2. Your Safety Product Use This product is designed for household use and should not be used for commercial applications. After use, always ensure that all controls are in the “OFF” position. When frying with a gas flame, take particular care not to allow the oil or grease in the pan to catch...
Page 7 - OPTIMAL; ADEQUATE; INADEQUATE; For Users; For Installers and Users
Page 7 3. Tips & Suggestions OPTIMAL Rangehood bigger than the cooking area. ADEQUATE Rangehood equal to the cooking area. INADEQUATE Rangehood smaller than the cooking area. The Rangehood has one mode of operation: Air extraction: The air is drawn in and cleaned by the grease filters and direct...
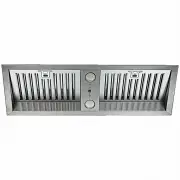
Page 8 - Speed Control; Main Rangehood
Page 8 4. Description Speed Control Speed control usage suggestions: • Low speed for simmering.• Medium speed for light cooking.• High speed for heavy frying or heavy cooking. Main Rangehood Filter Lamp (For GU10 fittings, please twist to remove) For use with Isodrive motor system 1 Male Plug (Main ...
Page 9 - Control Panel
Page 9 5. Operation Control Panel 1 2 3 1 2 3 1 2 3 1 2 3 1 2 3 Press - to decrease the fan speed Press + to increase the fan speed To switch on or off the lights Up to 15 minutes timer setting and fully adjustable. When you press the timer button the digital display will change to “00” timer mode. ...
Page 10 - Surfaces
Page 10 6. Cleaning & Maintenance WARNING Always switch off and disconnect power before cleaning. Surfaces Wash with warm soapy water and a soft sponge. Never use abrasive detergent, scouring pads, steel wool or solvents on any part of this appliance, Always make sure to dry the appliance after ...
Page 11 - Cleaning the Interior
Page 11 6. Cleaning & Maintenance WARNING • If the grease filters are very dirty, the motor will extract only a small quantity of air, which reduces its efficiency; • The grease deposits that build up on the filter are highly flammable and COULD EASILY CATCH FIRE. • The manufacturer is exonerate...
Page 13 - Replacing the Light Bulb; DANGER
Page 13 6. Cleaning & Maintenance Replacing the Light Bulb Step 2 Gently turn light bulb anti-clockwise, pull the light bulb down and remove it from the light holder. Step 3 Insert a new light bulb by lining up the pins of the light bulb with the larger holes inside the light holder. Once the pi...
Page 14 - Mounting Laws and Regulations; For indoor kitchen area:; For 60cm wide rangehoods:
Page 14 7. Installation DANGER Always switch off and disconnect power before installing the rangehood. Failure to do so may cause serious injury. Cabinet Cutout Size Present the rangehood to your cabinet maker so that they may take their own measurements and check that the rangehood fits in the cabi...
Page 15 - Mounting Points; FRONT VIEW
Page 15 7. Installation Mounting Points FRONT VIEW SIDE VIEW FRONT VIEW SIDE VIEW Measurements are from the top of the trivets to the lowest part of the rangehood, including the button section. WARNING If the user decides to install the rangehood at a distance of less than minimum height above the c...
Page 17 - Flexible Ducting
Page 17 7. Installation Flexible Ducting For the Isodrive motors, please do not crush or kink any of the flexi ducting, this will reduce the air flow and may cause noise throughout the system. Ducting needs to be kept taut at all times. Please refer to the Isodrive motor installation guide for more ...
Page 18 - Isodrive Motor Setup; DO NOT REMOVE; IMPORTANT
Page 18 7. Installation Isodrive Motor Setup Clip Please remove the clip when attaching Isodrive 1600 / 3200 motor (Single or Twin) system. To remove the clip, hold down 1, 2 and 3 gently pull out to direction 4. NOTE: DO NOT REMOVE the clip at the end of the white cord when installing an Isodrive 6...
Page 19 - DO NOT; DO
Page 19 7. Installation Overview 1 2 3 4 5 6 7 8 9 WARNING All electrical wiring should be kept inside the roof space. * NOTE: The Isodrive motor system does not include the roof seal kit, cable tie, duct tape or the support straps. The weather shield is only available for the Isodrive 1600 motor an...
Page 20 - Condensation Information
Page 20 8. Maintenance Condensation Information The induction cooktop is designed to provide rapid heating, improved thermal efficiency and greater heat consistency. For some customers with an induction cooktop, condensation can form on their rangehood filters while using their cooktop. The inductio...
Page 21 - User advice to avoid condensation in the rangehood:
Page 21 8. Maintenance User advice to avoid condensation in the rangehood: • The rangehood should be switched on approx. 10 minutes prior to cooking and the delay shut down timer set after cooking has stopped in order to clear the fumes held in the flue. These steps will help clear the flue out full...
Page 22 - Troubleshooting; If the product does not work:; Model
Page 22 8. Maintenance Troubleshooting If the product does not work: Before you contact the technical service department, make sure that the product is plugged in, the electric fuse (on selected models) is in correctly and electric wiring is connected. (Fuses can be purchased from your local electri...
Page 23 - Calling the Technical Assistance Service Hotline; Faulty Installation
Page 23 8. Maintenance Calling the Technical Assistance Service Hotline In the event that the failure is not due to the faults mentioned in Trouble Shooting, contact the Technical Service 1300 829 066. A service request will require the following information:• The purchase date• The rangehood model ...
Page 26 - Notes
Page 28 - HOME APPLIANCES; schweigen
HOME APPLIANCES Distributed by: Unit 102/45 Gilby Road, Mt Waverley 3149 Victoria. 1300 881 693 (EST) www. schweigen .com.au