Page 2 - Index
Page 2 Index 1. Welcome 3 Your State Regulatory Authority 3 2. Important Safety Information 4 Before Installation 5 Product Use 6 Electrical Cord 6 3. Description 7 Rangehood 7 4. Operation 8 Touch Button Control Panel 8 Remote Control 8 Using the ON/OFF Button 8 Speed Control 8 5. Cleaning & Ma...
Page 3 - Welcome; Your State Regulatory Authority
Page 3 1. Welcome Thank you for purchasing your new Schweigen rangehood. To get the maximum output from this unit, please read through this guide before use. The guide contains important information on the use and maintenance of the unit, as well as important safety notes. This will ensure your pers...
Page 4 - Important Safety Information; WARNING
Page 4 2. Important Safety Information WARNING Please read this section thoroughly before attempting to operate the appliance. Inspect your product upon receipt. Any damage or defects MUST be reported within 48 hours, or no claim will be recognised. DO NOT INSTALL THIS APPLIANCE IF YOU FIND IT DAMAG...
Page 5 - Before Installation
Page 5 2. Important Safety Information Before Installation 1. We recommend this appliance be installed or repaired by an experienced Home Appliance technician. 2. Please see our website www.schweigen.com.au for experienced installers. 3. It is dangerous to modify any part of this appliance. Modifica...
Page 6 - Product Use; Electrical Cord
Page 6 2. Important Safety Information Product Use This product is designed for household use and should not be used for commercial applications. After use, always ensure that all controls are in the “OFF” position. When frying with a gas flame, take particular care not to allow the oil or grease in...
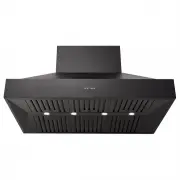
Page 7 - Rangehood; Description
Page 7 Rangehood (dependent on ranghood chosen) 1. Mounting Bracket 2. Flue 3. Socket lead for Isodrive ® motor 4. Main Power Cord 5. CL8912S and CL8915S Rangehood Body (all colour variants) 6. Baffles 7. Lights 8. Remote Control 9. CL7372S or CL7375S Rangehood Body (all colour variants) NOTE: Depen...
Page 8 - Operation; T O U C H B U T T O N C O N T R O L P A N E L
Page 8 4. Operation T O U C H B U T T O N C O N T R O L P A N E L Remote control sensor Turn light on/off Fan speed setting Turn rangehood on/off R E M O T E C O N T R O L As well as the touch buttons, this rangehood comes with a remote control to operate the rangehood. 1. Use this button for turnin...
Page 9 - Cleaning & Maintenance; Cleaning the Interior; OK; Warning
Page 9 5. Cleaning & Maintenance Cleaning the Interior Clean the interior of the rangehood with a damp cloth and a neutral detergent. NOTE: Do not use denatured alcohol on the exterior of the rangehood. Do not clean the electric parts or the motor with liquids or solvents Cleaning the Exterior W...
Page 10 - Baffles
Page 10 5. Cleaning & Maintenance Endure the baffles are cool before removing, to ensure no oil is spilt. To remove the filter lift up the lever and pull towards you. Then lower the filter to remove from the cavity. To replace, perform the same operation but in reverse. Baffles For this applianc...
Page 11 - Danger
Page 11 5. Cleaning & Maintenance Danger Always switch off and disconnect the power cord before replacing any lights. Failure to do so may cause serious injury. Please be aware that the light will retain heat for a short period of time after being switched off. Replacing the Light Step 2 Gently ...
Page 12 - Installation; Rangehood Size vs Cooktop Size; BBQ Installation
Page 12 6. Installation Rangehood Size vs Cooktop Size In addition to the size, the height of the rangehood above the cooktop is important to obtain the best performance. INADEQUATE Rangehood smaller than cooking zone ADEQUATE Rangehood same size as cooking zone OPTIMAL Rangehood larger than cooking...
Page 13 - Mounting Instructions – Outdoor/Alfresco; In addition to the information in this manual,
_n_. _RH Section_ Page 13 6. Installation Mounting Instructions – Outdoor/Alfresco When installing in an outdoor kitchen or alfresco area,the rangehood MUST NOT be installed where it is directly exposed to the elements . It is STRONGLY RECOMMENDED that the rangehood be installed centrally over the c...
Page 14 - DANGER
_n_. _LH Section_ Page 14 6. Installation CL8912S and CL8915S Wall Mount Installation (all colour variants) There are two primary mounting points and several secondary mounting points to firmly fix the rangehood in place. Suitable fixing screws must be used to mount the appliance on a secure surface...
Page 15 - Faulty Installation
_n_. _RH Section_ Page 15 6. Installation Faulty Installation It is not the responsibility of Schweigen to rectify any incorrect installations. A service call out fee will be charged for any Schweigen technician that attends a call, whereby it is established that the fault is due to an incorrect ins...
Page 16 - IMPORTANT
Page 16 6. Installation IMPORTANT Please ensure all plastic protection on the rangehood and filters is removed before use. Step 3 Place flue covers on the rangehood. (Be careful not to scratch the top of the rangehood). PLEASE NOTE: Only a standard length of stainless steel flue is provided. Any add...
Page 20 - Ducting
Page 20 6. Installation Ducting Please DO NOT crush or kink the ducting. 1. Crushed or kinked ducting creates sharp corners that creates turbulence. This reduces the size and efficiency of the ducting, lowers extraction and may cause excessive noise. 2. Sweeping curves and taut ducting reduces resis...
Page 21 - Single Isodrive
Page 21 6. Installation Single Isodrive ® Motor Installation 1. Isodrive ® Motor 2. Roof Seal Kit (Dektite) (Not supplied)* 3. Support Straps (Not supplied)* 4. Isodrive ® Motor Power Lead (Plug) 5. Rangehood to Isodrive ® Motor Lead (Socket) 6. Multi-fit Y-Joint, cut to 250 x 200 x 200mm 7. Mains p...
Page 23 - Optional Wall Mounted Motor Installation
Page 23 6. Installation Optional Wall Mounted Motor Installation Bulkhead Rangehood Isodrive Motor Ducting The Isodrive motor can optionally be installed mounted to a wall if a roof mount is not possible. The construction of a bulkhead is also recommended. The position of the motor can be to an exte...
Page 24 - Troubleshooting
Page 24 7. Troubleshooting Before you contact the technical service department, make sure that the product is plugged in and power is supplied. • Do not take any action that will damage the product. Check electric c onnection. V oltage o f the electric ne tw ork should be be tw een 220 - 240V , r an...
Page 25 - Technical Specifications; Specifications
Page 25 596 591.5 303 307.5 150 MAX 11 45 320 350 350 1200 / 1500 800 Technical Specifications Model CL8912S, CL8912BS, CL8915S, CL8915BS Feeding Voltage 220–240V 50Hz Lamp Power — LED (W) 4 x 3W ILCOS Code DRR-3-H-GU10-51/55 CL8912S and CL8915S Dimensions. (all colour variants) *All dimensions are ...
Page 27 - Disclaimer
Page 27 9. Disclaimer Disclaimer Under our policy of continuous product development, product specifications may change without notice. Prospective purchasers should therefore check with the retailer to ensure this publication correctly describes the products being offered for sale. All information s...