Page 2 - Safety Information; Regulatory Compliance Statements; CAUTION; Warning; Do not expose this apparatus to dripping or splashing.
2 44 Safety Information A Regulatory Compliance Statements CAUTION RISK OF ELECTRIC SHOCK DO NOT OPEN The lighting flash and arrowhead within the triangle is a warning sign alerting you to dangerous voltage inside the product. CAUTION : TO REDUCE THE RISK OF ELECTRIC SHOCK, DO NOT REMOVE THE COVER (...
Page 3 - IMPORTANT NOTE; FCC Radiation Exposure Statement
3 44 FCC Caution: Any changes or modifications not expressly approved by the party responsible for compliance could void the user ’ s authority to operate this equipment. This device complies with Part 15 of the FCC Rules. Operation is subject to the following two conditions: (1) This device may not ...
Page 4 - IC Radiation Exposure Statement:; Important Safety Instructions
4 44 IMPORTANT NOTE: IC Radiation Exposure Statement: This equipment complies with IC RSS-102 radiation exposure limits set forth for an uncontrolled environment. This equipment should be installed and operated so there is at least 8 inches (20cm) between the radiator and your body. ❚ Important Safe...
Page 5 - Safety precautions; Power Supply Precautions
5 44 A Safety precautions ❚ Power Supply Precautions • Do not overload outlets or extension cords. - This may result in abnormal heat or fire. • Do not plug in or unplug the power cord with wet hands. • Do not place the product near heating equipment. • To clean the power plug blades, remove the plug...
Page 7 - Additional Information; About the Network Connection; NOTE; Copyright
7 44 A Additional Information ❚ About the Network Connection • Depending on the wireless router used, some network operations may perform differently. • For detailed information on networking with a wireless router or modem, refer to the router ’ s or modem ’ s documentation. • Select one wireless c...
Page 8 - Contents; SAFETy INFORMATION
8 44 Contents SAFETy INFORMATION Regulatory Compliance Statements ............................................................. 2 Warning .................................................................................................................... 2 FCC Statement: (for U.S.A) ...................
Page 10 - FUNCTIONS; Changing the sort order of listed M7s
10 44 44 Connecting with TV SoundConnect function .............................................. 36 Disconnecting TV SoundConnect ............................................................................ 37 Connecting to the AUX IN ....................................................................
Page 11 - Playing music from content providers; APPENdIx
11 44 44 Setting the Default Radio Stations in Speaker Preset ............................................... 56 Searching for a Radio Station .................................................................................. 56 Playing music from content providers .....................................
Page 12 - Understanding Your M7; Before you begin; Communication Basics; Requirements: Wireless Router, Smart Device; Basic Connection
12 44 44 Understanding Your M7 A Before you begin ❚ Communication Basics 1 Requirements: Wireless Router, Smart Device 2 The wireless router should be connected to the Internet. 3 The smart device should be connected to the router via a Wi-Fi connection. A Basic Connection Wireless Router Smart Devi...
Page 13 - How you can enjoy your M7; Play music through a Wi-Fi connection from your smart device.; Devices
13 44 44 A How you can enjoy your M7 • Stream music through Internet radio, music services, or from the cloud. • Play music through a Wi-Fi connection from your smart device. • Play music from your phone, PC, or smart devices via Bluetooth. • Use the TV SoundConnect function to play sound from your ...
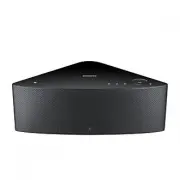
Page 14 - Getting Started; Top Panel; NOTES
14 44 44 Getting Started A Top Panel 1 NFC Tag Connect your NFC compatible device via Bluetooth to the M7 using the simple NFC tagging procedure. (Android only) 2 Internet Radio Preset Press this button to listen to an Internet radio station. Each time you press the button, you change the radio stat...
Page 15 - Rear Panel; Press this button to add an M7 to your network.; Button: Press for 1 second to pair your M7 with a HUB.
15 44 44 A Rear Panel 1 SPK ADD button (Speaker Add) Press this button to add an M7 to your network. 2 WPS/Wi-Fi SETUP button Press this button to connect your M7 to your network using WPS or Wi-Fi setup. 3 AUX IN Lets you connect the M7 to the analog output of a smart device. 4 SERVICE For service ...
Page 16 - Accessories; Confirm you have the supplied accessories shown below.; accessories can void your warranty.
16 44 44 A Accessories Confirm you have the supplied accessories shown below. VOLUME Wireless Audio - Multiroom M7 Power cord (WAM750 : 3903-000910 WAM751 : 3903-000911) Cover-Stand (WAM750 : AH96-02695A WAM751 : AH96-02695B) Toroidal ferrite core (3301-000144) Quick Guide (AH68-02665A) Getting start...
Page 17 - Connecting the Power Cable; Remove the rear cover.
17 44 44 A Connecting the Power Cable 1 Remove the rear cover. 2 Insert the power cable through the rear cover hole into the M7 power port. 3 Close the rear cover. SPK ADD WPS / Wi-Fi SETUP AUX IN SERVICE ETHERNET POWER SPK ADD WPS / Wi-Fi SETUP AUX IN SERVICE ETHERNET POWER SPK ADD WPS / Wi-Fi SETU...
Page 18 - Connecting the Cover-Stand; remove the rear cover.; Caution
18 44 44 A Connecting the Cover-Stand 1 Before attaching the Cover-Stand, remove the rear cover. Insert the power cable through the Cover-Stand hole into the M7 power port. 2 The inside of the Cover-Stand has two sides. One side (A) has four tabs - two large tabs and two small tabs. The other side (...
Page 19 - Separating the cover-stand; Locate the Cover-Stand
19 44 44 ❚ Separating the cover-stand 1 Locate the Cover-Stand ’ s handle. See the diagram on the right. 2 Push the Cover-Stand's handle while applying force to the Cover-Stand in the direction of the arrow. Important : Push the Cover-Stand straight ahead, parallel to the surface of the M7. You may ...
Page 20 - Installing on a wall
20 44 44 A Installing on a wall Warning 9 Please have a qualified installer install the Wall Mount Bracket. 9 Check the strength of the wall before you install the Wall Mount Bracket. If the strength is insufficient, make sure to reinforce the wall before installing the Wall Mount Bracket and the M7 o...
Page 21 - Attaching the toroidal ferrite core to the power cord of; interference from radio signals.; Looping the power cable around the toroidal ferrite core; Lift up to; and another close to the terminal where it connects to the M7.
21 44 44 A Attaching the toroidal ferrite core to the power cord of the M7 Attaching the Toroidal ferrite core to the power cord of the M7 helps prevent RF interference from radio signals. 1 Pull the fixing tab of the Toroidal ferrite core to open it. 2 Make a loop around the core with the power cabl...
Page 22 - Sleep Mode; operation (either from the top panel or from the app) for 25 minutes.; the M7 will not switch to the Sleep mode.
22 44 44 A Sleep Mode ` In Wi-Fi / Bluetooth / TV SoundConnect mode - The M7 switches to the sleep mode if there is no music playback or no button operation (either from the top panel or from the app) for 25 minutes. ` In AUx mode - The M7 switches to the sleep mode if there is no button operation (...
Page 23 - Connections
23 44 44 A Connecting with a HUB (Not Included) • If the M7 fails to connect to your network or its network connection operates abnormally, place the M7 closer to the HUB or your router and try again. • The M7 is a wireless network device. Its communications with your network may be disrupted becaus...
Page 25 - app guide on your device to connect the M7 and the HUB.; of your own choosing.
25 44 44 8 If the automatic setup fails, run the App again and follow the instructions in the app guide on your device to connect the M7 and the HUB. NOTE 9 After pairing is complete, the M7 naming screen appears. Edit the name or enter a name of your own choosing.
Page 26 - Connecting the M7 to your Network with a LAN Cable (For a; Connect one end of the LAN cable to the M7; Connect your smart device to your Wi-Fi network.; Samsung Multiroom; app from Google Play or the App Store of
26 44 44 A Connecting without a HUB (Not Included) • If the M7 fails to connect to your network or its network connection operates abnormally, place the M7 closer to the HUB or your router and try again. • The M7 is a wireless network device. Its communications with your network may be disrupted bec...
Page 27 - Unplug the M7
27 44 44 6 In the app, select “ I don’t have a Hub ” , and then press Next . On the next screen, select Wired , and then press Next . 7 Unplug the M7 ’ s power cable, and then plug it in again. NOTE 9 After pairing is complete, the M7 naming screen appears. Edit the name or enter a name of your own ...
Page 28 - Connecting the M7 to your Network via the WPS Method (For a
28 44 44 ❚ Connecting the M7 to your Network via the WPS Method (For a Single M7) NOTES 9 The M7 does not support Wi-Fi Direct or Wi-Fi Setup (tethering). 9 Some Wi-Fi devices may search for and find the M7, but not support the connection. 1 Plug the M7 into an electrical outlet. The LED pairing indi...
Page 30 - Connecting the M7 to your Network via the Wi-Fi Setup Method; I don’t have a Hub; Setup, and then press; Next
30 44 44 ❚ Connecting the M7 to your Network via the Wi-Fi Setup Method (For a Single M7) 1 Plug the M7 into an electrical outlet. The LED pairing indicator starts to blink. 2 Connect your smart device to your Wi-Fi network. 3 Download the Samsung Multiroom app from Google Play or the App Store of y...
Page 32 - on the app screen. The smart device lists available networks.; Connect
32 44 44 12 Use the keyboard that appears to enter your password. 13 Press the Next on the app screen. The smart device lists available networks. Select your network from the list. 14 If you have a password for your network, the Security screen appears on your smart device. Use the keyboard that app...
Page 33 - When the connection is complete, press; Internet service provider or the network administrator.
33 44 44 15 Your smart device connects to the same network your M7 is attached to. When the connection is complete, press Next . NOTES 9 Connecting to a secure wireless network requires the correct password. - For the password of your secured home or work wireless network, consult your Internet serv...
Page 34 - Connecting the M7 to Bluetooth devices; Scan for
34 44 44 A Connecting the M7 to Bluetooth devices You can connect the M7 to Bluetooth devices and enjoy music with high quality stereo sound, all without wires. Bluetooth technology lets Bluetooth-compliant devices interconnect easily with each other using a short, wireless connection. To connect a ...
Page 35 - disconnecting Bluetooth
35 44 44 9 This M7 may cause electric interference during its operation. 9 In Bluetooth connection mode, the Bluetooth connection will be lost if the distance between the M7 and the Bluetooth device exceeds 16.25 ft (5m). 9 You may be required to enter a PIN code (password) when connecting the Bluet...
Page 36 - Connecting with TV SoundConnect function; Add New device
36 44 44 A Connecting with TV SoundConnect function This section explains how to connect the M7 to Bluetooth compatible SAMSUNG TVs. 1 Plug the M7 into an outlet, and then press the button on its top panel. 2 Set Add New device to On in the TV's TV SoundConnect Settings menu. (Refer to the TV's user...
Page 37 - disconnecting TV SoundConnect; function on your TV.; Source; To establish a TV SoundConnect connection, see page 36.
37 44 44 ❚ disconnecting TV SoundConnect To disconnect the TV SoundConnect connection, turn off the TV SoundConnect function on your TV. (For more information, please refer to the TV's user manual.) You can also disconnect the TV SoundConnect connection in the App. 1 On your Smart device, select the...
Page 38 - Connecting to the AUx IN; AUx IN; Audio Cable
38 44 44 A Connecting to the AUx IN This section explains how to connect the M7 to an audio device using the AUX In terminal. 1 Plug the M7 into an electrical outlet. 2 Connect the audio cable (not included) to the M7 ’ s AUx IN and the smart device ’ s AUx OUT . 3 Select the desired track to play f...
Page 39 - disconnecting AUx connection; You can also disconnect the AUX connection in the App.; Switch to another mode and the AUX connection terminates.
39 44 44 ❚ disconnecting AUx connection To terminate the AUX connection, disconnect the audio cable from the smart device. You can also disconnect the AUX connection in the App. 1 On your Smart device, select the Samsung Multiroom app. 2 Press the Source button. 3 Switch to another mode and the AUX ...
Page 40 - Adding an M7; Adding an extra M7 to a HUB that is connected to an M7
40 44 44 A Adding an M7 • Before adding an M7, unplug all M7s that are connected to the Multiroom app. • If you add a new HUB and an extra M7 and connect them to the same wireless router that an existing M7 is connected to, the existing M7 will disappear from the Multiroom app. To re-connect the exi...
Page 41 - Adding another M7 and Hub to a single M7 in use; When the M7 in use is connected to the router with a LAN cable; Disconnect the LAN cable from the M7 in use.; SPK Add; button on the back of the M7. The M7's blue LED pairing
41 44 44 ❚ Adding another M7 and Hub to a single M7 in use ` When the M7 in use is connected to the router with a LAN cable 1 Disconnect the LAN cable from the M7 in use. 2 Connect the HUB to the wireless router with the LAN cable, and then plug in the HUB's power cable. 3 Plug in the power cable of...
Page 42 - When the M7 in use is connected using WPS or the Wi-Fi Setup method; HUB's power cable into an electrical outlet.; button the back of the old M7. The old M7's blue LED
42 44 44 ` When the M7 in use is connected using WPS or the Wi-Fi Setup method 1 Connect the HUB to your wireless router with a LAN cable, and then plug the HUB's power cable into an electrical outlet. 2 Plug in the power cable of the new M7. The new M7's blue LED pairing indicator starts to flash. W...
Page 43 - Adding a HUB; Relocating the M7; Without a HUB; With a HUB
43 44 44 A Adding a HUB An M7 and a HUB may not pair successfullly if the M7 and HUB are too far apart or are on different floors. In such cases, you can link two HUBs together by setting the second HUB to Repeater mode. The additional HUB amplifies the signal and lets you pair the M7 to the closest H...
Page 44 - Functions; Installing the Samsung Multiroom App; accessing the app through Google play or the App Store.; App installed, you can play music stored in your smart; iOS; Market search : Samsung Multiroom; Accessing the Samsung Multiroom App
44 44 44 Functions A Installing the Samsung Multiroom App To use the M7, you must download and then install the Samsung Multiroom App by accessing the app through Google play or the App Store. With the Samsung Multiroom App installed, you can play music stored in your smart device, from connected de...
Page 45 - Using the Samsung Multiroom App; Renaming a connected M7; Save; Switching the input source
45 44 44 A Using the Samsung Multiroom App ❚ Renaming a connected M7 You can rename M7s connected to your network. 1 Tap the and then enter the name you want using the keyboard. When finished, select Save . ❚ Switching the input source You can switch the input source. 1 Press the Source button on the...
Page 46 - Drag the of the M7 you want to re-order up or down.
46 44 44 ❚ Changing the sort order of listed M7s If you have added multiple M7s, this function is available. (See pages 40~42.) Press here 1 Drag the of the M7 you want to re-order up or down.
Page 47 - grouping M7s
47 44 44 ❚ grouping M7s You can group multiple M7s linked to the App and play the same music on all connected M7s in the same group. This function is available only If you have added multiple M7s. (See pages 40~42.) Press here NOTES 9 This function is available only when M7s are connected to a HUB. ...
Page 48 - Renaming a group; When finished, select
48 44 44 ` Renaming a group You can re-name a group of M7s. 1 Press the button, and then enter a name for the group using the keyboard. When finished, select Save .
Page 49 - Playing a Song; Select; My Phone; Select the desired song from the list that appears. The song plays.; Sorting the song; Songs; : Shows the list of music stored in the smart device.; Albums; : Shows the list of music stored in the smart device, sorted by album.; Folders; : Shows the list of music stored in the smart device, sorted by stored
49 44 44 ❚ Playing a Song 1 Press the button. 2 Select My Phone . 3 Select the desired song from the list that appears. The song plays. ❚ Sorting the song You can list and sort the songs in your smart device by selecting one of the tabs on the My Music screen. • Songs : Shows the list of music store...
Page 50 - Adding tracks to a Playlist; Touch and hold the desired file, and then drag it to the Playlist.; done
50 44 44 ❚ Adding tracks to a Playlist 1 Touch and hold the desired file, and then drag it to the Playlist. 2 Enter a name for the playlist, and then select done .
Page 51 - Swipe the screen with your finger right to left to move to; My Music; The Create Playlist appears.
51 44 44 3 Swipe the screen with your finger right to left to move to My Music . The Create Playlist appears.
Page 52 - Creating a Playlist; Select the desired tracks. When done, select; Add to My Music
52 44 44 ❚ Creating a Playlist 1 Press the button. 2 Select the desired tracks. When done, select Add to My Music , and then select Create Playlist .
Page 53 - Enter a name for the playlist, and then select; The Created Playlist plays.
53 44 44 3 Enter a name for the playlist, and then select done . 4 Swipe the screen with your finger right to left to move to My Music . The Created Playlist plays.
Page 54 - Listening to a radio station; Setting My Preset
54 44 44 ❚ Listening to a radio station 1 Select TuneIn . The TuneIn screen appears with the following tabs: • Favorites : Lists 3 default radio stations. • Browse : Lists all supported Internet radio stations. • Search : Lets your search for a desired Internet radio station using keypad input. 2 Se...
Page 55 - Touch; The selected radio station is added to the My Preset list.
55 44 44 2 Select an item from the radio play list to display the selected radio station ’ s front page. Touch ♥ , and then select Save . 3 The selected radio station is added to the My Preset list.
Page 57 - Services; Playing music from the Amazon cloud player; Music; Playing music from a selected device; devices
57 44 44 ❚ Playing music from content providers 1 Select Services . 2 You can play music from content providers. NOTES 9 Depending on your region or manufacturer, supported contents service may differ. 9 You may not subscribe to a service using your smart device. To use a for-pay service, first subsc...
Page 58 - Using the Settings menu; guide; App tutorial; Select App tutorial to learn how to use the app.
58 44 44 A Using the Settings menu 1 Press the button. ❚ guide ` App tutorial Select App tutorial to learn how to use the app.
Page 59 - Coach Mark; disable; : The app displays Help text as you navigate through the screens.; Service; Displays a list of available services.
59 44 44 ` Coach Mark • disable : The Help text is not displayed. • Enable : The app displays Help text as you navigate through the screens. ❚ Service ` Amazon Music, Pandora, Rhapsody Displays a list of available services.
Page 60 - TuneIn Radio; Gives you access to TuneIn Radio.; Speaker Settings; Add Speaker; smart device from one or more connected M7s.
60 44 44 ` TuneIn Radio Gives you access to TuneIn Radio. ❚ Speaker Settings ` Add Speaker Lets you can add one or more M7s to the App and enjoy the music stored in your smart device from one or more connected M7s.
Page 61 - Front LEd; Sound Feedback
61 44 44 ` Front LEd • disable : Turns off the M7's front LED indicators. • Enable : Turns on the M7's front LED indicators. ` Sound Feedback • disable : Turns off the Sound Feedback. • Enable : Turns on the Sound Feedback.
Page 62 - Speaker Auto Update; Software
62 44 44 ` Speaker Auto Update Shows the M7 ’ s current software version, and lets you turn auto update on or off. • On : When on, automatically updates the software when new firmware is released. • Off : Turns off the auto update function. NOTES 9 Auto update is available when your M7 is connected t...
Page 63 - Clock; Alarm; Lets you set the alarm.; Sleep Timer; Lets you set the Sleep Timer.
63 44 44 ❚ Clock ` Alarm Lets you set the alarm. ` Sleep Timer Lets you set the Sleep Timer.
Page 64 - Support; device Id; Lets you check the device ID.; Contact Samsung; Provides a link to the Samsung website.
64 44 44 ❚ Support ` device Id Lets you check the device ID. ` Contact Samsung Provides a link to the Samsung website.
Page 65 - Open source licenses; Lets you view the Open source licenses.; App Version; Lets you view the App version.
65 44 44 ❚ Open source licenses Lets you view the Open source licenses. ❚ App Version Lets you view the App version.
Page 66 - Reset your product; Resetting the M7; Internet Radio Preset
66 44 44 A Reset your product ❚ Resetting the M7 1 Press and hold both the Internet Radio Preset and Mute buttons for more than 5 seconds to reset the M7. 2 The Touch button on the M7 will blink twice. 3 Press and hold the Internet Radio Preset button for more than 5 seconds to reboot the M7. NOTE 9...
Page 67 - Troubleshooting; Before requesting service, please check the following.; Symptom; Appendix
67 44 44 A Troubleshooting Before requesting service, please check the following. Symptom Check Remedy The unit will not turn on. • Is the power cord plugged into the outlet? • Connect the power plug to the outlet. A function does not work when the button is pressed. • Is there static electricity in...
Page 68 - I cannot group speakers.
68 44 44 Symptom Check Remedy M7 doesn't work properly • Is the M7 plugged in? • Does the M7’s front LED indicator remain red 5 minutes after turning on? • Plug in the M7. • Check whether the Wi-Fi router you’re using had been certified for Wi-Fi. • Unplug the M7, plug it back in, and then reconnect...
Page 70 - Specifications; General; Network speeds equal to or below 10Mbps are not supported.
70 44 44 A Specifications General Power Requirements AC 110V ~ 120V 50/60Hz Power Consumption 24 W Weight 8.6 Ibs (3.9 Kg) Dimensions 15,8 (W) X 7,6 (D) X 5,3 (H) inches (402 (W) x 194 (D) x 137 (H) mm) Operating Temperature Range +41°F to +95°F Operating Humidity Range 10 % to 75 % Amplifier Rated o...
Page 71 - Open Source License Notice
gNU gENERAL PUBLIC LICENSE Version 2, June 1991Copyright (C) 1989, 1991 Free Software Foundation, Inc. 51 Franklin Street, Fifth Floor, Boston, MA 02110-1301, USA Everyone is permitted to copy and distribute verbatim copies of this license document, but changing it is not allowed. Preamble The licen...
Page 83 - Contact SAMSUNg WORLd WIdE; SAMSUNG customer care center.
Area Contact Center Web Site North America CANADA 1-800-SAMSUNG (726-7864) www.samsung.com/ca (English) www.samsung.com/ca_fr (French) U.S.A 1-800-SAMSUNG (726-7864) www.samsung.com/us MEXICO 01-800-SAMSUNG (726-7864) www.samsung.com Latin America ARGENTINE 0800-333-3733 www.samsung.com.ar URUGUAY...
Page 86 - QUESTIONS OR COMMENTS?; COUNTRY
QUESTIONS OR COMMENTS? COUNTRY CALL OR VISIT US ONLINE AT WRITE IN THE US 1-800-SAMSUNG (726-7864) www.samsung.com/us Samsung Electronics America, Inc. 85 Challenger Road Ridgefield Park, NJ 07660


 Samsung SWA-9200S User Manual
 Samsung SWA-9500S User Manual
 Samsung WAM350 User Manual
 Samsung WAM1500 User Manual
 Samsung WAM5500 User Manual
 Samsung WAM6500 User Manual
 Samsung MX-T40 User Manual
 Samsung MX-T70 User Manual
 Samsung SWA-8000S User Manual