Page 2 - Regulatory Compliance Statements; CAUTION; WARNING; Safety Information
A Regulatory Compliance Statements CAUTION RISK OF ELECTRIC SHOCK. DO NOT OPEN. This symbol indicates that high voltage is present inside. It is dangerous to make any kind of contact with any internal part of this product. CAUTION: TO REDUCE THE RISK OF ELECTRIC SHOCK, DO NOT REMOVE THE COVER (OR BA...
Page 3 - Wiring the Main Power Supply Plug (UK Only); IMPORTANT NOTICE; THE LETTER E OR BY THE EARTH SYMBOL; Safety precautions; Power Supply Precautions; Do not overload outlets or extension cords.
❚ Wiring the Main Power Supply Plug (UK Only) IMPORTANT NOTICE The mains lead on this equipment is supplied with a moulded plug incorporating a fuse. The value of the fuse is indicated on the pin face of the plug and if it requires replacing, a fuse approved to BS1362 of the same rating must be used...
Page 4 - Installation Precautions; A damaged cord may cause a fire and poses a risk of electric shock.; Usage Precautions; the power cord, and then contact a Samsung dealer or service centre.
❚ Installation Precautions • Do not install the product near equipment or objects that generate heat or produce fire (candles, mosquito coils, heaters, radiators, etc.). Do not install in direct sunlight. • When moving the product, turn off the power and disconnect all cords (include the power cord)...
Page 5 - Cleaning Precautions
• Do not drop the product. In case of a mechanical breakdown, disconnect the power cord and contact a Samsung dealer or service centre. - There is a risk of fire or electric shock. • Do not hold or pull the product by the power cord or the signal cable. - A damaged cable can cause the product to mal...
Page 6 - Contents; Connecting between the Dial
Contents Safety Information Regulatory Compliance Statements ...........ii WARNING ..........................................................iiCAUTION ............................................................ii Safety precautions.............................................iii Power Supply Precau...
Page 7 - Getting Started; Checking the Components; AC/DC Adapter until you hear a
Getting Started A Checking the Components Check the components supplied with your speakers. VL350 / VL351 Speaker Dial Controller AC/DC Adapter AC Plug Connect the AC plug to the AC/DC Adapter until you hear a “snapping” sound to ensure they are securely fastened. (Dedicated for VL350 / VL351) Quick...
Page 8 - Product Overview; Bluetooth; Touch and drag the touch wheel clockwise to
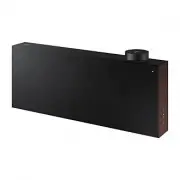
A Product Overview ❚ Top / Front / Right Side of the Speaker Bluetooth Wi-Fi AUX 1 2 1 Volume adjustment (Turning the Touch-wheel) Touch and drag the touch wheel clockwise to increase the volume. Touch and drag the touch wheel anticlockwise to decrease the volume. Play / Pause Touch p to play or pau...
Page 9 - Play / Pause and Skip features are not available in; Mute / unmute feature can be used with the
2 LED Display LED Status Description Operation Mode White On Connected / Normal operation - Blinking Booting - Ready for connecting to Dial Controller - Updating the firmware - Ready for Wi-Fi connection Wi-Fi Blue Blinking Waiting to connect the device Bluetooth Red On Connection error - Yellow Bli...
Page 10 - Rear of the Speaker; Connect the power cord to the AC/DC adapter.; RESET; button is for troubleshooting.
❚ Rear of the Speaker AUX IN AUX IN AUX IN AUX IN AUX IN AUX IN AUX IN AUX IN AUX IN DC 24V SERVICE AUX IN LAN POWER NETWORK (DC IN) POWER SERVICE AUX IN LAN RESET CONNECT RESET CONNECT (DC IN) POWER DC 24V SERVICE AUX IN LAN POWER NETWORK (DC IN) POWER SERVICE AUX IN LAN RESET CONNECT RESET CONNECT...
Page 11 - Using Dial Controller; Top of the Dial Controller; to play the next music.
A Using Dial Controller ❚ Top of the Dial Controller 1 Multi-Function Button 2 LED Display 3 Volume wheel 4 Voice MIC 1 X 1 Play / Pause Touch X 1 to play or pause music. X 2 Play the next music Touch X 2 to play the next music. X 3 Play the previous music Touch X 3 to play the previous music. 2 Sec...
Page 13 - Bottom of the Dial Controller; Charge your Dial Controller before turning the power on.; RESET Button; Connect the Micro USB cable to charge the Dial Controller.; CONNECT; Try connecting to a Speaker.
❚ Bottom of the Dial Controller 1 Remove the cover at the bottom of Dial Controller and then turn on the power. • Charge your Dial Controller before turning the power on. OPEN OPEN OPEN OPEN OPEN OPEN CONNECT DC 5V IN RESET 1 2 OPEN OPEN CONN ECT RESET OPEN RESET Button 1 DC 5V IN Jack Connect the M...
Page 14 - Connecting between the Dial Controller and Speaker; * Before use of the Dial Controller
❚ Connecting between the Dial Controller and Speaker * Before use of the Dial Controller Charge the Dial Controller until the LED lights. (When fully charged, the LED changes to white.) CONNECT DC 5V IN RESET Micro USB Cable (not supplied) 1 Press the CONNECT button on the rear of the speaker. DC 24...
Page 15 - * First time connection; Press the; button on the right side of the speaker for 5 seconds or more.; Mobile device; Only Step 2 is required when reconnecting to mobile devices.; Connecting to Bluetooth
You can connect a mobile device via the Bluetooth, and then enjoy sound from the speaker. * First time connection 1 Press the Bluetooth button on the right side of the speaker for 5 seconds or more. 5 Sec 2 Select the speaker from the Bluetooth list on your mobile device and connect it. (e.g. [AV] S...
Page 17 - Spotify Premium users can enjoy music by using the Spotify app.; * Deleting a device from SmartThings app; next to
4 Repeat steps 1-3 to connect all speakers to the same wireless router. • Spotify Premium users can enjoy music by using the Spotify app. 5-1 Follow the instruction below to reconnect or connect to a new wireless router. The speaker generates a voice message notifying that it is now in standby mode....
Page 18 - Connecting an external device via the AUX cable; button on the right side of the speaker to switch to; AUX; Connect the; AUX Cable; Connecting to an External Device
❚ Connecting an external device via the AUX cable You can connect a mobile device via the AUX cable, and then enjoy sound from the speaker. 1 Press the AUX button on the right side of the speaker to switch to AUX mode. 2 Connect the AUX IN port on the rear of the speaker to an external device via th...
Page 19 - Using mobile device voice recognition; Dedicated functions in Bluetooth mode; Listening to music; Additional Functions
A Using mobile device voice recognition Dedicated functions in Bluetooth mode • This function can be used only when a mobile device is connected via Bluetooth. • The operation may differ depending on the specification of the mobile device. Mobile Device Voice Recognition Service 2 Sec Depending on t...
Page 20 - To connect a mobile device, please see; Press and hold the
1 Press the Bluetooth button on the right side of the speaker to switch to Bluetooth mode. 1-1 If you have not already, set up Bluetooth connection between the speakers and your mobile device. • To connect a mobile device, please see [Connecting to Bluetooth] Click here. . Mobile device 2 Press and ...
Page 21 - Using via Wi-Fi connection; Functions upon Wi-Fi connection; Using 2 units - Audio Group; SmartThings; app to connect and enjoy 2 speakers as a; Audio Group
A Using via Wi-Fi connection Functions upon Wi-Fi connection • Using 2 units - Audio Group • Using 2 units - Stereo (Dedicated for VL350 / VL351) • Connecting with a Samsung Smart TV • Connecting an Amazon product Speakers should be all connected to the same wireless router. 5 GHz wireless connectio...
Page 22 - app to connect and enjoy two speakers as a; Stereo
2 Select Audio Group in SmartThings app. Touch at the top right Select from the device list Touch "Audio Group" Select the second device and touch “SAVE” 1 2 ❚ Using 2 units - Stereo (Dedicated for VL350 / VL351) 1 Use SmartThings app to connect and enjoy two speakers as a Stereo . • To use ...
Page 24 - Connecting with a Samsung Smart TV; Expert Settings
❚ Connecting with a Samsung Smart TV 1. This feature is available only for Samsung Smart TVs released in 2014 and later. 2. TV must be connected to a wireless router. 3. Your Samsung speakers should be connected to the wireless router that is connected to your TV. (Refer to the corresponding product...
Page 25 - Connecting an Amazon product; Connect and use with an Amazon product (Amazon Echo)
❚ Connecting an Amazon product • This feature may not be available in some countries. • This service is provided by Amazon and can be terminated at any time. Samsung does not assume responsibility for service availability. ` Connect and use with an Amazon product (Amazon Echo) Use an Amazon Echo pro...
Page 27 - To play the next song
` Use voice commands to control the Speaker • The Amazon Echo service you can use with your Speaker is limited to music. Other services provided by Amazon Echo, such as news and weather, can only be accessed through your Amazon Echo product. Trigger + Command + Speaker name Use the Speaker name you ...
Page 28 - mount the Speaker on.; Considerations for purchasing; Do not install in a place with high temperature or humidity.; Wall-Mount Components; Wall Fixing Screw; Installing the Wall Mount
Purchase wall mounting screws according to the type and thickness of the wall you want to mount the Speaker on. • Considerations for purchasing - Endurable load : VL350 / VL351 : Above 8.4 Kg VL550 / VL551 : Above 18.0 Kg - Hole size : M5 Do not install in a place with high temperature or humidity. ...
Page 29 - Fix the; and then adjust the
2 Fix the Bracket-Wall , and then fasten the Wall Fixing Screw from the left hole. Wall Bracket-Wall Wall Fixing Screw (not supplied) 3 Fasten the Wall Fixing Screw in the right hole. • When leveling is not made correctly, slightly unfasten the Wall Fixing Screw on the left and then adjust the Brack...
Page 30 - * Removing the Wall Mount; Lift the main unit up until the
5 Align the Bracket-Screw on the main unit to fit into the large groove of Bracket-Wall . Slide it in the arrow direction until it is seated in the small groove. • Be sure to slide it in the arrow direction until it is seated in the small groove of the Bracket-Wall . * Removing the Wall Mount Lift t...
Page 31 - Appendix; Troubleshooting; area may be exposed to
Appendix A Troubleshooting Before requesting service, please check the following. Symptom Check Remedy The speaker does not turn on. • Check if the power cord is properly connected. • Plug in the power cord. There is no response when you press a button or touch wheel area. • The button or touch whee...
Page 32 - See “Connecting to an External
Symptom Check Remedy Cannot connect the speaker to a mobile device or TV. For wired connection • Check the cable connection. • Check on the right side of the speaker and make sure that the speaker mode is set to AUX mode. • Check the name of the port and make sure that the cable is connected to the ...
Page 33 - GHz Wi-Fi network and having this
Symptom Check Remedy The audio stutters when playing music or videos on my mobile device over Bluetooth. • Check if there are any nearby devices that use radio communications or may cause interferences. • Are your mobile device or any radio communication devices are connected to 2.4 GHz Wi-Fi networ...
Page 34 - Wi-Fi max transmitter power
A Open Source Licence Notice • For further information on Open Sources used in this product, please visit the website: http://opensource.samsung.com A Licences • The Spotify Software is subject to third party licences found here : www.spotify.com/connect/third-party-licenses • For more information a...
Page 35 - 0 seconds or more to enable Wi-Fi again.; 0 seconds or more to enable Bluetooth again.
Overall Standby Power Consumption (W) (All the network ports are “ON” condition) 3.0 W Wi-Fi Disabling Wi-Fi In Wi-Fi mode, press the Play / Pause button (on the top side) and the CONNECT button (in the rear side) together and hold for 30 seconds or more to disable Wi-Fi. Enabling Wi-Fi Press the Wi...
Page 36 - Additional Information; About the Network Connection; Copyright
A Additional Information ❚ About the Network Connection • Depending on the wireless router used, some network operations may perform differently. • For detailed information on networking with a wireless router or modem, refer to the router's or modem's documentation. • Select the wireless channel th...
Page 37 - operated in all EU countries.; [Correct disposal of batteries in this product]; or lead above the reference levels in EC Directive 2006/66.; Correct Disposal of This Product; household waste at the end of their working life.
• Hereby, Samsung Electronics, declares that this equipment is in compliance with Directive 2014/53/EU. The full text of the EU declaration of conformity is available at the following internet address: http://www.samsung.com go to Support > Search Product Support and enter the model name. This eq...
Page 39 - Contact SAMSUNG WORLD WIDE; SAMSUNG customer care centre listed for your country.
UNITED KINGDOM EIRE This Samsung product is warranted for the period of twelve (12) months from the original date of purchase, against defective materials and workmanship. In the event that warranty service is required, you should return the product to the retailer from whom it was purchased. Howeve...