remo+ DCM2MG Security Camera – User Manual, read for free online in PDF format. We hope this helps you resolve any issues you may have. If you have further questions, please contact us through the contact form.
1
2
3
4
5
6
7
8
9
10
11
12
13
14
15
16
17
18
Table of Contents:
Page 2 – WHAT’S IN THE BOX; BATTERY COVER SCREW
Page 3 – MEET DOORCAMTM 2
Page 4 – CREATE AN ACCOUNT; Make sure your mobile device is connected to
Page 5 – REGISTER DOORCAMTM 2
Page 6 – PHYSICAL INSTALLATION
Page 7 – ADJUST DOORCAMTM 2; DoorCamTM 2 supports both push-to-enter and; Option A on page 8; INSIDE
Page 8 – Option A
Page 9 – Option B
Page 11 – POWER SOURCE; BATTERIES; Install the batteries in accordance with the
Page 13 – FAQ; * Once your DoorCamTM 2 is registered, you can return
Loading the manual
Quick Start Guide
DoorCam™ 2
"Loading the manual" means you need to wait until the file loads and becomes available for online reading. Some manuals are very large, and the time they take to appear depends on your internet speed.
Summary
Page 2 - WHAT’S IN THE BOX; BATTERY COVER SCREW
2 WHAT’S IN THE BOX 3 D-CELL BATTERIES BATTERY COVER SCREW "PROTECTED BY REMO+" STICKER MOUNTING SCREWS (Optional) HEX WRENCH DOORCAM™ 2
Page 3 - MEET DOORCAMTM 2
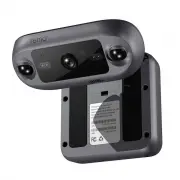
3 MEET DOORCAM™ 2 *Remove the protective film before use**Optional to secure the Battery Cover***Optional for mounting 9 10 11 12 13 14 15 Camera’s Bracket Adjustment Screw Mounting Holes*** Body’s Bracket Adjustment Screws Status Button Status LED Wi-Fi Antenna Battery Cover 1 2 3 4 5 6 7 8 PIR Sen...
Page 4 - CREATE AN ACCOUNT; Make sure your mobile device is connected to
4 CREATE AN ACCOUNT 1. Make sure your mobile device is connected to your home’s 2.4GHz Wi-Fi (5GHz not supported). 2. Download and launch the Remo+ app. 3. Press "Sign Up" at the bottom of the login page. 4. Enter your email and create a password. Then press "Sign Up". For Help, pres...
Page 5 - REGISTER DOORCAMTM 2
5 1. Have your Wi-Fi network password available. Make sure the device you are using to register your DoorCam™ 2 is already connected to your 2.4 Ghz Wi-Fi network before beginning the process (5 Ghz network not supported). TIP: If you are using a smartphone, turn OFF your cellular data and connect t...
Page 6 - PHYSICAL INSTALLATION
6 We recommend installing DoorCam™ 2 at the center of your door as shown below. Remove the protective film from the Adhesive Pad on the back of DoorCam™ 2 body. Use the Hex Wrench to loosen the Camera’s Bracket Adjustment Screw and fully extend the bracket. Tighten the Camera’s Bracket Adjustment Sc...
Page 7 - ADJUST DOORCAMTM 2; DoorCamTM 2 supports both push-to-enter and; Option A on page 8; INSIDE
7 ADJUST DOORCAM™ 2 DoorCam™ 2 supports both push-to-enter and pull-to-enter doors. If your door pushes-to-enter, follow Option A on page 8 . If your door pulls-to-enter, follow Option B on page 9 . INSIDE OUTSIDE PUSH-TO-ENTER DOORS INSIDE OUTSIDE PULL-TO-ENTER DOORS
Page 8 - Option A
8 Option A 1. Use the Hex Wrench to loosen the Body’s Bracket Adjustment Screws. 2. Push the body inward until the inside of the body touches the door. 3. Use the Hex Wrench to tighten the Body’s Bracket Adjustment Screws.
Page 9 - Option B
9 Option B 1. Use the Hex Wrench to loosen the Camera’s Bracket Adjustment Screw. 2. Push the camera inward until the back of the camera touches the door. 3. Use the Hex Wrench to tighten the Camera’s Bracket Adjustment Screw.
Page 11 - POWER SOURCE; BATTERIES; Install the batteries in accordance with the
11 DoorCam™ 2 operates on 3 D batteries which can last up to 4 months POWER SOURCE BATTERIES INSTALLATION : 3. Close the Battery Cover. Optional: You can further secure the Battery Cover by using the Battery Cover Screw. 1. Remove the Battery Cover. 2. Install the batteries in accordance with the en...
Page 13 - FAQ; * Once your DoorCamTM 2 is registered, you can return
FAQ What can I do if I keep getting the error “Connect to DoorCam 2 network to continue…”? 1. Turn OFF cellular data under your Wi-Fi settings and turn ON Airplane Mode 2. Turn OFF the following setting on your smart phone or tablet: If you are using an Android: Go to your Wi-Fi settings > Select...