Page 2 - Accessories
EN - 2 Accessories List ITEM NAME QTY Car Charger 1 Smart Mount 1 USB Cable 1 Stylus pen 1 Smart mount user guide 1 Driver / Documentation CD 1 User Manual 1 Warranty Card 1 Accessories EN
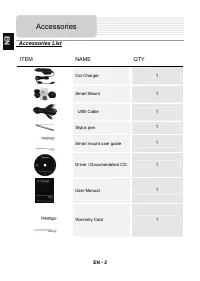
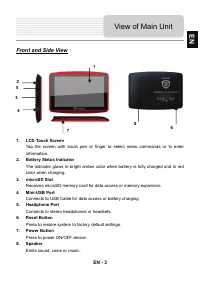
Page 3 - Front and Side View; View of Main Unit
EN - 3 Front and Side View 1. LCD Touch Screen Tap the screen with touch pen or finger to select menu commands or to enter information. 2. Battery Status Indicator The indicator glows in bright amber color when battery is fully charged and in red color when charging. 3. microSD Slot Receives microSD...
Page 4 - Inserting microSD Card; Charging; Device Connection
EN - 4 NOTE: Please always make sure that the device and any other external device connected to the device are powered off and unplugged from the power supply before attempting to connect the device to any external device. Inserting microSD Card z To insert a microSD card, place connector towards de...
Page 5 - EN
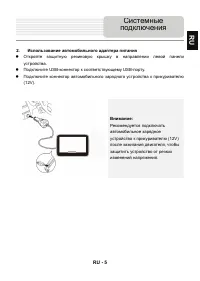
EN - 5 2. Connecting to Car Charger z Flip open the protective rubber cover towards the left side of the device. z Insert USB connector into the appropriate USB port. z Insert car charger connector into vehicle 12V accessory/cigarette socket to start charging. NOTE: Please connect the car charger to...
Page 6 - Connecting to Earphones
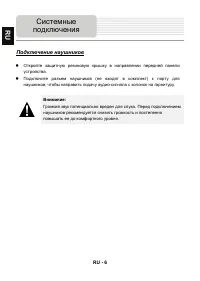
EN - 6 Connecting to Earphones z Flip open the protective rubber cover towards the front of the device. z Insert earphone plug (not included) into the appropriate earphone port to switch audio output from device speaker to earphone. NOTE: Excessively loud volume is potentially detrimental to hearing...
Page 7 - About Rechargeable Battery; Cautions on Battery
EN - 7 About Rechargeable Battery The device is equipped with a built-in rechargeable battery. Please fully charge the battery (for at least 8 hours) before initial use. The battery status indicator glows in red color when charging and turns bright amber color when charging is complete. Charging tim...
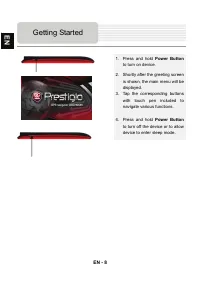
Page 8 - Getting Started
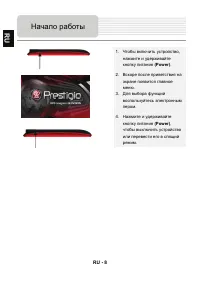
EN - 8 1. Press and hold Power Button to turn on device. 2. Shortly after the greeting screen is shown, the main menu will be displayed. 3. Tap the corresponding buttons with touch pen included to navigate various functions. 4. Press and hold Power Button to turn off the device or to allow device to...
Page 9 - Main Menu
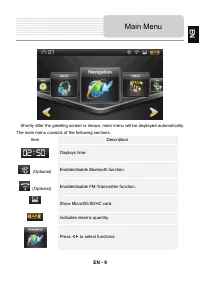
EN - 9 Shortly after the greeting screen is shown, main menu will be displayed automatically. The main menu consists of the following sections. Item Description Displays time. (Optional) Enable/disable Bluetooth function. (Optional) Enable/disable FM-Transmitter function. Show MicroSD/SDHC card. Ind...
Page 10 - Audio Player Mode
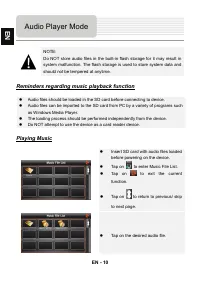
EN - 10 NOTE: Do NOT store audio files in the built-in flash storage for it may result in system malfunction. The flash storage is used to store system data and should not be tempered at anytime. Reminders regarding music playback function z Audio files should be loaded in the SD card before connect...
Page 11 - During Music Playback
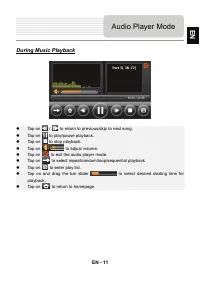
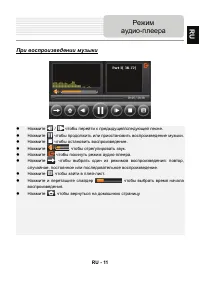
EN - 11 During Music Playback z Tap on / to return to previous/skip to next song. z Tap on to play/pause playback. z Tap on to stop playback. z Tap on to adjust volume. z Tap on to exit the audio player mode. z Tap on to select repeat/random/loop/sequential playback. z Tap on to enter play list. z T...
Page 12 - Video Player Mode
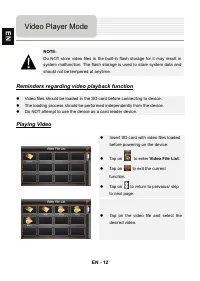
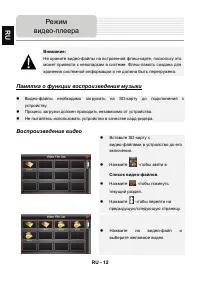
EN - 12 NOTE: Do NOT store video files in the built-in flash storage for it may result in system malfunction. The flash storage is used to store system data and should not be tempered at anytime. Reminders regarding video playback function z Video files should be loaded in the SD card before connect...
Page 13 - During Video Playback
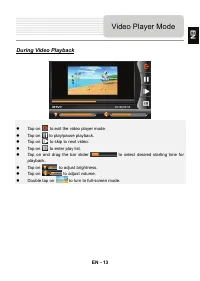
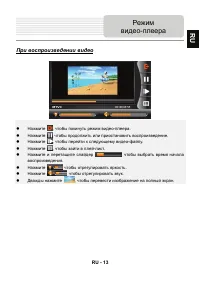
EN - 13 During Video Playback z Tap on to exit the video player mode. z Tap on to play/pause playback. z Tap on to skip to next video. z Tap on to enter play list. z Tap on and drag the bar slider to select desired starting time for playback. z Tap on to adjust brightness. z Tap on to adjust volume....
Page 14 - Photo Viewer Mode
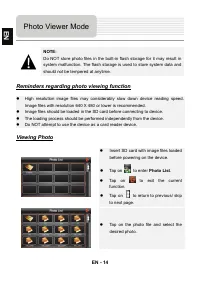
EN - 14 NOTE: Do NOT store photo files in the built-in flash storage for it may result in system malfunction. The flash storage is used to store system data and should not be tempered at anytime. Reminders regarding photo viewing function z High resolution image files may considerably slow down devi...
Page 15 - During Photo Viewing; Photo Mode
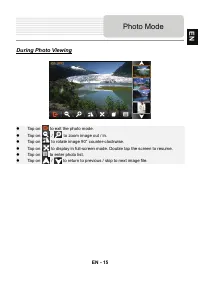
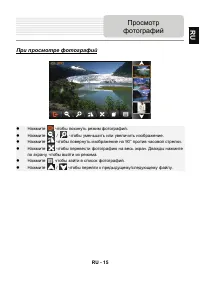
EN - 15 During Photo Viewing z Tap on to exit the photo mode. z Tap on / to zoom image out / in. z Tap on to rotate image 90° counter-clockwise. z Tap on to display in full-screen mode. Double tap the screen to resume. z Tap on to enter photo list. z Tap on / to return to previous / skip to next ima...
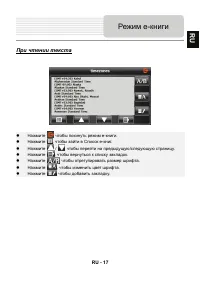
Page 17 - During Text Playback
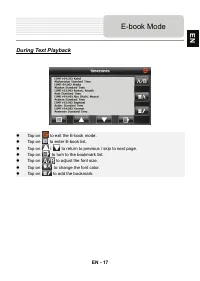
EN - 17 During Text Playback z Tap on to exit the E-book mode. z Tap on to enter E-book list. z Tap on / to return to previous / skip to next page. z Tap on to turn to the bookmark list. z Tap on to adjust the font size. z Tap on to change the font color. z Tap on to add the bookmark. E-book Mode EN
Page 18 - Game Mode
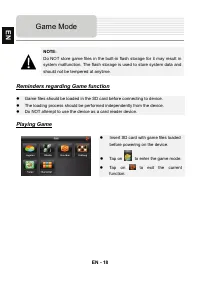
EN - 18 NOTE: Do NOT store game files in the built-in flash storage for it may result in system malfunction. The flash storage is used to store system data and should not be tempered at anytime. Reminders regarding Game function z Game files should be loaded in the SD card before connecting to devic...
Page 19 - Bluetooth Function
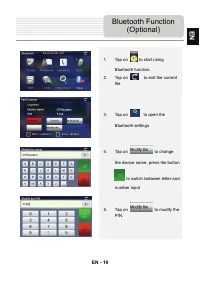
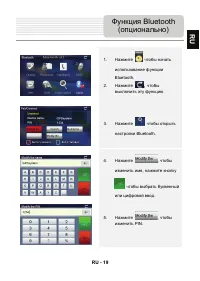
EN - 19 1. Tap on to start using Bluetooth function. 2. Tap on to exit the current file 3. Tap on to open the Bluetooth settings 4. Tap on to change the device name, press the button to switch between letter and number input 5. Tap on to modify the PIN. Bluetooth Function (Optional) EN
Page 24 - Tool Mode; Others
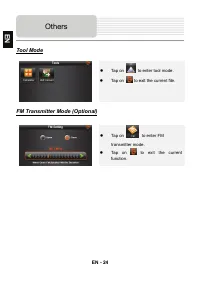
EN - 24 Tool Mode z Tap on to enter tool mode. z Tap on to exit the current file. FM Transmitter Mode (Optional) z Tap on to enter FM transmitter mode. z Tap on to exit the current function. Others EN
Page 25 - Program interface
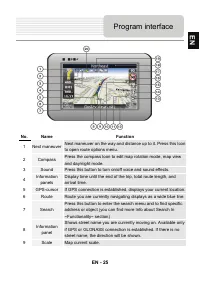
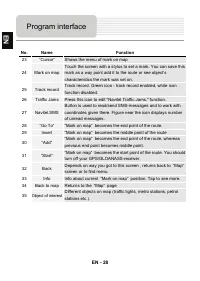
EN - 25 No. Name Function 1 Next maneuver Next maneuver on the way and distance up to it. Press this Icon to open route options menu. 2 Compass Press the compass loon to edit map rotation mode, map view and day/night mode. 3 Sound Press this button to turn on/off voice and sound effects. 4 Informati...
Page 29 - Autorouting
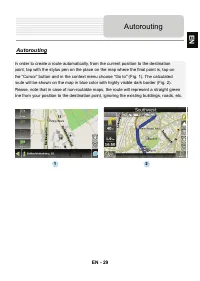
EN - 29 Autorouting In order to create a route automatically, from the current position to the destination point, tap with the stylus pen on the place on the map where the final point is, tap on the “Cursor” button and in the context menu choose "Go to" (Fig. 1). The calculated route will be...
Page 31 - Additional features
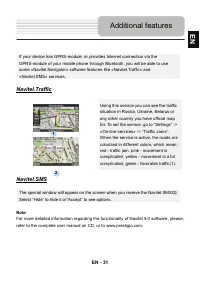
EN - 31 If your device has GPRS-module, or provides Internet connection via the GPRS-module of your mobile phone through Bluetooth, you will be able to use some «Navitel.Navigator» software features like «Navitel.Traffic» and «Navitel.SMS» services. Navitel.Traffic Using this service you can see the...
Page 32 - Troubleshooting
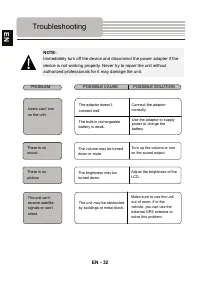
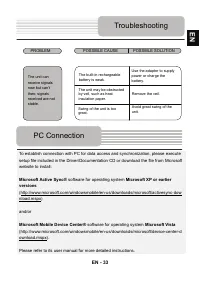
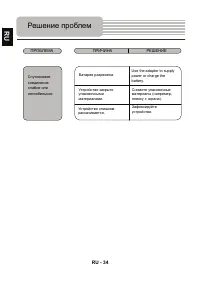
EN - 32 NOTE: Immediately turn off the device and disconnect the power adapter if the device is not working properly. Never try to repair the unit without authorized professionals for it may damage the unit. Troubleshooting PROBLEM POSSIBLE CAUSE POSSIBLE SOLUTION There is no sound. The volume may b...
Page 33 - PC Connection
EN - 33 To establish connection with PC for data access and synchronization, please execute setup file included in the Driver/Documentation CD or download the file from Microsoft website to install: Microsoft Active Sync® software for operating system Microsoft XP or earlier versions (http://www.mic...
Page 34 - Specifications
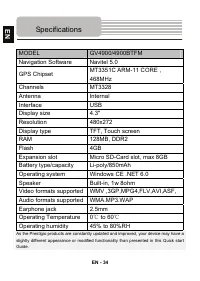
EN - 34 MODEL GV4900/4900BTFM Navigation Software Navitel 5.0 GPS Chipset MT3351C ARM-11 CORE , 468MHz Channels MT3328 Antenna Internal Interface USB Display size 4.3" Resolution 480x272 Display type TFT, Touch screen RAM 128MB, DDR2 Flash 4GB Expansion slot Micro SD-Card slot, max 8GB Battery t...
Page 35 - Инструкции
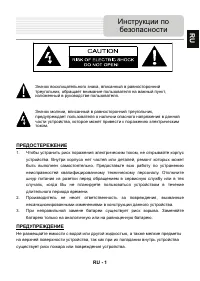
RU - 1 ПРЕДОСТЕРЕЖЕНИЕ 1. Чтобы устранить риск поражения электрическим током , не открывайте корпус устройства . Внутри корпуса нет частей или деталей , ремонт которых может быть выполнен самостоятельно . Предоставьте всю работу по устранению неисправностей квалифицированному техническому персоналу ...
Page 36 - Комплектность
RU - 2 Список аксессуаров Изображение Описание Кол - во Автомобильное зарядное устройство 1 Крепление Smart Mount 1 Кабель USB 1 Электронное перо 1 Инструкция ( для крепления smart mount) 1 CD с драйвером и документацией 1 Руководство пользователя 1 Гарантийный талон 1 Комплектность RU
Page 37 - Обзор; RU
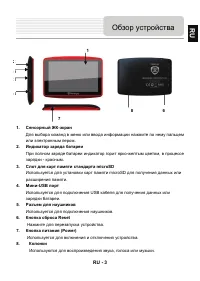
RU - 3 1. Сенсорный ЖК - экран Для выбора команд в меню или ввода информации нажмите по нему пальцем или электронным пером . 2. Индикатор заряда батареи При полном заряде батареи индикатор горит ярко - желтым цветом , в процессе зарядки - красным . 3. Слот для карт памяти стандарта microSD Используе...
Page 38 - Установка; Зарядка; Системные
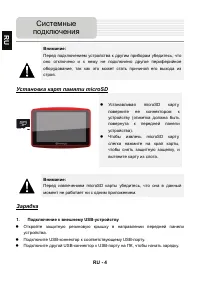
RU - 4 Внимание : Перед подключением устройства к другим приборам убедитесь , что оно отключено и к нему не подключено другое периферийное оборудование , так как это может стать причиной его выхода из строя . Установка карт памяти microSD z Устанавливая microSD карту , поверните ее коннектором к уст...
Page 41 - Питание
RU - 7 Использование батареи Ваше портативное GPS- устройство имеет встроенную перезаряжаемую аккумуляторную батарею . При первом использовании устройства необходимо полностью зарядить батарею ( как минимум 8 часов ). Индикатор заряда батареи горит красным цветом во время зарядки и ярко - желтым пос...
Page 43 - Главное
RU - 9 Вскоре после приветствия на экране появится главное меню . Оно состоит их следующих разделов . Раздел Описание Отображает время . ( опционально ) ВКЛ / ВЫКЛ функцию Bluetooth. ( опционально ) ВКЛ / ВЫКЛ функцию FM- передатчика . Показывает карту MicroSD/SDHC. Показывает количество заряда . На...
Page 44 - Режим
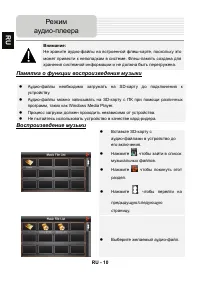
RU - 10 Внимание : Не храните аудио - файлы на встроенной флеш - карте , поскольку это может привести к неполадкам в системе . Флеш - память создана для хранения системной информации и не должна быть перегружена . Памятка о функции воспроизведения музыки z Аудио - файлы необходимо загружать на SD- к...
Page 48 - Просмотр
RU - 14 Внимание : Не храните файлы с изображениями на встроенной флеш - карте , поскольку это может привести к неполадкам в системе . Флеш - память создана для хранения системной информации и не должна быть перегружена . Памятка о функции просмотра фотографий z Изображения с высоким разрешением мог...
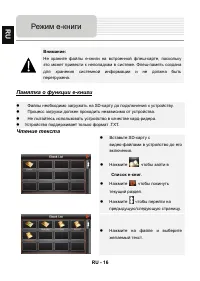
Page 50 - Памятка
RU - 16 Внимание : Не храните файлы е - книги на встроенной флеш - карте , поскольку это может привести к неполадкам в системе . Флеш - память создана для хранения системной информации и не должна быть перегружена . Памятка о функции е - книги z Файлы необходимо загружать на SD- карту до подключения...
Page 52 - Игры
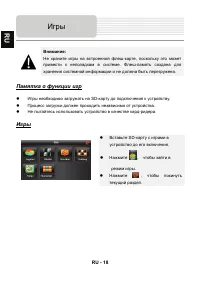
RU - 18 Внимание : Не храните игры на встроенной флеш - карте , поскольку это может привести к неполадкам в системе . Флеш - память создана для хранения системной информации и не должна быть перегружена . Памятка о функции игр z Игры необходимо загружать на SD- карту до подключения к устройству . z ...
Page 55 - Функция
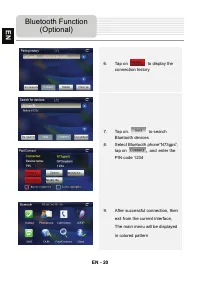
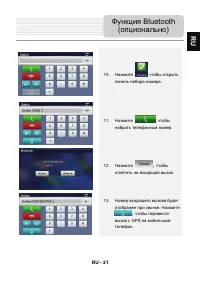
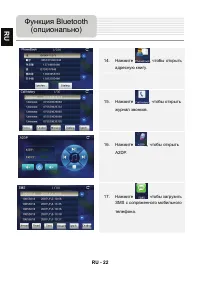
RU - 21 10. Нажмите , чтобы открыть панель набора номера . 11. Нажмите , чтобы набрать телефонный номер . 12. Нажмите , чтобы ответить на входящий вызов . 13. Номер входящего вызова будет отображен при звонке . Нажмите , чтобы перевести вызов с GPS на мобильный телефон . Функция Bluetooth ( опционал...
Page 57 - опционально
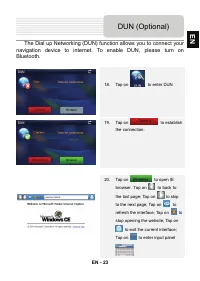
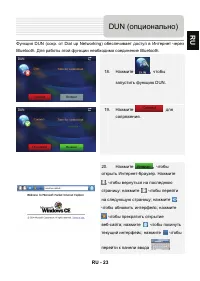
RU - 23 Функция DUN ( сокр . от Dial up Networking) обеспечивает доступ в Интернет через Bluetooth. Для работы этой функции необходимо соединение Bluetooth. 18. Нажмите , чтобы запустить функцию DUN. 19. Нажмите для сопряжения . 20. Нажмите , чтобы открыть Интернет - браузер . Нажмите , чтобы вернут...
Page 58 - Другое
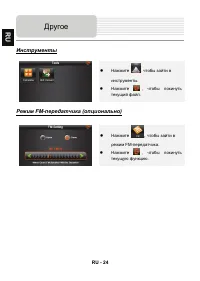
RU - 24 Инструменты z Нажмите , чтобы зайти в инструменты . z Нажмите , чтобы покинуть текущий файл . Режим FM- передатчика ( опционально ) z Нажмите , чтобы зайти в режим FM- передатчика . z Нажмите , чтобы покинуть текущую функцию . Другое RU
Page 59 - Интерфейс
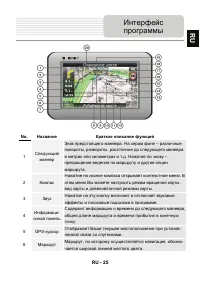
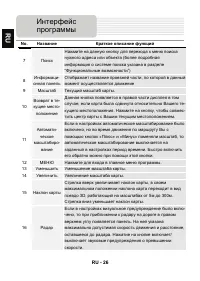
RU - 25 No. Название Краткое описание функций 1 Следующий маневр Знак предстоящего маневра . На сером фоне – различные повороты , развороты , расстояние до следующего маневра в метрах или километрах и т . д . Нажатие по знаку – прекращение ведения по маршруту и другие опции маршрута . 2 Компас Нажат...
Page 64 - Автороутинг
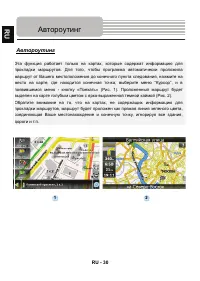
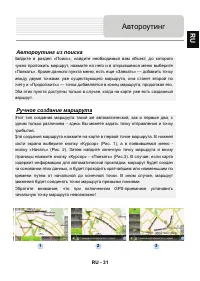
RU - 30 Автороутинг Эта функция работает только на картах , которые содержат информацию для прокладки маршрутов . Для того , чтобы программа автоматически проложила маршрут от Вашего местоположения до конечного пункта следования , нажмите на место на карте , где находится конечная точка , выберите м...
Page 66 - Навител; Дополнительно
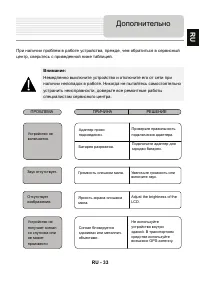
RU - 32 В случае , если модель Вашего навигатора обладает в c троенным GPRS- модулем или имеет возможность выхода в Интернет через GPRS модуль вашего телефона по Bluetooth соединению , Вам будут доступны некоторые полезные дополнительные функции , такие как « Навител . Пробки » и « Навител . SMS». «...
Page 69 - Соединение
RU - 35 Для соединения с ПК с целью синронизации и доступа к данным запустите установочный файл , содержащийся на компакт - диске с драйвером и документацией , или загрузите файл с вебсайта компании Microsoft, чтобы установить : ПО Microsoft Active Sync® для операционной системы Microsoft XP или бол...