Philips QP6542/15 - User Manual
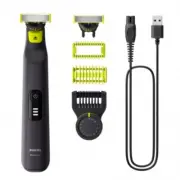
Philips QP6542/15 – User Manual, read for free online in PDF format. We hope this helps you resolve any issues you may have. If you have further questions, please contact us through the contact form.


OneBlade
QP6541, QP6551
>75 % recycled paper
>75 % papier recyclé
© 2023 Koninklijke Philips N.V.
All rights reserved
Tous droits réservés
3000.104.3560.1 (26/01/2023)
English
IMPORTANT SAFETY INSTRUCTIONS
When using an electric product, basic precautions
should always be followed, including the following:
Read all instructions before using this product.
DANGER
To reduce the risk of electric shock:
-
Do not reach for a corded product that has fallen
into water. Unplug immediately from the power
outlet.
-
Keep the power cord dry (Fig. 2).
-
Do not place or store the product where it can
fall or be pulled into a tub or sink. Do not place or
drop the product into water or other liquid.
-
This product does not work while it is connected
to the power outlet. Except when charging, always
unplug this product from the power outlet.
-
Remove power cord from power outlet and
product before cleaning.
WARNING
To reduce the risk of burns, fire, electric shock, or
injury to persons:
-
This product is not intended for use by persons
(including children) with reduced physical, sensory
or mental capabilities, or lack of experience
and knowledge, unless they have been given
supervision or instruction concerning use of the
product by a person responsible for their safety.
Children should be supervised to ensure that they
do not play with the product.
-
Use this product only for its intended household
use as described in this manual. Misuse can lead to
hazards or serious injuries. Do not use attachments
not recommended by Philips Electronics Ltd
(Canada).
-
Never operate this product if it has a damaged
power cord, if it is not working properly, after
it has been dropped or damaged, or after the
product or power cord has been dropped into
water. For assistance call 1-866-800-9311.
-
Keep the power cord away from heated surfaces.
-
Never drop or insert any object into any opening.
-
Do not use the power cord in or near a power
outlet that contains an electric air freshener to
prevent damage to the power cord.
-
Do not use product outdoors or operate where
aerosol (spray) products are being used or where
oxygen is being administered.
-
Always check cutting units and other attachments
and accessories before you use the product. Never
use the product with a damaged cutting unit,
attachment or accessory, as injury may occur.
-
Always attach power cord to product first, then to
power outlet. To disconnect, set all controls to ‘off’
position. Then remove power cord from power
outlet.
-
Plug power cord directly into power outlet. Do not
use an extension cord.
-
Unplug power cord before plugging in or
unplugging the product.
-
Only use the power cord and other accessories
supplied with the product.
-
The batteries used in this product may present
a fire or chemical burn hazard if mistreated.
Do not disassemble, heat above 100 °C (212 °F)
or incinerate.
IMPORTANT
: The power plug contains a transformer.
Do not cut off the power plug to replace it with
another plug as this will cause a hazardous condition.
-
Only use original Philips accessories or
consumables. Only use detachable power cord
HQ8505.
-
Charge, use and store the product at a
temperature between 5 °C and 35 °C.
-
Keep product and batteries away from fire and
do not expose them to direct sunlight or high
temperatures.
-
If the product becomes abnormally hot or smelly,
changes color or if charging takes longer than
usual, stop using and charging the product and
contact Philips.
-
Do not place products and their batteries in
microwave ovens or on induction cookers.
-
Do not open, modify, pierce, damage or dismantle
the product or battery to prevent batteries
from heating up or releasing toxic or hazardous
substances. Do not short-circuit, overcharge or
reverse charge batteries.
-
If batteries are damaged or leaking, avoid contact
with the skin or eyes. If this occurs, immediately
rinse well with water and seek medical care.
-
When you handle batteries, make sure that your
hands, the product and the batteries are dry.
-
To avoid accidental short-circuiting of batteries
after removal, do not let battery terminals come
into contact with metal objects (e.g. coins,
hairpins, rings). Do not wrap batteries in aluminum
foil. Tape battery terminals or put batteries in a
plastic bag before you discard them.
Electromagnetic fields (EMF)
This Philips appliance complies with all applicable
standards and regulations regarding exposure to
electromagnetic fields.
SAVE THESE INSTRUCTIONS
IMPORTANT INFORMATION
-
This appliance is waterproof (Fig. 3). It is suitable
for use in the bath or shower and for cleaning
under the tap. For safety reasons, the appliance
can only be used without cord.
-
Because of hygiene, only one person should use
the appliance.
-
Switch off the appliance before removing or
attaching attachments and before cleaning.
-
Clean the appliance after each use (see ‘Cleaning’).
Introduction
Congratulations on your purchase and welcome
to Philips! To fully benefit from the support
that Philips offers, register your product at
www.philips.com/welcome
.
You can find the model number on the back of your
product.
The full model number (e.g. QP1234/56) is located on
the bottom of the packaging, your receipt or order
confirmation.
General description (Fig. 1)
1 Protection cap
2 Blade
3 Blade release slide switch
4 On/off button
5 Battery charge indicator (QP6551)
6 Battery charge indicator (QP6541)
7 Click-on body comb 3 mm
8 Click-on skin guard
9 Extra blade
10 Precision trimming comb
11 Pouch (QP6551)
12 Power plug
The display
Battery low
QP6541
When the battery is almost empty, the bottom light
of the battery charge indicator starts flashing orange
(Fig. 4).
QP6551
When the appliance is almost empty, the battery
symbol flashes orange. The remaining battery capacity
is indicated by the battery charge percentage on the
display (Fig. 5).
Charging
QP6541
When the appliance is charging, the bottom charging
light starts flashing white, then the next one and so
on.
QP6551
When the appliance is charging, the battery charge
percentage and the battery symbol flash white. The
battery charge is indicated by the battery charge
percentage shown on the display.
Battery full
QP6541
When the appliance is fully charged, all lights of the
battery charge indicator light up white.
QP6551
When the battery is fully charged, the battery charge
percentage on the display shows 100% and the
charge symbol lights up continuously.
Remaining battery charge
QP6541
The remaining battery charge is indicated by the
lights of the battery charge indicator that light up
continuously.
QP6551
The remaining battery charge is indicated by the
battery charge percentage shown on the display.
Charging
-
Charging takes approx. 1 hour.
-
Charge the appliance before first use and when
the display indicates that the battery is almost
empty.
-
Charging or using the appliance at temperatures
below 5 °C or higher than 35 °C adversely affects
the lifespan of the battery.
-
If the appliance is subjected to a major change in
temperature, pressure or humidity, let the product
acclimatize for 30 minutes before use.
Charging with the power plug
1 Make sure the appliance is switched off.
2 Insert the small plug into the appliance and put
the power plug in any 120V AC outlet.
3 After charging, remove the supply unit from the
wall socket and pull the small plug out of the
appliance.
Note: Approx. 30 minutes after the battery is fully
charged or when you disconnect the appliance
from the wall socket, the battery charge indicator
switches off automatically.
Operating time
When the appliance is fully charged, it has a cordless
operating time up to 90 minutes (QP6541) or up to
120 minutes (QP6551).
Quick charge
After approx. 5 minutes charging, the appliance
contains enough power for one cordless trimming
session.
QP6541
During quick charge, all three lights of the battery
charge indicator light up. After approx. 5 minutes of
charging, the appliance contains enough energy for
5 minutes of use. When quick charge is finished, the
bottom light of the battery charge indicator starts
to flash.
QP6551
During quick charge, the battery charge symbol
flashes white and the battery charge percentage
counts up to 7. The appliance now contains enough
energy for 5 minutes of use. When quick charge is
finished, the battery charge symbol flashes white and
the battery charge percentage counts up to 100.
Using the appliance
-
Trimming is easier when the skin and hair are dry.
-
Trim with the trimming comb to obtain a certain
length.
-
Edge without comb to create perfect edges and
sharp lines.
-
Take your time when you first start to use the
appliance. You have to gain practice with the
appliance.
-
Allow some time for the skin to get adjusted to the
appliance.
-
Use the blade on a clean face. The blades go blunt
faster if on skin that isn’t clean.
3mm
QP6551
QP6541
QP6551
10
12
7
2
3
4
5
6
11
1
8
9
2
1
2
5
8
11
1
3
6
9
12
4
7
10
13
1
2
30
sec
1
2
1
2
26
23
20
17
14
27
24
21
18
15
28
25
22
19
16
-
Do not use the blade when damaged or broken.
Replace the blade immediately if it is damaged.
The face blade and the stubble combs are for use on
facial hair. They are not intended for shaving, edging
or trimming hairs on lower body parts or scalp hair.
Switching the appliance on and off
1 To switch the appliance on or off, press the on/off
button once.
Face
Shaving tips and tricks
-
Shave off any length of hair. The appliance does
not shave as close as a traditional blade so your
skin will stay comfortable.
-
Make long strokes while pressing lightly.
-
You can use the appliance dry or wet with gel
or foam. You can even use the appliance in the
shower.
-
Shaving a clean beard and face gives the best
results.
Shaving
Before you use the appliance, always check
the blade for damage or wear. If the blade is
damaged or worn, do not use the appliance,
as injury may occur. Replace a damaged blade
before you use the appliance.
1 Switch aon the appliance.
2 Place the blade on the skin and move the
appliance up or against the grain in long strokes
while you press it lightly (Fig. 7).
Note: Make sure you hold the surface of the blade
flat against your skin (Fig. 8).
3 Switch off and clean the appliance after every use
(see ‘Cleaning and maintenance’Cleaning’).
Edging
-
You can also use both edges of the blade to create
sharp lines and perfect edges.
-
Hold the appliance in such a way that the blade
is perpendicular to the skin and one of its edges
touches the skin. This allows more precise detailing
of sideburns and the area around the mouth and
nose.
1 Switch on the appliance.
2 Place the edge of the blade perpendicular onto
the skin (Fig. 9).
Note: To use the blade for creating sharp edges
and lines, use either edge of the blade (Fig. 10).
3 Make straight strokes while applying gentle
pressure (Fig. 11).
4 Switch off and clean the appliance after every use
(see ‘Cleaning and maintenance’).
Using the precision trimming comb
-
The precision trimming comb allows you to trim
hair to different lengths. When you trim for the
first time, start at the highest length setting to
familiarize yourself with the product.
-
The settings on the wheel correspond to
the remaining hair length after trimming in
millimeters. You can select a length from 0.5 mm
to 9 mm (QP6541) or from 0.4 mm to 10 mm
(QP6551).
-
Always trim in the direction of the teeth of the
precision trimming comb, making sure that the flat
part of the comb is in full contact with the skin for
an even trimming result (Fig. 12).
-
Since all hairs do not grow in the same direction,
you may want to try different trimming directions
(i.e. upwards, downwards, or across). Practice is
best for optimum results.
-
Make sure to always move the appliance against
the grain.
-
Trimming is easier when the skin and hair are dry.
1 Plaace the front part of the comb onto the blade
and push the projection at the back of the comb
into the appliance (’click’) (Fig. 13).
2 Turn the hair length setting wheel to select the
desired hair length setting (Fig. 14). The settings
on the wheel correspond to the remaining hair
length after trimming.
3 Switch on the appliance.
4 Place the comb onto the skin and move the
appliance upwards slowly, against the grain.
5 Switch off and clean the appliance after each use.
6 To remove the comb, pull the back part off the
appliance and then slide the comb off the blade.
(Fig. 15)
Body
-
For hygienic reasons, only use the body blade for
trimming and shaving your body.
-
For body trimming and shaving, make sure the
hair is clean and dry as wet hair tends to stick to
the body.
-
When shaving sensitive areas, always use the skin
guard.
-
Since all hairs do not grow in the same direction,
you may want to try different trimming directions
(i.e. upwards, downwards, or across). Practice is
best for optimum results.
-
For the best result, move the product against the
grain.
-
Make long strokes while pressing lightly.
-
Use the product dry or wet with gel or foam, even
in the shower.
-
Shaving a clean body gives the best results.
Shaving with skin guard
For optimal performance, use the skin guard only on
sensitive areas (for example the groin and armpits).
1 Hold the skin guard on both sides and press it onto
the blade (Fig. 16).
2 Switch on the product.
3 Place the skin guard onto the skin and stretch
the skin with your free hand. Move the product
upwards slowly, against the grain.
-
When using the product on your armpits, raise
your arm and put your hand on the back of
your head to stretch the skin (Fig. 17).
-
Regularly remove cut hair from the guard. If
a lot of hair has accumulated in the guard,
remove it from the product and blow and/or
shake out the hairs.
4 Switch off and clean the product after each use.
5 To remove the skin guard, put one finger under
the edge of the guard and press on the blade with
your thumb (Fig. 18).
Shaving without skin guard
The body blade without the skin guard allows you
to shave hair on your body below the neckline (for
example the chest).
1 Switch on the product.
2 Place the blade on the skin and move the product
against the grain in long strokes while pressing
lightly. Stretch the skin with your free hand.
Note: Make sure you hold the surface of the blade
flat against your skin (Fig. 8).
3 Switch off and clean the product after each use
(see ‘Cleaning’).
Trimming with body comb
The 1/8 inch (3 mm) body comb allows you to trim
hair on your body below the neckline (for example
chest, armpits, groin).
1 Hold the body comb on both sides and press onto
the blade (Fig. 19).
2 Switch the product on.
3 Place the comb onto the skin and stretch the skin
with your free hand. Move the product upwards
slowly, against the grain (Fig. 20).
-
Make sure that the flat part of the comb is
always in full contact with the skin to obtain an
even trimming result.
-
When you use the product on your armpits,
raise your arm and put your hand on the back
of your head to stretch the skin.
-
Regularly remove cut hair from the guard.
If a lot of hair has accumulated in the guard,
remove it from the product and blow and/or
shake out the hairs.
4 Switch off and clean the product after each use
(see ‘Cleaning’).
5 To remove the comb, hold it on both sides and pull
it off the blade (Fig. 21).
Cleaning and maintenance
Clean the appliance after every use.
Never use compressed air, scouring pads, abrasive
cleaning agents or aggressive liquids such as petrol
or acetone to clean the appliance.
Do not tap the appliance against a surface to
remove water from it, as this may cause damage.
Replace the blade if it is damaged.
Never dry the blade with a towel or tissue, as this
may cause damage.
Cleaning the appliance
1 Switch off the appliance.
2 Remove the comb from the blade (Fig. 15).
3 Blow off any hairs that have accumulated on the
blade and/or comb.
4 Switch on the appliance for approx. 15 seconds
and rinse the blade with lukewarm water.
5 Rinse the comb for approx. 15 seconds with
lukewarm water.
6 Carefully shake off excess water and let all parts air
dry completely.
Note: The blade is fragile. Handle it carefully. Replace
the blade immediately if it is damaged.
Storage
We advise you to let the appliance and its
attachments dry completely before you store them for
the next use.
1 Place the protection cap onto the edge of the
blade (Fig. 22).
2 Close the protection cap (Fig. 23).
-
Store the appliance in the pouch supplied.
Make sure the appliance and attachments are
completely dry before storing in the pouch.
Travel lock
Note: The travel lock function only applies to model
QP6551.
The appliance is equipped with a travel lock function.
You can use the travel lock if you are going to store
the appliance for a longer time period or when you
travel. The travel lock prevents the appliance from
being switched on by accident.
Activating the travel lock
1 Press the on/off button for 3 seconds (Fig. 24).
-
The travel lock symbol lights up and the digital
display counts down (Fig. 25).
-
When the travel lock is activated, the travel lock
symbol flashes.
Deactivating the travel lock
1 Press the on/off button for 3 seconds (Fig. 24).
-
The display counts down. Then the travel lock
symbol lights up and switches off.
-
The appliance is now switched on and ready for
use.
Note: The appliance unlocks automatically when you
connect it to a wall socket.
Replacement
Usage indicator
For optimal cutting and gliding performance, we
advise you to replace the blade every 4 months or
when it no longer provides the shaving or trimming
results you expect.
Depending on your usage behavior, the exact lifetime
of the blade could be longer or shorter. Similar to a
manual blade, the blade becomes blunt over time,
which results in increased hair pulling and reduced
cutting performance.
A replacement symbol will gradually appear on the
blade as you use it (Fig. 26). When the replacement
symbol is fully visible, it’s time to replace your blade.
Note that accessories such as combs can prevent the
replacement symbol from becoming visible.
Tip: The replacement symbol resembles the icon on
the blade release button of your OneBlade. For older
blades, a green rectangle may appear in place of the
replacement symbol.
QP6541-QP6551-CAN_3000.104.3560.1_LFLT_foldedA7_BW.indd 1-6
QP6541-QP6551-CAN_3000.104.3560.1_LFLT_foldedA7_BW.indd 1-6
01-02-2023 15:32
01-02-2023 15:32
"Loading the manual" means you need to wait until the file loads and becomes available for online reading. Some manuals are very large, and the time they take to appear depends on your internet speed.
Was this manual helpful?
About this manual
- Brand
- Philips
- Model
- QP6542/15
- Document type
- User Manual
- Language(s)
- English
- Pages
- 2
- File size
- 1014.1 KB
- Format
Ask a question
Related manuals
Popular Philips Other


More Philips Other models
 Philips QP4631/30 User Manual
 Philips QP4631/65 User Manual
 Philips QP6504/15 User Manual
 Philips QP6506/15 User Manual
 Philips QP6520/30 User Manual
 Philips QP6541/15 User Manual
 Philips QP6550/15 User Manual
 Philips QP6551/15 User Manual
 Philips QP6551/30 User Manual
 Philips QP6552/15 User Manual
 Philips QP6552/30 User Manual
 Philips QP6651/61 User Manual