Page 2 - ENGLISH; TABLE OF CONTENTS; Before first use
2 ENGLISH TABLE OF CONTENTS Important 3 Introduction 7 General description 7 Before first use 9 The NutriU App 9 Voice control 10 Preparing for use 10 Using the appliance 11 Food table 11 Airfrying 12 Choosing the keep warm mode 16 Cooking with a preset 17 Changing to another preset 18 Starting a re...
Page 3 - Important; Read this important information carefully before you use the; Danger; Do not fill the pan with oil as this may cause; Warning; similarly qualified persons in order to avoid a
3 ENGLISH Important Read this important information carefully before you use the appliance and save it for future reference. Danger - Never immerse the appliance in water nor rinse it under the tap. - Do not let any water or other liquid enter the appliance to prevent electric shock. - Always put th...
Page 4 - and it shall be above 6°C to minimize the
4 ENGLISH - Children should be supervised to ensure that they do not play with the appliance. - This appliance is not intended for use by persons (including children) with reduced physical, sensory or mental capabilities, or lack of experience and knowledge, unless they have been given supervision o...
Page 5 - appliance for the first time. Refer to the; Caution; use in environments such as staff kitchens
5 ENGLISH - Check if the voltage indicated on the appliance corresponds to the local mains voltage before you connect the appliance. - Keep the mains cord away from hot surfaces. - Do not place the appliance on or near combustible materials such as a tablecloth or curtain. - Do not use the appliance...
Page 6 - regulations regarding electromagnetic fields.
6 ENGLISH - Always return the appliance to a service center authorised by Philips for examination or repair. Do not attempt to repair the appliance yourself, otherwise the guarantee becomes invalid. - Always unplug the appliance after use. - Let the appliance cool down for approximately 30 minutes b...
Page 7 - This appliance is equipped with an automatic shut-off function.; Introduction
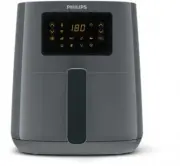
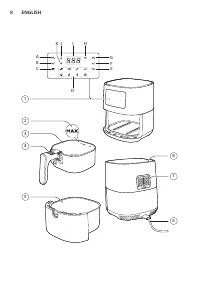
7 ENGLISH Automatic shut-off This appliance is equipped with an automatic shut-off function. If you do not press a button within 20 minutes, the appliance switches off automatically. To switch off the appliance manually, press the power On/off button. Introduction Congratulations on your purchase an...
Page 9 - WiFi Indicator Status; Remove all packing material.; The NutriU App; Connecting your Airfryer to the app; profile under “My Appliances”.
9 ENGLISH WiFi Indicator Status The Wi-Fi indicator is off • Either your Airfryer is not connected to your home WiFi (no initial WiFi set-up done so far), or the connection to your home WiFi is lost due to e.g. home router has changed or the distance between the Airfryer and router is too far The Wi...
Page 10 - Voice control; connection can be done directly while onboarding or later; Note; Preparing for use; Note
10 ENGLISH Note • Make sure to connect your Airfryer to a 2.4 GHz 802.11 b/g/n home WiFi network. • The easy WiFi set-up is needed to connect the Airfryer to your home WiFi. • The pairing process is to connect the NutriU App with your smart Airfryer. • The WiFi setup process can be cancelled via the...
Page 11 - Using the appliance; Food table; food you want to prepare.; Ingredients
11 ENGLISH Using the appliance Food table The table below helps you select the basic settings for the types of food you want to prepare. Note • Keep in mind that these settings are suggestions. As ingredients differ in origin, size, shape as well as brand, we cannot guarantee the best setting for yo...
Page 12 - Airfrying; This is an Airfryer that works on hot air. Do not fill the pan with; Put the plug in the wall outlet.
12 ENGLISH Ingredients Min.– max. amount Time (min) Tem per a ture Note Pre-baked bread/rolls (around 60 g/ 2 oz) 1-4 pieces 6-8 200°C/400°F Homemade bread 500 g/18 oz 50-60 150°C/300°F • Use the baking accessory • The shape should be as flat as possible to avoid that the bread touches the heating e...
Page 13 - Put the ingredients in the basket.; Put the pan with the basket back into the Airfryer.; Never use the pan without the basket in it.; Press the power On/Off button to switch on the appliance.
13 ENGLISH 3 Put the ingredients in the basket. Note • The Airfryer can prepare a large range of ingredients. Consult the “Food table” for the right quantities and approximate cooking times. • Do not exceed the amount indicated in the “Food table” section or overfill the basket beyond the “MAX” indi...
Page 14 - Press the On/Off button to start the cooking process.; To change the temperature unit from Celsius to Fahrenheit or the; When you hear the timer bell, the cooking time has
14 ENGLISH 8 Press the On/Off button to start the cooking process. Note • During cooking the temperature and time are shown alternately. • The last cooking minute counts down in seconds. • Refer to the food table with basic cooking settings for different types of food. • When the cooking process is ...
Page 15 - The Airfryer pan is hot after the cooking process. Always place it; After the cooking process, the pan, the basket, the interior; for preparing another batch.
15 ENGLISH 10 Pull out the pan and check if the ingredients are ready. Caution • The Airfryer pan is hot after the cooking process. Always place it on a heat resistant work top (eg. trivet, etc.) when you remove the pan from the device. Note • If the ingredients are not ready yet, simply slide the p...
Page 16 - Press the On/Off button to turn on the Airfryer.; To resume the keep warm mode, press the On/Off button; Tip
16 ENGLISH Choosing the keep warm mode 1 Press the On/Off button to turn on the Airfryer. 2 Press the menu button as often as the keep warm icon is blinking. 3 Press the On/Off button to start the keep warm mode. Note • The keep warm timer is set to 30 minutes. To change the keep warm time (1 - 30 m...
Page 17 - Follow steps 1 to 5 in chapter “Airfrying”.; Frozen potato
17 ENGLISH Cooking with a preset 1 Follow steps 1 to 5 in chapter “Airfrying”. 2 Press the Menu button. The frozen snacks icon is blinking. Press the Menu button as often as your needed preset is blinking. 3 Start the cooking process by pressing the On/Off button. Note • In the following table you c...
Page 18 - Muffin; Changing to another preset; During the cooking process long press the power On/Off
18 ENGLISH Preset Preset time (min) Preset temperature Weight (Max.) Information Muffin 13 180°C/350°F 50 g/1.8 oz per muffin • 7 muffins in one go Meat chops 13 200°C/400°F 300 g/11 oz • Up to 2 meat chops without bone Mixed vegetables 20 180°C/350°F 600 g/21 oz • Roughly chopped • Use the XL bakin...
Page 19 - Starting a recipe from the NutriU App
19 ENGLISH 4 Press the On/Off button to start the cooking process. Starting a recipe from the NutriU App 1 Press the On/Off button to turn on the Airfryer. 2 Open the NutriU App on your smart device and look for your preferred recipe. 3 Open the recipe and start the cooking process in the App. Note ...
Page 20 - To make great home-made fries in the Airfryer:; Cleaning; Let the basket, the pan, and the inside of the appliance cool; Clean the appliance after every use. Remove oil and fat from the
20 ENGLISH Making home-made fries To make great home-made fries in the Airfryer: - Choose a potato variety suitable for making fries, e.g. fresh, (slightly) floury potatoes. - It is best to air fry the fries in portions of up to 500 g/18 oz for an even result. Larger fries tend to be less crispy tha...
Page 21 - Dispose of rendered fat or oil from the bottom of the pan.; Wipe the outside of the appliance with a moist cloth.; Clean the heating element with a cleaning brush to remove
21 ENGLISH 2 Dispose of rendered fat or oil from the bottom of the pan. 3 Clean the pan and the basket in a dishwasher. You can also clean them with hot water, dishwashing liquid and a non- abrasive sponge (see “Cleaning table”). Note • Put the pan with the rubber plug in the dishwasher. Do not remo...
Page 22 - Storage; Unplug the appliance and let it cool down.; Recycling; waste at the end of its life, but hand it in at an official; Declaration of Conformity; The Airfryer HD9255 is equipped with a WiFi module, 2.4GHz
22 ENGLISH Cleaning table Storage 1 Unplug the appliance and let it cool down. 2 Make sure all parts are clean and dry before storing. Note • Always hold the Airfryer horizontally when you carry it. Make sure that you also hold the pan on the front part of the appliance as the pan with the basket ca...
Page 23 - Guarantee and support; Device compatibility
23 ENGLISH Guarantee and support If you need information or support, please visit www.philips.com/support or read the separate worldwide guarantee leaflet. Software updates Updating is essential to safeguard your privacy and the proper functioning of your Airfryer and the App. From time to time, the...
Page 24 - Troubleshooting; This chapter summarizes the most common problems you
24 ENGLISH Troubleshooting This chapter summarizes the most common problems you could encounter with the appliance. If you are unable to solve the problem with the information below, visit www.philips.com/support for a list of frequently asked questions or contact the Consumer Care Center in your co...
Page 25 - Problem
25 ENGLISH Problem Possible cause Solution I see some peeling off spots inside my Airfryer. Some small spots can appear inside the pan of the Airfryer due to the incidental touching or scratching of the coating (e.g. during cleaning with harsh cleaning tools and/ or while inserting the basket). You ...
Page 26 - DEUTSCH; INHALTSVERZEICHNIS; Für den Gebrauch vorbereiten; Grillzeiten-Tabelle; Pflege; Reinigungstabelle
26 DEUTSCH INHALTSVERZEICHNIS Wichtig! 27 Einführung 32 Allgemeine Beschreibung 32 Vor dem ersten Gebrauch 34 Die NutriU-App 34 Sprachsteuerung 35 Für den Gebrauch vorbereiten 35 Das Gerät benutzen 36 Grillzeiten-Tabelle 36 Garen mit dem Airfryer 37 Auswählen des Warmhaltemodus 41 Garen mit einer Vo...
Page 27 - Lesen Sie diese wichtigen Informationen vor dem Gebrauch des; Achtung
27 DEUTSCH Wichtig! Lesen Sie diese wichtigen Informationen vor dem Gebrauch des Geräts aufmerksam durch, und bewahren Sie sie für eine spätere Verwendung auf. Achtung! - Tauchen Sie das Gerät niemals in Wasser; spülen Sie es auch nicht unter fließendem Wasser ab. - Achten Sie darauf, dass kein Wass...
Page 30 - Vorsicht
30 DEUTSCH Vorsicht - Dieses Gerät ist ausschließlich für die Verwendung in gewöhnlichen Haushalten vorgesehen. Es ist nicht für die Verwendung in Personalküchen von Geschäften, Büros, landwirtschaftlichen Betrieben oder anderen Arbeitsbereichen vorgesehen. Auch ist es nicht für den Gebrauch in Hote...
Page 31 - Elektromagnetische Felder; Dieses Philips Gerät erfüllt sämtliche Normen und Regelungen; Automatische Abschaltung; Dieses Gerät ist mit einer automatischen Abschaltungsfunktion
31 DEUTSCH Kartoffeln bei höchstens 180°C, um der Entwicklung von Acrylamid vorzubeugen. - Drücken Sie während des Schüttelns nicht die Korbentriegelungstaste. - Seien Sie vorsichtig bei der Reinigung des oberen Bereichs der Zubereitungskammer, und beachten Sie das heiße Heizelement und die Kante de...
Page 32 - Einführung
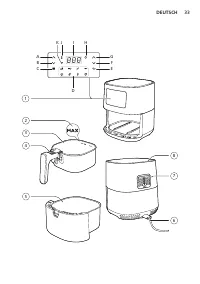
32 DEUTSCH Einführung Herzlichen Glückwunsch zu Ihrem Kauf und willkommen bei Philips! Um das Kundendienstangebot von Philips vollständig nutzen zu können, sollten Sie Ihr Produkt unter www.philips.com/welcome registrieren. Der Philips Airfryer ist der einzige Airfryer mit einzigartiger Rapid Air-Te...
Page 34 - Vor dem ersten Gebrauch; Entfernen Sie sämtliches Verpackungsmaterial.; Verbinden des Airfryers mit der App; WLAN-Heimnetzwerks befindet, bevor Sie mit der einfachen
34 DEUTSCH WLAN-Statusanzeige Die WLAN-Anzeige ist aus. • Entweder ist der Airfryer nicht mit Ihrem WLAN-Heimnetzwerk verbunden (bisher wurde noch kein WLAN eingerichtet) oder die Verbindung zu Ihrem WLAN-Heimnetzwerk wurde unterbrochen, weil sich z. B. der Router zu Hause geändert hat oder die Entf...
Page 35 - Wenn die WLAN-LED auf der Benutzeroberfläche des Airfryers; Sprachsteuerung; Verbinden Sie die NutriU App mit der App Ihres; Hinweis; Hinweis
35 DEUTSCH 5 Wenn die WLAN-LED auf der Benutzeroberfläche des Airfryers durchgehend leuchtet, ist der Airfryer verbunden. Hinweis • Stellen Sie sicher, dass Sie den Airfryer mit einem WLAN-Netzwerk des Standards 802.11 b/g/n mit 2,4 GHz verbinden. • Die einfache WLAN-Einrichtung ist erforderlich, um...
Page 36 - Das Gerät benutzen; Zutaten
36 DEUTSCH Das Gerät benutzen Grillzeiten-Tabelle Die folgende Tabelle hilft Ihnen dabei, die grundlegenden Einstellungen für die Lebensmittel auszuwählen, die Sie zubereiten möchten. Hinweis • Beachten Sie, dass es sich bei diesen Einstellungen nur um Empfehlungen handelt. Da Zutaten sich in ihrer ...
Page 37 - Garen mit dem Airfryer; Stecken Sie den Stecker in die Steckdose.
37 DEUTSCH Zutaten Min./Max. Menge Zeit (Min.) Temperatur Hinweis Ganzer Fisch (ca. 300–400 g) 1 Fisch 15–20 200°C/400°F Fischfilet (ca. 200 g) 1 – 3 (1 Schicht) 22–25 160°C/325°F Gemischtes Gemüse (grob gehackt) 200–600 g 10 bis 20 180°C/350°F • Garzeit nach Geschmack einstellen • Nach der Hälfte d...
Page 38 - Nehmen Sie die Pfanne mit dem Korb aus dem Gerät,; Setzen Sie den Korb mit der Pfanne wieder in den Airfryer; Verwenden Sie die Pfanne nie ohne den Korb.; Drücken Sie die Taste zum Erhöhen oder Verringern der
38 DEUTSCH 2 Nehmen Sie die Pfanne mit dem Korb aus dem Gerät, indem Sie am Griff ziehen. 3 Geben Sie die Zutaten in den Korb. Hinweis • Der Airfryer kann viele verschiedene Zutaten zubereiten. Die richtigen Mengen und entsprechenden Garzeiten finden Sie in der Lebensmitteltabelle. • Überschreiten S...
Page 39 - Tipp; Um die Temperatureinheit von Celsius auf Fahrenheit oder
39 DEUTSCH 7 Drücken Sie die Taste zum Erhöhen oder Verringern der Zeit, um die gewünschte Garzeit auszuwählen. 8 Drücken Sie den Ein-/Ausschalter, um den Garvorgang zu starten. Hinweis • Während des Garvorgangs werden Temperatur und Zeit abwechselnd angezeigt. • Die letzte Minute des Garvorgangs wi...
Page 40 - Ziehen Sie die Pfanne heraus, und überprüfen Sie, ob die; Die Pfanne des Airfryers ist nach dem Kochen heiß. Stellen Sie; heben Sie den Korb aus der Pfanne, indem Sie; Nach dem Garvorgang sind Pfanne, Korb, Innengehäuse und
40 DEUTSCH Hinweis • Wenn Sie die erforderliche Garzeit nicht innerhalb von 20 Minuten einstellen, schaltet sich das Gerät aus Sicherheitsgründen automatisch aus. • Einige Zutaten müssen zur Hälfte der Garzeit geschüttelt oder gewendet werden (siehe Lebensmitteltabelle). Zum Schütteln der Zutaten zi...
Page 41 - Leeren Sie den Inhalt des Korbs in eine Schüssel oder auf; Wenn Ihre Zutaten fertig sind, können Sie sofort weitere Zutaten; Auswählen des Warmhaltemodus; Drücken Sie die Menü-Taste, bis das Symbol „Warmhalten“
41 DEUTSCH 12 Leeren Sie den Inhalt des Korbs in eine Schüssel oder auf einen Teller. Nehmen Sie den Korb zum Entleeren immer aus der Pfanne, da sich heißes Öl unten in der Pfanne ansammeln kann. Hinweis • Um große oder zerbrechliche Zutaten herauszunehmen, verwenden Sie eine Zange, um die Zutaten a...
Page 42 - Garen mit einer Voreinstellung
42 DEUTSCH 3 Drücken Sie den Ein-/Ausschalter, um den Warmhaltemodus zu starten. Hinweis • Der Warmhalte-Timer ist auf 30 Minuten voreingestellt. Um die Warmhaltezeit zu ändern (1 bis 30 Minuten), drücken Sie die Taste zum Verringern der Zeit. Die Zeit wird automatisch bestätigt. • Die Temperatur ka...
Page 43 - Ausschalter drücken.; Voreinstellung
43 DEUTSCH 3 Starten Sie den Garvorgang, indem Sie den Ein-/ Ausschalter drücken. Hinweis • In der folgenden Tabelle finden Sie weitere Informationen zu den Voreinstellungen. Voreinstellung Voreingestellte Zeit (Min.) Voreingestellte Temperatur Gewicht (max.) Informationen Gefrorene Snacks aus Karto...
Page 44 - Wechseln zu einer anderen Voreinstellung; Halten Sie während des Garvorgangs den Ein-/Ausschalter
44 DEUTSCH Voreinstellung Voreingestellte Zeit (Min.) Voreingestellte Temperatur Gewicht (max.) Informationen Gemischtes Gemüse 20 180°C/350°F 600 g • Grob gehackt • XL-Backzubehör verwenden Warmhalten 30 80°C/175°F N/V • Temperatur kann nicht eingestellt werden Wechseln zu einer anderen Voreinstell...
Page 45 - Öffnen Sie die NutriU App auf Ihrem Smart-Gerät und; Hausgemachte Pommes frites; Wählen Sie eine Kartoffelsorte, die sich zur Herstellung von
45 DEUTSCH Starten eines Rezepts aus der NutriU App 1 Drücken Sie den Ein-/Ausschalter, um den Airfryer einzuschalten. 2 Öffnen Sie die NutriU App auf Ihrem Smart-Gerät und suchen Sie nach Ihrem bevorzugten Rezept. 3 Öffnen Sie das Rezept und starten Sie den Garvorgang in der App. Hinweis • Stellen ...
Page 46 - Nehmen Sie die Stifte mit den Fingern oder einer; Reinigen Sie das Gerät nach jedem Gebrauch. Entfernen Sie nach
46 DEUTSCH 1 Schälen Sie die Kartoffeln, und schneiden Sie sie in Stifte (10 x 10 mm/0,4 x 0,4 in dick). 2 Lassen Sie die Kartoffelstifte mindestens 30 Minuten in Wasser ziehen. 3 Gießen Sie das Wasser ab, und tupfen Sie die Kartoffelstifte mit einem Küchen- oder Papiertuch ab. 4 Geben Sie einen Ess...
Page 47 - Sie können sie auch mit einem nicht kratzenden Schwamm
47 DEUTSCH 3 Reinigen Sie die Pfanne und den Korb in der Spülmaschine. Sie können sie auch mit einem nicht kratzenden Schwamm in heißem Spülwasser reinigen (siehe „Reinigungstabelle“). Hinweis • Stellen Sie die Pfanne mit dem Gummistecker in die Spülmaschine. Entfernen Sie den Gummistecker nicht vor...
Page 48 - Aufbewahrung; Ziehen Sie den Netzstecker, und lassen Sie das Gerät; - Dieses Symbol bedeutet, dass das Produkt nicht mit dem
48 DEUTSCH Reinigungstabelle Aufbewahrung 1 Ziehen Sie den Netzstecker, und lassen Sie das Gerät abkühlen. 2 Stellen Sie sicher, dass alle Teile sauber und trocken sind, bevor Sie das Gerät verstauen. Hinweis • Halten Sie den Airfryer beim Tragen immer horizontal. Achten Sie darauf, die Pfanne an de...
Page 49 - Konformitätserklärung; Hiermit erklärt DAP B.V., dass der Airfryer HD9255 der Richtlinie; Garantie und Support; Philips Website unter; Softwareaktualisierungen; Gerätekompatibilität; verbunden und nicht mehr mit Ihrem Smart-Gerät gekoppelt.
49 DEUTSCH Konformitätserklärung Hiermit erklärt DAP B.V., dass der Airfryer HD9255 der Richtlinie 2014/53/EU entspricht. Der komplette Text der EU-Konformitätserklärung ist unter der folgenden Internet-Adresse einsehbar: https://www.philips.com . Der Airfryer HD9255 ist mit einem WLAN-Modul (2,4 GH...
Page 50 - Fehlerbehebung; In diesem Kapitel sind die häufigsten Probleme aufgeführt,
50 DEUTSCH Fehlerbehebung In diesem Kapitel sind die häufigsten Probleme aufgeführt, die beim Gebrauch Ihres Geräts auftreten können. Sollten Sie ein Problem mithilfe der nachstehenden Informationen nicht beheben können, besuchen Sie unsere Website unter www.philips.com/support für eine Liste mit hä...
Page 52 - ESPAÑOL; CONTENIDO; Antes de utilizarlo por primera vez; Tabla de limpieza; Compatibilidad con otros dispositivos
52 ESPAÑOL CONTENIDO Importante 53 Introducción 58 Descripción general 58 Antes de utilizarlo por primera vez 60 Aplicación NutriU 60 Control de voz 61 Preparación para su uso 61 Uso del aparato 62 Tabla de alimentos 62 Freír con aire 63 Selección del modo de conservación del calor 67 Cocción con un...
Page 53 - Importante; Antes de usar el aparato, lea atentamente esta información; Peligro; cualificación similar para evitar que se
53 ESPAÑOL Importante Antes de usar el aparato, lea atentamente esta información importante y consérvela por si necesitara consultarla en el futuro. Peligro - No sumerja nunca el aparato en agua ni lo enjuague bajo el grifo. - No deje que entre agua ni ningún otro líquido en el aparato para evitar d...
Page 55 - almacenada y superior a 6°C para minimizar
55 ESPAÑOL - Almacenaje de las patatas: la temperatura debe ser acorde a la variedad de patata almacenada y superior a 6°C para minimizar el riesgo de exposición a la acrilamida en los alimentos preparados. - No coloque el aparato sobre o cerca de una estufa de gas caliente ni cualquier tipo de estu...
Page 56 - Precaución
56 ESPAÑOL Precaución - Este aparato se ha diseñado solo para uso doméstico en interiores normal. No está diseñado para un uso en entornos como zonas de cocina en tiendas, oficinas, granjas y otros entornos laborales. Tampoco lo deben usar clientes de hoteles, hostales, moteles y entornos residencia...
Page 57 - las piezas metálicas.; Este aparato de Philips cumple los estándares y las normativas; Desconexión automática; Este aparato dispone de una función de desconexión automática.
57 ESPAÑOL - No pulse el botón de liberación de la cesta mientras sacude el recipiente. - Tenga cuidado al limpiar la parte superior de la cámara: la resistencia caliente y el borde de las piezas metálicas. - Asegúrese siempre de que los alimentos estén completamente cocinados en la Airfryer. - Aseg...
Page 58 - Introducción; Para poder beneficiarse por completo de la asistencia que ofrece; Descripción general
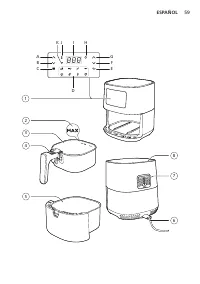
58 ESPAÑOL Introducción Enhorabuena por su adquisición y bienvenido a Philips Para poder beneficiarse por completo de la asistencia que ofrece Philips, registre el producto en www.philips.com/welcome. La Philips Airfryer es la única Airfryer con la exclusiva tecnología Rapid Air para freír sus alime...
Page 60 - Estado del indicador de Wi-Fi; Retire todos los materiales de embalaje.; Aplicación NutriU; Conexión de la Airfryer a la aplicación; en la sección “Mis aparatos”
60 ESPAÑOL Estado del indicador de Wi-Fi El indicador de Wi-Fi está apagado • La Airfryer no está conectada a la red Wi-Fi doméstica (no se ha realizado la configuración inicial de la red Wi-Fi hasta el momento) o se ha perdido la conexión a la red Wi-Fi doméstica debido a que, por ejemplo, el route...
Page 61 - Cuando el LED de la red Wi-Fi de la interfaz de usuario de la; Control de voz; Conecte la aplicación NutriU con su aplicación de asistente; Preparación para su uso
61 ESPAÑOL 5 Cuando el LED de la red Wi-Fi de la interfaz de usuario de la Airfryer está encendido de forma permanente, la Airfryer está conectada. Nota: • Asegúrate de conectar la Airfryer a una red Wi-Fi doméstica de 2,4 GHz (802.11 b/g/n). • La configuración sencilla de la red Wi-Fi es necesaria ...
Page 62 - Uso del aparato; Tabla de alimentos; Ingredientes; corte fino congeladas
62 ESPAÑOL Uso del aparato Tabla de alimentos La siguiente tabla le ayudará a seleccionar los ajustes básicos para los tipos de alimentos que desee preparar. Nota: • Tenga en cuenta que estos ajustes son indicaciones. Debido a que los ingredientes varían según su origen, tamaño, forma o marca, no po...
Page 63 - Freír con aire
63 ESPAÑOL Ingredientes Cantidad mín. y máx. Tiempo (min) Temperatura Nota: Pescado entero (de unos 300-400 g/11- 14 oz) 1 pescado 15 - 20 200°C/400°F Filete de pescado (de unos 200 g/7 oz) 1-3 (1 capa) 22-25 160°C/325°F Verduras variadas (cortadas en trozos grandes) 200-600 g/ 7-21 oz 10-20 180°C/3...
Page 64 - Enchufe el aparato a la toma de corriente.; Coloque de nuevo el recipiente con la cesta en la Airfryer.; Nunca utilice la sartén si no está la cesta en su interior.; Pulse el botón de encendido para encender el aparato.
64 ESPAÑOL 1 Enchufe el aparato a la toma de corriente. 2 Retire el recipiente con la cesta del aparato tirando del asa. 3 Ponga los ingredientes en la cesta. Nota: • La Airfryer puede preparar una gran variedad de ingredientes. Consulte la sección “Tabla de alimentos” para conocer las cantidades ad...
Page 65 - Pulse el botón de aumento o disminución de temperatura; Consejo; Para cambiar la unidad de temperatura de la Airfryer entre
65 ESPAÑOL 6 Pulse el botón de aumento o disminución de temperatura para seleccionar la temperatura deseada. 7 Pulse el botón de aumento de tiempo para seleccionar el tiempo necesario. 8 Pulse el botón de encendido para iniciar el proceso de cocción. Nota: • Durante la cocción, la temperatura y el t...
Page 66 - Cuando escuche el timbre del temporizador, habrá; El recipiente de la Airfryer estará caliente tras el proceso de; Para retirar los ingredientes pequeños (por ejemplo,; Tras el proceso de cocción, el recipiente, la cesta, la carcasa
66 ESPAÑOL Nota: • Si no ajusta el tiempo de cocción necesario antes de 20 minutos, el aparato se apagará automáticamente por motivos de seguridad. • Es necesario sacudir o dar la vuelta a algunos ingredientes a mitad del tiempo de cocción (consulte la sección ”Tabla de alimentos”). Para agitar los ...
Page 67 - Cuando un lote de ingredientes está listo, la Airfryer está; Selección del modo de conservación del calor
67 ESPAÑOL 12 Vacíe el contenido de la cesta en un bol o en un plato. Retire siempre la cesta del recipiente para vaciar el contenido, ya que puede haber aceite caliente en el fondo del recipiente. Nota: • Para retirar ingredientes delicados o de gran tamaño, utilice unas pinzas para sacar los ingre...
Page 68 - Pulse el botón de encendido para iniciar el modo de; Cocción con un ajuste predeterminado
68 ESPAÑOL 3 Pulse el botón de encendido para iniciar el modo de conservación del calor. Nota: • El temporizador de conservación del calor se establece en 30 minutos. Para cambiar el tiempo de conservación del calor (entre 1 y 30 minutos), pulse el botón de disminución de tiempo. El tiempo se confir...
Page 69 - Para iniciar el proceso de cocción, pulse el botón de; Ajuste; Sumérjalas 30 minutos
69 ESPAÑOL 3 Para iniciar el proceso de cocción, pulse el botón de encendido. Nota: • Podrá encontrar más información sobre los ajustes predeterminados en la siguiente tabla. Ajuste predeterminado Tiempo predeterminado (min) Temperatura predeterminada Peso (máx.) Información Aperitivos de patata con...
Page 70 - Cortada en trozos; Selección de otro ajuste predeterminado
70 ESPAÑOL Ajuste predeterminado Tiempo predeterminado (min) Temperatura predeterminada Peso (máx.) Información Verduras variadas 20 180°C/350°F 600 g/ 21 oz • Cortada en trozos grandes • Utilice el accesorio de horneado XL Conservación del calor 30 80°C/175°F N.D. • La temperatura no se puede ajust...
Page 71 - Pulse el botón de encendido para iniciar el proceso de; Iniciar una receta desde la aplicación NutriU; Pulse el botón de encendido para encender la Airfryer.
71 ESPAÑOL 4 Pulse el botón de encendido para iniciar el proceso de cocción. Iniciar una receta desde la aplicación NutriU 1 Pulse el botón de encendido para encender la Airfryer. 2 En su dispositivo inteligente, abra la aplicación NutriU y busque su receta preferida. 3 Abra la receta e inicie el pr...
Page 72 - 00 g/18 oz para obtener unos resultados uniformes. Las; Limpieza; Advertencia; completamente antes de limpiarlos.
72 ESPAÑOL Preparación de patatas fritas caseras Para preparar unas fantásticas patatas fritas caseras en la Airfryer: - Elija una variedad de patata adecuada para freír, por ejemplo, patatas frescas y (ligeramente) harinosas. - Es mejor freír con aire las patatas por lotes de hasta 500 g/18 oz para...
Page 73 - Limpie la resistencia con un cepillo de limpieza para
73 ESPAÑOL Consejo • Retire el recipiente y la cesta para permitir que la Airfryer se enfríe más rápido. 2 Elimine la grasa o el aceite sobrante que haya quedado en el fondo del recipiente. 3 Lave el recipiente y la cesta en el lavavajillas. También puede lavarlos con agua caliente, lavavajillas líq...
Page 74 - Limpie el interior del aparato con agua caliente y una; Almacenamiento; Desenchufe el aparato y déjelo enfriar.; Reciclaje; Este símbolo significa que este producto no debe desecharse
74 ESPAÑOL 6 Limpie el interior del aparato con agua caliente y una esponja no abrasiva. Tabla de limpieza Almacenamiento 1 Desenchufe el aparato y déjelo enfriar. 2 Asegúrese de que todas las piezas están limpias y secas antes de guardarlo. Nota: • Sostenga siempre la Airfryer en posición horizonta...
Page 75 - Declaración de conformidad; Cada cierto tiempo, la aplicación se actualiza automáticamente; botones de temperatura y tiempo a la vez durante 10 segundos.
75 ESPAÑOL Declaración de conformidad Por la presente, DAP B.V. declara que el aparato Airfryer HD9255 cumple la Directiva 2014/53/UE. El texto completo de la declaración de conformidad de la UE está disponible en la siguiente dirección de Internet: https://www.philips.com . La Airfryer HD9255 está ...
Page 76 - Solución de problemas
76 ESPAÑOL Solución de problemas Este capítulo resume los problemas más comunes que podría encontrarse con el aparato. Si no puede resolver el problema con la siguiente información, visite www.philips.com/support para consultar una lista de preguntas más frecuentes, o póngase en contacto con el serv...
Page 78 - FRANÇAIS; TABLE DES MATIÈRES; Avant la première utilisation
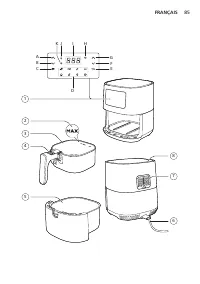
78 FRANÇAIS TABLE DES MATIÈRES Important 79 Introduction 84 Description générale 84 Avant la première utilisation 86 L'application NutriU 86 Commande vocale 87 Avant utilisation 87 Utilisation de l'appareil 88 Tableau de cuisson des aliments 88 Cuisson à l'air chaud 89 Sélection du mode de maintien ...
Page 79 - avec les résistances.; Avertissement; il doit être remplacé par Philips, son agent
79 FRANÇAIS Important Lisez attentivement ces informations importantes avant d'utiliser l'appareil et conservez-les pour un usage ultérieur. Danger - Ne plongez jamais l'appareil dans l'eau et ne le rincez pas sous le robinet. - Veillez à ne pas faire pénétrer d'eau ou d'autres liquides dans l'appar...
Page 81 - Attention
81 FRANÇAIS risque d'exposition à l'acrylamide dans les aliments préparés. - Ne placez pas l'appareil sur ou à proximité d'une cuisinière chaude à gaz ou de tout type de cuisinière électrique ou de plaques de cuisson électriques, ou dans un four chaud. - Ne remplissez jamais la cuve d'huile. - Cet a...
Page 83 - Cet appareil Philips est conforme à toutes les normes et à tous les; Arrêt automatique; aucun bouton pendant 20 minutes. Pour éteindre l'appareil
83 FRANÇAIS - N'appuyez pas sur le bouton de déverrouillage du panier pendant que vous secouez la cuve. - Soyez prudent(e) lorsque vous nettoyez la zone supérieure de la chambre de cuisson, l'élément chauffant ou le bord des pièces métalliques. - Assurez-vous toujours que les aliments sont parfaitem...
Page 86 - Le cas échéant, retirez tous les autocollants et étiquettes de
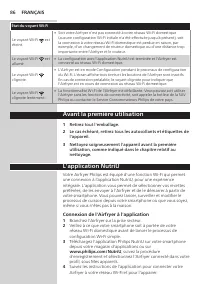
86 FRANÇAIS État du voyant Wi-Fi Le voyant Wi-Fi est éteint. • Soit votre Airfryer n'est pas connecté à votre réseau Wi-Fi domestique (aucune configuration Wi-Fi initiale n'a été effectuée jusqu'à présent), soit la connexion à votre réseau Wi-Fi domestique est perdue en raison, par exemple, d'un cha...
Page 87 - Lorsque le voyant Wi-Fi sur l'interface utilisateur de l'Airfryer; Commande vocale; directement lors de l'intégration ou ultérieurement dans; Remarque; Avant utilisation; Remarque
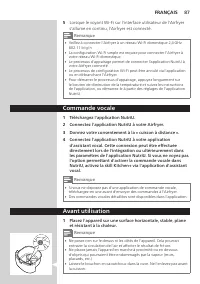
87 FRANÇAIS 5 Lorsque le voyant Wi-Fi sur l'interface utilisateur de l'Airfryer s'allume en continu, l'Airfryer est connecté. Remarque • Veillez à connecter l'Airfryer à un réseau Wi-Fi domestique 2,4 GHz 802.11 b/g/n. • La configuration Wi-Fi simple est requise pour connecter l'Airfryer à votre rés...
Page 88 - Utilisation de l'appareil; Tableau de cuisson des aliments; Ingrédients
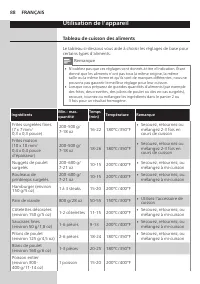
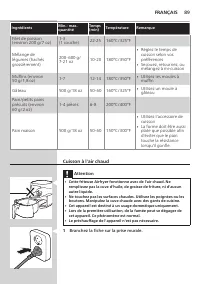
88 FRANÇAIS Utilisation de l'appareil Tableau de cuisson des aliments Le tableau ci-dessous vous aide à choisir les réglages de base pour certains types d'aliments. Remarque • N'oubliez pas que ces réglages sont donnés à titre d'indication. Étant donné que les aliments n'ont pas tous la même origine...
Page 89 - Cuisson à l'air chaud; Cette friteuse Airfryer fonctionne avec de l'air chaud. Ne; Branchez la fiche sur la prise murale.
89 FRANÇAIS Ingrédients Min.- max. quantité Temps (min) Température Remarque Filet de poisson (environ 200 g/7 oz) 1-3 (1 couche) 22-25 160°C/325°F Mélange de légumes (hachés grossièrement) 200-600 g/ 7-21 oz 10-20 180°C/350°F • Réglez le temps de cuisson selon vos préférences • Secouez, retournez, ...
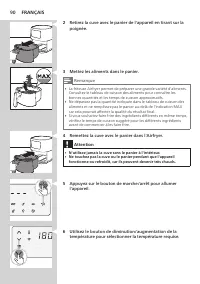
Page 90 - Retirez la cuve avec le panier de l'appareil en tirant sur la; Remettez la cuve avec le panier dans l'Airfryer.; Ne touchez pas la cuve ou le panier pendant que l'appareil; Appuyez sur le bouton de marche/arrêt pour allumer
90 FRANÇAIS 2 Retirez la cuve avec le panier de l'appareil en tirant sur la poignée. 3 Mettez les aliments dans le panier. Remarque • La friteuse Airfryer permet de préparer une grande variété d'aliments. Consultez le tableau de cuisson des aliments pour connaître les bonnes quantités et les temps d...
Page 91 - Utilisez le bouton d'augmentation de la durée pour; Pour changer d'unité de température et basculer des degrés
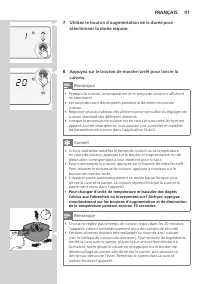
91 FRANÇAIS 7 Utilisez le bouton d'augmentation de la durée pour sélectionner la durée requise. 8 Appuyez sur le bouton de marche/arrêt pour lancer la cuisson. Remarque • Pendant la cuisson, la température et le temps de cuisson s'affichent en alternance. • Les secondes sont décomptées pendant la de...
Page 92 - La cuve de l'Airfryer est chaude après la cuisson. Placez-la; l'appareil et les ingrédients sont chauds. En fonction du type
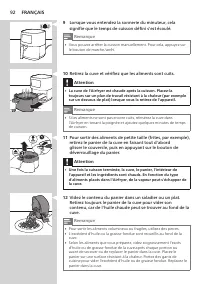
92 FRANÇAIS 9 Lorsque vous entendez la sonnerie du minuteur, cela signifie que le temps de cuisson défini s'est écoulé. Remarque • Vous pouvez arrêter la cuisson manuellement. Pour cela, appuyez sur le bouton de marche/arrêt. 10 Retirez la cuve et vérifiez que les aliments sont cuits. Attention • La...
Page 93 - Lorsqu'un panier d'aliments est cuit, vous pouvez immédiatement; Sélection du mode de maintien au chaud; Mettez l'Airfryer en marche en appuyant sur le bouton de
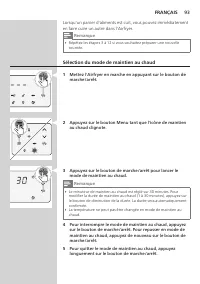
93 FRANÇAIS Lorsqu'un panier d'aliments est cuit, vous pouvez immédiatement en faire cuire un autre dans l'Airfryer. Remarque • Répétez les étapes 3 à 12 si vous souhaitez préparer une nouvelle tournée. Sélection du mode de maintien au chaud 1 Mettez l'Airfryer en marche en appuyant sur le bouton de...
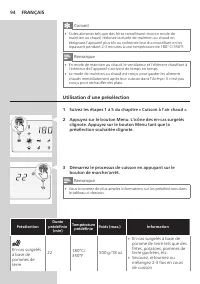
Page 94 - Conseil; Utilisation d'une présélection; Suivez les étapes 1 à 5 du chapitre « Cuisson à l'air chaud ».; Présélection; Secouez, retournez ou
94 FRANÇAIS Conseil • Si des aliments tels que des frites ramollissent trop en mode de maintien au chaud, réduisez la durée de maintien au chaud en éteignant l'appareil plus tôt ou redonnez-leur du croustillant en les repassant pendant 2-3 minutes à une température de 180° C/350°F. Remarque • En mod...
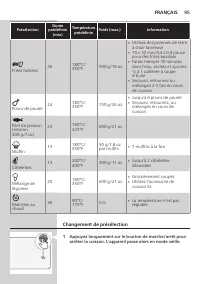
Page 95 - Changement de présélection; Appuyez longuement sur le bouton de marche/arrêt pour
95 FRANÇAIS Présélection Durée prédéfinie (min) Température prédéfinie Poids (max.) Information Frites fraîches 26 180°C/ 350°F 500 g/18 oz • Utilisez des pommes de terre à chair farineuse • 10 x 10 mm/0,4 x 0,4 pouce pour des frites épaisses • Faites tremper 30 minutes dans l'eau, séchez et ajoutez...
Page 96 - Allumez l'Airfryer en appuyant sur le bouton de marche/
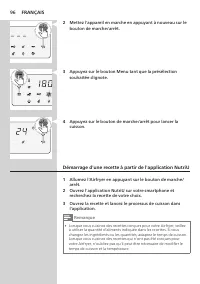
96 FRANÇAIS 2 Mettez l'appareil en marche en appuyant à nouveau sur le bouton de marche/arrêt. 3 Appuyez sur le bouton Menu tant que la présélection souhaitée clignote. 4 Appuyez sur le bouton de marche/arrêt pour lancer la cuisson. Démarrage d'une recette à partir de l'application NutriU 1 Allumez ...
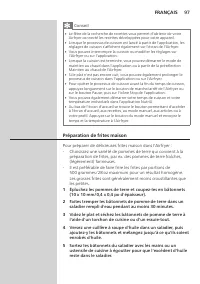
Page 97 - Préparation de frites maison; Pour préparer de délicieuses frites maison dans l'Airfryer :
97 FRANÇAIS Conseil • Le filtre de la recherche de recettes vous permet d'obtenir de votre Airfryer connecté les recettes développées pour votre appareil. • Lorsque le processus de cuisson est lancé à partir de l'application, les réglages de cuisson s'affichent également sur l'écran de l'Airfryer. •...
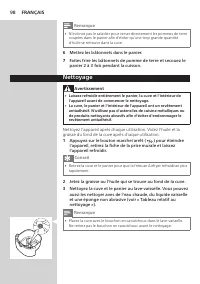
Page 98 - Nettoyage; Laissez refroidir entièrement le panier, la cuve et l'intérieur de; Nettoyez l'appareil après chaque utilisation. Videz l'huile et la
98 FRANÇAIS Remarque • N'inclinez pas le saladier pour verser directement les pommes de terre coupées dans le panier afin d'éviter qu'une trop grande quantité d'huile se retrouve dans la cuve. 6 Mettez les bâtonnets dans le panier. 7 Faites frire les bâtonnets de pomme de terre et secouez le panier ...
Page 99 - Nettoyez l'élément chauffant avec une brosse de nettoyage
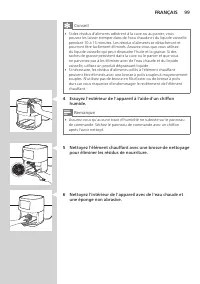
99 FRANÇAIS Conseil • Si des résidus d'aliments adhèrent à la cuve ou au panier, vous pouvez les laisser tremper dans de l'eau chaude et du liquide vaisselle pendant 10 à 15 minutes. Les résidus d'aliments se détacheront et pourront être facilement éliminés. Assurez-vous que vous utilisez du liquide...
Page 100 - Rangement; Veillez à nettoyer et sécher tous les éléments avant de; Recyclage; Ce symbole signifie que ce produit ne doit pas être mis au; Déclaration de conformité
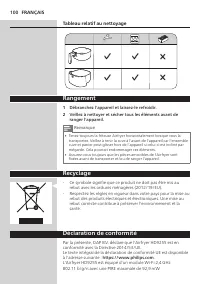
100 FRANÇAIS Tableau relatif au nettoyage Rangement 1 Débranchez l'appareil et laissez-le refroidir. 2 Veillez à nettoyer et sécher tous les éléments avant de ranger l'appareil. Remarque • Tenez toujours la friteuse Airfryer horizontalement lorsque vous la transportez. Veillez à tenir la cuve à l'av...
Page 101 - Garantie et assistance; Appareils compatibles
101 FRANÇAIS Garantie et assistance Si vous avez besoin d'une assistance ou d'informations supplémentaires, consultez le site Web www.philips.com/support ou lisez le dépliant séparé sur la garantie internationale. Mises à jour logicielles La mise à niveau est essentielle pour préserver votre vie pri...
Page 104 - ITALIANO; SOMMARIO; Prima di utilizzare l'apparecchio per la prima volta; Tabella dei cibi; Conservazione
104 ITALIANO SOMMARIO Importante 105 Introduzione 110 Descrizione generale 110 Prima di utilizzare l'apparecchio per la prima volta 112L'app NutriU 112 Controllo vocale 113 Preparazione per l'uso 113 Utilizzo dell'apparecchio 114 Tabella dei cibi 114 Frittura ad aria 115 Scelta della modalità di man...
Page 105 - Prima di utilizzare l'apparecchio, leggere attentamente queste; Pericolo
105 ITALIANO Importante Prima di utilizzare l'apparecchio, leggere attentamente queste informazioni importanti e conservarle per eventuali riferimenti futuri. Pericolo - Non immergete mai l'apparecchio nell'acqua e non risciacquatelo sotto l'acqua corrente. - Non lasciare entrare acqua o altri liqui...
Page 108 - Attenzione
108 ITALIANO Attenzione - Questo apparecchio è stato progettato per il normale uso domestico. Non è progettato per l'uso in ambienti quali zone dedicate alla cucina all'interno di negozi, uffici e altri ambienti di lavoro. Non è ideato per essere utilizzato dagli ospiti di alberghi, motel, bed and b...
Page 109 - Questo apparecchio Philips è conforme a tutti gli standard e alle; Spegnimento automatico; L'apparecchio dispone della funzione di spegnimento automatico.
109 ITALIANO - quando scuotete gli ingredienti, non premete il pulsante di sgancio del cestello. - Fare attenzione quando si pulisce la zona superiore della camera di cottura: la resistenza e i bordi delle parti metalliche sono caldi. - Assicurarsi sempre che il cibo sia completamente cotto nel sist...
Page 110 - Introduzione
110 ITALIANO Introduzione Congratulazioni per l'acquisto e benvenuti in Philips. Per trarre il massimo vantaggio dall'assistenza fornita da Philips, registrare il proprio prodotto sul sito: www.philips.com/welcome . Philips Airfryer è l'unico sistema Airfryer dotato dell'esclusiva tecnologia Rapid A...
Page 112 - Stato indicatore WiFi; Prima di utilizzare l'apparecchio per la prima; Rimuovere tutto il materiale di imballaggio.; Collegare Airfryer all'app; registrazione e selezionare il
112 ITALIANO Stato indicatore WiFi L'indicatore Wi-Fi è spento • Il sistema Airfryer non è connesso alla rete Wi-Fi di casa (nessuna configurazione iniziale Wi-Fi eseguita finora), oppure la connessione alla rete Wi-Fi di casa è stata persa, ad esempio, a causa di un cambiamento del router di casa o...
Page 113 - Quando il LED Wi-Fi sull'interfaccia utente di Airfryer è acceso; Controllo vocale; Nota; Preparazione per l'uso; Nota
113 ITALIANO 5 Quando il LED Wi-Fi sull'interfaccia utente di Airfryer è acceso fisso, il sistema Airfryer è connesso. Nota • Assicurati di collegare Airfryer a una rete WiFi domestica da 2,4 GHz 802.11 b/g/n. • Per collegare Airfryer alla rete WiFi di casa è necessario eseguire la configurazione se...
Page 114 - Utilizzo dell'apparecchio; per le pietanze che si desidera preparare.; Ingredienti; Utilizzare l'accessorio
114 ITALIANO Utilizzo dell'apparecchio Tabella dei cibi La tabella sottostante aiuta a selezionare le impostazioni di base per le pietanze che si desidera preparare. Nota • Tenere a mente che queste impostazioni sono dei suggerimenti. Dal momento che gli ingredienti sono di origine, dimensione, form...
Page 115 - Utilizzare gli stampi per; Frittura ad aria
115 ITALIANO Ingredienti Quantità min. - max. Time (Ora) (min) Temperatura Nota Pesce intero (circa 300-400 g) 1 pesce 15-20 200°C/400°F Filetto di pesce (circa 200 g) 1-3 (1 strato) 22-25 160°C/325°F Verdure miste (tagliate grossolanamente) 200-600 g 10-20 180°C/350°F • Impostare il tempo di cottur...
Page 116 - Inserire la spina nella presa a muro.; Riposizionare recipiente e il cestello nell'Airfryer.; Non utilizzare mai il recipiente senza il cestello al suo interno.
116 ITALIANO 1 Inserire la spina nella presa a muro. 2 Rimuovere il recipiente e il cestello dall'apparecchio tirando l'impugnatura. 3 Mettere gli ingredienti nel cestello. Nota • L'Airfryer è in grado di preparare un'ampia varietà di ingredienti. Consultare la tabella dei cibi per le quantità corre...
Page 117 - Premere il pulsante per aumentare o ridurre la temperatura; Suggerimento; Per modificare l'unità di misura della temperatura da Celsius
117 ITALIANO 6 Premere il pulsante per aumentare o ridurre la temperatura per selezionare il livello desiderato. 7 Premere il pulsante per regolare il tempo per selezionare il tempo desiderato. 8 Premere il pulsante on/off per avviare il processo di cottura. Nota • Durante la cottura, il livello di ...
Page 118 - Il recipiente di Airfryer è caldo dopo il processo di cottura.; gli ingredienti sono caldi. A seconda del tipo di ingredienti
118 ITALIANO Nota • Se non viene impostato il tempo di cottura richiesto entro 20 minuti, l'apparecchio si spegne automaticamente per motivi di sicurezza. • Alcuni ingredienti richiedono di essere scossi o girati durante la cottura (vedere la tabella dei cibi). Per agitare gli ingredienti, estrarre ...
Page 119 - Quando una prima parte di ingredienti è cotta, Airfryer è subito; Scelta della modalità di mantenimento della
119 ITALIANO 12 Svuotare il contenuto del cestello in un recipiente o in un piatto. Rimuovere sempre il cestello dal recipiente per svuotare il contenuto, in quanto l'olio caldo potrebbe trovarsi sul fondo del recipiente. Nota • Per rimuovere ingredienti grandi o fragili, sollevarli utilizzando un p...
Page 120 - Per mettere in pausa la modalità di mantenimento della; Cucinare con una preimpostazione
120 ITALIANO 3 Premere il pulsante on/off per attivare la modalità di mantenimento della temperatura. Nota • Il timer del mantenimento della temperatura è impostato su 30 minuti. Per modificare il tempo di mantenimento della temperatura (1-30 minuti), premere il pulsante per ridurre il tempo. Il tem...
Page 121 - Avviare il processo di cottura premendo il pulsante on/off.; Preimpostazione
121 ITALIANO 3 Avviare il processo di cottura premendo il pulsante on/off. Nota • Nella tabella seguente sono riportate ulteriori informazioni sulle preimpostazioni. Preimpostazione Preimpost. tempo cottura (min) Preimpost. temperatura Peso (max) Informazioni Snack surgelati a base di patate 22 180°...
Page 123 - Preparazione di patatine fritte fatte in casa; Per preparare eccellenti patatine fritte nell'Airfryer:
123 ITALIANO Nota • Quando si cucinano ricette sviluppate per Airfryer, assicurarsi di utilizzare la stessa quantità di alimenti indicata nelle ricette. Quando si utilizzano ingredienti diversi o una diversa quantità di alimenti, regolare il tempo di cottura. Quando si cucinano ricette non sviluppat...
Page 124 - da cucina forato in modo che l'olio in eccesso resti nel; Pulizia; Avviso; Il recipiente, il cestello e l'interno dell'apparecchio sono; Pulire l'apparecchio dopo ogni uso. Rimuovere l'olio e il grasso dal
124 ITALIANO 4 Versare un cucchiaio di olio per cucinare nel recipiente, aggiungere le patate a bastoncini e mescolarle bene fino a quando non sono ricoperte di olio. 5 Rimuovere i bastoncini con le dita o con un utensile da cucina forato in modo che l'olio in eccesso resti nel recipiente. Nota • No...
Page 125 - Pulire la superficie esterna dell'apparecchio con un panno; Per rimuovere eventuali residui di cibo, pulire la resistenza
125 ITALIANO Suggerimento • Se residui di cibo sono rimasti attaccati al recipiente o al cestello, metterli a bagno in acqua calda e detersivo per piatti per 10-15 minuti. Ciò scioglierà i residui di cibo e consentirà di rimuoverli più facilmente. Assicurarsi di utilizzare un detersivo per piatti in...
Page 126 - Scollegare la spina dall'apparecchio e lasciarlo raffreddare.; Riciclaggio; - Questo simbolo indica che il prodotto non può essere smaltito; Dichiarazione di conformità; Con la presente, DAP B.V. dichiara che il sistema Airfryer HD9255 è
126 ITALIANO Tabella di pulizia Conservazione 1 Scollegare la spina dall'apparecchio e lasciarlo raffreddare. 2 Accertarsi che tutte le parti siano pulite e asciutte prima di riporle. Nota • Tenere sempre l'Airfryer in posizione orizzontale durante il trasporto. Assicurarsi di tenere una mano sul re...
Page 127 - Garanzia e assistenza; Dispositivi compatibili
127 ITALIANO Garanzia e assistenza Per assistenza o informazioni, visitare il sito Web all'indirizzo www.philips.com/support oppure leggere l'opuscolo della garanzia internazionale. Aggiornamenti software Gli aggiornamenti sono essenziali per proteggere la privacy e il corretto funzionamento del sis...
Page 130 - NEDERLANDS; INHOUDSOPGAVE; Algemene beschrijving; De warmhoudmodus kiezen; Conformiteitsverklaring
130 NEDERLANDS INHOUDSOPGAVE Belangrijk 131 Introductie 135 Algemene beschrijving 136 Voor het eerste gebruik 138 De NutriU-app 138 Spraakbediening 138 Klaarmaken voor gebruik 139 Het apparaat gebruiken 139 Tabel voor etenswaren 139 Heteluchtfrituren 141 De warmhoudmodus kiezen 145 Voedsel bereiden ...
Page 131 - Belangrijk; Lees deze belangrijke informatie zorgvuldig door voordat u het; Gevaar
131 NEDERLANDS Belangrijk Lees deze belangrijke informatie zorgvuldig door voordat u het apparaat gaat gebruiken. Bewaar het boekje om het indien nodig later te kunnen raadplegen. Gevaar - Dompel het apparaat nooit in water en spoel het nooit af onder de kraan. - Zorg dat er geen water of een andere...
Page 133 - Let op
133 NEDERLANDS - Plaats het apparaat niet op of in de buurt van een heet gasfornuis of elektrisch fornuis, hete elektrische kookplaat of in een warme oven. - Vul de pan nooit met olie. - Dit apparaat is ontworpen voor gebruik bij een omgevingstemperatuur tussen 5°C en 40°C. - Controleer of het volta...
Page 135 - Wees voorzichtig bij het schoonmaken; voorschriften met betrekking tot elektromagnetische velden.; Automatische uitschakeling; Dit apparaat heeft een functie voor automatische uitschakeling.
135 NEDERLANDS - Wees voorzichtig bij het schoonmaken van het bovenste gedeelte van de bereidingsruimte: het verwarmingselement is heet en de randen van metalen onderdelen zijn scherp. - Zorg altijd dat het voedsel in de Airfryer volledig wordt gegaard. - Zorg altijd dat u de Airfryer in het oog hou...
Page 136 - Introductie; Knop “temperatuur verhogen”
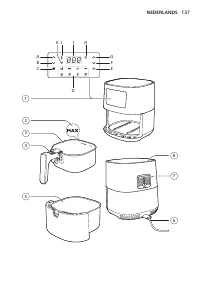
136 NEDERLANDS Introductie Gefeliciteerd met uw aankoop en welkom bij Philips! Registreer uw product op www.philips.com/welcome om optimaal gebruik te kunnen maken van de door Philips geboden ondersteuning. De Philips Airfryer is de enige Airfryer met de unieke Rapid Air- technologie waarmee u uw fa...
Page 138 - Voor het eerste gebruik; Verwijder al het verpakkingsmateriaal.; De Airfryer verbinden met de app
138 NEDERLANDS Status Wi-Fi-indicator De Wi-Fi-indicator is uit • Uw Airfryer is niet verbonden met uw Wi-Fi-thuisnetwerk (nog geen Wi-Fi-instellingen geconfigureerd) of de verbinding is verbroken omdat u bijvoorbeeld een andere router hebt gekregen of omdat de afstand tussen de Airfryer en de route...
Page 139 - Spraakbediening; de apps direct tijdens het instellen koppelen of dit later; Opmerking; Klaarmaken voor gebruik; Opmerking
139 NEDERLANDS Opmerking • Verbind uw Airfryer met een 2.4 GHz 802.11 b/g/n Wi-Fi- thuisnetwerk. • De eenvoudige Wi-Fi-configuratie is nodig om de Airfryer met uw Wi- Fi-thuisnetwerk te verbinden. • Met het koppelingsproces koppelt u de NutriU-app met uw smart Airfryer. • U kunt het Wi-Fi-configurat...
Page 140 - Het apparaat gebruiken; Tabel voor etenswaren; Ingrediënten; Zelfgemaakte frites
140 NEDERLANDS Het apparaat gebruiken Tabel voor etenswaren De onderstaande tabel vermeldt de basisstanden voor veelvoorkomende etenswaren die u wilt bereiden. Opmerking • Houd er rekening mee dat deze standen slechts indicaties zijn. Aangezien etenswaren verschillen in herkomst, grootte, vorm en me...
Page 141 - Heteluchtfrituren; Steek de stekker in het stopcontact.
141 NEDERLANDS Ingrediënten Min. - max. hoeveelheid Bewerkingstijd (min) Temperatuur Opmerking Gemengde groenten (grof gesneden) 200-600 g/ 7-21 oz 10-20 180°C/ 350°F • Stel de bereidingstijd naar eigen voorkeur in • Schud, draai of roer halverwege Muffins (ongeveer 50 g/1,8 oz) 1-7 12-14 180°C/ 350...
Page 142 - Verwijder de pan met de mand uit het apparaat door aan; Gebruik de pan nooit zonder mand.
142 NEDERLANDS 2 Verwijder de pan met de mand uit het apparaat door aan het handvat te trekken. 3 Doe de etenswaren in de mand. Opmerking • Met de Airfryer kunt u een grote verscheidenheid aan etenswaren bereiden. Raadpleeg de “Tabel voor etenswaren” voor de juiste hoeveelheden en de kooktijden bij ...
Page 143 - Druk op de knop “tijd verlengen” om de gewenste tijd te; Als u de temperatuureenheid op uw Airfryer wilt wijzigen
143 NEDERLANDS 7 Druk op de knop “tijd verlengen” om de gewenste tijd te selecteren. 8 Druk op de aan-uitknop om de bereiding te starten. Opmerking • Tijdens de bereiding worden afwisselend de temperatuur en tijd weergegeven. • De laatste kookminuut telt af in seconden. • Raadpleeg de etenswarentabe...
Page 144 - De pan van de Airfryer is heet na het koken. Plaats de pan altijd; Na het bereidingsproces zijn de pan, de mand, de binnenkant van; mand uit de pan om de inhoud eruit te halen aangezien; Zodra er een portie klaar is, kunt u direct een volgende portie
144 NEDERLANDS 9 Wanneer u het belsignaal hoort, is de bereidingstijd verstreken. Opmerking • U kunt de bereiding handmatig stoppen. Druk hiervoor op de aan-uitknop. 10 Haal de pan eruit en controleer of de etenswaren gaar zijn. Let op • De pan van de Airfryer is heet na het koken. Plaats de pan alt...
Page 146 - Voedsel bereiden met een voorinstelling; Volg stappen 1 t/m 5 uit het hoofdstuk “Heteluchtfrituren”.; Voorkeurznd; van aardappel zoals
146 NEDERLANDS Opmerking • Tijdens de warmhoudmodus gaan de ventilator en het verwarmingselement in het apparaat zo nu en dan aan. • De warmhoudmodus is ontworpen om uw voedsel onmiddellijk na bereiding in de Airfryer warm te houden. Deze modus is niet bedoeld voor opwarmen. Voedsel bereiden met een...
Page 147 - Overschakelen naar een andere voorinstelling; Houd tijdens het bereidingsproces de aan-uitknop
147 NEDERLANDS Voorkeurznd Vooringestelde tijd (min.) Vooringestelde temperatuur Gewicht (max.) Informatie Kippendrumsticks 24 180°C/350°F 750 g/ 26 oz • Tot 6 kipdrumsticks • Schud, draai of roer tussendoor Visfilet, ongeveer 200 g/7 oz 23 160°C/325°F 600 g/ 21 oz Muffin 13 180°C/350°F 50 g/1,8 oz ...
Page 149 - Zelfgemaakte frites maken; Ga als volgt te werk om zelfgemaakte frites in de Airfryer te
149 NEDERLANDS Tip • Via het filter in de zoekfunctie voor recepten kunt u filteren op uw specifieke smart Airfryer voor recepten die zijn afgestemd op uw apparaat. • Nadat u het bereidingsproces in de app hebt gestart, kunt u de bereidingsinstellingen ook op het scherm van de Airfryer bekijken. • U...
Page 150 - Schoonmaken; Waarschuwing; Laat de mand, de pan en de binnenkant van het apparaat; Maak het apparaat na ieder gebruik schoon. Haal na elk gebruik
150 NEDERLANDS 6 Leg de aardappelreepjes in de mand. 7 Frituur de aardappelreepjes en schud de mand 2-3 keer tijdens het bereiden. Schoonmaken Waarschuwing • Laat de mand, de pan en de binnenkant van het apparaat volledig afkoelen voordat u begint met reinigen. • De pan, de mand en de binnenkant van...
Page 151 - Schoonmaaktabel; Opbergen; Haal de stekker uit het stopcontact en laat het apparaat
151 NEDERLANDS 4 Veeg de buitenkant van het apparaat schoon met een vochtige doek. Opmerking • Zorg ervoor dat er geen vocht achterblijft op het bedieningspaneel. Droog het bedieningspaneel met een doek nadat u het hebt schoongemaakt. 5 Maak het verwarmingselement schoon met een schoonmaakborsteltje...
Page 153 - Apparaatcompatibiliteit; Probleem
153 NEDERLANDS Opmerking • Zorg dat uw Airfryer verbonden is met het Wi-Fi-thuisnetwerk wanneer er een update wordt geïnstalleerd. Het smart apparaat kan met een willekeurig netwerk worden verbonden. • Gebruik altijd de meest recente app en firmware • Updates worden beschikbaar gesteld wanneer de so...
Page 156 - TÜRKÇE; İÇİNDEKİLER; Sesli kontrol; Yiyecek tablosu; Temizlik
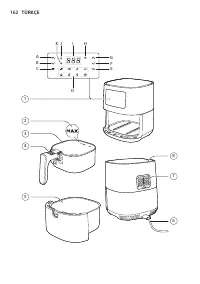
156 TÜRKÇE İÇİNDEKİLER Önemli 157 Giriş 161 Genel açıklamalar 161 İlk kullanımdan önce 163 NutriU Uygulaması 163 Sesli kontrol 164 Cihazın kullanıma hazırlanması 164 Cihazın kullanımı 165 Yiyecek tablosu 165 Havayla kızartma 166 Sıcak tutma modunu seçme 170 Bir ön ayar ile pişirme 171 Başka bir ön a...
Page 157 - Önemli; gelecekte başvurmak üzere saklayın.; Tehlike; - Sepete yiyecek koyarken kesinlikle belirtilen; Uyarı
157 TÜRKÇE Önemli Cihazı kullanmadan önce bu önemli bilgileri dikkatlice okuyun ve gelecekte başvurmak üzere saklayın. Tehlike - Cihazı kesinlikle suya batırmayın veya musluk altında durulamayın. - Elektrik çarpmasını önlemek için su veya diğer sıvıların cihaza girmesine izin vermeyin. - Isıtma elem...
Page 159 - Dikkat
159 TÜRKÇE - Cihazı prize takmadan önce, üstünde yazılı olan gerilimin, evinizdeki şebeke gerilimiyle aynı olup olmadığını kontrol edin. - Elektrik kablosunu sıcak yüzeylerden uzak tutun. - Cihazı masa örtüsü veya perde gibi yanıcı malzemelerin üstüne veya yakınına koymayın. - Cihazı, bu kılavuzda b...
Page 161 - Otomatik kapanma
161 TÜRKÇE Elektromanyetik alanlar (EMF) Bu Philips cihazı, elektromanyetik alanlarla ilgili yürürlükteki tüm standartlar ve düzenlemelere uygundur. Otomatik kapanma Bu cihazda otomatik kapanma işlevi bulunur. 20 dakika içerisinde bir düğmeye basmazsanız cihaz otomatik olarak kapanır. Cihazı manuel ...
Page 163 - WiFi Göstergesi Durumu; İlk kullanımdan önce; Tüm ambalaj malzemelerini çıkarın.; NutriU Uygulaması; Airfryer'ınızı uygulamaya bağlama
163 TÜRKÇE WiFi Göstergesi Durumu Wi-Fi göstergesi kapalı • Airfryer'ınız ev WiFi ağınıza bağlı değil (henüz ilk WiFi kurulumu yapılmamış) veya ev yönlendiricisinin değiştirilmesi ya da Airfryer ile yönlendirici arasındaki mesafenin çok fazla olması gibi bir nedenle ev WiFi bağlantınız kesilmiş Wi-F...
Page 164 - Not; Cihazın kullanıma hazırlanması; Not
164 TÜRKÇE Not • Airfryer'ınızı 2,4 GHz 802.11 b/g/n ev WiFi ağına bağladığınızdan emin olun. • Airfryer'ı ev WiFi ağınıza bağlamak için kolay WiFi kurulumu gerekir. • Eşleştirme işlemi, NutriU Uygulamasını akıllı Airfryer'ınıza bağlayarak gerçekleştirilir. • WiFi kurulum işlemi Uygulama aracılığıyl...
Page 165 - Cihazın kullanımı; Malzemeler; Hamburger
165 TÜRKÇE Cihazın kullanımı Yiyecek tablosu Aşağıdaki tablo, hazırlamak istediğiniz yiyecek tipleri için temel ayarları seçmenize yardımcı olur. Not • Bu ayarların öneri niteliğinde olduğunu unutmayın. Malzemeler, köken, boyut, şekil ve markaya göre farklılık gösterdiğinden malzemeleriniz için sabi...
Page 166 - Kek; Havayla kızartma
166 TÜRKÇE Malzemeler Min. – maks. miktar Süre (dk) Sıcaklık Not Tavuk göğsü (yaklaşık 160 g/6 oz) 1-3 parça 20-25 180°C/350°F Bütün balık (yaklaşık 300-400 g/11-14 oz) 1 balık 15-20 200°C/400°F Balık fileto (yaklaşık 200 g/7 oz) 1-3 (1 fileto) 22-25 160°C/325°F Karışık sebze (büyükçe doğranmış) 200...
Page 167 - Tavayı ve sepeti sapından çekerek cihazdan çıkarın.; Tavayı ve sepeti tekrar Airfryer'a yerleştirin.; Tavayı asla içinde sepet olmadan kullanmayın.; Cihazı çalıştırmak için Açma/Kapatma düğmesine basın.
167 TÜRKÇE 1 Fişi prize takın. 2 Tavayı ve sepeti sapından çekerek cihazdan çıkarın. 3 Yiyecekleri sepete koyun. Not • Airfryer, geniş bir malzeme yelpazesini pişirmek için kullanılabilir. Doğru miktarlar ve yaklaşık pişirme süreleri için “Yemek tablosu” bölümüne başvurun. • Yemek kalitesini etkiley...
Page 168 - Gerekli sıcaklığı seçmek için sıcaklık arttırma veya azaltma; İpucu; geçiş yapmak için sıcaklık artırma ve azaltma düğmelerine aynı
168 TÜRKÇE 6 Gerekli sıcaklığı seçmek için sıcaklık arttırma veya azaltma düğmesine basın. 7 Gerekli süreyi seçmek için süre artırma düğmesine basın. 8 Pişirme işlemini başlatmak için Açma/Kapama düğmesine basın. Not • Pişirme sırasında sıcaklık ve süre değişimli olarak gösterilir. • Pişirme sırasın...
Page 169 - Zamanlayıcı uyarısını duyduğunuzda pişirme süresi; Sepeti çekip çıkarın ve malzemelerin hazır olup olmadığını; Pişirme işleminden sonra Airfryer tavası sıcak olur. Tavayı; önce kapağı kaydırıp ardından sepet serbest bırakma; Pişirme işlemi sonrasında tava, sepet, iç muhafaza ve malzemeler
169 TÜRKÇE Not • Gerekli pişirme süresini 20 dakika içinde ayarlamazsanız cihaz güvenlik nedeniyle otomatik olarak kapanır. • Bazı malzemelerin pişirme süresinin yarısında karıştırılması veya döndürülmesi gerekir (“Yemek tablosu”na bakın). Malzemeleri sallamak için tavayı ve sepeti çekip çıkarın, ıs...
Page 170 - Sepetteki malzemeleri bir kaseye veya tabağa boşaltın.; anında kullanıma hazırdır.; Sıcak tutma modunu seçme; Sıcak tutma simgesi yanıp sönene kadar menü düğmesine
170 TÜRKÇE 12 Sepetteki malzemeleri bir kaseye veya tabağa boşaltın. Tavanın tabanında sıcak yağ olabileceğinden yiyecekleri boşaltırken daima sepeti tavadan çıkarın. Not • Büyük veya yumuşak malzemeleri çıkarmak için malzemeleri maşa kullanarak kaldırın. • Malzemelerden çıkan fazla yağ süzülen yağ ...
Page 171 - Bir ön ayar ile pişirme
171 TÜRKÇE 4 Sıcak tutma modunu duraklatmak için Açma/Kapama düğmesine basın. Sıcak tutma moduna devam etmek için tekrar Açma/Kapama düğmesine basın. 5 Sıcak tutma modundan çıkmak için Açma/Kapama düğmesine uzunca basın. İpucu • Patates kızartması gibi yiyecekler sıcak tutma modunda çıtırlıklarını ç...
Page 172 - Ön ayar süresi; patatesli; Başka bir ön ayara geçiş yapma; Pişirme sırasında pişirme işlemini durdurmak için Açma/
172 TÜRKÇE Preset (Hafıza) Ön ayar süresi (dakika) Ön ayar sıcaklığı Ağırlık (Maks.) Bilgi Dondurulmuş patatesli atıştırmalıklar 22 180°C/ 350°F 500 g/18 oz • Patates kızartması, patates dilimleri, tırtıklı patates kızartması gibi patatesli donmuş atıştırmalıklar • Pişirme sırasında 2-3 kez sallayı...
Page 174 - Ev yapımı kızartmalar yapma; Airfryer'da mükemmel ev yapımı kızartmalar yapmak için:
174 TÜRKÇE İpucu • Cihazınız için geliştirilen tarifleri almak için tarif aramasındaki filtreyle akıllı Airfryer'ınızı filtreleyebilirsiniz. • Pişirme işlemi Uygulamadan başlatıldığında pişirme ayarlarını Airfryer'ın ekranında da görebilirsiniz. • Pişirme işlemini duraklatabilir veya Airfryer'da ya ...
Page 175 - Temizlemeye başlamadan önce sepet, tava ve cihazın iç kısmının; Her kullanım sonrasında cihazı mutlaka temizleyin. Tavanın
175 TÜRKÇE 7 Patates dilimlerini kızartın ve pişirme sırasında sepeti 2-3 kez sallayın. Temizlik Uyarı • Temizlemeye başlamadan önce sepet, tava ve cihazın iç kısmının soğumasını bekleyin. • Tava, sepet ve cihazın iç kısmı yapışmaz malzemeyle kaplanmıştır. Bu yapışmaz kaplamada hasar oluşmaması için...
Page 176 - Saklama
176 TÜRKÇE 5 Yiyecek artıklarını çıkarmak için ısıtma elemanını bir temizleme fırçasıyla temizleyin. 6 Cihazın içini sıcak su ve aşındırıcı olmayan bir sünger ile temizleyin. Temizleme masası Saklama 1 Cihazın fişini prizden çekin ve soğumasını bekleyin. 2 Saklamadan önce tüm parçaların temiz ve kur...
Page 177 - Geri dönüşüm; Cihaz uyumluluğu
177 TÜRKÇE Geri dönüşüm - Bu simge, ürünün normal evsel atıklarla birlikte atılmaması gerektiği anlamına gelir (2012/19/EU). - Elektrikli ve elektronik ürünlerin ayrı olarak toplanması ile ilgili ülkenizin kurallarına uyun. Eski ürünlerin doğru şekilde atılması, çevre ve insan sağlığı üzerindeki olu...
Page 178 - Fabrika ayarlarına dönüş; listesi için
178 TÜRKÇE Fabrika ayarlarına dönüş Airfryer'ı fabrika ayarlarına sıfırlamak için sıcaklık ve süre artırma düğmelerine 10 saniye boyunca aynı anda basın. Ardından Airfryer'ınızın evinizin WiFi ağıyla bağlantısı kesilir ve akıllı cihazınızla eşleşmesi sona erer. Sorun giderme Bu bölümde cihaz ile ilg...
Page 179 - Sorun
179 TÜRKÇE Sorun Olası nedeni Çözüm Airfryer cihazımın iç kısmında bazı noktaların kaplaması soyulmuş. Airfryer tavasının iç kısmında bazı noktalar kaplamanın yanlışlıkla çizilmesi sonucunda (örn. Sert temizlik aletleriyle temizlerken ve/veya sepeti yerleştirirken). Tavayı sepete doğru alçaltırken d...
Page 180 - © 2022 Philips Domestic Appliances Holding B.V.
© 2022 Philips Domestic Appliances Holding B.V. All rights reserved.



















 Philips HD9220 Manual
 Philips HD9225 Manual
 Philips HD9240 Manual
 Philips HD9252/70 User Manual
 Philips HD9252/91 User Manual
 Philips HD9255/80 User Manual
 Philips HD9255/90 User Manual
 Philips HD9257/88 User Manual
 Philips HD9260/90 User Manual
 Philips HD9270/60 Quick Guide
 Philips HD9270/70 Quick Guide