Page 2 - Table of Contents; Safety precautions and maintenance .1
Table of Contents 1. Important ............................................... 1 1.1 Safety precautions and maintenance .1 1.2 Notational Descriptions ............................2 1.3 Disposal of product and packing material ...............................................................3 2. Settin...
Page 3 - Warnings
1 1. Important 1. Important This electronic user’s guide is intended for anyone who uses the Philips monitor. Take time to read this user manual before you use your monitor. It contains impor tant information and notes regarding operating your monitor.The Philips guarantee applies provided the produ...
Page 4 - Notational Descriptions; Notes, Cautions and Warnings
2 1. Important • Temperature: 0-40°C 32-95°F • Humidity: 20-80% RH Important information for Burn-in/Ghost image • Always activate a moving screen saver program when you leave your monitor unattended. Always activate a periodic screen refresh application if your monitor will display unchanging stati...
Page 5 - Waste Electrical and Electronic Equipment-
3 1. Important 1.3 Disposal of product and packing material Waste Electrical and Electronic Equipment- WEEE This marking on the product or on its packaging illustrates that, under European Directive 2012/19/EU governing used electrical and electronic appliances, this product may not be disposed of w...
Page 6 - Setting up the monitor; Package contents; *Depends on the country; *Depends on the country
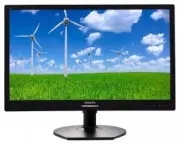
4 2. Setting up the monitor 2. Setting up the monitor 2.1 Installation Package contents 221S6QHA: 221S6 *VGA © 20 14 K on ink lijk e P hilip s N .V. A ll rig hts rese rved . Un autho rized d uplicatio n is a violation of applicable laws. M ade a nd p rint ed in C hin a. V ers ion Philips and the Phi...
Page 8 - (1) Gently attach the stand to the VESA
6 2. Setting up the monitor 221S6QYM, 221S6QM: 1. Place the monitor face down on a smooth surface. Pay attention not to scratch or damage the screen. 2. Hold the stand with both hands. (1) Gently attach the stand to the VESA mount area until the latch locks the stand. (2) Gently attach the base to t...
Page 9 - Connect to PC
7 2. Setting up the monitor 221S6QYM: 1 2 1 2 3 4 4 3 6 5 7 1 AC power input 2 VGA input 3 DVI input 4 DisplayPor t input 5 Audio input 6 Earphone jack 7 Kensington anti-theft lock 221S6QM: 1 2 1 2 3 3 5 6 4 1 AC power input 2 VGA input 3 DVI input 4 Audio input 5 Earphone jack 6 Kensington anti-the...
Page 10 - Operating the monitor; Front view product description
8 2. Setting up the monitor 2.2 Operating the monitor Front view product description 221S6QHA: 7 6 2 5 4 3 1 Switch monitor’s power ON and OFF . Access the OSD menu. Confirm the OSD adjustment.Adjust the OSD menu. Select the Smar tPower control level. Adjust the speaker volume. Return to previous OS...
Page 11 - Switch monitor’s power ON and
9 2. Setting up the monitor 221S6QYM, 221S6QM: 7 6 2 5 4 3 1 Switch monitor’s power ON and OFF . Access the OSD menu. Confirm the OSD adjustment.Adjust the OSD menu. Select the Smar tPower control level. Adjust the speaker volume. Return to previous OSD level. Smar tImage hot key. There are 6 modes ...
Page 12 - Basic and simple instruction on the control
10 2. Setting up the monitor 221S6QYM: Basic and simple instruction on the control keys In the OSD shown above, you can press buttons at the front bezel of the monitor to move the cursor, and press OK button to confirm the choice or change. The ...
Page 13 - Resolution notification; Swivel
11 2. Setting up the monitor Resolution notification This monitor is designed for optimal performance at its native resolution, 1920 × 1080 @ 60 Hz. When the monitor is powered on at a different resolution, an aler t is displayed on screen: Use 1920 × 1080 @ 60 Hz for best results.Display of the nat...
Page 14 - Remove the Base Assembly for; Before you star t disassembling the monitor
12 2. Setting up the monitor 2.3 Remove the Base Assembly for VESA Mounting Before you star t disassembling the monitor base, please follow the instructions below to avoid any possible damage or injur y. 221S6QYM, 221S6QM: 1. Extend the monitor base to its maximum height. 2. Place the monitor face d...
Page 15 - Image Optimization; How to enable SmartImage?
13 3. Image Optimization 3. Image Optimization 3.1 SmartImage What is it? Smar tImage provides presets that optimize display for different types of content, dynamically adjusting brightness, contrast, color and sharpness in real time. Whether you're working with text applications, displaying images ...
Page 17 - Technical Specifications; Connectivity
15 4. Technical Specifications 4. Technical Specifications Picture/Display Monitor Panel Type AH-IPS LCD Backlight LED Panel Size 21.5" W (54.6 cm) Aspect Ratio 16:9 Pixel Pitch 0.248 (H) mm x 0.248 (V) mm Smar tContrast 20,000,000:1 Response Time (typ.) 14 ms Smar tResponse Time (typ.) 5 ms(GtG...
Page 19 - Dimensions
17 4. Technical Specifications Sleep (Standby) <0.3W Off <0.2W On Mode(ECO mode) 13.4W (typ.) Power(EnergyStar test method) Energy Consumption AC Input Voltage at 100VAC , 50Hz AC Input Voltage at 115VAC , 60Hz AC Input Voltage at 230VAC, 50Hz Normal Operation 16.73W (typ.) 16.96W (typ.) 17W (...
Page 20 - Operating Condition
18 4. Technical Specifications Product with stand 4.9 kg (221S6QYM, 221S6QM) 3.4 kg (221S6QS, 221S6QHA) Product without stand 3.1 kg (221S6QYM, 221S6QM) 3.0 kg (221S6QS, 221S6QHA) Product with packaging 7.0 kg (221S6QYM, 221S6QM) 5.3 kg (221S6QS, 221S6QHA) Operating Condition Temperature range (oper...
Page 21 - Maximum Resolution
19 4. Technical Specifications 4.1 Resolution & Preset Modes Maximum Resolution 1920 x 1080 @ 60 Hz (analog input) 1920 x 1080 @ 60 Hz (digital input) Recommended Resolution 1920 x 1080 @ 60 Hz (digital input) H. freq (kHz) Resolution V. freq (Hz) 31.47 720 x 400 70.09 31.47 640 x 480 59.94 35.0...
Page 23 - Regulatory Infomation; Regulatory Information; Some of the Usability features of TCO
21 6. Regulatory Infomation 6. Regulatory Information Congratulations! This product is designed for both you and the planet! TCO Development works for sustainable IT - manufacture, use and recycling of IT products reflecting environmental, social and economic responsibility. TCO Cer tified is a thir...
Page 24 - CE Declaration of Conformity
22 6. Regulatory Infomation CE Declaration of Conformity This product is in conformity with the following standards • EN60950-1:2006+A11:2009+A1: 2010+A12:2011+A2:2013(Safety requirement of Information Technology Equipment). • EN55022:2010(Radio Disturbance requirement of Information Technology Equi...
Page 25 - FCC Declaration of Conformity
23 6. Regulatory Infomation Changes or modifications not expressly approved by the par ty responsible for compliance could void the user's authority to operate the equipment. Use only RF shielded cable that was supplied with the monitor when connecting this monitor to a computer device. To prevent d...
Page 26 - EN 55022 Compliance (Czech Republic Only)
24 6. Regulatory Infomation EN 55022 Compliance (Czech Republic Only) Polish Center for Testing and Certification Notice The equipment should draw power from a socket with an attached protection circuit (a three-prong socket). All equipment that works together (computer, monitor, printer, and so on)...
Page 27 - North Europe (Nordic Countries) Information
25 6. Regulatory Infomation North Europe (Nordic Countries) Information Placering/Ventilation VARNING: FÖRSÄKRA DIG OM ATT HUVUDBRYTARE OCH UTTAG ÄR LÄTÅTKOMLIGA, NÄR DU STÄLLER DIN UTRUSTNING PÅPLATS. Placering/Ventilation ADVARSEL: S Ø R G V E D P L A C E R I N G E N F O R , AT NETLEDNINGENS STIK ...
Page 28 - EU Energy Label; Restriction on Hazardous Substances
26 6. Regulatory Infomation EU Energy Label The European Energy Label informs you on the energy efficiency class of this product. The greener the energy efficiency class of this product is the lower the energy it consumes. On the label, you can find the energy efficiency class, the average power con...
Page 29 - 环保使用期限
27 6. Regulatory Infomation a designated collection point for the recycling of waste electrical and electronic equipment . The separate collection and recycling of your waste equipment at the time of disposal will help to conser ve natural resources and ensure that it is recycled in a manner that pr...
Page 30 - Before replacing the plug cover, make cer tain
28 6. Regulatory Infomation 1. The GREEN&YELLOW wire must be connected to the terminal in the plug which is marked with the letter "E" or by the Ear th symbol or coloured GREEN or GREEN&YELLOW. 2. The BLUE wire must be connected to the terminal which is marked with the letter "N&...
Page 31 - Customer care and warranty; Customer care and; Philips’ Flat Panel Monitors Pixel; subpixel; Pixels and Sub pixels
29 7. Customer care and warranty 7. Customer care and warranty 7.1 Philips’ Flat Panel Monitors Pixel Defect Policy Philips strives to deliver the highest quality products. We use some of the industr y's most advanced manufacturing processes and practice stringent quality control. However, pixel or ...
Page 32 - Proximity of Pixel Defects
30 7. Customer care and warranty Proximity of Pixel Defects Because pixel and sub pixels defects of the same type that are near to one another may be more noticeable, Philips also specifies tolerances for the proximity of pixel defects. Pixel Defect Tolerances In order to qualify for repair or repla...
Page 33 - Center number listed below.; Country
31 7. Customer care and warranty 7.2 Customer Care & Warranty For warranty coverage information and additional suppor t requirement valid for your region, please visit www.philips.com/suppor t website for details. You may also contact your local Philips Customer Care Center number listed below. ...
Page 34 - Contact Information for CENTRAL AND EASTERN EUROPE region:
32 7. Customer care and warranty Contact Information for CENTRAL AND EASTERN EUROPE region: Country Call center CSP Consumer care number Belarus NA IBA +375 17 217 3386 +375 17 217 3389 Bulgaria NA LAN Ser vice +359 2 960 2360 Croatia NA MR Ser vice Ltd +385 (01) 640 1111 Czech Rep. NA Asuppor t 420...
Page 35 - Contact Information for APMEA region:; フィリップスモニター
33 7. Customer care and warranty Contact Information for APMEA region: Country ASP Consumer care number Opening hours Australia AGOS NETWORK PTY LTD 1300 360 386 Mon.~Fri. 9:00am-5:30pm New Zealand Visual Group Ltd. 0800 657447 Mon.~Fri. 8:30am-5:30pm Hong Kong Macau Company: Smar t Pixels Technolog...
Page 36 - Common Problems; Note
34 8. Troubleshooting & FAQs 8. Troubleshooting & FAQs 8.1 Troubleshooting This page deals with problems that can be corrected by a user. If the problem still persists after you have tried these solutions, contact Philips customer ser vice representative. Common Problems No Picture (Power LE...