Page 2 - Introduction; Paslode Cordless Framing Nailer; READ THE MANUAL FROM COVER TO COVER
2 Introduction Paslode Cordless Framing Nailer Operating Manual 1. READ THE MANUAL FROM COVER TO COVER BEFORE USING THE TOOL.2. FOLLOW ALL INSTRUCTIONS IN THE MANUAL. My Paslode representative is: Name Address p i Z e t a t S y ti C Telephone Number My Service & Repair Center is: Name Address p ...
Page 3 - Contents; The battery charger meets all safety requirements for power
Contents e g a P t c e j b u S Introduction................................................................................ 2 An Overview of the Paslode Cordless Framing Nailer ...............4 Safety Instructions......................................................................5 Battery and Cha...
Page 4 - An Overview of the Paslode Cordless Framing Nailer; Description; NOTE: Altitude Restriction
4 An Overview of the Paslode Cordless Framing Nailer Description The Paslode Cordless Framing Nailer is a self-contained, fully portable nailer that uses liquid hydrocarbon fuel to power a unique linear drive internal combustion motor.As with any internal combustion motor, the Paslode Cordless Naile...
Page 5 - Safety Instructions
5 Safety Instructions The following safety instructions have been included in this booklet to provide you with basic information necessary for safe operation of the Paslode Cordless Framing Nailer. DO NOT ATTEMPT TO OPERATE THIS TOOL UNTIL YOU HAVE READ AND UNDERSTAND ALL SAFETY PRECAUTIONS AND MANU...
Page 6 - WARNING
6 Safety Instructions WARNING EYE and EAR safety gear must be worn when working with or in the vicinity of the Paslode Cordless Framing Nailer. 7. NEVER OPERATE THE TOOL WITH THE WORK CONTACTING ELEMENT REMOVED OR DISABLED.This device helps reduce the possibility of accidental fastener discharge by ...
Page 7 - IMPORTANT SAFETY INSTRUCTIONS!; DANGER; TO REDUCE THE RISK OF FIRE; CHARGING SYSTEM SAFETY; For connection to a supply outside North
7 14. ALLOW ONLY QUALIFIED PERSONNEL TO OPERATE THE CORDLESS FRAMING NAILER. WARNING Only persons who have read and fully understand all tool operation, safety and maintenance instructions should be allowed to operate the tool. 15. PROPERLY STORE FUEL CELL. 16. ALWAYS STORE THE TOOL WITH THE FUEL CA...
Page 8 - Battery And Charging System; Charging Instructions:; tool; unitʼs
8 Battery And Charging System Charging Instructions: 1. 2. NOTE 3. After charging, the red light will go out and the green light will come on, indicating that the battery is fully charged. The charger will keep the battery at full charge until it is removed. 4. Charging Times: First charge (new batt...
Page 9 - Battery and Charging System; Inserting Battery; NOTE:If battery is left in tool for an extended period of time
9 Battery and Charging System Inserting Battery 1. Load the battery, contacts first, into the Cordless Framing Nailer. 2. Push battery fully forward into its locked position.3. To remove battery, push down on locking tab and slide battery out. Battery Indicator Light The illustration is a close-up o...
Page 10 - during normal operation. When cleaning the tool, use only; Paslode Framing Fuel Cell
10 WARNING EXPLOSION/FIRE HAZARDRead ALL safety instructions before using the fuel cell. Failure to fol- low ALL instructions may This may cause serious per- sonal injuries or property damage. Keep the fuel cartridge away from heat, sparks and open flame. Do not smoke when handling or operating tool...
Page 11 - For maximum performance use fuel before “Best Use Before” date.; Paslode Framing Fuel Cell Disposal Guidelines:; date on the bottom of the can and on the Fuel Fastener Pack carton.; BEST USE BEFORE
11 NOTE: For maximum performance use fuel before “Best Use Before” date. Paslode Framing Fuel Cell Disposal Guidelines: Paslode the industry leader in cordless technology provides this information to assist users with the proper disposal of discarded fuel cells/cartridges. Acceptable disposal option...
Page 12 - Inserting Paslode
12 Paslode Framing Fuel Cell 1. Swing Up 2. Push Down Inserting Paslode Framing Fuel Cell A. To insert the Paslode Framing Fuel Cell into the Cordless Framing Nailer, press up at the bottom of the actuator cover and pivot outward to open. The cover will swing out of the way. B. Lift the Paslode Fram...
Page 13 - Paslode Cordless Framing Nailer and; CAUTION; Lockout Feature; A. Pull the follower back to
13 Preparing the Paslode Cordless Framing Nailer for Use Paslode Cordless Framing Nailer and Outdoor Weather Use the Cordless Framing Nailer outdoors, in clear weather, when the nailer, fuel cartridge, and battery are between 14 ° F (-10 ° C) and 120 ° F (49 ° C. HOT WEATHER OPERATIONThe Cordless Fr...
Page 14 - Paslode Cordless Framing Nailer Operation; Adjustable Utility Hook; Remove the battery before adjusting the depth of drive.
14 Paslode Cordless Framing Nailer Operation No-Mar Work-Contacting Element For applications where the work-piece must be mark free, like in siding and recreational decks, order the No-Mar Work-Contacting Element, Part No. 901252 ANZ Product Code: B20544G DANGER Never attempt to operate the Cordless...
Page 15 - Fasteners and Applications; Smooth Shank - For general construction, carpentry and
15 Fasteners and Applications N O I T A C I L P P A E P Y T E Z I S , g n i h t a e h s ll a w , t n e m y a lr e d n U k n a h S g n i R n o m m o C ) (50 x 2.87 mm) D 6 ( 3 1 1 . x " 2 roof and floor decking, siding g n i d is , g n ic n e F , k n a h s g n ir n o m m o C ) (50 x 2.87 mm) D 6 ...
Page 16 - If you need further assistance, please visit:; Servicing; nailerʼs
16 PASLODE FRAMING FUEL CELL CHECK DANGER Wear safety glasses when performing this test. Never perform this test near an open flame or sparks, while smoking, or where the fuel may get into your eyes. Restrict Field Service to the Following CHECKING THE ENERGY LEVEL OF THE BATTERYRECHARGING THE BATTE...
Page 17 - Air Filter; No-Mar Work Contacting Element; Tools; Tool Cleaning and Oiling
17 Servicing Air Filter Open the grille by pressing slightly above the adapter, and pivoting the cover open. The air filter simply lifts out.Tap the filter GENTLY to remove any dust. Check and clean the air filter every two days. Soap and water restores the filter to a "like new" condition. ...
Page 18 - Troubleshooting; representative for service.
18 Battery does not appear to accept charge when the battery and charger are plugged into the wall mount adapter. Battery charger flashes red/green for more than 20 minutes. Charger gets hot, makes excessively loud noise, or smokes during charging cycle. Charger cord or wall plug gets hot. Inoperati...
Page 19 - Normal Stage of Operation; For US Region Only; For technical support contact Paslode:
19 Tool operates properly, but fasteners do not drive fully. Tool operates, but no fastener is driven. Tool operates erratically or appears to be losing power - tool indicator light is green. Work-contacting element requires adjustment. Dirty air filter. There may be loss of seal in combustion chamb...
Page 20 - For Cleaning Procedure Manual
20 Canada A Division of ITW Australia Pty Ltd ABN 63 004 235 063 PO Box 914 45 to 47 Williamson Road Ingleburn,1890 www.paslode.com.au Australia A Division of ITW New Zealand Ltd PO Box 100 303 NSMC 8 Orbit Drive Aukland, New Zealandwww.paslode.co.nz New Zealand USA An Illinois Tool Works Co. 155 Ha...
Page 21 - CLAVADORA PASLODE CORDLESS; IMPORTANTE; Modelo
MANUAL DE FUNCIONAMIENTO --- CLAVADORA PASLODE CORDLESS IMPORTANTE NO DEST RUYA ESTE MANUAL El cleinte tiene la responsabilidad de que todo personal de operaciones y servicio lea y entienda este manual. Printed in U.S.A. ©2019 Illinois Tool Works Inc. Modelo CFN325XP 906300 B20580 906400 Modelo CF32...
Page 22 - Introducción; Manual de funcionamiento de la; LEER DETENIDA Y COMPLETAMENTE ESTE
2 Introducción Manual de funcionamiento de la clavadora Paslode Cordless El propósito de este manual es familiarizarlo con la clavadora de Paslode. A diferencia de otras herramientas mecánicas, la clavadora Paslode Cordless está accionada por un motor lineal de combustión interna, es decir, un motor...
Page 23 - Contenido
3 Tema ............................................................................. PáginaIntroducción................. ............................................................ 2Aspectos generales de la clavadora ....................................... 4Instrucciones de seguridad .................
Page 24 - NOTA: Si se excede esta velocidad, la clavadora se puede; Aspectos generales de la clavadora Paslode Cordless; CONJUNTO DEL MOTOR; NOTA
4 Descripción La clavadora Paslode Cordless contiene todo lo necesario para funcionar, es totalmente portátil y utiliza combustible líquido de hidrocarburos para accionar un motor especial de combustión interna de transmisión lineal. Para que usted comprenda la información de este manual, es necesar...
Page 25 - Instrucciones de seguridad; PELIGRO
5 Las siguientes instrucciones de seguridad se han incluido en este folleto para proporcionarle la información básica necesaria para que su clavadora Impulse Compact™ funcione sin peligro. NO INTENTE USAR ESTA HERRAMIENTA HASTA QUE HAYA LEÍDO Y COMPRENDIDO TODAS LAS ADVERTENCIAS DE SEGURIDAD Y LAS I...
Page 27 - ADVERTENCIA; INSTRUCCIONES DE SEGURIDAD
7 ADVERTENCIA Nunca trate de usar la clavadora en lugares que deba alcanzar con esfuerzo, ya que el retroceso puede hacer que pierda el equilibrio. Siempre esté pendiente de las orillas y los declives al clavar sobre tejados y otros lugares al- tos. Siempre colóquese de manera que estos peligros le ...
Page 28 - Notas importantes de carga; Batería y cargador de batería; Adaptador; Batería
8 INSTRUCCIONES PARA CARGAR LA BATERÍA: 1. 2. Saque la batería de la clavadora o del estuche e introduzca las terminales en el cargador. La luz roja se enciende indicando que la batería está cargando y se apaga la luz verde. NOTA Si la batería se ha descargado por completo, las luces roja y verde pu...
Page 29 - NOTA: Si la batería se queda dentro de la clavadora; Para colocar la batería; Instalación de batería
9 1. Introduzca la batería, con los contactos por delante, en la clavadora Paslode Cordless . 2. Empuje la batería totalmente hacia delante hasta que quede fija en su lugar. 3. Para sacar la batería, oprima hacia abajo la lengüeta de fijación y deslice la batería hacia fuera. NOTA: Si la batería se ...
Page 30 - Pila de Combustible para Pistola de; ¡ADVERTENCIA!; ¡PELIGRO!; Nunca intente recargar el cartucho! Reemplaze con; : La restricción de altura; Pila de Combustible para Pistola de Clavos Paslode
10 ¡PELIGRO! PELIGRO DE EXPLOSIÓN Y DE INCENDIO Lea TODAS las instrucciones de seguridad antes de cargar o de usar el cartucho de gas. Si no se siguen TODAS las instrucciones pueden producirse explosiones o incendios. Esto puede causar lesiones personales graves o daños a la propiedad. Mantenga el c...
Page 32 - Colocación de la Pila de Combustible
12 . we ar safet y glas ses Ro unDr ive Nails we ar sa fet y gl ass es Rou nDr ive Na ils we ar sa fet y gl ass es Rou nDr ive Na ils 1. Empuje hacia arriba.2. Tire hacia fuera. 1. Levántela. 2. Empuje hacia abajo. Colocación de la Pila de Combustible para Pistola de Clavos Paslode A. Para insertar ...
Page 33 - Preparación para usar la clavadora Paslode; Cómo descargar los clavos
13 PRECAUCIÓN La clavadora no debe ser usada en la lluvia o donde haya demasiada humedad. Si se usa la clavadora Paslode Cordless bajo estas condiciones se pueden dañar sus componentes y la clavadora se puede averiar. Característica de bloqueo La clavadora al aire libre Use la clavadora Paslode Cord...
Page 34 - Funcionamiento de la clavadora Paslode Cordless; Ajuste de la profundidad con que se clava; Saque el cartucho de gas antes de ajustar la profundidad; Gancho ajustable de Utilidad
14 PRESIONE EL ELEMENTO DE CONTACTO CON- TRA LA SUPERFICIE DE TRABAJO. El ventilador del motor arranca, el combus- tible se inyecta en la cámara de combustión y el ventilador lo mezcla con aire. APRIETE EL GATILLO. La bujía produce una chispa y se enciende la mezcla de combus- tible y aire. La combu...
Page 35 - Sujetadores y aplicaciones; Caña lisa - Para construcción en general, carpintería y para; GalvGaurdTM
15 N Ó I C A C I L P A O P I T O Ñ A M A T 2" x .113 (50 mm x 2.87) (6D) Caña común anillado Calzos, revestimientos exteriores, entablados de d e r a p e d s o d al b at n e ,o si p e d y o d aj et ) D 6 ( ) 7 8. 2 x m m 0 5 ( 3 1 1. x " 22-3/8" x .113 (60mm x 2.87) (6D) Caña común anill...
Page 36 - Revisión de la batería; Servicio; para encontrar su centro de reparaciones; Revisión de la Pila de Combustible para
16 Para desatorar la clavadora Un problema típico que puede encontrar es una clavadora con clavos atorados. Debido al diseño único de la clavadora Impulse, es muy sencillo sacar los clavos atorados:1. Retire la Pila de Combustible para Pistola de Clavos Paslode y la batería. 2. Asegure el transporta...
Page 37 - Filtro de aire; Accesorios Paslode Cordless; Aceite Lubricante Paslode Cordless - Pieza No. 401482; Clavadoras Paslode Cordless
17 Asegúrese de que los tornillos de montaje del cargador estén apretados y de que el cargador esté justo contra la punta. Si intenta disparar un clavo con el cargador suelto no tendrá control de los clavos, se puede dañar la clavadora o se pueden descargar los clavos contra usted. Filtro de aire Ab...
Page 38 - Durante el funcionamiento normal; Detección y corrección de fallas
18 Durante el funcionamiento normal SÍNTOMA POSIBLES PROBLEMAS SERVICIO Detección y corrección de fallas El elemento de contacto no se puede oprimir por completo - la clavadora no funciona. La clavadora no clava, pero el ventilador sí funciona. La luz indicadora está iluminada constantemente en verd...
Page 39 - SÍNTOMA; Para soporte técnico, contáctese con Paslode:
19 Detección y corrección de fallas Durante el funcionamiento normal SÍNTOMA POSIBLES PROBLEMAS SERVICIO La clavadora funciona correctamente, pero los clavos no penetran por completo. Es necesario ajustar el elemento de contacto. Ajuste el elemento de contacto. El nivel de combustible cartucho de ga...
Page 40 - Para ver el Manual del Procedimiento de Limpieza
20 Canada A Division of ITW Australia Pty LtdABN 63 004 235 063 PO Box 914 45 to 47 Williamson Road Ingleburn,1890 www.paslode.com.au Australia A Division of ITW New Zealand Ltd PO Box 100 303 NSMC 8 Orbit Drive Aukland, New Zealandwww.paslode.co.nz New Zealand USA An Illinois Tool Works Co. 155 Har...
Page 41 - Pour le manuel de procédure de nettoyage
20 Canada A Division of ITW Australia Pty Ltd ABN 63 004 235 063 PO Box 914 45 to 47 Williamson Road Ingleburn,1890 www.paslode.com.au Australia A Division of ITW New Zealand Ltd PO Box 100 303 NSMC 8 Orbit Drive Aukland, New Zealand www.paslode.co.nz New Zealand USA An Illinois Tool Works Co. 155 H...
Page 42 - Diagnostic de défaillance; Étape d’opération normale; Pour le support technique, veuillez; pour trouver votre centre de service le plus proche.
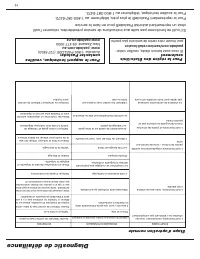
19 Diagnostic de défaillance Étape d’opération normale SYMPTOMES PROBLÈMES POSSIBLES ENTRETIEN L’outil fonctionne normalement, mais les attaches ne s’enfoncent pas complètement L’outil fonctionne irrégulièrement ou semble perdre de la force – la lampe témoin est verte L’outil fonctionne et plante le...
Page 43 - Préparation de l’outil – Problèmes de batterie ou de recharge
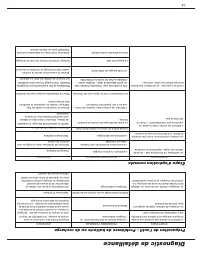
18 La batterie n’est pas chargée Plac er le tr ansport eur en lign e a vec le s a tta che s Diagnostic de défaillance Préparation de l’outil – Problèmes de batterie ou de recharge SYMPTOMES PROBLÈMES POSSIBLES ENTRETIEN SYMPTOMES PROBLÈMES POSSIBLES ENTRETIEN La batterie ne semble pas accepter une c...
Page 44 - Nettoyage et lubrification de l’outil; Outils; Entretien
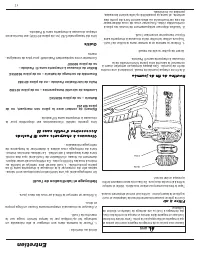
17 Boîtier de cloueuse à charpente sans fil Paslode – no de pièce 905607 Arrivé au domicile : 1. Placer la batterie dans son chargeur si elle nécessite un recharge tel qu’indiqué par la lampe témoin rouge sur le manche de l’outil. 2. Essuyer la cloueuse à charpente sans fil avec un linge propre et d...
Page 45 - Dégagement d’un blocage; Limiter l’entretien en chantier aux points suivants; Pile à carburant pour charpente Paslode
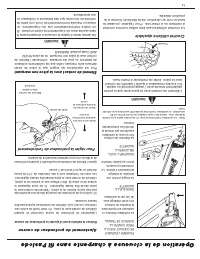
16 DANGER DANGER Enlever Dégagement d’un blocage Un problème occasionnel serait d’avoir un blocage d’attache. Grâce à la conception unique de la cloueuse à charpente sans fil, une attache bloquée est très facile à libérer. 1. Retirez la cellule et la pile à carburant pour charpente Paslode. 2. Verro...
Page 46 - Attaches et applications
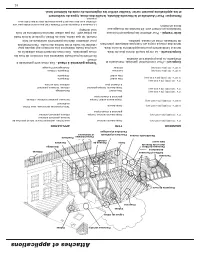
15 Corps bouclé commun sous finition, revêtement mural, toits et planches de terrasse, parement extérieur. Corps bouclé commun, trempe galvanisé à chaud et plus clôtures, parement extérieur Corps bouclé Toits et planches de terrasse, sous finition, revêtement Corps bouclé enduit, trempe galvanisé à ...
Page 47 - Crochet utilitaire ajustable; Enlever la batterie avant d’ajuster la profondeur de course; Élément de contact avec la pièce non marquant; Pour régler la profondeur de l’entraînement
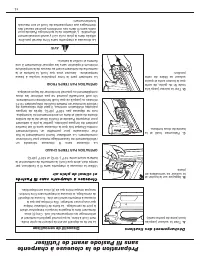
14 DANGER Arrêt de sonde POUSSER L’ÉLÉMENT DE CONTACT AVEC LA PIÈCE CONTRE LA SURFACE DE TRAVAIL Le ventilateur démarre, le carburant est injecté dans la chambre de combus - tion et est mélangé avec de l’air par le ventilateur TIRER SUR LA GACHETTE La bougie produit une étincelle, le mélange air/car...
Page 48 - Déchargement des fixations; B. Appuyez sur le bouton et; toute fin du guide, de sorte; Dispositif de verrouillage; et climat de plein air; OPERATION PAR TEMPS CHAUD
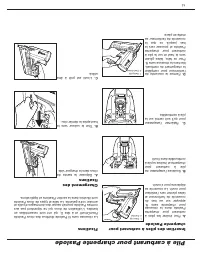
13 Préparation de la cloueuse à charpente sans fil Paslode avant de l’utiliser Déchargement des fixations A. Tirez le suiveur jusqu’au bout (zone de poche carré). B. Appuyez sur le bouton et le suiveur se verrouillera en place. C. Retournez l'outil et la bande de clous tombera. D. Tirer le suiveur j...
Page 49 - Insertion des piles à carburant pour; déplacera pour s’ouvrir.; D. Fermez le couvercle de; Fixations; A. Déposez la bande de; L’outil est
12 1. Swing Up 2. Push Down we ar safet y glas ses Ro unDrive Nails 1. Press Up 2. Pull Out we ar sa fet y gl ass es Rou nDr ive Na ils we ar sa fet y gl ass es Rou nDr ive Na ils Insertion des piles à carburant pour charpente Paslode A. Pour insérer les piles à carburant pour charpente Paslode dans...
Page 50 - Utiliser avant la date; Les piles à carburant pour charpente
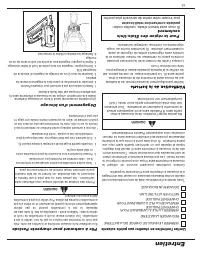
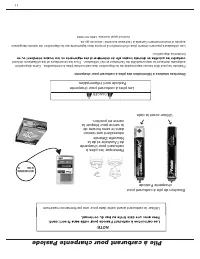
11 NOTE: DANGER Paslode ne peut être tenue responsable de la disposition des cartouches/piles à combustible. Cette disposition adéquate demeure la responsabilité de l’acheteur et de l’utilisateur. Tous les revendeurs et les utilisateurs doivent limitent la disposition. Les utilisateurs peuvent obten...
Page 51 - REMARQUE: Limitations en altitude
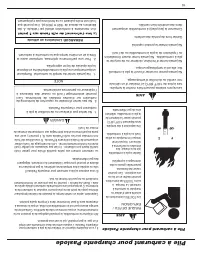
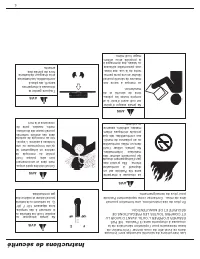
10 AVIS AVIS NOTE DANGER REMARQUE: Limitations en altitude d'un mécanisme à combustion affecté par l'altitude. À des élévations au-dessus de 1829 m (6000 pi), il se pourrait que l'outil soit moins puissant ou ne fonctionne pas cycliquement. RISQUE DE FEU / EXPLOSION Lire TOUTES le instructions de sé...
Page 52 - Système de recharge et batterie
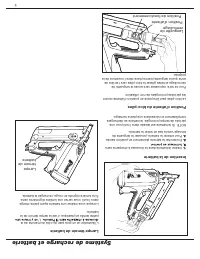
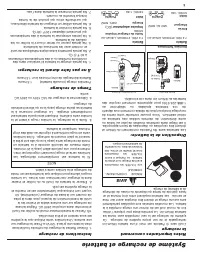
9 Insertion de la batterie 1. Insérer la batterie dans la cloueuse à charpente sans 2. Enclencher la batterie pleinement en position barrée. 3. Pour enlever la batterie, pousser la languette de blocage vers le bas et retirer la batterie. NOTE: Si la batterie est laissée dans l’outil pour une période...
Page 53 - NOTE; Impulse adaptateur; Batterie
8 NOTE Système de recharge et batterie Notes importantes concernant la recharge L’outil sans fil Paslode est muni d’une batterie lithium-ion rechargeable et de son propre système de recharge. Ce système de recharge est le seul compatible avec toutes les batteries lithium-ion. La première étape pour ...
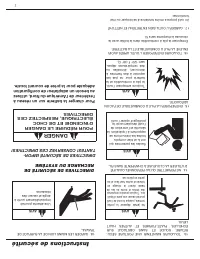
Page 54 - Instructions de sécurité; AVIS; DIRECTIVES DE SÉCURITÉ DE; POUR RÉDUIRE LE DANGER
7 Seules les personnes qui ont lu et bien compris toutes les instructions se rapportant à l’opération, la sécurité et l’entretien de l’outil devraient avoir le privilège d’opérer l’outil. 15. ENTREPOSER LA PILE À COMBUSTIBLE DE FACON ADÉQUOITE. DANGER Instructions de sécurité AVIS AVIS AVIS AVIS 13....
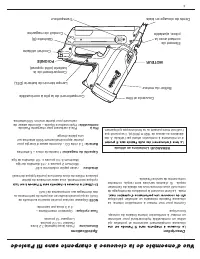
Page 57 - Capacité du magazine:; Pile à carburant pour charpente Paslode.; Spécifications; Couvercle et filtre; MOTEUR
4 Description Dimensions: Poids (avec batterie) 7.2 livres Hauteur 14-1/2 pouces Longueur 12 pouces Taux cyclique: Opération intermittente – 2 à 3 clous par seconde. Attaches: ruban papier collationné à 30° Minimum 2 pouces x .113 diamètre de tige Maximum 3-1/4 pouces x .131 diamètre de tige Capacit...
Page 58 - Contenu; Paslode® est un membre de:; Sujet
Contenu Introduction.............................. ......................................................... 2 Vue d’ensemble de la cloueuse à charpente sans fil Paslode.......... 4 Instruction de sécurité....................................................................... 5 ........................
Page 59 - Manuel de l’opérateur; LIRE LE MANUEL AU COMPLET DU DÉBUT À LA
2 Introduction Manuel de l’opérateur 1.LIRE LE MANUEL AU COMPLET DU DÉBUT À LA FIN AVANT D’UTILISER L’OUTIL. 2.SUIVEZ TOUTES LES INSTRUCTIONS DANS LE MANUEL. Mon représentant Paslode est: Nom Adresse Ville Province Code postal Numéro de téléphone Mon centre de service et de réparation est: Nom Adres...
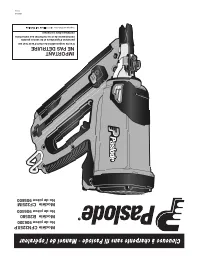
Page 60 - IMPORTANT; No de pièce; Modèle
2019 11/19 C'est la responsabilité du client d'avoir tout son personnel d'opérateurs et de service prendre connaissance de et se conformer aux instructions contenues dans ce manuel. IMPORTANT NE PAS DÉTRUIRE Imprimé aux États-Unis Modèle CFN325XP 906300 B20580 906400 Modèle CF325IM 905800 No de pièc...