Page 3 - Operating Instructions; Intended use ���������������������������������������� 8; Contents
3 Engli sh Operating Instructions (Household) AC/Rechargeable Beard Trimmer Model No. ER‑SB40 Thank you for purchasing this Panasonic product. Before operating this unit, please read these instructions completely and save them for future use� Safety precautions..................... 4 Intended use ��...
Page 4 - Safety precautions; Explanation of symbols; DANGER; IMPORTANT SAFETY INSTRUCTIONS; To reduce the risk of electric; WARNING
4 English Safety precautions To reduce the risk of injury, loss of life, electric shock, fire, and damage to property, always observe the following safety precautions. Explanation of symbols The following symbols are used to classify and describe the level of hazard, injury, and property damage caus...
Page 5 - Always attach plug to appliance first, then to; SAVE THESE INSTRUCTIONS; Power supply
5 Engli sh 3. Never operate this appliance when it has a damaged cord or plug, when it is not working properly, after it has been dropped or damaged, or after it has been dropped into water. Return the appliance to a service center for examination and repair. 4. Keep the cord away from heated surfac...
Page 6 - In case of an abnormality or malfunction
6 English WARNING Always ensure the appliance is operated on an electric power source matched to the rated voltage indicated on the AC adaptor� Fully insert the adaptor� ‑ Failure to do so may cause fire or electric shock. Always unplug the adaptor from a household outlet when cleaning� ‑ Failure to...
Page 7 - Take care of the following precautions as well; CAUTION; Protecting the skin
7 Engli sh WARNING ► Take care of the following precautions as well This appliance is not intended for use by persons (including children) with reduced physical, sensory or mental capabilities, or lack of experience and knowledge, unless they have been given supervision or instruction concerning use...
Page 8 - Handling of the removed battery when disposing; Intended use
8 English Handling of the removed battery when disposing DANGER The rechargeable battery is exclusively for use with this appliance� Do not use the battery with other products� Do not charge the battery after it has been removed from the product� • Do not throw into fire or apply heat. • Do not hit,...
Page 9 - Parts identification; Charging; Connect the appliance plug to the
9 Engli sh Parts identification a b c A Main body 1 Trimming height indication mark 2 Dial (Height adjustment control) 3 Power switch 4 Appliance socket 5 Water inlet 6 Lamp display a. Battery capacity lamp b. Switch lock lamp ( ) c. Charge status lamp ( ) B...
Page 10 - Disconnect the adaptor after charging is completed�; How to use; Mount the desired attachment and adjust the
10 English 3 Disconnect the adaptor after charging is completed� While charging After charging is completed The charge status lamp ( ) glows. The battery capacity lamp will blink in order of “LOW”, “MID”, and “HIGH” while the charging progresses. The battery capacity lamp and the charge status lamp ...
Page 11 - Press; Locking/unlocking the power switch; AC operation
11 Engli sh When the battery capacity is low “LOW” blinks when operating the appliance. The appliance beeps twice after switched off. You can trim approx. 5 minutes after “LOW” blinks. (This will differ depending on usage.) 3 Press when finished. Locking/unlocking the power switch ► Locking the powe...
Page 12 - Trimming height comb attachment; against the flow of the beard.
12 English Trimming height comb attachment (Trimming height: approx. 1 mm (1/32”) to 10 mm (13/32”)) • Actual hair length will be a little longer than the height you set. ► How to adjust the trimming height Turn the dial and adjust the trimming height indication mark ( a ) to the desired height� I...
Page 13 - Cleaning; With water; With the brush
13 Engli sh Cleaning •Clean the main body, blade and the attachment after each use. (If not cleaned, the motion will become poor and the sharpness will worsen.) •Turn the appliance off. •Remove the main body from the AC adaptor. With water ► Main body, blade and the attachment To remove light dirt T...
Page 14 - Lubrication
14 English Lubrication • Apply the oil to the blade before and after each use. 1 Remove the blade� (See this page�) 2 Apply a drop of the oil to each indicated point� 3 Attach the blade to the main body, turn on the power and allow to run for approximately 5 seconds� Removing and mounting the blade ...
Page 15 - Troubleshooting; Blade life
15 Engli sh Troubleshooting Perform the following actions. If the problems still cannot be solved, contact the store where you purchased the unit or a service center authorized by Panasonic for repair. Problem Action The power switch does not turn ON. Unlock the switch lock. (See page 11.) The appli...
Page 16 - Removing the built-in rechargeable battery; Specifications
16 English Removing the built-in rechargeable battery ATTENTION: A lithium ion battery that is recyclable powers the product you have purchased. Please call 1‑800‑8‑BATTERY for information on how to recycle this battery. Remove the built-in rechargeable battery before disposing the appliance� This f...
Page 19 - Mode d’emploi; Modèle; Identification des composants; Table des matières
19 Français Mode d’emploi Tondeuse à barbe rechargeable/CA (à usage domestique) Modèle ER‑SB40 Merci d’avoir choisi ce produit Panasonic. Avant de faire fonctionner cet appareil, veuillez lire toutes les instructions et les conserver pour une utilisation ultérieure� Consignes de sécurité �����������...
Page 20 - Consignes de sécurité; Explication des symboles; CONSIGNES DE SÉCURITÉ IMPORTANTES; Afin de réduire tout risque de; AVERTISSEMENT; Afin de réduire le risque de brûlures, d’incendie,
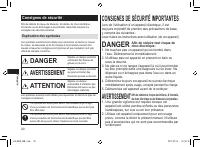
20 Français Consignes de sécurité Afin de réduire le risque de blessure, de décès, de choc électrique, d’incendie ou de dommages à la propriété, respectez toujours les consignes de sécurité suivantes. Explication des symboles Les symboles suivants sont utilisés pour répertorier et décrire le niveau ...
Page 21 - Retournez l’appareil à un centre de service pour le; CONSERVEZ LES PRÉSENTES CONSIGNES; Alimentation électrique
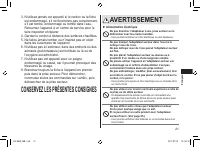
21 Français 3. N’utilisez jamais cet appareil si le cordon ou la fiche est endommagé, s’il ne fonctionne pas correctement, s’il est tombé, endommagé ou tombé dans l’eau. Retournez l’appareil à un centre de service pour le faire inspecter et réparer. 4. Gardez le cordon à distance des surfaces chauff...
Page 22 - En cas d’anomalie ou de dysfonctionnement; Ce produit
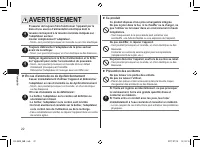
22 Français AVERTISSEMENT S’assurer de toujours faire fonctionner l’appareil par le biais d’une source d’alimentation électrique dont la tension correspond à la tension nominale indiquée sur l’adaptateur secteur� Insérer complètement l’adaptateur� ‑ Sinon, ceci pourrait provoquer un incendie ou un c...
Page 23 - Respecter également les consignes suivantes; ATTENTION; Protection de la peau; Veuillez tenir compte des précautions suivantes
23 Français AVERTISSEMENT ► Respecter également les consignes suivantes Cet appareil n’a pas été conçu pour être utilisé par des personnes (enfants y compris) souffrant d’un handicap physique, sensoriel ou mental, ou ne disposant pas de l’expérience et des connaissances nécessaires à une utilisation...
Page 24 - Manutention de la pile retirée lors de la mise au rebut; Usage prévu
24 Français Manutention de la pile retirée lors de la mise au rebut DANGER La pile rechargeable s’utilise uniquement avec cet appareil� Ne pas utiliser la pile avec un quelconque autre appareil� Ne pas recharger la pile une fois qu’elle a été retirée de l’appareil� • Ne pas la jeter au feu ou la sou...
Page 25 - Préparatifs; Recharge; Raccordez la fiche du cordon
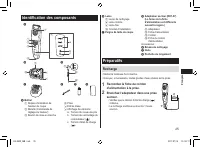
25 Français Identification des composants a b c A Boîtier 1 Repère d’indication de hauteur de coupe 2 Molette (Commande de réglage de hauteur) 3 Bouton de mise en marche 4 Prise 5 Entrée d’eau 6 Affichage des témoins a. Témoin du niveau de pile b. Témoin de ...
Page 26 - Débranchez l’adaptateur une fois la recharge terminée�; Instructions d’utilisation; Installez l’accessoire souhaité et réglez la hauteur de
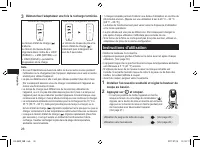
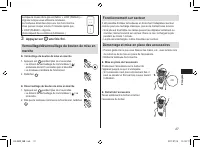
26 Français 3 Débranchez l’adaptateur une fois la recharge terminée� Pendant le chargement Une fois le chargement terminé Le témoin d’état de charge ( ) s’allume. Le témoin du niveau de pile clignotera dans l’ordre de « LOW (FAIBLE) », « MID (MOYEN) » et « HIGH (ÉLEVÉ) » pendant la progression de la...
Page 27 - Appuyez sur; Verrouillage/déverrouillage du bouton de mise en; Fonctionnement sur secteur
27 Français Lorsque le niveau de la pile est faible, « LOW (FAIBLE) » clignote lorsque vous utilisez la tondeuse. La tondeuse émet deux bips une fois hors marche. Vous pouvez couper environ 5 minutes après que « LOW (FAIBLE) » clignote. (Cela dépend des conditions d’utilisation.) 3 Appuyez sur une f...
Page 28 - Peigne de taille de coupe; Sans l’accessoire
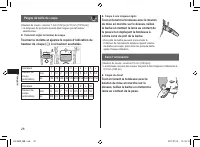
28 Français Peigne de taille de coupe (Hauteur de coupe : environ 1 mm (1/32 po) à 10 mm (13/32 po)) • La longueur du poil sera à peine plus longue que la hauteur sélectionnée. ► Comment régler la hauteur de coupe Tournez la molette et ajustez le repère d’indication de hauteur de coupe ( a ) à la ha...
Page 29 - Nettoyage; Avec de l’eau
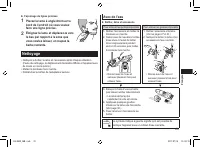
29 Français ► Façonnage de lignes précises 1 Placez la lame à angle droit sur le bord de l’endroit où vous voulez faire une ligne précise� 2 Éloignez la lame et déplacez-la vers le bas par rapport à la zone que vous voulez laisser, et coupez la barbe restante� Nettoyage • Nettoyez le boîtier, la lam...
Page 30 - Avec la brosse; Lubrification
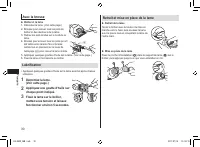
30 Français Avec la brosse ► Boîtier et la lame 1. Démontez la lame. (Voir cette page.) 2. Brossez pour enlever tous les poils du boîtier et des alentours de la lame. 3. Retirez les poils tondus sur le bord de la lame. 4. Brossez pour enlevez tous les poils qui ont été taillés entre la lame fixe et ...
Page 31 - Dépannage; Durée de vie de la lame
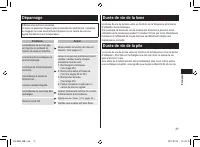
31 Français Dépannage Effectuez les actions suivantes. Si vous ne parvenez toujours pas à résoudre les problèmes, contactez le magasin où vous avez acheté l’appareil ou un centre de service agréé Panasonic pour la réparation. Problème Action La tondeuse ne se met pas en marche en activant le bouton ...
Page 32 - Retrait de la pile rechargeable intégrée
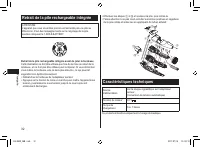
32 Français Retrait de la pile rechargeable intégrée ATTENTION: L’appareil que vous vous êtes procuré est alimenté par une pile au lithium‑ion. Pour des renseignements sur le recyclage de la pile, veuillez composer le 1‑800‑8‑BATTERY. Retrait de la pile rechargeable intégrée avant de jeter la tondeu...
Page 35 - Instrucciones de funcionamiento; Vida de la batería �������������������������������������� 47; Contenido
35 Español Instrucciones de funcionamiento (Electrodoméstico) Recortador de barba recargable/CA Modelo n.º ER‑SB40 Gracias por comprar este producto Panasonic. Antes de poner esta unidad en funcionamiento, lea las instrucciones en su totalidad y guárdelas para su uso en el futuro� Precauciones de se...
Page 36 - Precauciones de seguridad; Explicación de los símbolos; ADVERTENCIA; PRECAUCIÓN; INSTRUCCIONES DE SEGURIDAD IMPORTANTES; Al utilizar un dispositivo eléctrico, se requiere seguir; PELIGRO; Para reducir el riesgo de; Excepto cuando lo esté cargando, desenchufe siempre; ADVERTENCIA; Para reducir el riesgo de quemaduras, fuego,
36 Español Precauciones de seguridad Para reducir el riesgo de sufrir lesiones, descargas eléctricas, o incluso el fallecimiento, y de provocar un incendio o daños en la propiedad, cumpla siempre las precauciones de seguridad que figuran a continuación. Explicación de los símbolos Los siguientes sím...
Page 37 - Nunca utilice el dispositivo si tiene el cordón o el; GUARDE ESTAS INSTRUCCIONES; Alimentación
37 Español 3. Nunca utilice el dispositivo si tiene el cordón o el enchufe dañado, si no funciona correctamente, o si se ha caído, dañado o mojado. Devuelva el dispositivo a un centro de servicio para examinarlo y repararlo. 4. Mantenga el cable alejado de las superficies calientes. 5. Nunca deje ca...
Page 38 - En caso de anomalía o fallo de funcionamiento
38 Español ADVERTENCIA Asegúrese siempre de que el aparato esté operando desde una fuente de energía eléctrica acorde con la tensión nominal indicada en el adaptador de CA. Introduzca completamente el adaptador� ‑ De lo contrario, podría provocar un incendio o sufrir una descarga eléctrica. Desenchu...
Page 39 - Asegúrese también de tomar las siguientes precauciones; Proteger la piel; Tenga en cuenta las siguientes precauciones
39 Español ADVERTENCIA ► Asegúrese también de tomar las siguientes precauciones Este aparato no debe ser utilizado por personas (incluyendo niños) con capacidades físicas, sensoriales o mentales reducidas, o con falta de conocimiento y experiencia, a menos que se encuentren bajo supervisión o bajo i...
Page 40 - Manipulación de la batería extraída para la eliminación; Uso previsto
40 Español Manipulación de la batería extraída para la eliminación PELIGRO La batería recargable debe utilizarse exclusivamente con este aparato� No utilice la batería con otros productos� No cargue la batería una vez retirada del producto� • No la arroje al fuego ni le aplique calor� • No la golpee...
Page 41 - Identificación de las piezas; Preparación; Carga; Conecte la clavija del aparato en el
41 Español Identificación de las piezas a b c A Cuerpo principal 1 Marca indicativa de longitud de corte 2 Dial (Control de ajuste de altura) 3 Interruptor de encendido 4 Receptáculo de clavija 5 Entrada de agua 6 Pantalla de lámpara a. Luz indicadora de la ...
Page 42 - Forma de uso; Coloque el accesorio deseado y ajuste la longitud de
42 Español 3 Desconecte el adaptador una vez que se haya completado la carga� Durante la carga Cuando la carga se haya completado El piloto indicador de estado de carga ( ) se ilumina. La luz indicadora de la capacidad de batería parpadeará en el orden “LOW (BAJA)”, “MID (MEDIA)” y “HIGH (ALTA)” mie...
Page 43 - Pulse cuando termine�; Bloquear/desbloquear el interruptor de encendido; Funcionamiento con CA
43 Español Si la capacidad de la batería es baja, parpadeará “LOW (BAJA)” cuando utilice el aparato. El aparato emite dos pitidos después de apagarlo. Puede recortar durante aprox. 5 minutos después de que parpadee “LOW (BAJA)”. (Esto puede variar dependiendo de la utilización.) 3 Pulse cuando termi...
Page 44 - Longitud de corte del accesorio de peine; desplazando el aparato en la dirección; Sin el accesorio
44 Español Longitud de corte del accesorio de peine (Longitud de corte: aprox. de 1 mm (1/32”) a 10 mm (13/32”)) • La longitud real del pelo será un poco superior a la altura que defina. ► Cómo ajustar la longitud de corte Gire el dial y ajuste la marca indicativa de longitud de corte ( a ) en la po...
Page 45 - Limpieza; Con agua; Con el cepillo
45 Español Limpieza • Limpie el cuerpo principal, la cuchilla y el accesorio después de cada uso. (Si no están limpios, el movimiento se debilita y empeora el afilado). • Apague el aparato. • Retire el cuerpo principal del adaptador de CA. Con agua ► Cuerpo principal, cuchilla y accesorio Para elimi...
Page 46 - Lubricación; Remoción y montaje de la cuchilla
46 Español Lubricación • Aplique el aceite en la cuchilla antes y después de cada uso. 1 Retire la cuchilla� (Consulte esta página�) 2 Aplique una gota de aceite en cada punto indicado� 3 Coloque la cuchilla en el cuerpo principal, enciendalo y deje que funcione durante aproximadamente 5 segundos� R...
Page 47 - Solución de problemas; Duración de la cuchilla
47 Español Solución de problemas Realice las siguientes acciones. Si los problemas persisten, póngase en contacto con el establecimiento en el que adquirió la unidad o con un servicio técnico autorizado por Panasonic para su reparación. Problema Acción El interruptor de encendido no se enciende. Des...
Page 48 - Extracción de la batería recargable interna; Especificaciones
48 Español Extracción de la batería recargable interna ATENCIÓN: El producto que ha comprado se alimenta con una batería de iones Litio reciclable. Llame al teléfono 1-800-8-BATTERY para obtener información acerca de cómo reciclar la batería. Extraiga la batería recargable integrada antes de desecha...
Page 50 - MEMO












 Panasonic SA-XR58 Manual
 Panasonic SA-XR59 Manual
 Panasonic SA-XR70 Manual
 Panasonic SA-XR700 Manual
 Panasonic SB-AK780 Manual
 Panasonic SB-HEP10 Manual
 Panasonic SC-AK25 User Manual
 Panasonic SC-AK220 Manual
 Panasonic SC-AK750 Manual
 Panasonic SC-AK770 Manual
 Panasonic SC-AKX18 Manual
 Panasonic SC-AKX56 Manual