Panasonic FV 0511VFL1 - Manual

This Installation Manual covers Panasonic’s ceiling radiation damper (model PC-RD05C5), designed to reduce radiant heat transfer in HVAC systems, particularly with Whisper-series fans. Key topics include mounting configurations–such as securing the damper to fan housings and ceiling structures–using UL-certified hardware for both non-combustible and combustible ceilings, and ensuring compatibility with specific wood truss designs. The manual emphasizes horizontal installation and highlights UL555C certification requirements across various fan models.


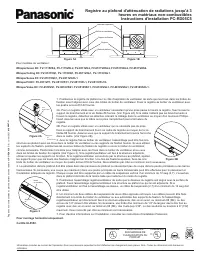
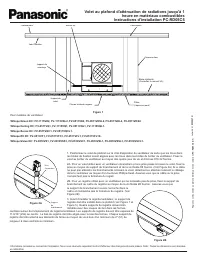

Table of Contents:
- Page 1 – Damper Installation with Fan Mounting
- Page 2 – Damper Installation with Whisper Fans
- Page 3 – Mounting Brackets and Structural Compatibility
- Page 4 – Non-combustible Ceiling Radiation Cover Installation
- Page 5 – Radiant Ceiling Panel Mounting
- Page 6 – Combustible Ceiling Radiation Cover Installation
- Page 7 – Ceiling Register Attenuation Mounting
- Page 8 – Radiation Attenuation Shutter Installation
- Page 9 – Damper Mounting and Structural Certification
1. Position the ceiling radiation damper on the inlet side of the fan such that the holes in the damper mounting
flanges line up with the holes in the flange of the fan housing. Secure the damper to the fan housing using the four
#10-32 machine screws/nuts supplied.
2A. For a damper used with a fan requiring a plug connector to pass through the damper, secure the plug
connector using the wiring bracket and #8 course threaded screw supplied. (See Figure 2A) If the plug connector
cannot reach through the damper to the grill plug attachments, release the clips holding the wiring inside the fan
with a Phillips-Head screwdriver. make sure the wire lead or plug connector does not interfere with the closing of
the damper.
2B. For a damper used with a fan that does not require a plug connector, secure
the wiring bracket supplied to the damper frame using the supplied #8 course
threaded screw supplied. Make sure the wiring bracket covers the notch in the
frame. (See Figure 2B).
3. With the damper secured to the fan housing, the assembly can be attached to
the structure above using the holes in the fan housing flange or the supplied mounting brackets. If the mounting
brackets are used, position the mounting brackets under the damper mounting flanges or under the fan housing
flange as required. Position the slot so it aligns with the holes in the fan housing and/or the holes in the damper
mounting flanges (See Figure 3). If the damper/fan is being attached to the adjacent structure, the brackets must
be used and adjusted to fit accordingly. If the damper/fan is supported from structure above, the brackets should
be adjusted so the ends of the brackets align accordingly. Once the brackets are adjusted, attach them to the
flange of the fan housing using four #10-32 screws and nuts supplied. A minimum of two fasteners per side is
required.
4. The ceiling penetration should be located within ceiling tiles or panels without necessitating cuts in the ceiling suspension main runners or cross
tees. If required, a maximum of one runner or cross tee may be cut to enable proper damper location and installation. Each cut end shall be supported
by a min. 12 swg (2.7) vertical hanger wire. The opening in the ceiling should be the same size as the outside of
the damper frame.
5. Position the damper/fan assembly such that the bottom edge of the damper is flush with the finished surface of
the ceiling. Attach the damper/fan assembly to the structure above or adjacent to it. If the damper/fan is being
attached to the assembly above, a minimum of 12 swg. (2.7) hanger wire must be used. A minimum of two hanger
wires on two opposite sides are required. The hanger wires can be attached directly to the fan housing flange or to
the ends of the mounting brackets. If the damper/fan assembly is being directly mounted to the adjacent structure, a
minimum #8 (M4) sheet metal screws or 1/2" dia. bolts/nuts must be used. If necessary, a min. 1/2" wide flange is
to be attached to the damper using a minimum #8 (M4) sheet metal screw, 3/16" pop rivets, welds or bolts at 6"
(152) o.c. maximum. A minimum of 2 connections per side is required.
6. For other installation details see Panasonic Installation Instructions.
For horizontal mount only.
Certified to UL555C.
Up to 3 hour non-combustible assemblies
ceiling radiation damper
PC-RD05C5 installation instructions
N
on
-C
om
bu
st
ib
le
C
ei
lin
g
R
ad
ia
tio
n
D
am
pe
rs
P
C
-R
D
05
C
5
(1
/9
)
M
-5
44
47
-H
Information is correct at time of printing. However, we reserve the right to make changes without notice. Note: All dimensions are shown in () millimeters..
For fan model:
Plug
Connector
Wiring
Bracket
L I
S T I N G
S
E R V I C E
ST
AT
E O
F CAL IFOR
NIA
ST
AT
E FIR E M ARS H
A L
L
C
Fan Housing
Flange
Mounting
Brackets
Hanger Wire
Fan Housing
Damper
Mounting Bracket
Ceiling Tile
Figure 1A
Figure 1B
Figure 2A
Figure 2B
Figure 3
SEE DETAILS ON UL
CLASSIFICATION
MARKING ON
ENCLOSED PRODUCT
®
UL
CLASSIFIED
®
UL
CLASSIFIED
WhisperGreen DC: FV-1115VK2, FV-1115VKL2, FV-0511VK2, FV-0511VKSL2, FV-0511VKL2, FV-0511VKS2.
WhisperCeiling DC: FV-0511VQ1, FV-1115VQ1, FV-0511VQL1, FV-1115VQL1.
WhisperSense DC: FV-0511VQC1, FV-0511VQCL1.
WhisperFit DC: FV-0511VF1, FV-0511VFC1, FV-0511VFL1, FV-0511VFL1K.
WhisperValue DC: FV-0510VS1, FV-0810VSS1, FV-0510VSC1, FV-0510VSL1, FV-0810VSSL1, FV-0510VSCL1.
July 2021
"Loading the manual" means you need to wait until the file loads and becomes available for online reading. Some manuals are very large, and the time they take to appear depends on your internet speed.
Was this manual helpful?
About this manual
- Brand
- Panasonic
- Model
- FV 0511VFL1
- Document type
- Manual
- Language(s)
- English, Spanish, French
- Pages
- 9
- File size
- 1.1 MB
- Format
Other Manuals for Panasonic FV 0511VFL1
Summary
Installation instructions for mounting the PC-RD05C5 ceiling radiation damper, including component placement, wiring, securing to fan housing, and handling ceiling penetrations.
Installation procedures for the PC-RD05C5 ceiling radiation damper when used with Whisper series fan models, detailing placement relative to ceiling components and wiring bracket installation.
Instructions for mounting brackets, securing the damper to the fan housing, installing drywall support assemblies, and specifying compatible UL-rated wood truss floor/ceiling designs. The product is certified for horizontal mounting only.
Ask a question
Related manuals
Popular Panasonic Other


More Panasonic Other models
 Panasonic FV-1115VK3 User Manual
 Panasonic FV 04VE1 User Manual
 Panasonic FV 0510VS1 Manual
 Panasonic FV 0510VSC1 User Manual
- Panasonic FV 0510VSL1 Manual
 Panasonic FV 0511VF1 Manual
 Panasonic FV 0511VK2 Manual
 Panasonic FV 0511VKS2 Manual
 Panasonic FV 0511VKSL2 Manual
 Panasonic FV 0511VQ1 Manual
 Panasonic FV 0511VQC1 Manual
 Panasonic FV 0511VQL1 Manual