Page 3 - IMPORTANT SAFEGUARDS; WARNING
2 3 ninjakitchen.com ninjakitchen.com IMPORTANT SAFEGUARDS HOUSEHOLD USE ONLY • READ ALL INSTRUCTIONS BEFORE USE Read and review instructions for operation and use . Take care to avoid contacts with hot surface . Always use hand protection to avoid burns . For indoor and household use only . Read al...
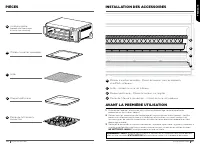
Page 4 - ACCESSORY PLACEMENT
4 ninjakitchen.com 5 ninjakitchen.com PARTS BEFORE FIRST USE 1 Remove and discard any packaging material, promotional labels, and tape from the unit. 2 Remove all accessories from the package and read this manual carefully. Please pay particular attention to operational instructions, warnings, and i...
Page 5 - USING THE CONTROL PANEL
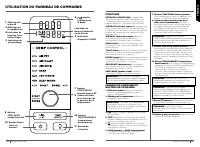
7 ninjakitchen.com CONTROL PANEL DISPLAY & OPERATING BUTTONS 1 Time display: Shows the cook time. The time will count down when cooking is in progress. 2 Temperature display: Shows the cook temperature. 3 PRE flashes when the unit is preheating. 4 will appear on the time display when the unit is...
Page 6 - USING YOUR FOODITM DIGITAL AIR FRY OVEN; or; POWER CORD MANAGEMENT
8 9 ninjakitchen.com ninjakitchen.com USING THE COOKING FUNCTIONS To turn on the unit, plug the power cord into the wall, flip oven down into cooking position, and press the button. Air Fry1 To select the function, turn the dial until AIR FRY illuminates. The default time and temperature settings wi...
Page 8 - USING YOUR FOODITM
12 13 ninjakitchen.com ninjakitchen.com Bagel1 To select the function, turn the dial until BAGEL illuminates. The default number of slices and darkness level will display. 2 Press the TIME/SLICE button and use the dial to select the number of slices. You may toast up to 6 bagel slices at once. To se...
Page 9 - ACCESSORIES FOR PURCHASE
14 15 ninjakitchen.com ninjakitchen.com 15 ninjakitchen.com We offer a suite of accessories custom made for your Ninja® Foodi™ Digital Air Fry Oven. Visit ninjaaccessories.com to expand your capabilities and take your cooking to the next level. • Broiling Rack • Casserole Dish/Baking Pan (2" dee...
Page 10 - TROUBLESHOOTING; REPLACEMENT PARTS
16 ninjakitchen.com 17 ninjakitchen.com The One (1) Year Limited Warranty applies to purchases made from authorized retailers of SharkNinja Operating LLC . Warranty coverage applies to the original owner and to the original product only and is not transferable.SharkNinja warrants that the unit shall...
Page 12 - CONSIGNES DE SÉCURITÉ IMPORTANTES; AVERTISSEMENT
20 21 ninjakitchen.com ninjakitchen.com CONSIGNES DE SÉCURITÉ IMPORTANTES POUR USAGE DOMESTIQUE UNIQUEMENT • VEUILLEZ LIRE TOUTES LES INSTRUCTIONS AVANT UTILISATION Lisez et étudiez les instructions de fonctionnement et d’utilisation . Prenez soin d’éviter de toucher toute surface chaude . Protégez-...
Page 13 - INSTALLATION DES ACCESSOIRES
22 ninjakitchen.com 23 ninjakitchen.com PIÈCES AVANT LA PREMIÈRE UTILISATION 1 Enlevez de l’appareil et éliminez tout matériau d’emballage, toute étiquette de promotion et tout ruban adhésif. 2 Retirez tous les accessoires de l’emballage et lisez ce manuel attentivement. Veuillez porter une attenti...
Page 14 - UTILISATION DU PANNEAU DE COMMANDE
25 ninjakitchen.com PANNEAU DE COMMANDE ET BOUTONS DE COMMANDE 1 Affiche de la durée : Montre la durée de cuisson. La durée apparaîtra lorsque la cuisson commencera. 2 Affichage de la température : Montre la température de cuisson. 3 PRE clignote lorsque l’appareil est en mode préchauffage. 4 appara...
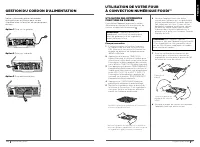
Page 15 - UTILISATION DE VOTRE FOUR; ou; GESTION DU CORDON D’ALIMENTATION
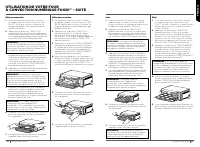
26 27 ninjakitchen.com ninjakitchen.com UTILISATION DES DIFFÉRENTES FONCTIONS DE CUISSON Pour allumer l’appareil, branchez le cordon d’alimentation, mettez le four en position de cuisson, et appuyez sur le bouton . Frire par convection1 Pour sélectionner la fonction, tournez le cadran jusqu’à ce qu...
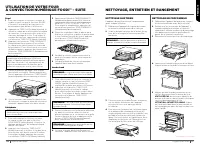
Page 17 - NETTOYAGE, ENTRETIEN ET RANGEMENT
30 31 ninjakitchen.com ninjakitchen.com NETTOYAGE EN PROFONDEUR 1 Débranchez l’appareil de la prise de courant et laissez-le refroidir avant de le nettoyer. 2 Retirez tous les accessoires de l’appareil, y compris le plateau à miettes, et lavez-les séparément. Utilisez une brosse de nettoyage non ab...
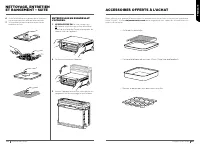
Page 18 - ACCESSOIRES OFFERTS À L’ACHAT; NETTOYAGE, ENTRETIEN
32 33 ninjakitchen.com ninjakitchen.com 33 Nous offrons une gamme d’accessoires sur mesure pour votre four à convection numérique Ninja® Foodi™. Visitez ninjaaccessories.com pour augmenter vos capacités et améliorer vos talents de cuisinier. • Grille de la lèchefrite • Casserole/plaque de cuisson (5...
Page 19 - DÉPANNAGE; PIÈCES DE RECHANGE; FAQ
34 35 ninjakitchen.com ninjakitchen.com 34 35 La garantie limitée d’un (1) an s’applique aux achats effectués auprès de détaillants autorisés de SharkNinja Operating LLC . La garantie s’applique uniquement au premier propriétaire et au produit original et n’est pas transférable.SharkNinja garantit c...
Page 21 - SALVAGUARDAS IMPORTANTES; ADVERTENCIA
38 39 ninjakitchen.com ninjakitchen.com SALVAGUARDAS IMPORTANTES SOLO PARA USO DOMÉSTICO • LEA TODAS LAS INSTRUCCIONES ANTES DE USAR Lea y repase las instrucciones de uso y funcionamiento . Tenga cuidado de evitar el contacto con la superficie caliente . Siempre use protección para las manos a fin d...
Page 22 - COLOCACIÓN DE LOS ACCESORIOS
PIEZAS ANTES DEL PRIMER USO 1 Retire y descarte todo el material de embalaje, las etiquetas promocionales y la cinta de la unidad. 2 Retire todos los accesorios del embalaje y lea detenidamente este manual. Preste particular atención a las instrucciones de funcionamiento, las advertencias y las medi...
Page 23 - CÓMO UTILIZAR EL PANEL DE CONTROL
43 ninjakitchen.com PANTALLA DEL PANEL DE CONTROL Y BOTONES DE FUNCIONAMIENTO 1 Visualizador de tiempo: Muestra el tiempo de cocción. Cuando se esté realizando l a cocción, el tiempo avanzará en una cuenta regresiva. 2 Visualizador de temperatura: Muestra la temperatura de cocción. 3 PRE (precalenta...
Page 24 - CÓMO USAR EL HORNO DIGITAL
44 45 ninjakitchen.com ninjakitchen.com CÓMO USAR LAS FUNCIONES DE COCCIÓN Para encender la unidad, enchufe el cable de alimentación al tomacorriente, voltee el horno a la posición horizontal de cocción y presione el botón . Air Fry (freír con aire caliente)1 Para seleccionar la función, gire el dia...
Page 25 - CÓMO USAR EL HORNO DIGITAL PARA FREÍR
46 47 ninjakitchen.com ninjakitchen.com CÓMO USAR EL HORNO DIGITAL PARA FREÍR CON AIRE CALIENTE FOODI™ (CONT .) Hornear 1 Para seleccionar la función, gire el dial hasta que se ilumine BAKE (hornear). Se mostrarán los ajustes de tiempo y temperatura predeterminados. 2 Presione el botón TIME/SLICE (t...
Page 26 - LIMPIEZA, MANTENIMIENTO
48 49 ninjakitchen.com ninjakitchen.com LIMPIEZA PROFUNDA 1 Desenchufe la unidad del tomacorriente y deje que se enfríe antes de limpiarla. 2 Retire todos los accesorios de la unidad, inclusive la bandeja para migas, y lávelos por separado. Use un cepillo de limpieza no abrasivo para lavar más a fon...
Page 27 - ACCESORIOS PARA COMPRAR
50 51 ninjakitchen.com ninjakitchen.com 51 Ofrecemos una línea de accesorios a medida para su horno digital para freír con aire caliente Ninja® Foodi™. Visite ninjaaccessories.com para ampliar sus destrezas y llevar sus habilidades culinarias al siguiente nivel. • Estante para asar a la parrilla • B...
Page 28 - SOLUCIÓN DE PROBLEMAS; PIEZAS DE REPUESTO; MENSAJES DE ERROR; PREGUNTAS FRECUENTES
53 ninjakitchen.com 52 ninjakitchen.com ninjakitchen.com La garantía limitada de un (1) año se aplica a las compras realizadas a los vendedores minoristas autorizados de SharkNinja Operating LLC . La cobertura de garantía se aplica solo al propietario y al producto originales, y no puede transferirs...