Page 2 - L A N G U A G E I N D E X
www.newair.com 2 L A N G U A G E I N D E X English Manual ..................................................................................................... 3 Manuel en Français ............................................................................................ 39 Manual en Español.........
Page 3 - EN; A Name You Can Trust; Count on Newair; A team member will respond to you within 24 hours.
EN www.newair.com 3 A Name You Can Trust Trust should be earned and we will earn yours. Customer happiness is the focus of our business. From the factory to the warehouse, from the sales floor to your home, the whole Newair family promises to provide you with innovative products, exceptional service...
Page 4 - EAD AND SAVE THESE INSTRUCTIONS; T A B L E O F C O N T E N T S; Limited Manufacturer’s Warranty
EN www.newair.com 4 R EAD AND SAVE THESE INSTRUCTIONS . T A B L E O F C O N T E N T S LANGUAGE INDEX ................................................................................................ 2 Table Of Contents .....................................................................................
Page 5 - S P E C I F I C A T I O N S
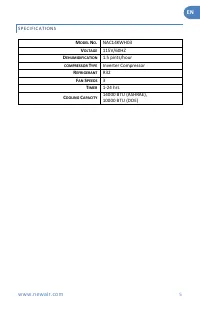
EN www.newair.com 5 S P E C I F I C A T I O N S M ODEL N O . NAC14KWH03 V OLTAGE 115V/60HZ D EHUMIDIFICATION 1.5 pints/hour COMPRESSOR T YPE Inverter Compressor R EFRIGERANT R32 F AN S PEEDS 3 T IMER 1-24 hrs C OOLING C APACITY 14000 BTU (ASHRAE), 10000 BTU (DOE)
Page 6 - R E G I S T E R Y O U R P R O D U C T O N L I N E; record the following information, located on the
EN www.newair.com 6 R E G I S T E R Y O U R P R O D U C T O N L I N E Register Your Newair Product Online Today! Take advantage of all the benefits product registration has to offer: Service and Support Diagnose troubleshooting and service issues faster and more accurately Recall Notifications Stay ...
Page 7 - WARNING
EN www.newair.com 7 S A F E T Y I N F O R M A T I O N & W A R N I N G S VERY IMPORTANT: Please do not install or use your portable air conditioner before you have carefully read this manual. Please keep this instruction manual for future reference and warranty purposes. WARNING • Do not attempt ...
Page 9 - The symbol shown to the right indicates that
EN www.newair.com 9 • Children should be supervised to ensure that they do not play with the appliance. • If power supply cord is damaged, it must be replaced by the manufacturer, a service agent, or a similarly qualified person to avoid hazard. • This appliance can be operated by children aged 8 ye...
Page 10 - Impedance declaration:; These appliances can be connected only to a supply
EN www.newair.com 10 • Do not turn the unit on or off by inserting or pulling on the power supply cord, as this may cause electric shock or fire. • Power off and unplug the unit if strange sounds, odors, or smoke emits from it. • Impedance declaration: These appliances can be connected only to a sup...
Page 12 - A C C E S S O R I E S
EN www.newair.com 12 A C C E S S O R I E S Part Description Quantity Exhaust hose 1 Window connector 1 Housing adaptor 1 Remote control 1 Window Kit 1 Water pipe 1 After unpacking, please check that the above-mentioned accessories are included and review their purposes in the installation section of...
Page 13 - A S S E M B L Y & I N S T A L L A T I O N
EN www.newair.com 13 A S S E M B L Y & I N S T A L L A T I O N I N S T A L L A T I O N • For proper installation, this appliance should be installed on a level surface. Ensure that the air outlet is not blocked and that all sides of the appliance are clear by at least 1 ft. (see Fig.8). • This a...
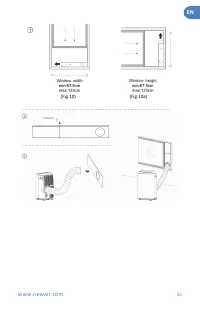
Page 14 - I N T R O D U C T I O N T O E X H A U S T H O S E I N S T A L L A T I O N; Temporary installation; Place the other end of the exhaust hose on a nearby windowsill.; Window Slider Kit Installation; height and affix it with the dowel.
EN www.newair.com 14 I N T R O D U C T I O N T O E X H A U S T H O S E I N S T A L L A T I O N Fig.9 Temporary installation 1. Twist both ends of the exhaust hose into the square fixing clip and the flat fixing clip. 2. Insert the square fixing clip into the openings on the back of the air condition...
Page 16 - W A T E R T R A Y F U L L A L A R M
EN www.newair.com 16 W A T E R T R A Y F U L L A L A R M The water tray inside the air conditioner has a water level safety switch that controls the water level. When the water level reaches a specified height, the associated indicator light will illuminate. (If water pump is damaged, when the water...
Page 17 - O P E R A T I N G I N S T R U C T I O N S; Cooling only model; Cooling
EN www.newair.com 17 O P E R A T I N G I N S T R U C T I O N S A P P E A R A N C E A N D F U N C T I O N O F C O N T R O L P A N E L Cooling only model A Power on/off 1 Cooling B Fan speed 2 Dehumidifying C Temperature up 3 Fan D Temperature down 4 High fan speed E Operation mode 5 Medium fan speed ...
Page 18 - A P P E A R A N C E A N D F U N C T I O N O F R E M O T E C O N T R O L
EN www.newair.com 18 A P P E A R A N C E A N D F U N C T I O N O F R E M O T E C O N T R O L 1 Power on/off 2 Timer on/off 3 Operating mode 4 °C / °F 5 Temperature up 6 Temperature down 7 LED display 8 Oscillate 9 Fan speed 10 Sleep mode 1 Receiver signal 2 Cooling 3 Dehumidifying 4 Fan 5 Heating (n...
Page 19 - the window position as needed (see detailed instructions above).; B E F O R E U S I N G; Operation temperature range:; Maximum cooling
EN www.newair.com 19 O P E R A T I N G I N S T R U C T I O N S I N T R O D U C T I O N Before operating this appliance: 1) Find a place with a power supply nearby. 2) As shown in Fig.5 and Fig.5a, install the exhaust hose securely and adjust the window position as needed (see detailed instructions a...
Page 20 - CAUTION; Ensure that unit’s the power supply meets the above specified; C O O L I N G O P E R A T I O N; To set a timer for powering on:; “Preset ON Time” will be displayed on the operation panel.
EN www.newair.com 20 IMPORTANT: Before using this appliance, check that the exhaust hose has been mounted properly. CAUTION - For cooling and dehumidifying operations: • When using the cooling and dehumidifying functions, maintain an interval of at least 3 minutes between each power ON/OFF. • Ensure...
Page 21 - To set a timer for powering off:; “Preset OFF Time” will be displayed on the operation panel.; A U T O O S C I L L A T I O N; Press the SLEEP button again to cancel these settings.; W A T E R D R A I N A G E; Water Tray Full Alarm
EN www.newair.com 21 To set a timer for powering off: • When the air conditioner is on, press the TIMER button and select a desired OFF time by using the time settings buttons. • “Preset OFF Time” will be displayed on the operation panel. • “OFF time” can be set for any time from 0 -24 hours. • Pres...
Page 22 - C L E A N I N G & M A I N T E N A N C E; A I R F I L T E R; Dismounting: Open the air inlet grille and remove air filter.; C L E A N I N G T H E S U R F A C E O F T H E U N I T
EN www.newair.com 22 • If water pump is damaged, continuous drainage can be used by attaching a drain hose to the unit and placing it in a drain or sufficient receptacle. The unit can function properly this way as well. • If water pump is damaged, intermittent drainage can also be used. Under this c...
Page 23 - T R O U B L E S H O O T I N G
EN www.newair.com 23 T R O U B L E S H O O T I N G Problem Possible Cause Solution 1.Unit does not start when pressing on/off button - Water tank is full (check for blinking water full indicator light). Empty the water tank. - Room temperature is higher than the setting temperature (heating mode). R...
Page 24 - I N S T R U C T I O N S F O R R E P A I R I N G A P P L I A N C E S C O N T A I N I N G R 3 2; GENERAL INSTRUCTIONS; hazards or ignition risks. “No Smoking” signs should be di
EN www.newair.com 24 I N S T R U C T I O N S F O R R E P A I R I N G A P P L I A N C E S C O N T A I N I N G R 3 2 1. GENERAL INSTRUCTIONS • IMPORTANT: Prior to working on systems containing flammable refrigerants, safety checks are necessary to ensure that the risk of ignition is minimized. The fol...
Page 25 - Checks to the refrigeration equipment:; When electrical components are; Checks to electrical devices:; Repair and maintenance to electrical
EN www.newair.com 25 conducting any work involving heat. Ventilation should continue during the full duration of the work and should safely disperse any released refrigerant and preferably expel it externally into the atmosphere. • Checks to the refrigeration equipment: When electrical components ar...
Page 26 - REPAIRS TO SEALED COMPONENTS
EN www.newair.com 26 qualifications for dealing with refrigeration systems as recognized by this industry. If other technicians are needed to maintain or repair the appliance, they should be supervised by a person who holds the qualifications for working with flammable refrigerants. 2. REPAIRS TO SE...
Page 27 - DETECTION OF FLAMMABLE REFRIGERANTS; Examples of fluid leak detection methods are; REMOVAL AND EVACUATION
EN www.newair.com 27 5. DETECTION OF FLAMMABLE REFRIGERANTS • Under no circumstances should potential sources of ignition be used in the search for or detection of refrigerant leaks. A halide torch (or any other detector using an open flame) should never be used. 6. LEAK DETECTION METHODS • The foll...
Page 28 - CHARGING PROCEDURES; Cylinders should be kept upright.
EN www.newair.com 28 refrigerants. This process might need to be repeated several times. Compressed air or oxygen should not be used for purging refrigerant systems. • For appliances containing flammable refrigerants, refrigerant purging should be achieved by breaking the vacuum in the system with o...
Page 29 - Pump down refrigerant system, if possible
EN www.newair.com 29 c) Ensure that: handling equipment is available, if required, for handling refrigerant cylinders; all personal protective equipment is available and being used correctly; the recovery process is supervised at all times by a competent person; recovery equipment and cylinders conf...
Page 30 - C O M P E T E N C E O F S E R V I C E P E R S O N N E L; General; The achieved competence should be documented by a certificate.; Training; Training should include the following:; In the case of unventilated enclosure
EN www.newair.com 30 weighing scales should be available and in good working order. Hoses shall be complete with leak-free disconnect couplings and in good condition. Before using the recovery machine, check that it is in satisfactory working order, has been properly maintained, and that any associa...
Page 31 - In the case of ventilated enclosure; Check safety equipment before using.
EN www.newair.com 31 Switching off the appliance and opening the housing has no significant effect on the safety. Nevertheless, it is possible that leaking refrigerant could accumulate inside the enclosure and that flammable refrigerant could be released when the housing is opened. • In the case of ...
Page 33 - When flammable refrigerants are used,; Marking of equipment using signs; See national regulations.; Storage of equipment/appliances
EN www.newair.com 33 outlet. Take special care that drained refrigerant will not float back into the building. • When flammable refrigerants are used, a) Evacuate the refrigerant circuit. b) Purge the refrigerant circuit with oxygen-free nitrogen. c) Evacuate again (not required for A2L refrigerants...
Page 35 - L I M I T E D M A N U F A C T U R E R ’ S W A R R A N T Y; Warranty Exclusions:
EN www.newair.com 35 L I M I T E D M A N U F A C T U R E R ’ S W A R R A N T Y This appliance is covered by a limited manufacturer’s warranty. For one year from the original date of purchase, the manufacturer will repair or replace any parts of this appliance that prove to be defective in materials ...
Page 37 - FR; Un nom de confiance; Vous pouvez compter sur Newair; Contactez-nous du lundi au vendredi de 8h à 4h HNP au:
FR www.newair.com 37 Un nom de confiance La confiance doit être gagnée et nous allons mériter la vôtre. La satisfaction du client est notre priorité. De l’usine à l’entrepôt et de la surface de vente à votre domicile, les fabricants des produits Newair font la promesse de vous fournir des produits n...
Page 38 - ISEZ ET GARDEZ CES INSTRUCTIONS; Table Des Matières; Introduction À
FR www.newair.com 38 L ISEZ ET GARDEZ CES INSTRUCTIONS . Table Des Matières Spécifications ..................................................................................................... 39 Enregistrez Votre Produit En Ligne .................................................................... ...
Page 39 - S P É C I F I C A T I O N S; DÉSHUMIDIFICATION; Inverser le compreseur; RÉFRIGÉRANTE; CAPACITÉDEREFROIDISSEMENT
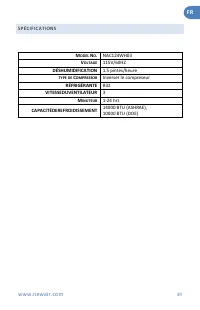
FR www.newair.com 39 S P É C I F I C A T I O N S M ODEL N O . NAC124WH03 V OLTAGE 115V/60HZ DÉSHUMIDIFICATION 1.5 pintes/heure TYPE DE C OMPRESSOR Inverser le compreseur RÉFRIGÉRANTE R32 VITESSEDUVENTILATEUR 3 M INUTEUR 1-24 hrs CAPACITÉDEREFROIDISSEMENT 14000 BTU (ASHRAE), 10000 BTU (DOE)
Page 40 - E N R E G I S T R E Z V O T R E P R O D U I T E N L I G N E; DATE
FR www.newair.com 40 E N R E G I S T R E Z V O T R E P R O D U I T E N L I G N E Enregistrez Votre Produit Newair En Ligne Dès Aujourd'hui ! Profitez de tous les avantages offerts par l'enregistrement du produit: Service Et Assistance Diagnostiquer les problèmes de dépannage et de service plus rapid...
Page 42 - I N F O R M A T I O N S E T A V E R T I S S E M E N T S D E S É C U R I T É; AVERTISSEMENT; Ne percez ni ne brûlez aucune partie de l'appareil.
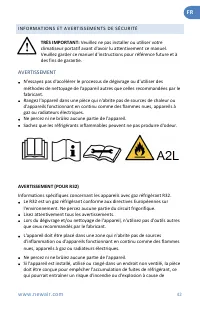
FR www.newair.com 42 I N F O R M A T I O N S E T A V E R T I S S E M E N T S D E S É C U R I T É TRÈS IMPORTANT: Veuillez ne pas installer ou utiliser votre climatiseur portatif avant d'avoir lu attentivement ce manuel. Veuillez garder ce manuel d'instructions pour référence future et à des fins de ...
Page 43 - Cet appareil est destiné à un usage intérieur uniquement.
FR www.newair.com 43 l'inflammation du réfrigérant causée par les radiateurs électriques, poêles, ou autres sources d'inflammation. • L'appareil doit être rangé de manière à éviter toute défaillance mécanique. • Les personnes qui opèrent ou travaillent sur le circuit réfrigérant doivent avoir la cer...
Page 44 - Maintenez l'appareil en position verticale pendant le transport,
FR www.newair.com 44 • N'insérez jamais vos doigts ou tout autre objet dans la sortie d'air. Prenez des précautions particulières pour avertir les enfants de ces dangers. • Maintenez l'appareil en position verticale pendant le transport, l’ entreposage et l'utilisation. • Avant de nettoyer l'apparei...
Page 45 - Ces appareils ne peuvent être connectés qu'à une
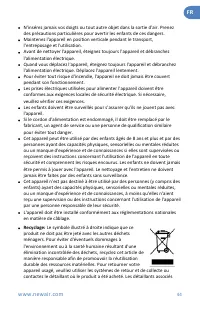
FR www.newair.com 45 peuvent prendre ce produit pour un recyclage respectueux de l'environnement. • Contactez un technicien de service agréé pour la réparation ou l'entretien de cet appareil. • Ne tirez pas, ne déformez pas, ne modifiez pas le cordon d'alimentation ou ne l'immergez pas dans l'eau, c...
Page 47 - L I S T E D E S P I È C E S
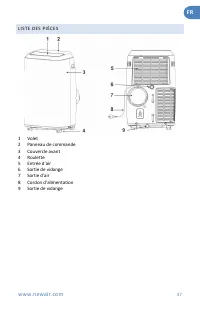
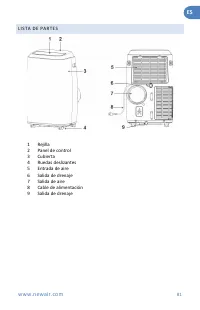
FR www.newair.com 47 L I S T E D E S P I È C E S 1 Volet 2 Panneau de commande 3 Couvercle avant 4 Roulette 5 Entrée d'air 6 Sortie de vidange 7 Sortie d'air 8 Cordon d'alimentation 9 Sortie de vidange
Page 48 - A C C E S S O I R E S; Connecteur de fenêtre
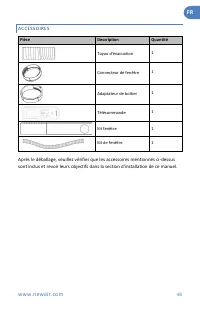
FR www.newair.com 48 A C C E S S O I R E S Pièce Description Quantité Tuyau d'évacuation 1 Connecteur de fenêtre 1 Adaptateur de boîtier 1 Télécommande 1 Kit fenêtre 1 Kit de fenêtre 1 Après le déballage, veuillez vérifier que les accessoires mentionnés ci-dessus sont inclus et revoir leurs objectif...
Page 49 - A S S E M B L A G E E T I N S T A L L A T I O N
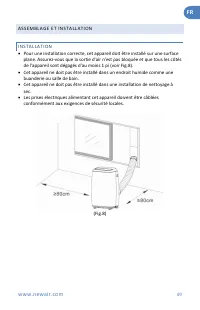
FR www.newair.com 49 A S S E M B L A G E E T I N S T A L L A T I O N I N S T A L L A T I O N • Pour une installation correcte, cet appareil doit être installé sur une surface plane. Assurez-vous que la sortie d'air n'est pas bloquée et que tous les côtés de l'appareil sont dégagés d'au moins 1 pi (v...
Page 50 - I N T R O D U C T I O N À; Installation temporaire; carré et le clip de fixation plat.; Installation du Kit De Glissière De Fenêtre; hauteur de la fenêtre et fixez-le avec le goujon.
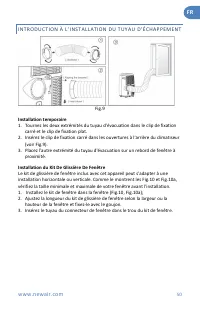
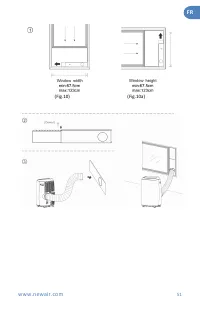
FR www.newair.com 50 I N T R O D U C T I O N À L ’ I N S T A L L A T I O N D U T U Y A U D ’ É C H A P P E M E N T Fig.9 Installation temporaire 1. Tournez les deux extrémités du tuyau d'évacuation dans le clip de fixation carré et le clip de fixation plat. 2. Insérez le clip de fixation carré dans ...
Page 52 - A L A R M E B A C À E A U P L E I N
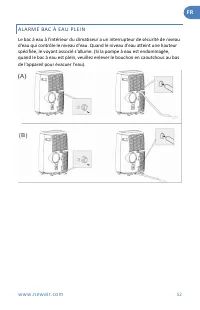
FR www.newair.com 52 A L A R M E B A C À E A U P L E I N Le bac à eau à l'intérieur du climatiseur a un interrupteur de sécurité de niveau d'eau qui contrôle le niveau d'eau. Quand le niveau d'eau atteint une hauteur spécifiée, le voyant associé s'allume. (Si la pompe à eau est endommagée, quand le ...
Page 53 - M O D E D ’ E M P L O I; Modèle froid seul; Refroidissement
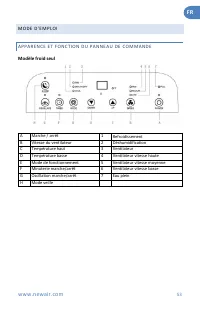
FR www.newair.com 53 M O D E D ’ E M P L O I A P P A R E N C E E T F O N C T I O N D U P A N N E A U D E C O M M A N D E Modèle froid seul A Marche / arrêt 1 Refroidissement B Vitesse du ventilateur 2 Déshumidification C Température haut 3 Ventilateur D Température basse 4 Ventilateur vitesse haute ...
Page 54 - A P P A R E N C E E T F O N C T I O N D E L A T É L É C O M M A N D E; Télécommande sans affichage
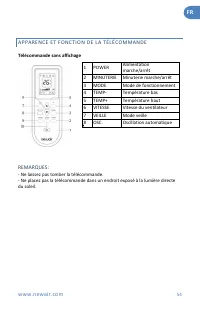
FR www.newair.com 54 A P P A R E N C E E T F O N C T I O N D E L A T É L É C O M M A N D E Télécommande sans affichage 1 POWER Alimentation marche/arrêt 2 MINUTERIE Minuterie marche/arrêt 3 MODE Mode de fonctionnement 4 TEMP- Température bas 5 TEMP+ Température haut 6 VITESSE Vitesse du ventilateur ...
Page 55 - Gamme de température de fonctionnement:
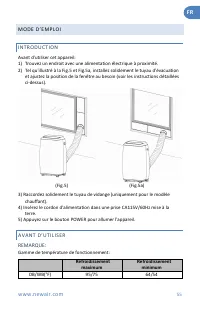
FR www.newair.com 55 M O D E D ’ E M P L O I I N T R O D U C T I O N Avant d'utiliser cet appareil: 1) Trouvez un endroit avec une alimentation électrique à proximité. 2) Tel qu'illustré à la Fig.5 et Fig.5a, installez solidement le tuyau d'évacuation et ajustez la position de la fenêtre au besoin (...
Page 56 - O P É R A T I O N D E R E F R O I D I S S E M E N T; Pour régler une minuterie pour la mise sous tension:
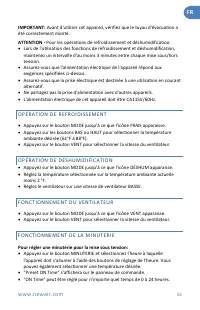
FR www.newair.com 56 IMPORTANT: Avant d'utiliser cet appareil, vérifiez que le tuyau d'évacuation a été correctement monté. ATTENTION - Pour les opérations de refroidissement et déshumidification: • Lors de l'utilisation des fonctions de refroidissement et déshumidification, maintenez un intervalle ...
Page 57 - Pour régler une minuterie pour la mise hors tension:; Appuyez à nouveau sur le bouton VEILLE pour annuler ces réglages.; É V A C U A T I O N D E; Alarme de Bac À Eau Plein
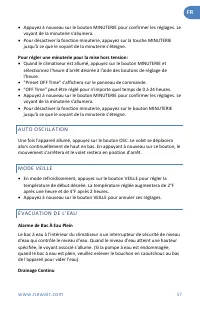
FR www.newair.com 57 • Appuyez à nouveau sur le bouton MINUTERIE pour confirmer les réglages. Le voyant de la minuterie s'allumera. • Pour désactiver la fonction minuterie, appuyez sur la touche MINUTERIE jusqu'à ce que le voyant de la minuterie s'éteigne. Pour régler une minuterie pour la mise hors...
Page 58 - N E T T O Y A G E E T E N T R E T I E N; F I L T R E À A I R
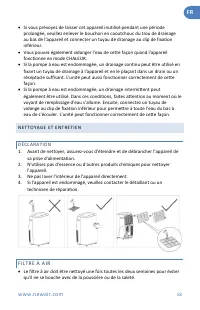
FR www.newair.com 58 • Si vous prévoyez de laisser cet appareil inutilisé pendant une période prolongée, veuillez enlever le bouchon en caoutchouc du trou de drainage au bas de l'appareil et connecter un tuyau de drainage au clip de fixation inférieur. • Vous pouvez également vidanger l'eau de cette...
Page 59 - N E T T O Y A G E D U S U R F A C E D E L ' A P P A R E I L
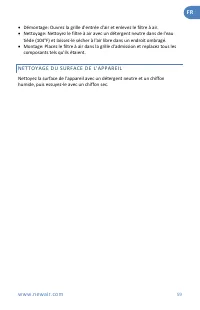
FR www.newair.com 59 • Démontage: Ouvrez la grille d'entrée d'air et enlevez le filtre à air. • Nettoyage: Nettoyez le filtre à air avec un détergent neutre dans de l'eau tiède (104°F) et laissez-le sécher à l'air libre dans un endroit ombragé. • Montage: Placez le filtre à air dans la grille d'admi...
Page 60 - D É P A N N A G E
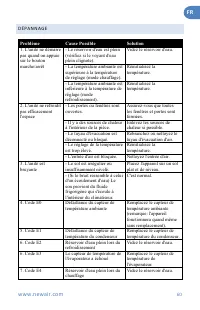
FR www.newair.com 60 D É P A N N A G E Problème Cause Possible Solution 1. L'unité ne démarre pas quand on appuie sur le bouton marche/arrêt - Le réservoir d'eau est plein (vérifiez si le voyant d'eau plein clignote). Videz le réservoir d'eau. - La température ambiante est supérieure à la températur...
Page 61 - INSTRUCTIONS GÉNÉRALES
FR www.newair.com 61 I N S T R U C T I O N S P O U R L A R É P A R A T I O N D E S A P P A R E I L S C O N T E N A N T D U R 3 2 1. INSTRUCTIONS GÉNÉRALES • IMPORTANT: Avant de travailler sur des systèmes contenant des réfrigérants inflammables, des contrôles de sécurité sont nécessaires pour s'assu...
Page 62 - Assurez-vous que la zone de travail est soit à l'extérieur ou, si; Contrôles des équipements frigorifiques:; Quand des composants; Contrôles des appareils électriques:; La réparation et l'entretien des
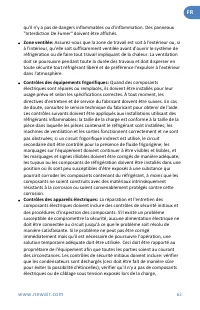
FR www.newair.com 62 qu'il n'y a pas de dangers inflammables ou d'inflammation. Des panneaux "Interdiction De Fumer" doivent être affichés. • Zone ventilée: Assurez-vous que la zone de travail est soit à l'extérieur ou, si à l'intérieur, qu'elle soit suffisamment ventilée avant d'ouvrir le s...
Page 63 - RÉPARATION DES COMPOSANTS SCELLÉS; L'utilisation de mastic silicone peut inhiber l'efficacité de; RÉPARATION DES COMPOSANTS À SÉCURITÉ INTRINSÈQUE
FR www.newair.com 63 récupération ou purge du système; vérifier qu'il y a continuité de mise à la terre. • Toutes les procédures de maintenance, d'entretien et de réparation susceptibles d'avoir un impact sur la sécurité ne doivent être faites que par des personnes compétentes conformément à l'Annex...
Page 64 - DÉTECTION DE FRIGORIGÈNES INFLAMMABLES; Des exemples de méthodes de détection de fuite de fluide sont
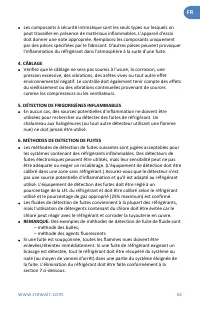
FR www.newair.com 64 • Les composants à sécurité intrinsèque sont les seuls types sur lesquels on peut travailler en présence de matériaux inflammables. L'appareil d'essai doit donner une note appropriée. Remplacez les composants uniquement par des pièces spécifiées par le fabricant. D'autres pièces...
Page 65 - ENLÈVEMENT ET ÉVACUATION; Les cylindres doivent être maintenus debout.
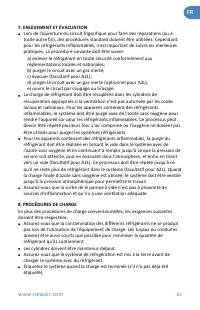
FR www.newair.com 65 7. ENLÈVEMENT ET ÉVACUATION • Lors de l'ouverture du circuit frigorifique pour faire des réparations (ou à toute autre fin), des procédures standard doivent être utilisées. Cependant, pour les réfrigérants inflammables, il est important de suivre les meilleures pratiques. La pro...
Page 66 - MISE HORS SERVICE; Se familiariser avec l'équipement et son fonctionnement
FR www.newair.com 66 • Des précautions extrêmes doivent être prises pour ne pas trop remplir le système de réfrigération. • Avant de recharger le système, il doit être testé sous pression avec OFN. Le système doit être testé pour les fuites à la fin de la charge mais avant la mise en service. Un tes...
Page 68 - C O M P É T E N C E D U P E R S O N N E L D E S E R V I C E; La compétence acquise doit être documentée par un certificat.
FR www.newair.com 68 C O M P É T E N C E D U P E R S O N N E L D E S E R V I C E Général • Des informations procédurales supplémentaires aux informations standard concernant les procédures d'installation, de réparation, d'entretien et de mise hors service des appareils de réfrigération sont requises...
Page 70 - d) Mise hors service
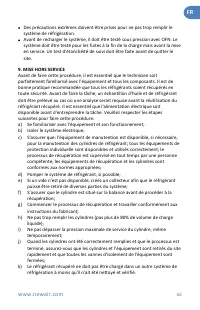
FR www.newair.com 70 - Purgez le point de brasage avec de l'azote pendant la procédure de brasage requise pour la réparation. - Effectuez un test d'étanchéité avant de charger en réfrigérant. d) Mise hors service • La charge de réfrigérant doit être enlevée avant la mise hors service. • Assurez une ...
Page 71 - Des réglementations de transport supplémentaires; Marquage des équipements à l'aide de panneaux; Voir les réglementations nationales.; Rangement des équipements/appareils
FR www.newair.com 71 • AVERTISSEMENT: Des réglementations de transport supplémentaires peuvent exister en ce qui concerne les équipements contenant des gaz inflammables. Le nombre maximum d'équipements ou la configuration des équipements autorisés à être transportés ensemble sera déterminé par les r...
Page 72 - G A R A N T I E L I M I T É E D U F A B R I C A N T; CONDITIONS DE GARANTIE:; Panne électrique; OBTENTION DU SERVICE:; ration agréé NewairTM. L'acheteur sera responsable de tous les
FR www.newair.com 72 G A R A N T I E L I M I T É E D U F A B R I C A N T Cet appareil est couvert par une garantie limitée du fabricant. Pendant un an à compter de la date d'achat d'origine, le fabricant réparera ou remplacera toutes les pièces de cet appareil qui s'avéreront défectueuses en termes ...
Page 73 - ES; Un Nombre en el que Puedes Confiar; Cuente con Newair
ES www.newair.com 73 Un Nombre en el que Puedes Confiar La confianza debe ganarse y nosotros nos ganaremos la suya. La felicidad del cliente es el centro de nuestro negocio. Desde la fábrica hasta el almacén, desde el piso de ventas hasta su hogar, toda la familia Newair se compromete a brindar prod...
Page 74 - EA Y GUARDE ESTAS INSTRUCCIONES; INDICE
ES www.newair.com 74 L EA Y GUARDE ESTAS INSTRUCCIONES INDICE Especificaciones ......................................................................................... 75 Registre su Producto en Línea ........................................................................... 76 Advertencias e Info...
Page 75 - E S P E C I F I C A C I O N E S
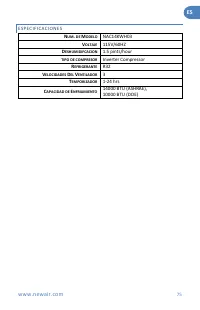
ES www.newair.com 75 E S P E C I F I C A C I O N E S N UM . DE M ODELO NAC14KWH03 V OLTAJE 115V/60HZ D ESHUMIDIFCACION 1.5 pints/hour TIPO DE COMPRESOR Inverter Compressor R EFRIGERANTE R32 V ELOCIDADES D EL V ENTILADOR 3 T EMPORIZADOR 1-24 hrs C APACIDAD DE E NFRIAMIENTO 14000 BTU (ASHRAE), 10000 B...
Page 76 - R E G I S T R E S U P R O D U C T O E N L Í N E A; Aproveche todas las ventajas que ofrece el registro de productos:; Servicio y soporte; Inscríbase para recibir promociones y ofertas de Newair
ES www.newair.com 76 R E G I S T R E S U P R O D U C T O E N L Í N E A ¡Registre su producto Newair en línea hoy! Aproveche todas las ventajas que ofrece el registro de productos: Servicio y soporte Diagnostique y resuelva problemas de servicio de forma más rápida y precisa Notificaciones Manténgase...
Page 77 - ADVERTENCIA
ES www.newair.com 77 A D V E R T E N C I A S E I N F O R M A C I Ó N D E S E G U R I D A D MUY IMPORTANTE: No instale ni utilice su aire acondicionado portátil antes de haber leído detenidamente este manual. Guarde este manual de instrucciones para futuras consultas y fines de garantía. ADVERTENCIA ...
Page 79 - El símbolo que se muestra a la derecha indica
ES www.newair.com 79 ● Cuando mueva la unidad, apáguela y desconecte la fuente de alimentación. Mueva la unidad lentamente. ● Para evitar el riesgo de incendio, la unidad nunca debe cubrirse mientras está en funcionamiento. ● Los enchufes eléctricos utilizados para alimentar la unidad deben cumplir ...
Page 80 - Declaración de Impedancia:; Estos aparatos se pueden conectar solo a una
ES www.newair.com 80 evaluación acreditada por la industria, que autorice su competencia para manipular refrigerantes de manera segura de acuerdo con una especificación de evaluación reconocida por la industria. ● El mantenimiento de esta unidad sólo debe realizarse según lo recomendado por el fabri...
Page 82 - A C C E S O R I O S
ES www.newair.com 82 A C C E S O R I O S Partes Descripción Cantidad Manguera de Escape 1 Conector de Ventana 1 Adaptador 1 Control Remoto 1 Kit de Ventana 1 Kit de ventana 1 Después de desempacar, verifique que los accesorios mencionados anteriormente estén incluidos y revise sus propósitos en la s...
Page 83 - M O N T A J E E I N S T A L A C I Ó N
ES www.newair.com 83 M O N T A J E E I N S T A L A C I Ó N I N S T A L A C I Ó N ● Para una instalación adecuada, este aparato debe instalarse en una superficie nivelada. Asegúrese de que la salida de aire no esté bloqueada y de que todos los lados del electrodoméstico estén despejados al menos 1 pi...
Page 84 - I N T R O D U C C I Ó N D E I N S T A L A C I Ó N D E L A M A N G U E R A D E E S C A P E; Instalación Temporal; cuadrado y el clip de fijación plano.; Instalación del Kit de Deslizador de Ventana; alto de la ventana y fíjelo con la clavija.; Ancho de la Ventana
ES www.newair.com 84 I N T R O D U C C I Ó N D E I N S T A L A C I Ó N D E L A M A N G U E R A D E E S C A P E Instalación Temporal 1. Gire ambos extremos de la manguera de escape en el clip de fijación cuadrado y el clip de fijación plano. 2. Inserte el clip de fijación cuadrado en las aberturas en...
Page 85 - L U Z I N D I C A D O R A D E B A N D E J A D E A G U A L L E N A
ES www.newair.com 85 *(Clavija) L U Z I N D I C A D O R A D E B A N D E J A D E A G U A L L E N A La bandeja de agua dentro del aire acondicionado tiene un interruptor de seguridad que controla el nivel de agua. Cuando el nivel del agua alcanza una altura especifica, la luz indicadora se iluminará. ...
Page 86 - I N S T R U C C I O N E S D E U S O; Modelo solo enfriamiento; A P A R I E N C I A Y F U N C I Ó N D E L C O N T R O L R E M O T O; Control Remoto sin pantalla
ES www.newair.com 86 I N S T R U C C I O N E S D E U S O A P A R I E N C I A Y F U N C I Ó N D E L P A N E L D E C O N T R O L Modelo solo enfriamiento A Boton de Encendido 1 Enfriamiento B Velocidad de Ventilador 2 Deshumidificante C Subir Temperatura 3 Abanico D Bajar Temperatura 4 Velocidad Alta ...
Page 88 - A N T E S D E U S A R; Enfriamiento Máximo; F U N C I Ó N D E E N F R I A M I E N T O
ES www.newair.com 88 A N T E S D E U S A R Aviso: Rango de temperatura de funcionamiento: Enfriamiento Máximo Enfriamiento Mínimo DB/WB(°F) 95/75 64/54 IMPORTANTE: Antes de usar este aparato, verifique que la manguera de escape se haya montado correctamente. PRECAUCIÓN - Para operaciones de enfriami...
Page 89 - O P E R A C I Ó N D E L T E M P O R I Z A D O R; Cómo configurar un temporizador para encender:; Para configurar un temporizador de apagado:; panel de operaciones.; O S C I L A C I Ó N A U T O M Á T I C A; Presione el botón SLEEP nuevamente para cancelar estos ajustes.
ES www.newair.com 89 O P E R A C I Ó N D E L T E M P O R I Z A D O R Cómo configurar un temporizador para encender: ● Presione el botón TIMER y seleccione el tiempo deseado para que la unidad se encienda usando los botones de configuración de tiempo. También puede seleccionar la temperatura deseada....
Page 90 - D R E N A J E D E L A G U A; Alarma de Bandeja de Agua Llena
ES www.newair.com 90 D R E N A J E D E L A G U A Alarma de Bandeja de Agua Llena La bandeja de agua dentro del aire acondicionado tiene un interruptor de seguridad de nivel de agua que controla el nivel de agua. Cuando el nivel del agua alcanza una altura especificada, la luz indicadora asociada se ...
Page 91 - L I M P I E Z A Y M A N T E N I M I E N T O; F I L T R O D E A I R E
ES www.newair.com 91 L I M P I E Z A Y M A N T E N I M I E N T O R E C O M E N D A C I O N E S 1. Antes de limpiar, asegúrese de apagar y desconectar la unidad de su toma de corriente. 2. No utilice gasolina u otros productos químicos para limpiar la unidad. 3. No lave la unidad internamente directa...
Page 92 - S O L U C I Ó N D E P R O B L E M A S; Vacíe el depósito de agua.
ES www.newair.com 92 S O L U C I Ó N D E P R O B L E M A S Problema Posible Causa Solución 1. La unidad no se enciende al presionar el botón de encendido/apagado - El tanque de agua está lleno (verifique si la luz indicadora de agua llena parpadea). Vacíe el depósito de agua. - La temperatura ambien...
Page 93 - Limpiar la entrada de aire.
ES www.newair.com 93 - La entrada de aire está bloqueada. Limpiar la entrada de aire. 3. La unidad produce mucho ruido - El suelo es irregular o no está nivelado. Coloque la unidad en un suelo plano y nivelado. - (Si el sonido es como el del agua que fluye) El sonido proviene del refrigerante que fl...
Page 95 - deben exhibir carteles de “No fumar”.; Comprobaciones al equipo de refrigeración:; Cuando se reparan o; Comprobaciones a dispositivos eléctricos:; La reparación y el mantenimiento
ES www.newair.com 95 comience el trabajo, se debe inspeccionar el área alrededor del equipo para asegurarse de que no haya peligros inflamables o riesgos de ignición. Se deben exhibir carteles de “No fumar”. ● Área Ventilada: Asegúrese de que el área de trabajo esté al aire libre o, si está adentro,...
Page 96 - REPARACIONES DE COMPONENTES SELLADOS
ES www.newair.com 96 expuestos mientras se carga, recupera o purga el sistema; comprobando que hay continuidad de puesta a tierra. ● Todo procedimiento de mantenimiento, servicio y reparación que pueda afectar la seguridad debe ser realizado únicamente por personas competentes de acuerdo con el Anex...
Page 97 - DETECCIÓN DE REFRIGERANTES INFLAMABLES; Ejemplos de métodos de detección de fugas de fluidos son
ES www.newair.com 97 ● Los componentes intrínsecamente seguros son los únicos tipos en los que se puede trabajar en presencia de materiales inflamables. El aparato de prueba debe producir una calificación adecuada. Reemplace los componentes solo con piezas especificadas por el fabricante. Otras part...
Page 98 - EXTRACCIÓN Y EVACUACIÓN; siguientes requisitos:
ES www.newair.com 98 de la fuga. La eliminación del refrigerante debe realizarse de acuerdo con la sección 7 a continuación. 7. EXTRACCIÓN Y EVACUACIÓN ● Al abrir el circuito de refrigerante para realizar reparaciones (o para cualquier otro propósito), se deben utilizar los procedimientos estándar. ...
Page 99 - Familiarizarse con el equipo y su funcionamiento
ES www.newair.com 99 ● Asegúrese de que el sistema de refrigeración esté conectado a tierra antes de cargar el sistema con refrigerante. ● Etiquete el sistema cuando la carga esté completa (si aún no ha sido etiquetado). ● Se debe tener mucho cuidado de no sobrellenar el sistema de refrigeración. ● ...
Page 101 - C O M P E T E N C I A D E L P E R S O N A L D E S E R V I C I O; La capacitación debe incluir lo siguiente:; En el caso de cerramiento sin ventilación
ES www.newair.com 101 calentamiento eléctrico del cuerpo del compresor para acelerar este proceso. Cuando se drena aceite de un sistema, este proceso debe llevarse a cabo de manera segura. C O M P E T E N C I A D E L P E R S O N A L D E S E R V I C I O General ● Se requiere información de procedimie...
Page 102 - Información sobre los procedimientos de trabajo correctos:; Verifique el equipo de seguridad antes de usarlo.
ES www.newair.com 102 ● Información sobre el concepto de componentes sellados y envolventes sellados según IEC 60079-15: 2010. Información sobre los procedimientos de trabajo correctos: a) Puesta en servicio ● Asegúrese de que el área del piso sea suficiente para la carga de refrigerante o que el co...
Page 103 - e) Al deshacerse del electrodoméstico
ES www.newair.com 103 - Vacíe el circuito de refrigerante. - Purgue el circuito de refrigerante con nitrógeno durante 5 min (no es necesario para refrigerantes A2L). - Vuelva a evacuar (no se requiere para refrigerantes A2L). - Quite las piezas a reemplazar cortándolas o soldandolas. - Purgue el pun...
Page 104 - Corte el compresor y drene el aceite.; Marcado de equipos mediante letreros; Consulte las normativas nacionales.; Almacenamiento de equipos / electrodomésticos
ES www.newair.com 104 ● Evacuar de nuevo. ● Corte el compresor y drene el aceite. Transporte, marcado y almacenamiento de unidades que emplean refrigerantes inflamables ● ATENCIÓN: Pueden existir regulaciones de transporte adicionales con respecto a equipos que contienen gas inflamable. El número má...
Page 105 - GARANTÍA
ES www.newair.com 105 GARANTÍA DEL FABRICANTE Este aparato está cubierto por una garantía limitada del fabricante. Durante un año a partir de la fecha original de compra, el fabricante reparará o reemplazará cualquier pieza de este electrodoméstico que demuestre tener defectos de materiales y mano d...