Page 3 - Contents
Contents 3 Warning and Safety instructions .......................................................................... 5 Caring for the environment ................................................................................ 15 Overview .............................................................
Page 4 - Gas connection
Contents 4 Gas connection .................................................................................................... 45 Setting the gas pressure ....................................................................................... 47 Burner ratings .........................................
Page 5 - Warning and Safety instructions
Warning and Safety instructions 5 This appliance conforms to current safety requirements.Inappropriate use can, however, lead to personal injury anddamage to property. To avoid the risk of accidents and damage to the appliance,please read these instructions carefully before using it for the firsttim...
Page 6 - Correct application; This cooktop is designed for domestic use and for use in similar
Warning and Safety instructions 6 Correct application This cooktop is designed for domestic use and for use in similar environments by guests in hotel or motel rooms, bed & breakfastsand other typical living quarters. This does not include common/shared facilities or commercial facilities with...
Page 7 - Safety with children
Warning and Safety instructions 7 Safety with children Young children must not be allowed to use this appliance. Older children may only use the appliance when its operation has been clearly explained to them and they are able to use it safely,recognising the dangers of misuse. Cleaning may on...
Page 8 - Technical safety
Warning and Safety instructions 8 Technical safety Repairs and other work by unqualified persons could be dangerous. Installation, maintenance work and repairs to electricalappliances must only be carried out by a Miele approved servicetechnician. A damaged appliance is dangerous. Check it for a...
Page 10 - If the appliance is installed behind a furniture door, do not close
Warning and Safety instructions 10 If the appliance is installed behind a furniture door, do not close the door while the appliance is in operation. Heat and moisturewould build up behind a closed furniture door, potentially causingdamage to the appliance, the furniture unit and the flooring. Wait...
Page 11 - Correct use
Warning and Safety instructions 11 Correct use The appliance gets hot when in use and remains hot for some time after being switched off. Do not touch the appliance if there is apossibility that it could still be hot. Do not use the appliance to heat up the room. Due to the high temperatures rad...
Page 14 - If the appliance has not been used for a long period of time it; Cleaning and care; Do not use a steam cleaning appliance to clean this appliance.
Warning and Safety instructions 14 If the appliance has not been used for a long period of time it should be thoroughly cleaned before it is used again. It is alsoadvisable to have the appliance tested by a qualified person forsafety. Cleaning and care Do not use a steam cleaning appliance to cl...
Page 15 - Caring for the environment
Caring for the environment 15 Disposal of the packingmaterial The transport and protective packaginghas been selected from materials whichare environmentally friendly fordisposal, and can normally be recycled. Recycling the packaging reduces theuse of raw materials in themanufacturing process and al...
Page 16 - Overview; Cooktop
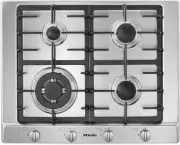
Overview 16 Cooktop a Wok burner b Auxiliary burner c Normal burner d Normal burner Controls knobs for the cooking zones: e Front right f Rear right g Rear left h Front left
Page 17 - Control knobs; Symbol
Overview 17 Control knobs Symbol Description Burner off, the gas supply is turned off Strongest flame Weakest flame
Page 18 - Burner; Wok burner
Overview 18 Burner Wok burner Auxiliary, normal and fast burners a Burner ring (wok burner) b Burner cap c Burner head d Burner base e Ignition safety device f Ignitor
Page 19 - Accessories supplied; Wok ring
Overview 19 Accessories supplied The accessories supplied with yourappliance, as well as a range of optionalones, are available to order from Miele(see "Optional accessories"). Wok ring The wok ring supplied gives additionalstability to the wok, especially to wokswith a rounded base.
Page 20 - Using for the first time
Using for the first time 20 Please stick the extra data plate forthe appliance supplied with thisdocumentation in the space providedin the "After sales service, data plate,warranty" section of this booklet.Alternatively, the additional label canbe stuck near the appliance if theappliance m...
Page 21 - Pans
Pans 21 Minimum pan base diameter Burner Ø cm Auxiliary burner 10 Normal burner 12 Fast burner 14 Wok burner 14 Maximum diameter at top of pot/ pan Burner Ø cm Auxiliary burner 22 Normal burner 22 Fast burner 24 Wok burner 24 – Select cookware that fits the size of the burner:Large diameter = larg...
Page 23 - Tips on saving energy; – Use a pan lid whenever possible to
Tips on saving energy 23 – Use a pan lid whenever possible to minimise heat loss. – Wide, shallow pans are preferable to tall, narrow ones. They will heat upfaster. – Cook with as little water as possible. – Reduce the power setting once the water has come to the boil or the oilis hot enough to fry ...
Page 24 - Operation; Switching on; Switching on during a power outage
Operation 24 Fire hazard! Do not leave the cooktop unattendedwhilst it is being used. Switching on The control for the burner requiredmust be pressed in and turned anti-clockwise to the large flame symbolto switch on. The ignitor will "click"and ignite the gas. When a control knob is act...
Page 25 - Adjusting the flame
Operation 25 Adjusting the flame The burners can be regulated at anylevel between the strongest andweakest flame. As the outer part of the flame is muchhotter than the centre, the tips of theflames should stay beneath the panbase. Flame tips which extend beyondthe sides of the pan merely warm upthe ...
Page 26 - Safety features; Thermo-electric ignition
Safety features 26 Thermo-electric ignition This appliance has a thermo-electricignition safety device. If the flame goesout, for example if food has boiled overor if there is a sudden draught, andautomatic re-ignition has beenunsuccessful, the supply of gas to theburner will be cut off. This will p...
Page 27 - Unsuitable cleaning agents
Cleaning and care 27 Danger of burning! The burners must be switched off.The cooktop needs to cool down. Danger of injury! The steam from a steam cleaningappliance could reach electricalcomponents and cause a shortcircuit.Do not use a steam cleaner to cleanthe cooktop. The use of unsuitable clea...
Page 28 - Food that has boiled over; Stainless steel surfaces; The Miele care product for
Cleaning and care 28 The surfaces of the burnercomponents and pan supports willbecome more matt with time. This iscompletely normal and does notindicate damage to the material. The cooktop should be cleaned aftereach use. Stubborn soiling should be soakedfirst. Dry the cooktop after using wate...
Page 29 - Pan supports; Remove the pan supports.
Cleaning and care 29 Pan supports Do not clean the pan supports in adishwasher. Remove the pan supports. Clean the pan supports with asolution of warm water and a littlewashing-up liquid applied with a softsponge. Stubborn soiling should besoaked first. After cleaning, dry the pan supportsthor...
Page 30 - Assembling the wok burner
Cleaning and care 30 Assembling the auxiliary, normal andfast burners Place the burner head onto the burner base so that the ignition safety device , the ignitor and the retaining pins fit into their respective holes in the burner head. Position the burner cap onto the burner h...
Page 31 - Problem solving guide; Problem
Problem solving guide 31 With the aid of the following guide, minor problems can be easily correctedwithout contacting Miele. If, after reading this guide, you can't remedy the problemyourself, please call Miele (see back cover for details).Please note, however, that a call-out charge will be applie...
Page 33 - Optional accessories; Removes finger marks and light soiling.
Optional accessories 33 Miele offers a range of usefulaccessories, as well as cleaning andconditioning products for yourappliance. These products can be ordered fromthe Miele online shop. They can also be ordered directly fromMiele (see end of this booklet forcontact details). Original Miele all pur...
Page 34 - Safety instructions for installation; The veneer or laminate coatings of worktops (or adjacent kitchen; All dimensions in this instruction booklet are given in mm.
Safety instructions for installation 34 Fit the wall units and rangehood before fitting the cooktop to avoid damagingthe cooktop. The veneer or laminate coatings of worktops (or adjacent kitchen units) must be treated with 100 °C heat-resistant adhesive which willnot dissolve or distort. Any splas...
Page 35 - Safety distances
Safety distances 35 Safety distance above thecooktop A minimum safety distance must bemaintained between the cooktop andthe rangehood above it. See therangehood manufacturer's operatingand installation instructions for details. If the manufacturer's instructions arenot available for the rangehood, a...
Page 36 - Not allowed
Safety distances 36 Safety distances to the sidesand back of the appliance Ideally the appliance should be installedwith plenty of space on either side.There may be a wall at the rear and atall unit or wall on one side (right or left).On the other side, however, no tall unitor wall should stand high...
Page 38 - Installation notes; Tiled worktop; Grout lines
Installation notes 38 Seal between the cooktop andthe worktop Do not use sealant between thecooktop and the worktop. This couldresult in damage to the cooktop orthe worktop if the cooktop everneeds to be removed for servicing.The sealing strip under the edge ofthe top part of the applianceprovides a...
Page 39 - Building-in dimensions; Front
Building-in dimensions 39 a Front b Building-in depth c Gas connection R ½ - ISO 7-1 d Mains connection box with mains connection cable, L = 2000 mm
Page 40 - Distances from burner to the edge of the appliance
Building-in dimensions 40 Distances from burner to the edge of the appliance
Page 41 - Installation; Preparing the worktop; R4) can be carefully scribed to
Installation 41 Preparing the worktop Make the worktop cut-out as shownin the building-in diagram. Observethe safety distances (see "Safetydistances"). Seal the cut surfaces on woodenworktops with a suitable sealant toavoid swelling caused by moisture.The sealant must be heat-resistant. ...
Page 42 - Securing the cooktop; – The flame must not go out on the
Installation 42 Securing the cooktop Secure the cooktop using thebrackets supplied. Checking operation After installing the cooktop, ignite allburners to check that they areoperating correctly: – The flame must not go out on the lowest setting, or when the control isturned quickly from the hi...
Page 43 - Electrical connection; Connection
Electrical connection 43 All electrical work must be carried outby a suitably qualified and competentperson in strict accordance with currentlocal and national safety regulations.Connection must be made via aswitched socket. This will make it easierfor service technicians should theappliance need to...
Page 44 - Danger of electrical shock!
Electrical connection 44 Replacing the mainsconnection cable Danger of electrical shock! The mains connection cable must bereplaced by a suitably qualified andcompetent person in accordancewith current local and national safetyregulations. If the mains cable needs to be replaced,it must be replace...
Page 45 - Connection to the gas supply, or
Gas connection 45 Connection to the gas supply, or conversion from one type of gas toanother should only be undertakenby an approved gas fitter, who isresponsible for correct functioning ofthe appliance when installed. Everyappliance should have its ownisolating valve. The gas connection must bein...
Page 46 - Connection to the appliance; – fixed connection
Gas connection 46 Depending on country of destinationthis appliance is set up for connectionto natural gas or ULPG.See adhesive label on the appliance:G = NG (natural gas)LP = ULPG (Propane/Butane) Depending on country of destinationjets are supplied for conversion to adifferent type of gas. If the ...
Page 47 - Setting the gas pressure; Pressure Test Point
Gas connection 47 Setting the gas pressure The gas pressure must be set by theapproved gas fitter as shown on thedata plate:Natural gas 1.0 kPaULPG (Propane/Butane) 2.75 kPa The gas pressure must be set with thelargest burner operating at maximumsetting. a b ~ 60 a Connection R ¹/₂" with test po...
Page 48 - Burner ratings; Nominal ratings
Burner ratings 48 Nominal ratings Burner Gas type Highest setting Lowest setting MJ/h MJ/h Auxiliary burner NGULPG 4.13.6 1.141.02 Normal burner NGULPG 7.06.5 1.641.93 Wok burner NGULPG 14.512.5 5.004.53 Total NGULPG 32.629.1
Page 49 - Conversion to another type of gas; Conversion from one type of gas; Jet table
Conversion to another type of gas 49 Conversion from one type of gas to another should only beundertaken by an approved andregistered gas fitter in strictaccordance with current local andnational safety and buildingregulations.Disconnect the cooktop from theelectricity supply and turn off the gass...
Page 50 - Changing the jets; and
Conversion to another type of gas 50 Changing the jets Disconnect the cooktop from theelectricity supply and turn off the gassupply. When converting to another type ofgas, both the main and small jets need to be changed. Changing the main jets Auxiliary, normal and large burnersThe burner cap i...
Page 51 - Changing the small jets; Checking operation
Conversion to another type of gas 51 Changing the small jets To change the jets, the burner fixingscrews must first be loosened and theupper section of the applianceremoved. Pull the control knobs off. Remove the burner components. Undo the screws. Lift the top of the appliance off. a b Re...
Page 52 - After sales service, data plate, warranty; After sales service; See back of this booklet for contact details.; Data plate; The manufacturer's warranty for this appliance is 2 years.
After sales service, data plate, warranty 52 After sales service In the event of any faults which you cannot easily remedy, please contact Miele. See back of this booklet for contact details. Please quote the model and serial number of your appliance when contactingMiele. Data plate Space in which t...
Page 55 - Miele New Zealand Limited
www.miele.com.au Miele Experience Centre and Head Office Melbourne: 1 Gilbert Park DriveKnoxfield, VIC 3180 Miele Experience Centre South Melbourne: 206-210 Coventry StreetSouth Melbourne, VIC 3205 Miele Experience Centre and Office Sydney: 3 Skyline PlaceFrenchs Forest, NSW 2086 Miele Experience Ce...