Page 3 - Contents
Guide to the appliance . . . . . . . . . . . . . . . . . . . . . . . . . . . . . . . . . . . . . . . . . . . . . 5 Models . . . . . . . . . . . . . . . . . . . . . . . . . . . . . . . . . . . . . . . . . . . . . . . . . . . . . . . . . . . 5 KM 5854 . . . . . . . . . . . . . . . . . . . . . . . . . ...
Page 5 - Models; ac; Guide to the appliance
Models KM 5854 ac Double circle zones bd Single circle zones e Single circle zone, can link with d to make a combination extended zone f Control panel Guide to the appliance 5
Page 7 - bd
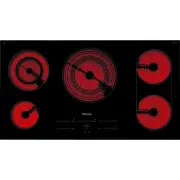
KM 5864 bd Single circle zones b Double circle zone c Triple circle zone e Single circle zone, can link with d to make a combination extended zone f Control panel Guide to the appliance 7
Page 8 - Control panel; a i
Control panel Guide to the appliance 8 4 0 1 2 3 5 6 7 8 9 4 0 1 2 3 5 6 7 8 9 4 0 1 2 3 5 6 7 8 9 4 0 1 2 3 5 6 7 8 9 4 0 1 2 3 5 6 7 8 9 8 8 h a i d e b b b b c f g h j m k l
Page 9 - PS
Sensors for a Switching the hob on and off b Setting the power level c Safety lock d Switching on the extended cooking area e - Setting the time- Setting the power level for the middle rear cooking zone, if present f Stop and Go g - Selecting the timer- Switching between the timer functions- Selecti...
Page 10 - Hobs bearing the
Cooking zones Zone KM 5856 KM 5854 C in cm Rating in watts for 230 V C in cm Rating in watts for 230 V y 10.0 / 18.0 600 / 1800 12.0 / 21.0 750 / 2200 w 14.5 1200 14.5 1200 b 12.0 / 21.0 750 / 2200 14.5 / 23.0 1500 / 3200 x 18.0 1800 18.0 1800 z 18.0 1800 18.0 1800 z + x 18.0 x 41.0 4000 18.0 x 41.0...
Page 11 - Correct application; Warning and Safety instructions
This hob complies with all relevantlocal and national safetyrequirements. Inappropriate usecan, however, lead to personal injuryand damage to property. To avoid the risk of accidents anddamage to the hob, please readthese instructions carefully beforeinstallation and before using it forthe first tim...
Page 12 - Safety with children
Safety with children ~ Use the safety lock to prevent children operating the hob or alteringthe settings. ~ Keep children away from the hob at all times. It is not a toy! To avoid the riskof injury, do not allow them to play withit or use the controls. They will notunderstand the potential dangerspo...
Page 13 - Technical safety
Technical safety ~ Before installation, check the hob for visible signs of damage. Do not installand use a damaged appliance. It couldbe dangerous. ~ The electrical safety of this hob can only be guaranteed if correctly earthed.It is most important that this basicsafety requirement is observed andre...
Page 14 - Correct use
~ Faulty components must only be replaced by genuine Miele originalspare parts. The manufacturer can onlyguarantee the safety of the hob whenMiele replacement parts are used. ~ If the connection cable is damaged, it must be replaced by a suitablyqualified electrician with a specialistconnection cabl...
Page 17 - Disposal of your old appliance; Caring for the environment
Disposal of the packingmaterial The transport and protective packinghas been selected from materials whichare environmentally friendly fordisposal, and should be recycled. Ensure that any plastic wrappings,bags, etc. are disposed of safely andkept out of the reach of babies andyoung children. Danger...
Page 18 - Cleaning for the first time; Remove any protective wrapping and adhesive labels.; Before using for the first time
Please stick the extra data plate for the appliance suppliedwith this documentation in the space provided in the "Aftersales service, data plate" section of this booklet. Cleaning for the first time ^ Remove any protective wrapping and adhesive labels. ^ Before using for the first time, clea...
Page 19 - How the cooking zones work
Single circle cooking zones have one heating element, whilstdouble circle (vario) cooking zones and extended zones havetwo. Depending on model, the heating elements may beseparated by an isolating ring. Each cooking zone has overheating protection (atemperature limiter), which stops the ceramic surf...
Page 20 - How the hob is operated; Operation
How the hob is operated The hob is equipped with electronic sensor controls whichreact to finger contact. When the hob is switched off only the symbols for the sensorsfor switching the hob on and off and the safety lock arevisible. When the hob is switched on all the other sensorslight up as well. T...
Page 21 - Switching on; Touch the
Switching on The hob must be switched on before any of the zones can beused. Do not leave the appliance unattended whilst it is beingused. To switch the hob on ^ Touch the s sensor. All the sensors will light up. The "0" on the numerical keypadwill light up more brightly than the other numbe...
Page 22 - Power level range
Power level range The appliance is delivered with 9 power levels programmed in. If you wish to finetune a setting, you can extend the power level range (see "Programming"). Cooking process Power levels* Standard factory settings (9 power levels) Extended settings (17 power levels) Melting bu...
Page 23 - Activating; If the range of power settings has been; extended
Auto heat-up When Auto heat-up has been activated, the cooking zoneswitches on automatically at the highest power setting andthen switches to the continued cooking setting selected. Theheat-up time depends on which continued cooking settinghas been chosen (see chart). As the higher continued cooking...
Page 24 - Continued
Continued cooking setting* Heat-up time in minutes and seconds (approx.) 1 1 : 20 1+ 2 : 00 2 2 : 45 2+ 3 : 25 3 4 : 05 3+ 4 : 45 4 5 : 30 4+ 6 : 10 5 6 : 50 5+ 7 : 10 6 1 : 20 6+ 2 : 00 7 2 : 45 7+ 2 : 45 8 2 : 45 8+ 2 : 45 9 - * *The continued cooking settings with + after the number are only avai...
Page 25 - Switching on the extended cooking area; Double circle zone / Extended zone; Touch the sensor for the double circle / extended zone.; Combination extended zone (depending on model); Touch the sensor for the extended zone.
Switching on the extended cooking area When cooking with larger pans, the outer circle of a doublecircle/extended zone (see "Guide to the appliance") can beswitched on to provide an extended cooking area.For hobs with a combination extended zone, two cookingzones (one behind the other) are s...
Page 26 - Switching off the extended cooking area
Triple circle zone (depending on model) ^ Touch the "0" on the numerical keypad for the cooking zoneyou wish to use. ^ Set the power level you want by touching the appropriatenumber. ^ Touch the sensor for the extended zone repeatedly until thenumber of circles you want is switched on. Switc...
Page 27 - Switching off and residual heat indicators; Switching off a cooking zone
Switching off and residual heat indicators Switching off a cooking zone ^ Touch the "0" on the numerical keypad for the cooking zoneyou wish to use. The numbers 1 to 9 will go out after a few seconds. If thecooking zone is still hot, residual heat will then be indicated inthe display. Switch...
Page 28 - Suitable pans
– Most suitable The best pans for use on a ceramic hob are those with athick base which is very slightly concave when cold. Whenheated, the base flattens to rest evenly on the hob,optimising the conduction of the heat. cold hot – Less suitable Pans made of glass, ceramic or stoneware are lesssuitabl...
Page 29 - Tips on saving energy
– Check that the diameter of the pan base is wide enough for the cooking zone so that heat is not lost unnecessarily. too small suitable – Use a pan lid whenever possible to minimise heat loss. uncovered covered – Select a smaller pan when cooking small quantities. A small pan on a small cooking zon...
Page 30 - Timer
The hob must be switched on to use the timer. The timer can be used for two different functions: – to set the minute minder – to set a cooking zone to switch off automatically. You can select a time from 1 minute ( 01 ) to 9 hours ( 9^ ). A time of up to 99 minutes is set and displayed in minutes.Ex...
Page 31 - Minute minder; To set the minute minder time
Minute minder To set the minute minder time Minutes Example: You want to set 15 minutes. ^ Switch the hob on. ^ Touch the m sensor. The m indicator lamp will flash. 00 will appear in the timer display. The 0 on the right will flash. Enter the tens first and then the units. ^ Touch the number on the ...
Page 32 - Hours
Hours Whole hours are set by touching the relevant number on thenumerical keypad.Half hours are set by touching the area between the relevanttwo numbers.Example: You want to set 2 hours 30 minutes. ^ Switch the hob on. ^ Touch the m sensor. The m indicator lamp will flash. 00 will appear in the time...
Page 33 - To change the minute minder time; To delete the minute minder time
To change the minute minder time ^ Touch the m sensor. ^ Set the time you want, as described above. To delete the minute minder time ^ Touch the m sensor. ^ Touch 0 on the numerical keypad. Timer 33
Page 34 - To switch a cooking zone off automatically
To switch a cooking zone off automatically You can set a time at the end of which a cooking zone willswitch off automatically.All the cooking zones can be programmed at the same time. If the time programmed is longer than the maximumoperational time allowed, the cooking zone will switch offafter the...
Page 35 - To use both timer functions at the same time; minute minder as well
To use both timer functions at the same time The minute minder and automatic switch-off functions can beused at the same time. If you have programmed in one or more switch-off times, andwould like to use the minute minder as well : Touch the m sensor repeatedly until the indicator lamps for the cook...
Page 36 - Safety lock / System lock; safety lock; Safety features
Safety lock / System lock Keep children away from the hob for their own safety. Your appliance is equipped with a safety lock to prevent thehob and the cooking zones being switched on or any settingsbeing altered. The safety lock is activated when the hob is switched on. If the safety lock is activa...
Page 37 - Stop and Go; . When Stop and Go activated, the cooking zone; Deactivating
Stop and Go Your appliance has a Stop and Go feature which, whenactivated, reduces the power of all cooking zones in use topower level 1 . When Stop and Go activated, the cooking zone power levels and the setting of the timer cannot be alteredand the hob can only be switched off. When Stop and Go is...
Page 38 - Safety switch-off with an over-long cooking time; * The continued cooking settings with + after the number are; Safety switch-off if the sensors are covered; will flash in the timer display. At the same time a tone will
Safety switch-off Safety switch-off with an over-long cooking time If one of the cooking zones is heated for an unusually longperiod of time (see chart) and the power level is not altered,the hob will switch itself off automatically and the relevantresidual heat indicator will light up. To use the c...
Page 39 - Overheating protection; Overheating can be caused by:
Overheating protection Each zone is equipped with overheating protection (internaltemperature limiter). This switches off the heating elements inthe cooking zone before the ceramic surface overheats. If the heating element switches on and off even when thehighest power level is selected, this indica...
Page 40 - Cleaning and care
For Miele branded cleaning and conditioning products see"Optional accessories". , Do not use a steam cleaning appliance to clean this appliance. The steam could reach electrical componentsand cause a short circuit. The appliance should be cleaned after each use. Let it cooldown to room tempe...
Page 41 - Spots; caused by limescale, water and aluminium residues; sugar, plastic or aluminium foil; spill or fall onto
Do not use washing-up liquid to clean the ceramic surface.Washing-up liquid will not remove all soiling and deposits.It will form an invisible coating which will cause permanentdiscolouration of the ceramic surface.Clean the hob regularly with a suitable ceramic hobcleaner. Wipe all coarse soiling o...
Page 42 - Programming
You can change the default settings of programme options(see chart). Several settings can be altered in succession. After programming mode has been called up, P (Programme) and S (Status) will appear in the timer display. On hobs with 3 cooking zones, an additional indicator will appear at the rearl...
Page 45 - The mains fuse has tripped. Reset the trip switch in the; Problem solving guide
With the help of the following notes, minor faults in the performance of theappliance, some of which may result from incorrect operation can be put rightwithout contacting the Service Department. , Installation work and repairs to electrical appliances must only be carried out by a suitably qualifie...
Page 48 - FE; flashes alternately
Problem Possible cause Remedy The sensors areover-sensitive or do notreact at all. The sensitivity level ofthe sensors haschanged. Make sure that there is nodirect light (from the sun orfrom an artificial source)falling onto the hob and thatthe surrounding area is nottoo dark. Make sure that there i...
Page 49 - To test the power level
You can test the power level of a cooking zone by measuringhow long it takes to bring a specific amount of water to theboil. The pan (and lid) must be stainless steel or enamel. Thediameter of the pan must match the cooking zone, and beflat-bottomed or slightly concave. ^ Take a note of the diameter...
Page 50 - * Max. time under unfavourable conditions
C Cooking zone in cm Rating in watts for 230 V Quantity of water in litres Time* in minutes 10.0 600 0.5 11.0 12.0 700 / 750 1.0 13.0 12.0 1200** 1.0 11.0 14.5 1000 / 1100 1.0 9.0 14.5 1200 1.0 8.5 14.5 1500** 1.0 7.0 17.0 1500 1.5 9.5 18.0 1700 / 1800 1.5 9.0 21.0 2000 2.0 10.5 21.0 2200 / 2300 2.0...
Page 51 - Cleaning products; Removes finger marks and light soiling.; Optional accessories
Miele offer a comprehensive range of useful accessories aswell as cleaning and conditioning products for yourappliance. These can be ordered online at: or from Miele (see back cover for contact details) Cleaning products Ceramic and stainless steel hob cleaner250 ml Removes heavy soiling, limescale ...
Page 52 - The; Miele; system allows communication-enabled; Con; is the communication between the hob and the
Miele | home system The Miele { home system allows communication-enabled appliances to send operating and status information to adisplay appliance via the household electrical supply system(Powerline Technology). SuperVision appliances can display status information fromother domestic appliances. Fo...
Page 54 - Communication module XKM 2000 DA
Con | ctivity a Communication module XKM 2000 DA b Communication module XKM 2100 KM c Electrical supply (Powerline) Optional accessories 54
Page 55 - Signing on the hob
Signing on the hob If you want to sign the hob – on to the Miele { home system, first prepare the signing on procedure on the master appliance (see the "Miele | home" fitting and installation instructions) – on to the Con | ctivity system, first sign on the cooker hood (see the "Con | ct...
Page 56 - Signing off the hob
Signing off the hob If you want to sign off from the Miele { home system, first prepare the signing off procedure on the master appliance(see the "Miele | home" fitting and installation instructions). ^ With the hob switched off, touch the s and $ sensors at the same time until the safety lo...
Page 57 - Safety instructions for installation
The appliance must only be installedand connected to the electricitysupply by a suitably qualified andcompetent person in strictaccordance with current nationaland local safety regulations. Fit the wall units and extractor hoodbefore fitting the hob to avoiddamaging the appliance. ~ The veneer or la...
Page 58 - Safety distance above the hob
Safety distance above an interimshelf It is not necessary to fit an interim shelfunderneath the hob. If an interim shelf is fitted underneaththe hob, a minimum safety distance of110 mm must be maintained betweenthe top of the worktop and the top ofthe interim shelf. A gap of at least 10 mm must bepr...
Page 61 - Tiled worktop; Grout lines
Hob with frame or bevellededges Seal between the hob and theworktop The sealing strip under the edge of thetop part of the appliance provides asufficient seal for the worktop. The hob must not be sealed withsealant (e.g. silicone).This could result in damage to thehob or the worktop if the hob evern...
Page 62 - Building-in dimensions
KM 5854 a Spring clamps b Casing depth c Building-in depth including cable exit d Mains connection box. Mains connection cable, L = 1440 mm e Wiring harness, L = 1550 mm f Building-in depth, including Miele | home connection box g Front Building-in dimensions 62
Page 65 - Secure the spring clamps; Installation
The exact positions of the springclamps, and the safety brackets forhobs with bevelled edges, are shownin the building-in dimensions for theparticular hob. Hobs with bevelled edges:The sealing strip will ensure that thehob sits securely in the cut-out. Anygap between the frame and worktopwill reduce...
Page 66 - Granite and marble worktops
Granite and marble worktops You will require double-sided tapeand silicone (not supplied). ^ Fix the spring clamps (or safetybrackets for hobs with bevellededges) in place using double-sidedtape c . The spring clamps must rest on thetop edge of the cut-out and the safetybrackets must be flush with t...
Page 67 - Installing the hob; Connect the hob to the mains.
Installing the hob ^ Feed the hob connection cable downthrough the cut-out. ^ Position the hob on the springclamps. ^ Using both hands, press downevenly on the sides of the hob until itclicks into position. When doing this,make sure that the seal under thehob sits flush with the worktop on allsides....
Page 68 - External mains connection box
The connection box can be sited asfollows: – placed in a base unit underneath the hob – on the side wall of a base unit underneath the hob – on the wall behind the base unit – in a neighbouring unit. A minimum safety distance of150 mm must be maintainedbetween the connection box and thehob and also ...
Page 69 - Electrical connection
All electrical work should be carriedout by a suitably qualified andcompetent person, in strictaccordance with current local andnational safety regulations (BS 7671in the UK). Installation, repairs and other workby unqualified persons could bedangerous. The manufacturercannot be held liable forunaut...
Page 70 - Wiring diagram
The electrical safety of this appliancecan only be guaranteed whencontinuity is complete between it andan effective earthing system, whichcomplies with current local and nationalsafety regulations. It is most importantthat this basic safety requirement ispresent and regularly tested and wherethere i...
Page 71 - – Your Miele dealer, or; After sales service, data plate
In the event of any faults which you cannot remedy yourself, or if the appliance isunder guarantee, please contact: – Your Miele dealer, or – the Miele Service Department (see back cover for address). Please note that telephone calls may be monitored and recorded to improveour service. When contacti...