Page 2 - Contents
Contents 2 IMPORTANT SAFETY INSTRUCTIONS ............................................................ 4 Caring for the environment .............................................................................. 12 Saving energy ............................................................................
Page 3 - Cleaning and care
Contents 3 Cleaning and care ............................................................................................. 32 Cleaning agents................................................................................................... 32Preparing the appliance for cleaning........................
Page 4 - IMPORTANT SAFETY INSTRUCTIONS; Appropriate use; This appliance is intended for use in the home and similar environ-
IMPORTANT SAFETY INSTRUCTIONS 4 This refrigeration appliance complies with current safety require-ments. Inappropriate use can, however, lead to personal injury andmaterial damage. Please read the operating and installation instructions carefully be-fore using the refrigeration appliance for the fir...
Page 5 - Safety with children; To reduce the risk of injury, do not allow children to play in, on or
IMPORTANT SAFETY INSTRUCTIONS 5 This refrigeration appliance is not suitable for storing and keeping cool medicines, blood plasma, laboratory preparations, or other simi-lar substances or products that are subject to the Medical Device Di-rective. Incorrect use of the refrigeration appliance for s...
Page 6 - Technical safety
IMPORTANT SAFETY INSTRUCTIONS 6 Technical safety The coolant circuit has been checked for leaks. The refrigeration appliance complies with statutory and regulatory requirements.. This refrigeration appliance contains the coolant Isobutane (R600a), a natural gas which is environmentally friendly....
Page 8 - Correct use
IMPORTANT SAFETY INSTRUCTIONS 8 - the screw-type fuses on the electrical service panel have been re- moved or - the power cord has been unplugged. Pull on the plug and not on the cord when removing it from the outlet. Installation, repair, and maintenance work should only be per- formed by a Miele...
Page 9 - Cleaning and maintenance
IMPORTANT SAFETY INSTRUCTIONS 9 Risk of explosion. Do not operate any electrical equipment (e.g., an electric ice-cream maker) inside the refrigeration appliance. Riskof sparking and explosion. When eating stored food, there is a danger of food poisoning. Storage times will depend on several fac...
Page 10 - Transport
IMPORTANT SAFETY INSTRUCTIONS 10 Transport To avoid damage to the appliance, always transport it upright and in its packaging. Risk of injury and damage. The refrigeration appliance is very heavy and must be transported by 2 people. Disposal of your old appliance Children could become trapped ...
Page 11 - Symbol on the compressor (depending on model); The oil in the compressor can be fatal if swallowed or if it pene-
IMPORTANT SAFETY INSTRUCTIONS 11 - scratching the surface coating. Symbol on the compressor (depending on model) This information is only relevant for recycling. There is no risk during normal oper-ation. The oil in the compressor can be fatal if swallowed or if it pene- trates the airways.
Page 12 - Caring for the environment; Disposal of packaging material
Caring for the environment 12 Disposal of packaging material The packaging is designed to protectthe appliance from damage duringtransportation. The packaging materialsused are selected from materials whichare environmentally friendly for disposaland should be recycled. Ensure that any plastic wrapp...
Page 13 - Saving energy
Saving energy 13 Normal energy consumption Increased energy consumption Installation /Maintenance In a well-ventilated room. In an enclosed, poorly venti-lated room. Protected from direct sun-light. In direct sunlight. Away from heat sources (ra-diator, range/oven). Near a heat source (radiator,oven...
Page 14 - Use
Saving energy 14 Normal energy consumption Increased energy consumption Use The drawers, and shelvesare arranged as they werewhen the appliance was de-livered. Only open the door whennecessary and for as short atime as possible. Store foodin an organized way. Frequent opening of thedoor for long per...
Page 15 - Guide to the appliance; Control panel
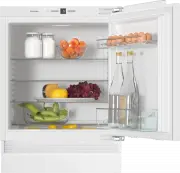
Guide to the appliance 15 Control panel a On/off button b Automatic SuperCool button c Display d Menu symbol(Settings mode for:switching the safety lock on/off) e Automatic SuperCool symbol f Lock symbol g Temperature display h Temperature selector button i Alarm off button
Page 17 - Accessories; Accessories supplied
Guide to the appliance 17 Accessories Accessories supplied Bottle holder The non-slip fins of the bottle holder jutout into the bottle shelf and make bot-tles more secure when you open andclose the appliance door. Egg tray Optional accessories A range of useful Miele accessories andcare products are...
Page 19 - Switching on and off; Before first use; Packaging material; Switching on the appliance; Switching off the appliance; Press the
Switching on and off 19 Before first use Packaging material Remove all packaging material fromthe inside of the appliance. Removing the protective film The stainless steel strips on the doorshelves and adjustable shelves have alayer of protective film to prevent dam-age during transportation. Ca...
Page 20 - Turn the appliance off.
Switching on and off 20 Switching off for longer peri-ods of time If, during a long absence, the refrig-eration appliance is switched off butnot cleaned and the door(s) left shut,there is a danger of bacteria buildingup inside the appliance.It is essential to clean the refrigera-tion appliance. If t...
Page 21 - The correct temperature; Temperature display; required; Setting the temperature
The correct temperature 21 It is very important to set the correcttemperature for storing food in the ap-pliance. Bacteria will cause food whichis not stored at the correct temperatureto deteriorate rapidly. Temperature influ-ences the growth rate of these bacteria.Reducing the temperature reduces t...
Page 22 - Using Automatic SuperCool; Automatic SuperCool function; Switching on Automatic SuperCool
Using Automatic SuperCool 22 Automatic SuperCool function The Automatic SuperCool function canbe used to rapidly reduce the tempera-ture in the Fridge Zone to its lowest set-ting (depending on the room tempera-ture). Automatic SuperCool is particularly rec-ommended for the rapid chilling of largeamo...
Page 23 - Door alarm; Turning the door alarm off early
Door alarm 23 The appliance is fitted with a warningsystem to avoid increased energy con-sumption if the door is left open. Door alarm An alarm will sound if the machine doorhas been left open for longer than60 seconds. As soon as the door is closed, thealarm sound will stop. Turning the door alarm ...
Page 24 - Selecting additional settings; Settings mode; – To activate the lock
Selecting additional settings 24 Settings mode Certain settings on the appliance canonly be selected in settings mode. Activating and deactivating thesafety lock Setting the temperature display°C/°F Settings mode is represented in the dis-play by the menu symbol . The procedure for accessing s...
Page 26 - Storing food in the refrigerator section; Risk of fire from electrical appli-; Different storage zones; To allow air to circulate efficiently,
Storing food in the refrigerator section 26 Do not load more than a maximum of35 lb (16 kg) of food in the appliancedoor. Risk of fire from electrical appli- ances.Operating electrical devices in theappliance can cause sparks to form.Do not operate any electrical devicesinside the appliance. Ris...
Page 27 - Coldest area
Storing food in the refrigerator section 27 Coldest area The coldest area in the refrigerator sec-tion is directly above the fruit and veg-etable drawer and at the back of theappliance. Use these areas to store all delicate andhighly perishable food, such as: - Fish, meat, poultry - Cold cuts, ready...
Page 28 - Notes on buying food; Take a cool bag when shopping,; Storing food correctly; in packaging or covered
Storing food in the refrigerator section 28 Notes on buying food The freshness of food when first placedin the appliance is an important factorin determining how long it stays fresh,and how long it can be kept in the ap-pliance.Take into account the use-by date andthe correct storage temperature.Tim...
Page 29 - Adjusting the interior fittings; Only move the door shelves/bottle; Moving the shelves
Adjusting the interior fittings 29 Adjusting the door shelf/bottleshelf Tip: Only move the door shelves/bottle shelves in the door when they areempty. Push the door shelf/bottle shelf up-ward, then remove it by pulling it for-ward. Replace the shelf at the requiredheight. Ensure that it is secur...
Page 30 - Moving the carbon filter; - Change the carbon filters sooner if
Adjusting the interior fittings 30 Moving the carbon filter The carbon filter with KKF-FF holder(Active AirClean) is available as an op-tional accessory (see “Accessories -Optional accessories”). When you are storing very strong-smelling food (e.g., cheese): - Place the holder with the carbon fil- t...
Page 31 - Defrosting; WARNING! DANGER of injury; Refrigerator section
Defrosting 31 WARNING! DANGER of injury and damage!Do not use any mechanical or othertypes of aids which are not recom-mended by the manufacturer to ac-celerate the defrosting process. Refrigerator section The refrigerator section defrosts auto-matically. Condensate and frost can build-up onthe ba...
Page 32 - WARNING! DANGER of electric; Cleaning agents; do not
Cleaning and care 32 WARNING! DANGER of electric shock!Unplug the appliance or trip the cir-cuit breaker. WARNING! Fire hazard! Do not damage the coolantpipework. Do not let water get into the elec-tronic or the lighting. Risk of damage due to moisture penetration.The steam from a steam cleane...
Page 34 - interior
Cleaning and care 34 Cleaning the interior and ac-cessories The appliance should be cleanedregularly (at least once a month). Clean up any spills, stains, or foodimmediately. Do not allow them todry and stick to the appliance. Clean the interior with a clean sponge, lukewarm water, and a littleliq...
Page 35 - Cleaning the door seal; Risk of damage as a result of in-; Cleaning the ventilation gaps
Cleaning and care 35 Cleaning the door seal If the door seal is damaged or hascome out of the groove, the door willnot close properly and this will affectcooling. As a result, condensate willbuild up in the interior cabinet andthis can cause a build-up of ice.Do not damage the door seal, andmake sur...
Page 36 - Replacing the carbon filters; The carbon filter holder is dish-
Cleaning and care 36 Replacing the carbon filters The carbon filter with KKF-FF holder(Active AirClean) is available as an op-tional accessory (see “Guide to theappliance” section “Optional acces-sories”). Replace the carbon filters in the holderaround every 6 months. Replacement KKF-RF carbon filte...
Page 37 - Frequently Asked Questions; Problem
Frequently Asked Questions 37 With the help of the following guide minor faults in the performance of the ma-chine, some of which may result from incorrect operation, can be remedied with-out contacting the Service Department. This guide may help you to find the reason for the fault, and how to corr...
Page 40 - Messages in the display; Contact Miele Technical Service.
Frequently Asked Questions 40 Messages in the display Message Possible cause and solution The symbol lights up in the display, the appli-ance does not get cold,although the controlsand the interior lightingare working. Demo mode is switched on. This allows the appli-ance to be presented in the sho...
Page 41 - The interior lighting is not working.
Frequently Asked Questions 41 The interior lighting is not working. Problem Possible cause and solution The interior lighting isnot working. The refrigeration appliance has not been turned on. Turn the refrigeration appliance on. To avoid overheating, the interior lighting switches it-self off aut...
Page 42 - Other problems
Frequently Asked Questions 42 Other problems Problem Possible cause and solution The floor of the refriger-ator section is wet. The drain hole is blocked. Clean the condensate channel and the drain hole. The external walls ofthe appliance feelwarm. This is not a fault. The warmth created by the ev...
Page 43 - Causes of noises; Cause
Causes of noises 43 Normalnoises Cause Brrrrr... A humming noise is made by the motor (compressor). This noisecan get louder for brief periods when the motor switches on. Blub, blub... A gurgling noise can be heard when the coolant circulatesthrough the pipes. Click... Clicking sounds occur whenever...
Page 44 - Customer Service; Contact in the event of a fault
Customer Service 44 Contact in the event of a fault In the event of a fault which you cannotremedy yourself, please contact yourMiele dealer or Miele Customer Service. You can book a Miele Service Call on-line at www.miele.com/service. Contact information for Miele Cus-tomer Service can be found at ...
Page 45 - Installation; Installation location
Installation *INSTALLATION* 45 Installation Side-by-side The appliance has two side-wall heatersencased in foam and can be installedside-by-side with other appliances.Each appliance must be installed in itsown niche. Please contact your dealer for specificinformation about which combinationswill wor...
Page 46 - Climate class
Installation *INSTALLATION* 46 Climate class The appliance is designed for use withina certain climate range (ambient tem-peratures) and should not be used out-side this range. The climate range of theappliance is stated on the data plate in-side the appliance. Climate class Room temperature SN 50°F...
Page 48 - Before installing the appliance
Installation *INSTALLATION* 48 Before installing the appliance Before installation, remove the bag ofinstallation accessories and other ac-cessories from the appliance. Remove the cord clips from the backof the appliance. Remove red transport safety de-vice (depending on model) and use the ...
Page 49 - Installation dimensions
Installation *INSTALLATION* 49 Installation dimensions Installation dimensions Appliance dimensions
Page 51 - Changing the door hinges; Risk of injury and damage when
Installation *INSTALLATION* 51 Changing the door hinges The appliance is supplied with right-hand hinging. If left-hand hinging is re-quired, the hinges must be changed. Risk of injury and damage when changing the door hinging.There is an increased risk of injuryand damage if the refrigeration app...
Page 52 - Installing the door
Installation *INSTALLATION* 52 Slightly loosen the hinge screws: and . Push the door outward and take it off its hinges. Undo the screws completely and loosely screw them in on the oppositeside. Undo the screws completely and loosely screw them in on the oppositeside. Installing th...
Page 54 - Adjusting the door hinge; Adjusting the door hinges
Installation *INSTALLATION* 54 Adjusting the door hinge Adjusting the door hinges If you would like the appliance door tobe cushioned so that it opens moresoftly, the spring tension on the appli-ance door can be adjusted. To do this, use an Allen key to adjustthe door hinges. To reduce the openin...
Page 55 - Building in the appliance; Parts required for installation:
Installation *INSTALLATION* 55 Building in the appliance To install the appliance, you will needthe following tools: Parts required for installation: All installation parts are number-coded.This coding is also used in the installa-tion instructions. Preparing the appliance Position the appliance d...
Page 57 - Positioning the appliance
Installation *INSTALLATION* 57 Positioning the appliance Risk of damaging the power cord.When pushing the refrigeration appli-ance into its niche, the power cordcan get trapped and damaged.Carefully push the appliance into theniche. Risk of damaging the floor. Moving the refrigeration appliancec...
Page 58 - On
Installation *INSTALLATION* 58 On cabinets with door fittings (e.g., knobs, raised seals) the dimension of these must be taken into account toensure that there is a gap of 1 5/8" (42 mm) all round. Pull the appliance forward by the ap-propriate dimension. Check again to make sure there is ag...
Page 60 - Securing the appliance in the niche; Installing the door panel
Installation *INSTALLATION* 60 Securing the appliance in the niche 1. Secured at the top 2. Secured at the side Screw the appliance into position onthe right and the left. Installing the door panel Ensure that the toe-kick facing is re-installed correctly. The distance between the appliancedoor ...
Page 61 - inside
Installation *INSTALLATION* 61 Tip: Push up the installation aids to- gether with the cabinet front until theyare at the same height as the neighbor-ing unit doors. Unscrew the nuts and remove the mounting frame together with the installation aids . Draw a faint central line with a penci...
Page 62 - Open the appliance door.
Installation *INSTALLATION* 62 Attach the side cover to the mountingframe on the side opposite the hinge. Turn the door panel over and attachthe handle (if required). Open the appliance door. Hang the door panel on adjustingbolts . Screw nuts loosely onto the ad- justing bolts. Clo...
Page 64 - Electrical connection
Installation *INSTALLATION* 64 Fit the cover in position. The appliance is properly installed inthe niche if: - the door closes properly - the door does not touch the housing unit - the seal on the top corner of the han- dle side is firmly seated To double check place a flashlight inthe applianc...
Page 66 - solar
Installation *INSTALLATION* 66 Do not connect the appliance to an in-verter such as those used with an au-tonomous energy source e.g. solar power . When switched on, peak loads in the system can cause the safetyswitch-off mechanism to be triggered.This can damage the electronic unit. The appliance m...
Page 67 - National Headquarters; Canada; Headquarters and Miele Centre
9 Independence WayPrinceton, NJ 08540Phone:Fax:www.mieleusa.com U.S.A. Miele, Inc. National Headquarters Please have the model and serial numberof your appliance available whencontacting Customer Service. Canada ImporterMiele Limited Headquarters and Miele Centre 800-843-7231609-419-4298 Customer Se...


 Miele WWD380 WCS PWash&Steam&9kg User Manual
 Miele W 1614 Manual
 Miele G 5266 SCVi SFP Active Plus User Manual
 Miele Classic C1 Turbo Team PowerLine - SBAN0 User Manual
![Miele PDR 307 [EL]](https://manualsarea.com/img/product/thumbs/48/ba/fd/bafde84806e8abc8b420f34eaf8fcd6e.webp) Miele PDR 307 [EL] User Manual
Miele PDR 307 [EL] User Manual Miele F 1911 Vi Manual
![Miele PDR 908 [EL MAR 3N AC 400V 50-60Hz]](https://manualsarea.com/img/product/thumbs/48/05/b7/05b705998b251f92b271e908423e1ecb.webp) Miele PDR 908 [EL MAR 3N AC 400V 50-60Hz] Installation Manual
Miele PDR 908 [EL MAR 3N AC 400V 50-60Hz] Installation Manual Miele K 9757 iD Manual
 Miele K 9457 iD Manual
 Miele K11820SD Manual
 Miele K 12010 S-2 Manual
 Miele K 31222 Ui-1 User Manual
 Miele K 31242 UiF-1 User Manual
 Miele KD 4072 E Active User Manual
 Miele KDB 37232 iD Manual
 Miele KDN 7713 E Active User Manual
 Miele KDN 7724 E Active User Manual
 Miele KDN 9713 iD Manual