Maytag MRSF4036PW - User Manual
Maytag MRSF4036PW Refrigerator – User Manual, read for free online in PDF format. We hope this helps you resolve any issues you may have. If you have further questions, please contact us through the contact form.
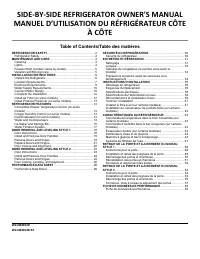


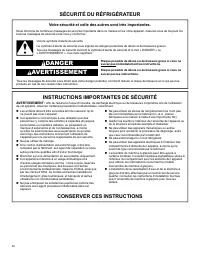
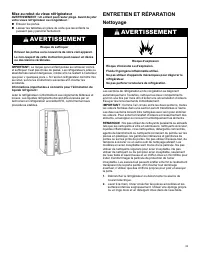

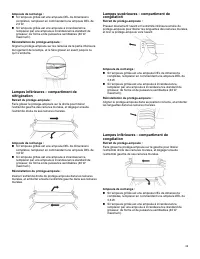
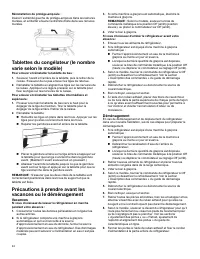
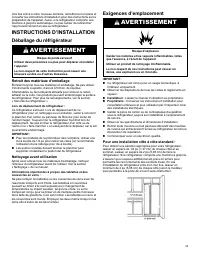
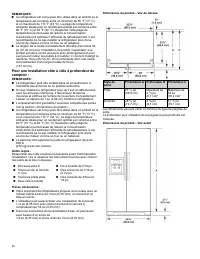
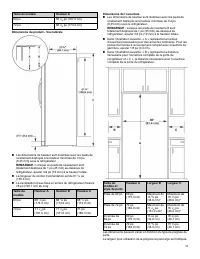

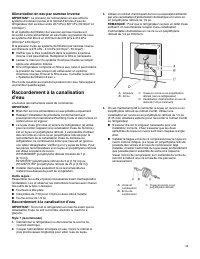
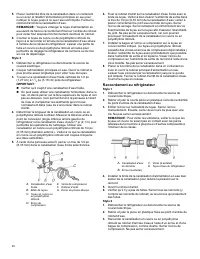

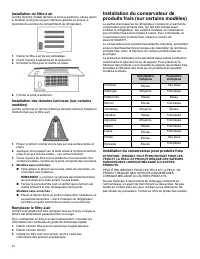
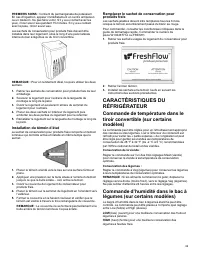
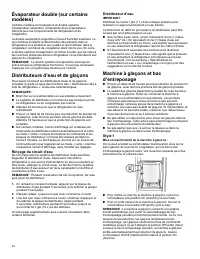


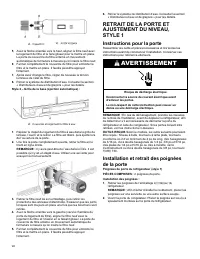
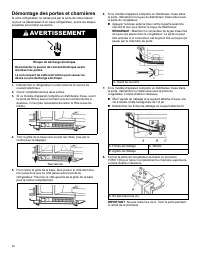
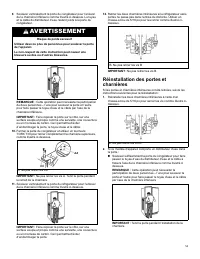
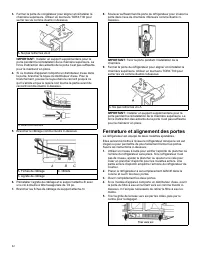
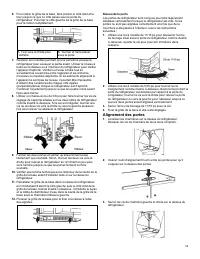
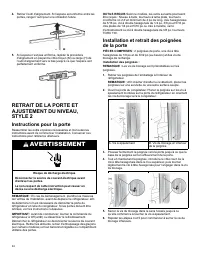
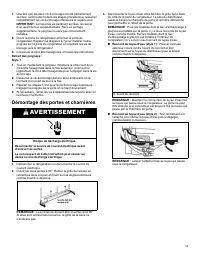

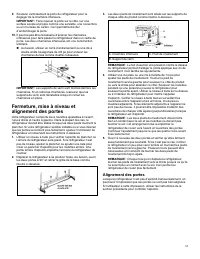


Table of Contents:
- Page 2 – REFRIGERATOR SAFETY; Your safety and the safety of others are very important.; DANGER; IMPORTANT SAFETY INSTRUCTIONS; SAVE THESE INSTRUCTIONS
- Page 3 – Proper Disposal of Your Old Refrigerator; MAINTENANCE AND CARE; Cleaning; WARNING; WARNING
- Page 4 – Lights; Refrigerator Compartment – Upper Lights; Refrigerator Compartment
- Page 5 – Vacation and Moving Care; Vacations
- Page 6 – Moving; INSTALLATION INSTRUCTIONS; Unpack the Refrigerator; Remove the Packaging; Clean Before Using
- Page 7 – Location Requirements
- Page 9 – Electrical Requirements
- Page 10 – Water Supply Requirements; Water Pressure; Connect Water Supply; Connect to Water Line
- Page 11 – Connect to Refrigerator
- Page 12 – Complete the Installation; Installing the Air Filter
- Page 13 – Replacing the Air Filter; Installing the Produce Preserver
- Page 14 – REFRIGERATOR FEATURES; Water and Ice Dispensers; Flush the Water System
- Page 15 – The Water Dispenser; Ice Maker and Storage Bin
- Page 16 – Style 3; Style 4
- Page 17 – Style 5; Water Filtration System; Water Filter Status Light
- Page 18 – Changing the Water Filter; Door Instructions
- Page 21 – Replace Doors and Hinges
- Page 22 – Door Closing and Alignment
- Page 23 – Door Alignment
- Page 28 – PERFORMANCE DATA SHEET
- Page 30 – SÉCURITÉ DU RÉFRIGÉRATEUR; Votre sécurité et celle des autres sont très importantes.; INSTRUCTIONS IMPORTANTES DE SÉCURITÉ; CONSERVER CES INSTRUCTIONS
- Page 31 – Mise au rebut du vieux réfrigérateur; ENTRETIEN ET RÉPARATION; Nettoyage; AVERTISSEMENT
- Page 32 – Lampes
- Page 34 – Vacances
- Page 35 – INSTRUCTIONS D’INSTALLATION; Déballage du réfrigérateur; Exigences d’emplacement
- Page 38 – Spécifications électriques; Pression d’eau
- Page 40 – Raccordement au réfrigérateur
- Page 41 – Terminer l’installation
- Page 42 – Installation du filtre à air; Remplacer le filtre à air; Installation du conservateur pour produits frais
- Page 43 – Installation du témoin d’état
- Page 44 – Distributeurs d’eau et de glaçons; Rinçage du circuit d’eau
- Page 47 – Système de filtration de l’eau; Témoin lumineux de l’état du filtre à eau
- Page 48 – Instructions pour la porte
- Page 50 – Démontage des portes et charnières
- Page 52 – Fermeture et alignement des portes
- Page 53 – Alignement des portes
- Page 59 – FICHE DE DONNÉES DE PERFORMANCE
- Page 61 – NOTES
W11484052D
W11484054D-SP
SIDE-BY-SIDE REFRIGERATOR OWNER'S MANUAL
MANUEL D’UTILISATION DU RÉFRIGÉRATEUR CÔTE
À CÔTE
Table of Contents/Table des matières
. . . . . . . . . . . . . . . . . . . . . . . . . . . . . . . . . . . . . . . . . . . . . . . . . 2
. . . . . . . . . . . . . . . . . . . . . . . . . . . . . . . . . . . . . . . . . . . . . . 3
Cleaning . . . . . . . . . . . . . . . . . . . . . . . . . . . . . . . . . . . . . . . . . . . . . . . . . . . . . . . . . . . . . . . . . . . . . . 3
Lights . . . . . . . . . . . . . . . . . . . . . . . . . . . . . . . . . . . . . . . . . . . . . . . . . . . . . . . . . . . . . . . . . . . . . . . . . . 4
Freezer Shelf (number varies by model). . . . . . . . . . . . . . . . . . . . . . . . . . . . . . 5
Vacation and Moving Care . . . . . . . . . . . . . . . . . . . . . . . . . . . . . . . . . . . . . . . . . . . . . . . 5
. . . . . . . . . . . . . . . . . . . . . . . . . . . . . . . . . . . . . . . . 6
Unpack the Refrigerator . . . . . . . . . . . . . . . . . . . . . . . . . . . . . . . . . . . . . . . . . . . . . . . . . . 6
Location Requirements . . . . . . . . . . . . . . . . . . . . . . . . . . . . . . . . . . . . . . . . . . . . . . . . . . . 7
Electrical Requirements . . . . . . . . . . . . . . . . . . . . . . . . . . . . . . . . . . . . . . . . . . . . . . . . . . 9
Water Supply Requirements . . . . . . . . . . . . . . . . . . . . . . . . . . . . . . . . . . . . . . . . . . . 10
Connect Water Supply . . . . . . . . . . . . . . . . . . . . . . . . . . . . . . . . . . . . . . . . . . . . . . . . . . 10
Complete the Installation . . . . . . . . . . . . . . . . . . . . . . . . . . . . . . . . . . . . . . . . . . . . . . . 12
Install Air Filter (on some models) . . . . . . . . . . . . . . . . . . . . . . . . . . . . . . . . . . . . 12
Install Produce Preserver (on some models) . . . . . . . . . . . . . . . . . . . . . . 13
. . . . . . . . . . . . . . . . . . . . . . . . . . . . . . . . . . . . . . . . . . . 14
Convertible Drawer Temperature Control (on some
models) . . . . . . . . . . . . . . . . . . . . . . . . . . . . . . . . . . . . . . . . . . . . . . . . . . . . . . . . . . . . . . . . . . . . . 14
Crisper Humidity Control (on some models) . . . . . . . . . . . . . . . . . . . . . . . 14
Dual Evaporator (on some models) . . . . . . . . . . . . . . . . . . . . . . . . . . . . . . . . . . 14
Water and Ice Dispensers . . . . . . . . . . . . . . . . . . . . . . . . . . . . . . . . . . . . . . . . . . . . . . 14
Ice Maker and Storage Bin . . . . . . . . . . . . . . . . . . . . . . . . . . . . . . . . . . . . . . . . . . . . . 15
Water Filtration System . . . . . . . . . . . . . . . . . . . . . . . . . . . . . . . . . . . . . . . . . . . . . . . . . 17
DOOR REMOVAL AND LEVELING STYLE 1
. . . . . . . . . . . . . . . . . . . . . . . 18
Door Instructions . . . . . . . . . . . . . . . . . . . . . . . . . . . . . . . . . . . . . . . . . . . . . . . . . . . . . . . . . 18
Install and Remove Door Handles . . . . . . . . . . . . . . . . . . . . . . . . . . . . . . . . . . . 19
Remove Doors and Hinges . . . . . . . . . . . . . . . . . . . . . . . . . . . . . . . . . . . . . . . . . . . . 19
Replace Doors and Hinges . . . . . . . . . . . . . . . . . . . . . . . . . . . . . . . . . . . . . . . . . . . . 21
Door Closing and Alignment . . . . . . . . . . . . . . . . . . . . . . . . . . . . . . . . . . . . . . . . . . . 22
DOOR REMOVAL AND LEVELING STYLE 2
. . . . . . . . . . . . . . . . . . . . . . . 23
Door Instructions . . . . . . . . . . . . . . . . . . . . . . . . . . . . . . . . . . . . . . . . . . . . . . . . . . . . . . . . . 23
Install and Remove Door Handles . . . . . . . . . . . . . . . . . . . . . . . . . . . . . . . . . . . 24
Remove Doors and Hinges . . . . . . . . . . . . . . . . . . . . . . . . . . . . . . . . . . . . . . . . . . . . 24
Door Closing, Leveling, and Alignment . . . . . . . . . . . . . . . . . . . . . . . . . . . . . 26
. . . . . . . . . . . . . . . . . . . . . . . . . . . . . . . . . . . . . . . . 28
. . . . . . . . . . . . . . . . . . . . . . . . . . . . . . . . . . . . 30
. . . . . . . . . . . . . . . . . . . . . . . . . . . . . . . . . . . . . . . . . 31
Nettoyage . . . . . . . . . . . . . . . . . . . . . . . . . . . . . . . . . . . . . . . . . . . . . . . . . . . . . . . . . . . . . . . . . . 31
Lampes . . . . . . . . . . . . . . . . . . . . . . . . . . . . . . . . . . . . . . . . . . . . . . . . . . . . . . . . . . . . . . . . . . . . . 32
Tablettes du congélateur (le nombre varie selon le
modèle) . . . . . . . . . . . . . . . . . . . . . . . . . . . . . . . . . . . . . . . . . . . . . . . . . . . . . . . . . . . . . . . . . . . . . 34
Précautions à prendre avant les vacances ou le
déménagement . . . . . . . . . . . . . . . . . . . . . . . . . . . . . . . . . . . . . . . . . . . . . . . . . . . . . . . . . . . 34
. . . . . . . . . . . . . . . . . . . . . . . . . . . . . . . . . . . 35
Déballage du réfrigérateur . . . . . . . . . . . . . . . . . . . . . . . . . . . . . . . . . . . . . . . . . . . . . 35
Exigences d’emplacement . . . . . . . . . . . . . . . . . . . . . . . . . . . . . . . . . . . . . . . . . . . . . 35
Spécifications électriques . . . . . . . . . . . . . . . . . . . . . . . . . . . . . . . . . . . . . . . . . . . . . . 38
Spécifications de l’alimentation en eau . . . . . . . . . . . . . . . . . . . . . . . . . . . . . 38
Raccordement à la canalisation d’eau . . . . . . . . . . . . . . . . . . . . . . . . . . . . . . 39
Terminer l’installation . . . . . . . . . . . . . . . . . . . . . . . . . . . . . . . . . . . . . . . . . . . . . . . . . . . . 41
Installer le filtre à air (sur certains modèles) . . . . . . . . . . . . . . . . . . . . . . . 41
Installation du conservateur de produits frais (sur certains
modèles) . . . . . . . . . . . . . . . . . . . . . . . . . . . . . . . . . . . . . . . . . . . . . . . . . . . . . . . . . . . . . . . . . . . . 42
CARACTÉRISTIQUES DU RÉFRIGÉRATEUR
. . . . . . . . . . . . . . . . . . . . . 43
Commande de température dans le tiroir convertible (sur
certains modèles) . . . . . . . . . . . . . . . . . . . . . . . . . . . . . . . . . . . . . . . . . . . . . . . . . . . . . . . . 43
Commande d’humidité dans le bac à légumes (sur certains
modèles) . . . . . . . . . . . . . . . . . . . . . . . . . . . . . . . . . . . . . . . . . . . . . . . . . . . . . . . . . . . . . . . . . . . . 43
Évaporateur double (sur certains modèles) . . . . . . . . . . . . . . . . . . . . . . . . 44
Distributeurs d’eau et de glaçons . . . . . . . . . . . . . . . . . . . . . . . . . . . . . . . . . . . . . 44
Machine à glaçons et bac d’entreposage. . . . . . . . . . . . . . . . . . . . . . . . . . . 44
Système de filtration de l’eau . . . . . . . . . . . . . . . . . . . . . . . . . . . . . . . . . . . . . . . . . . 47
RETRAIT DE LA PORTE ET AJUSTEMENT DU NIVEAU,
STYLE 1
Instructions pour la porte . . . . . . . . . . . . . . . . . . . . . . . . . . . . . . . . . . . . . . . . . . . . . . . 48
Installation et retrait des poignées de la porte . . . . . . . . . . . . . . . . . . . . . 48
Démontage des portes et charnières . . . . . . . . . . . . . . . . . . . . . . . . . . . . . . . . 50
Réinstallation des portes et charnières . . . . . . . . . . . . . . . . . . . . . . . . . . . . . 51
Fermeture et alignement des portes . . . . . . . . . . . . . . . . . . . . . . . . . . . . . . . . . 52
RETRAIT DE LA PORTE ET AJUSTEMENT DU NIVEAU,
STYLE 2
Instructions pour la porte . . . . . . . . . . . . . . . . . . . . . . . . . . . . . . . . . . . . . . . . . . . . . . . 54
Installation et retrait des poignées de la porte . . . . . . . . . . . . . . . . . . . . . 54
Démontage des portes et charnières . . . . . . . . . . . . . . . . . . . . . . . . . . . . . . . . 55
Fermeture, mise à niveau et alignement des portes . . . . . . . . . . . . . 57
FICHE DE DONNÉES DE PERFORMANCE
"Loading the manual" means you need to wait until the file loads and becomes available for online reading. Some manuals are very large, and the time they take to appear depends on your internet speed.
Was this manual helpful?
About this manual
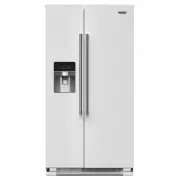
- Brand
- Maytag
- Model
- MRSF4036PW
- Document type
- User Manual
- Category
- Refrigerator
- Language(s)
- English, French
- Pages
- 64
- File size
- 2.9 MB
- Format
Other Manuals for Maytag MRSF4036PW
Summary
2 REFRIGERATOR SAFETY Your safety and the safety of others are very important. We have provided many important safety messages in this manual and on your appliance. Always read and obey all safetymessages. This is the safety alert symbol. This symbol alerts you to potential hazards that can kill or ...
3 Proper Disposal of Your Old Refrigerator WARNING: Risk of child entrapment. Before you throw awayyour old refrigerator or freezer: � Take off the doors. � Leave the shelves in place so that children may not easilyclimb inside. WARNING Suffocation Hazard Remove doors or lid from your old appliance....
4 4. There is no need for routine condenser cleaning in normalhome operating environments. If the environment isparticularly greasy or dusty, or there is significant pet traffic inthe home, the condenser should be cleaned every 2 to 3months to ensure maximum efficiency. If you need to clean the cond...
Ask a question
Related manuals
Popular Maytag Refrigerators
More Maytag Refrigerators models
 Maytag MFF2258FEZ User Manual
 Maytag MFW2055FRZ User Manual
 Maytag MRSF4036PB Manual
 Maytag MRSF4036PZ User Manual
 Maytag MRT118FFFE User Manual
 Maytag MRT311FFFE User Manual
 Maytag MRT311FFFZ User Manual
 Maytag MRT711SMFZ User Manual
 Maytag MSC21C6MFZ User Manual
 Maytag MSS25C4MGZ User Manual
 Maytag MSS25N4MKZ User Manual
 Maytag MBF2258FEZ User Manual