Makita KP0810C - Manual
Makita KP0810C Electric Planer – Manual, read for free online in PDF format. We hope this helps you resolve any issues you may have. If you have further questions, please contact us through the contact form.


Table of Contents:
- Page 2 – SPECIFICATIONS; Symbols
- Page 3 – EC Declaration of Conformity
- Page 5 – FUNCTIONAL DESCRIPTION; Adjusting depth of cut; For tool with lock button; Electronic function; Constant speed control; Foot; ASSEMBLY; Removing or installing planer blades
- Page 7 – For the correct planer blade setting; Correct setting; Cause: One or both blades fails to; Change of chip discharge direction
- Page 8 – Connecting a vacuum cleaner; OPERATION; Planing operation
- Page 9 – Chamfering
- Page 10 – MAINTENANCE; Sharpening the planer blades; For standard blades only; Replacing carbon brushes
- Page 11 – ACCESSORIES
1
ENGLISH (
O
rigina
l in
st
ruct
ions)
INSTRUCTION MANUAL
DOUBLE INSULATION
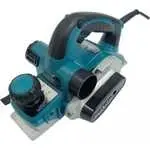
Power Planer
KP0810
KP0810C
007638
IMPORTANT:
Read Before Using.
"Loading the manual" means you need to wait until the file loads and becomes available for online reading. Some manuals are very large, and the time they take to appear depends on your internet speed.
Other Manuals for Makita KP0810C
Summary
2 ENGLISH (Original instructions) SPECIFICATIONS Model KP0810 KP0810C Planing width 82 mm Planing depth 4 mm Shiplapping depth 25 mm No load speed (min -1 ) 16,000 12,000 Overall length 290 mm Net weight 3.3 kg 3.4 kg Safety class /II • Due to our continuing programme of research and development, th...
3 • Be sure to identify safety measures to protect the operator that are based on an estimation of exposure in the actual conditions of use (taking account of all parts of the operating cycle such as the times when the tool is switched off and when it is running idle in addition to the trigger time)...
5 WARNING: DO NOT let comfort or familiarity with product (gained from repeated use) replace strict adherence to safety rules for the subject product. MISUSE or failure to follow the safety rules stated in this instruction manual may cause serious personal injury. FUNCTIONAL DESCRIPTION CAUTION: • A...