Page 2 - PRODUCT REGISTRATION
2 PRODUCT REGISTRATION Thank you for purchasing this Magic Chef® product. The first step to protect your new product is to complete the product registration on our website: www.mcappliance.com/register. The benefits of registering your product include the following: 1. Registering your product will ...
Page 3 - CONTENTS
3 CONTENTS PRODUCT REGISTRATION . . . . . . . . . . . . . . . . . . . . . . . . . . . . . . . . . . . . . . . . . . . . . . . . . . . . . 2PRECAUTIONS . . . . . . . . . . . . . . . . . . . . . . . . . . . . . . . . . . . . . . . . . . . . . . . . . . . . . . . . . . . . . . . 4IMPORTANT SAFETY INSTR...
Page 4 - PRECAUTIONS; EXPLANATION OF SYMBOLS; THIS PRODUCT IS INTENDED FOR
4 PRECAUTIONS EXPLANATION OF SYMBOLS WARNING Hazards or unsafe practices which COULD result in severe personal injury or death. CAUTION Hazards or unsafe practices which COULD result in minor personal injury. THIS PRODUCT IS INTENDED FOR HOUSEHOLD USE ONLY WARNING : Read and understand all safety pr...
Page 5 - IMPORTANT SAFETY INSTRUCTIONS; SAVE THESE INSTRUCTIONS
5 IMPORTANT SAFETY INSTRUCTIONS WARNING : To reduce the risk of fire, electrical shock, injury to persons, or damage when using the cooktop, follow basic precautions, including the following. CAUTION : DO NOT store items in cabinets above the cooktop that are of interest to children. Children climbi...
Page 6 - SPECIFICATIONS
6 SPECIFICATIONS Glass Width 24.0” (610 mm) Glass Depth 21.5” (546 mm) Cooktop Height Including Conduit (located at rear of cooktop, right side) 3-1/8” (80 mm) Frame Width 21-7/8” (556 mm) Frame Depth 19-1/8” (486 mm) Cooktop Height 2” (52 mm) Net Weight 20 lbs. (9.3 kg) Voltage Rating 240 V, 60 Hz ...
Page 7 - PARTS AND FEATURES
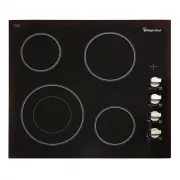
7 Figure 2 a. Single Cooking Zone b. Single/Dual Cooking Zone c. Single Cooking Zone d. Single Cooking Zone e. Hot Surface Indicator Light f. Control Knobs PARTS AND FEATURES a c e f d b
Page 8 - INSTALLATION REQUIREMENTS; TOOLS AND PARTS; LOCATION REQUIREMENTS
8 INSTALLATION REQUIREMENTS TOOLS AND PARTS Gather the required tools and parts before starting installation. Read and follow the instructions provided withany tools listed here. Check local codes. Check existing electrical supply. (Refer to “Electrical Requirements” section on page 9.)It is recomme...
Page 9 - ELECTRICAL REQUIREMENTS
9 b a c i f k k e l j g h d a. Combustible area above countertop b. Recommended upper cabinet width: 24” (61cm) c. Recommended upper cabinet depth: 13” (33 cm) d. 30” (76.2 cm) minimum clearance between top of cooktop platform and bottom of uncovered wood or metal cabinet (24” [61 cm] minimum cleara...
Page 11 - INSTALLATION INSTRUCTIONS; PREPARING COOKTOP FOR INSTALLATION; INSTALLING COOKTOP
11 Figure 4 INSTALLATION INSTRUCTIONS PREPARING COOKTOP FOR INSTALLATION WARNING : Excessive Weight Hazard • Use two or more people to move and install cooktop. • Failure to do so can result in back or other injury. Decide on the final location for the cooktop. Avoid drilling into or severing existi...
Page 12 - MAKE ELECTRICAL CONNECTION
12 4. Attach brackets to cooktop base bottom with bracket clamping screws using the bracket mounting holes. Securely tighten screws. a. Cooktopb. Cooktop Base c. Clamping Screw d. Clamping Bracket (It extends far enough beyond cooktop base to allow installation of clamping screws.) e. Countertopf. F...
Page 15 - BEFORE USE; CERAMIC GLASS SURFACE
15 Figure 9 BEFORE USE CERAMIC GLASS SURFACE The surface cooking area will glow red when an element is on. However some parts of the surface cooking area may not glow red when an element is on. This is normal operation. The burner will cycle on and off to maintain the selected heat level and to keep...
Page 16 - COOKWARE; HOME CANNING
16 COOKWARE IMPORTANT : DO NOT leave empty cookware on a hot surface cooking area, element or surface burner. Ideal cookware SHOULD have a flat bottom, straight sides, and a well-fitting lid and the material SHOULD be of medium-to-heavy thickness. Rough finishes may scratch the cooktop. Aluminum and...
Page 17 - OPERATION INSTRUCTIONS; COOKTOP CONTROLS
17 OPERATION INSTRUCTIONS Figure 10 Figure 11 Figure 12 COOKTOP CONTROLS Hot Surface Indicator Light Left Rear Control Knob Left Front Control Knob Right Rear Control Knob Right Front Control Knob WARNING : Fire Hazard • Turn off all controls when done cooking. • Failure to do so can result in death...
Page 19 - CARE AND MAINTENANCE; CLEANING COOKTOP CONTROLS; CLEANING CERAMIC GLASS
19 CARE AND MAINTENANCE WARNING : Before cleaning, make sure all controls are off and the oven and cooktop are cool. ALWAYS follow label instructions on cleaning products.Use soap, water and a soft cloth or sponge unless otherwise noted. CLEANING COOKTOP CONTROLS To avoid damage to the cooktop contr...
Page 20 - TROUBLESHOOTING
20 TROUBLESHOOTING Try the solutions suggested here first in order to avoid the cost of an unnecessary service call. Problem Possible Causes Solutions Nothing will operate Has a household fuse blown, or has a circuit breaker tripped? Replace the fuse or reset the circuit breaker. If the problem cont...
Page 21 - LIMITED WARRANTY
21 LIMITED WARRANTY MC Appliance Corporation warrants each new Electric Cooktop to be free from defects in material and workmanship, and agrees to remedy any such defect or to furnish a new part(s), at the company’s option, for any part(s) of the unit that has failed during the warranty period. Part...
Page 22 - Printed in China
22 CNA International, Inc. d/b/a MC Appliance Corporation. All rights reserved. Magic Chef® logo is a registered trademark of CNA International, Inc. www.mcappliance.com Printed in China
Page 23 - Modelo MCSCTE24BG; Manual del usuario
23 LEA ESTE MANUAL ANTES DE UTILIZAR SU PLACA DE COCINA ELÉCTRICA Y GUÁRDELO PARA FUTURA REFERENCIA. Modelo MCSCTE24BG Placa de cocina eléctrica de 24 pulgadas Manual del usuario
Page 24 - REGISTRACIÓN DEL PRODUCTO
24 REGISTRACIÓN DEL PRODUCTO Gracias por comprar el producto Magic Chef®. El primer paso para proteger su nuevo producto es completar la forma de registración en nuestra pagina web: www.mcappliance.com/register. Los beneficios de registrar su producto incluyen lo siguiente: 1. Al registrar su produc...
Page 25 - ÍNDICE
25 ÍNDICE REGISTRO DEL PRODUCTO . . . . . . . . . . . . . . . . . . . . . . . . . . . . . . . . . . . . . . . . . . . . . . . . . . . 24PRECAUCIONES . . . . . . . . . . . . . . . . . . . . . . . . . . . . . . . . . . . . . . . . . . . . . . . . . . . . . . . . . . . . . 26INSTRUCCIONES DE SEGURIDAD ...
Page 26 - PRECAUCIONES; EXPLICACIÓN DE LOS SÍMBOLOS; ESTE PRODUCTO ES SÓLO
26 PRECAUCIONES EXPLICACIÓN DE LOS SÍMBOLOS ADVERTENCIA Peligros o prácticas inseguras que PODRÍAN provocar lesiones personales graves o la muerte. PRECAUCIÓN Peligros o prácticas inseguras que PODRÍAN provocar lesiones personales leves. ESTE PRODUCTO ES SÓLO PARA USO DOMÉSTICO ADVERTENCIA : Lea y c...
Page 27 - INSTRUCCIONES DE SEGURIDAD IMPORTANTES
27 INSTRUCCIONES DE SEGURIDAD IMPORTANTES ADVERTENCIA : Para reducir el riesgo de incendio, descarga eléctrica o lesiones personales al momento de utilizar la placa de cocina, siga precauciones básicas, incluyendo las siguientes. PRECAUCIÓN : NO almacene artículos de interés para los niños en los ga...
Page 29 - ESPECIFICACIONES
29 ESPECIFICACIONES Ancho del vidrio 24,0” (610 mm) Profundidad del vidrio 21,5” (546 mm) Altura de la placa de cocina incluyendo el conductor (ubicado en la parte posterior de la superficie de placa de cocina, lado derecho) 3-1/8” (80 mm) Ancho del marco 21-7/8” (556 mm) Profundidad del marco 19-1/...
Page 30 - PARTES Y FUNCIONES
30 Figura 2 a. Área de cocción individual b. Área de cocción individual / dual c. Área de cocción individual a. Área de cocción individual e. Luz indicadora de superficie caliente f. Perillas de control PARTES Y FUNCIONES a c e f d b
Page 31 - REQUISITOS DE INSTALACIÓN; HERRAMIENTAS Y PIEZAS
31 REQUISITOS DE INSTALACIÓN HERRAMIENTAS Y PIEZAS Reúna las herramientas y las piezas necesarias antes de iniciar la instalación. Lea y siga las instrucciones suministradas con cualesquiera de las herramientas listadas aquí. Verifique los códigos locales. Verifique el suministro eléctrico existente...
Page 32 - REQUISITOS DE UBICACIÓN; REQUISITOS ELÉCTRICOS
32 REQUISITOS DE UBICACIÓN IMPORTANTE : Si instala una campana extractora o la combinación de microondas y campana extractora sobre la placa de cocina, siga las instrucciones de instalación de la campana extractora o de la combinación de microondas y campana extractora para las dimensiones de los es...
Page 34 - INSTRUCCIONES DE INSTALACIÓN; PREPARACIÓN DE LA PLACA DE COCINA PARA INSTALACIÓN; INSTALACIÓN DE LA PLACA DE COCINA
34 Figura 4 INSTRUCCIONES DE INSTALACIÓN PREPARACIÓN DE LA PLACA DE COCINA PARA INSTALACIÓN ADVERTENCIA : Peligro de peso excesivo • Use dos o más personas para mover e instalar la placa de cocina. • De no hacerlo podría resultar en lesión de la espalda u otra lesión. Decida la ubicación final de la...
Page 35 - REALIZAR LA CONEXIÓN ELÉCTRICA
35 3. Seleccione las ubicaciones de los soportes de montaje que permitirán al soporte extenderse suficientemente afuera de la placa de cocina para la instalación de los tornillos de sujeción. (Consulte la Figura 6). 4. Fije los soportes a la parte inferior de la base de la placa de cocina con los to...
Page 38 - ANTES DE USAR; SUPERFICIE DE VIDRIO CERÁMICO
38 ANTES DE USAR SUPERFICIE DE VIDRIO CERÁMICO El área de la superficie de cocción se iluminará de rojo cuando un elemento esté encendido. Sin embargo, algunas partes del área de la superficie de cocción podrían no iluminarse de rojo cuando el elemento esté encendido. Esto es funcionamiento normal. ...
Page 39 - UTENSILIOS DE COCINA; ENVASADO EN EL HOGAR
39 • Emplee utensilios de cocina con aproximadamente el mismo tamaño que la superficie del área de cocción. Los utensilios de cocina NO DEBEN extenderse más que 1/2” (1,3 cm) fuera del área. Figura 9 Superficie área de cocción Utensilios de cocina / Cazuela para envasado (Canner) 1/2" (1,3 cm) M...
Page 41 - INSTRUCCIONES DE FUNCIONAMIENTO; CONTROLES DE LA PLACA DE COCINA
41 INSTRUCCIONES DE FUNCIONAMIENTO Figura 10 Figura 11 Figura 12 CONTROLES DE LA PLACA DE COCINA Luz indicadora de superficie caliente Perilla de control trasera izquierda Perilla de control delantera izquierda Perilla de control trasera derecha Perilla de control delantera derecha ADVERTENCIA : Seg...
Page 43 - CUIDADO Y MANTENIMIENTO; LIMPIEZA DE LOS CONTROLES DE LA PLACA DE COCINA
43 CUIDADO Y MANTENIMIENTO ADVERTENCIA : Antes de limpiar, asegúrese de que todos los controles estén apagados y el horno y la placa de cocina estén fríos. SIEMPRE siga las instrucciones en la etiqueta de los productos de limpieza.Utilice jabón, agua, y un paño suave o esponja, a menos que se indiqu...
Page 45 - SOLUCIÓN DE PROBLEMAS
45 SOLUCIÓN DE PROBLEMAS Pruebe primero con las soluciones aquí sugeridas a efectos de evitar el costo innecesario de las llamadas de mantenimiento. Problema Posibles causas Soluciones Nada funciona ¿Tiene un fusible de la casa fundido, o se disparó un interruptor? Reemplace el fusible o reestablezc...
Page 46 - GARANTÍA LIMITADA
46 GARANTÍA LIMITADA MC Appliance Corporation garantiza que todas las Placa de cocina eléctrica carecen de defectos en el material y la mano de obra y acuerda solucionar cualquiera de estos defectos o instalar la(s) parte(s) nueva(s) (a elección de la compañía) en caso de que la unidad haya fallado ...
Page 48 - Impreso en China
48 CNA International, Inc. realiza negocios bajo el nombre de MC Appliance Corporation. Derechos reservados. El logotipo Magic Chef® es una marca registrada de CNA International, Inc. www.mcappliance.com Impreso en China