Page 2 - PROdUCT REGISTRATION
2 PROdUCT REGISTRATION Thank you for purchasing this Magic Chef® product� The first step to protect your new product is to complete the product registration on our website: www�mcappliance�com/register� The benefits of registering your product include the following: 1� Registering your product will ...
Page 3 - CONTENTS
3 CONTENTS PRODUCT REGISTRATION � � � � � � � � � � � � � � � � � � � � � � � � � � � � � � � � � � � � � � � � � � � � � � � � � � � � � 2PRECAUTIONS � � � � � � � � � � � � � � � � � � � � � � � � � � � � � � � � � � � � � � � � � � � � � � � � � � � � � � � � � � � � � � � 4IMPORTANT SAFETY INSTR...
Page 4 - PRECAUTIONS; ExPLANATION OF SYMbOLS; THIS PRODUCT IS INTENDED FOR
4 PRECAUTIONS ExPLANATION OF SYMbOLS WARNING Hazards or unsafe practices which COULD result in severe personal injury or death� CAUTION Hazards or unsafe practices which COULD result in minor personal injury� THIS PRODUCT IS INTENDED FOR HOUSEHOLD USE ONLY WARNING : Read and understand all safety pr...
Page 5 - ImPORTANT SAfETy INSTRUCTIONS
5 ImPORTANT SAfETy INSTRUCTIONS WARNING : To reduce the risk of fire, electrical shock, injury to persons, or damage when using the oven, follow basic precautions� • be sure the cooktop is properly installed by a qualified technician� • DO NOT allow anyone to climb, stand or hang on cooktop� • NEVER...
Page 6 - SPECIfICATIONS
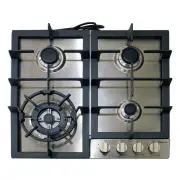
6 SPECIfICATIONS Height 3�4” (86 mm) Width 22�8” (580 mm) Depth 20�0” (510 mm) bTU Left Front burner - Triple Ring 16000 bTU Left Rear burner - Semi Rapid burner 6800 bTU Right Rear burner - Semi Rapid burner 6800 bTU Right Front burner - Auxiliary burner 5000 bTU NOTE : If the cooktop is installed ...
Page 7 - INSTAllATION REqUIREmENTS; TOOLS AND PARTS; LOCATION REQUIREMENTS
7 INSTAllATION REqUIREmENTS ImPORTANT : This appliance shall be installed only by qualified technician and in accordance with the manufacturer’s installation instructions, local gas fitting regulations, municipal building codes, electrical wiring regulations, local water supply regulations� ImPORTAN...
Page 8 - GAS AND ELECTRICAL SUPPLY REQUIREMENTS
8 • The opening must be constructed so that it will not be obstructed from inside or outside, or constructed close to the floor� The opening is recommended to be on the side opposite to that on which the flue gases are discharged� • Avoid placing cabinetry directly above cooktop when possible� If ca...
Page 9 - INSTAllATION INSTRUCTIONS; INSTALLING COOkTOP
9 INSTAllATION INSTRUCTIONS WARNING : Installation and service must be performed by a qualified installer, service agency or the gas supplier� Failure to do so can result in death, fire, or electrical shock� ImPORTANT : Save these instructions for local electrical inspectors use� Read and save these...
Page 10 - GAS CONNECTION
10 GAS CONNECTION WARNING : Explosion Hazard • Use a new CSA International approved gas supply line� • Install a shut-off valve� • Securely tighten all gas connections� • If connected to LP, have a qualified person make sure gas pressure does not exceed 14” (36cm) water column� • Examples of a quali...
Page 12 - GAS CONVERSION
12 GAS CONVERSION WARNING : Explosion Hazard • Use a new CSA International approved gas supply line� • Install a shut-off valve� • Securely tighten all gas connections� • If connected to LP, have a qualified person make sure gas pressure does not exceed 14” (36cm) water column� • Examples of a quali...
Page 14 - ELECTRICAL CONNECTION
14 • DO NOT remove the ground prong from the power cord plug� • DO NOT use an adapter� • DO NOT use an extension cord� • Failure to do so can result in death, fire or electrical shock� NOTE : before making the connection, make sure of the following� • The safety circuit breaker and the electrical sy...
Page 15 - HOW TO CHECk OPERATION
15 HOW TO CHECk OPERATION How to Adjust Standard burner ImPORTANT : Adjustments must be made with two other burners in operation on a medium setting� This prevents the upper row of the flames from being set too low, resulting in the flame being extinguished when other burners are turned on�1� Turn a...
Page 16 - OPERATION INSTRUCTIONS; COOkTOP
16 OPERATION INSTRUCTIONS COOkTOP figure 21 WARNING : Fire Hazard • DO NOT operate a burner using empty cookware or without cookware on the grate� • DO NOT touch the burner when the igniters are clicking (sparking)� • DO NOT let the burner flame extend beyond the edge of the pan� • Turn off all cont...
Page 17 - CONTROL kNObS
17 bURNERS • Place a burner cap on each burner head, matching the cap size to the head size� (Refer to Figure 23�) • The cap for each burner has an inner locating ring which centers the cap correctly on the burner head� • be sure that all the burner caps and burner heads are correctly placed bEFORE ...
Page 18 - COOkWARE; DEEP FRYING
18 COOkWARE CAUTION : NEVER extend the flame beyond the outer edge of the cookware� (Refer to Figure 26�)DO NOT use cookware that is unstable or easily tippable as this can increase the chances of spill over and serious injury� To avoid spillover make sure cookware is large enough to contain the foo...
Page 19 - CARE ANd mAINTENANCE
19 CARE ANd mAINTENANCE ImPORTANT : DO NOT attempt to clean or touch the cooktop while it is still hot� Some cleaners produce noxious fumes when applied to a hot surface� Failure to do so can result in serious bodily injury� CAUTION : To avoid possible burns or injuries, DO NOT attempt any of the fo...
Page 20 - lImITEd WARRANTy
20 lImITEd WARRANTy MC Appliance Corporation warrants each new Gas Cooktop to be free from defects in material and workmanship, and agrees to remedy any such defect or to furnish a new part(s), at the company’s option, for any part(s) of the unit that has failed during the warranty period� Parts and...
Page 21 - Printed in China
21 CNA International, Inc. d/b/a mC Appliance Corporation. All rights reserved. magic Chef® logo is a registered trademark of CNA International, Inc. www.mcappliance.com Printed in China
Page 22 - modelo mCSCTG24S; Placa de cocina a gas de 24 pulgadas; Manual del usuario
22 lEA ESTE mANUAl ANTES dE UTIlIZAR SU PlACA dE COCINA A GAS y GUÁRdElO PARA fUTURA REfERENCIA. modelo mCSCTG24S Placa de cocina a gas de 24 pulgadas Manual del usuario
Page 23 - REGISTRACIÓN dEl PROdUCTO
23 REGISTRACIÓN dEl PROdUCTO Gracias por comprar el producto Magic Chef®� El primer paso para proteger su nuevo producto es completar la forma de registración en nuestra pagina web: www�mcappliance�com/register� Los beneficios de registrar su producto incluyen lo siguiente: 1� Al registrar su produc...
Page 24 - ÍNdICE
24 ÍNdICE REGISTRO DEL PRODUCTO � � � � � � � � � � � � � � � � � � � � � � � � � � � � � � � � � � � � � � � � � � � � � � � � � � � 23PRECAUCIONES � � � � � � � � � � � � � � � � � � � � � � � � � � � � � � � � � � � � � � � � � � � � � � � � � � � � � � � � � � � � � 25INSTRUCCIONES DE SEGURIDAD ...
Page 25 - PRECAUCIONES; ExPLICACIÓN DE LOS SÍMbOLOS; ESTE PRODUCTO ES SÓLO PARA
25 PRECAUCIONES ExPLICACIÓN DE LOS SÍMbOLOS AdVERTENCIA Peligros o prácticas inseguras que PODRÍAN provocar lesiones personales graves o muerte� PRECAUCIÓN Peligros o prácticas inseguras que PODRÍAN provocar lesiones personales leves� ESTE PRODUCTO ES SÓLO PARA USO DOMÉSTICO AdVERTENCIA : Lea y comp...
Page 26 - INSTRUCCIONES dE SEGURIdAd ImPORTANTES
26 INSTRUCCIONES dE SEGURIdAd ImPORTANTES AdVERTENCIA : Para reducir el riesgo de incendio, descarga eléctrica o lesiones personales al momento de utilizar el horno, sigas las precauciones básicas� • Asegúrese de que la placa de cocina esté correctamente instalada y conectada a tierra por un técnico...
Page 27 - ESPECIfICACIONES
27 ESPECIfICACIONES Altura 3,4” (86 mm) Ancho 22,8” (580 mm) Profundidad 20,0” (510 mm) bTU Quemador delantero izquierdo - Triple anillo 16000 bTU Quemador posterior izquierdo - Quemador semirrápido 6800 bTU Quemador posterior derecho - Quemador semirrápido 6800 bTU Quemador delantero derecho - Quem...
Page 28 - REqUISITOS dE INSTAlACIÓN; HERRAMIENTAS Y PIEZAS; REQUERIMIENTOS LOCALES
28 REqUISITOS dE INSTAlACIÓN ImPORTANTE : Este aparato debe ser instalado únicamente por un técnico calificado y de acuerdo con las instrucciones de instalación del fabricante, las regulaciones locales sobre ajuste de gas, los códigos de construcción municipal, las normas de cableado eléctrico y las...
Page 29 - REQUISITOS DEL SUMINISTRO ELÉCTRICO Y DE GAS�
29 • La abertura debe ser construidas de manera que no sea obstruida desde adentro o afuera, o construida cerca del piso� La abertura se recomienda que esté en la parte opuesta a la cual se descargan los gases de salida� • Evite colocar ebanistería directamente sobre la placa de cocina en lo posible...
Page 30 - INSTRUCCIONES dE INSTAlACIÓN; INSTALACIÓN DE LA PLACA DE COCINA
30 INSTRUCCIONES dE INSTAlACIÓN AdVERTENCIA : La instalación y servicio deben ser realizados por un instalador calificado, una agencia de servicio o el proveedor de gas� No seguir estas instrucciones puede resultar en muerte, incendio o descarga eléctrica� ImPORTANTE : Guarde estas instrucciones par...
Page 31 - CONExIÓN DE GAS
31 6� Asegure la placa de cocina desde debajo con los sujetadores provistos y los tornillos� (Consulte la Figura 8)� CONExIÓN DE GAS AdVERTENCIA : Peligro de explosión • Use una línea de suministro de gas nueva aprobada por CSA International� • Instale una válvula de cierre� • Apriete firmemente tod...
Page 33 - CONVERSIÓN DE GAS
33 PRECAUCIÓN : La desalineación puede causar que los vástagos de la válvula causen fricción sobre el panel de control, dando como resultado una fuga de gas en la válvula� NOTA : Desconecta la placa de cocina y su válvula de cierre manual del sistema de tubería de suministro de gas durante toda prue...
Page 35 - CONExIÓN ELÉCTRICA
35 3� Instale los orificios adecuados en reemplazo de los que fueron retirados� 4� Reinstale las bases de los quemadores, los cabezales y las parrillas superiores� Asegúrese de que las tapas de los quemadores estén correctamente asentadas en los cabezales de los quemadores� NOTA : El quemador triple...
Page 36 - CÓMO VERIFICAR EL FUNCIONAMIENTO
36 Montaje de los quemadoresEl electrodo del sistema de encendido electrónico está ubicado arriba de la superficie de la base del quemador� NO quite la tapa del quemador, ni toque el electrodo de un quemador mientras otro esté encendido� Daño o descarga eléctrica puede ocurrir�1� Coloque las tapas d...
Page 38 - INSTRUCCIONES dE fUNCIONAmIENTO; PLACA DE COCINA
38 INSTRUCCIONES dE fUNCIONAmIENTO PLACA DE COCINA figura 21 AdVERTENCIA : Peligro de incendio • NO encienda un quemador con un utensilio de cocina vacío o sin utensilio de cocina en la parrilla� • NO toque el quemador cuando los encendedores estén haciendo clic (chispa)� • NO permita que las llamas...
Page 39 - PERILLAS DE CONTROL
39 QUEMADORES • Coloque una tapa de quemador en cada cabezal de quemador, haciendo coincidir el tamaño de la tapa con el tamaño del cabezal� (Consulte la Figura 23)� • La tapa para cada quemador tiene un anillo de localización interior que centra la tapa correctamente en el cabezal del quemador� • A...
Page 40 - UTENSILIO DE COCINA
40 NOTA : Si alguna llama del quemador se apaga debido a viento o por otras razones, la válvula de gas detendrá el suministro de gas� Para encender de nuevo el quemador, gire la válvula de gas a la posición de encendido y presione hacia abajo la perilla para encender el quemador� UTENSILIO DE COCINA...
Page 41 - FREÍR
41 FREÍR SIEMPRE use un termómetro y ajuste la perillas de control de la superficie a la temperatura correcta� Si el aceite está muy frio los alimentos absorberán la grasa� Si el aceite está demasiado caliente los alimentos se dorarán rápidamente y el centro quedará crudo� NO intente freír demasiado...
Page 42 - CUIdAdO y mANTENImIENTO
42 CUIdAdO y mANTENImIENTO ImPORTANTE : NO intente limpiar el aparato cuando la placa de cocina esté todavía caliente� Algunos limpiadores pueden producir vapores nocivos si se aplican a una superficie caliente� No seguir estas instrucciones puede resultar en lesiones corporales graves� PRECAUCIÓN :...
Page 43 - GARANTÍA lImITAdA
43 GARANTÍA lImITAdA MC Appliance Corporation garantiza que todas las Placa de cocina a gas carecen de defectos en el material y la mano de obra y acuerda solucionar cualquiera de estos defectos o instalar la(s) parte(s) nueva(s) (a elección de la compañía) en caso de que la unidad haya fallado dura...