Page 2 - TABLE OF CONTENTS
TABLE OF CONTENTS SAFETY INSTRUCTIONS .............................................................. 3 IMPORTANT SAFETY INSTRUCTIONS ..........................................................4 PRODUCT OVERVIEW .................................................................. 7 Exterior Parts .........
Page 3 - SAFETY INSTRUCTIONS; READ ALL INSTRUCTIONS BEFORE USE; your appliance. Always read and follow all safety messages.; WARNING; instructions are not followed.
3 EN SAFETY INSTRUCTIONS READ ALL INSTRUCTIONS BEFORE USE Your safety and the safety of others are very important.We have provided many important safety messages in this manual and on your appliance. Always read and follow all safety messages. This is the safety alert symbol.This symbol alerts you t...
Page 4 - IMPORTANT SAFETY INSTRUCTIONS; including the following:
4 EN IMPORTANT SAFETY INSTRUCTIONS WARNING To reduce the risk of explosion, fire, death, electric shock, scalding or injury to persons when using this product, follow basic precautions, including the following: INSTALLATION • Before use, the appliance must be properly installed as described in this ...
Page 6 - CAUTION; To reduce the risk of minor or moderate injury to persons,; INSTALLATION; SAVE THESE INSTRUCTIONS
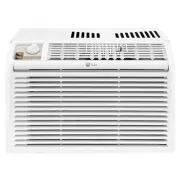
6 EN CAUTION To reduce the risk of minor or moderate injury to persons, malfunction, or damage to the product or property when using this product, follow basic precautions, including the following: INSTALLATION • Take care when installing the product that exhaust or condensation does not damage near...
Page 7 - PRODUCT OVERVIEW; Exterior Parts
7 EN PRODUCT OVERVIEW Exterior Parts Interior Parts 4 3 6 2 5 1 3 4 5 2 1 6 1 Control Panel 1 Evaporator 2 Air Filter 2 Air Guide 3 Front Grille 3 Compressor 4 Cabinet 4 Condenser 5 Air Outlet 5 Base Pan 6 Horizontal Air Deflector (Vertical Louver) 6 Power Cord
Page 8 - Electrical Data
8 EN INSTALLATION Electrical Data Power cord may include a current interrupter device. TEST and RESET buttons are provided on the plug case. The device should be tested on a periodic basis by frist pressing the TEST button and then the RESET button. If the TEST button does not trip or if the RESET b...
Page 9 - Tools Needed
9 EN Parts Included (Appearance May Vary) Right Curtain Panel Left Curtain Panel Foam seal (Non-adhesive) Foam strip(2) (Adhesive backed) L bracket (3) Upper Guide Type “A” Screws Type “A” Screws (14) (14) Type “B” Screws Type “B” Screws (2) (2) Type “C” Screws Type “C” Screws (2) (2) Tools Needed P...
Page 10 - How to Install the Unit; Window Requirements; Storm Window Requirements
10 EN How to Install the Unit 1 To prevent vibration and noise, make sure the unit is installed securely and firmly. 2 Install the unit out of direct sunlight. 3 There should be no obstacles, such as a fence or wall, within 20” from the back of the cabinet because it will prevent heat radiation of t...
Page 11 - Preparation of Chassis
11 EN Preparation of Chassis 1 Align holes between the upper guide and the top of the cabinet and then install it with 3 type A screws. Upper Guide Upper Guide Screws (Type A) Screws (Type A) 2 Insert the top and bottom rails of the curtain panels into the upper and lower panel guides Fasten the cur...
Page 12 - Unit Installation
12 EN Unit Installation CAUTION • During the following step, hold unit firmly until window sash is lowered to top channel behind side panel frames. Personal injury or property damage may result if unit falls from window. 1 Set the air conditioner in the window so that is centered. Place the air cond...
Page 13 - OPERATION; Control Panel
13 EN OPERATION Control Panel 2 1 3 NOTE • The feature may be changed according to the type of model. 1 Power Turns the air conditioner on or off. NOTE • If you move the Mode/Temp control knob from the Cool setting to the Fan Only setting, wait at least 3 minutes before swiching back to a Cool setti...
Page 14 - Additional Features; Air Direction
14 EN Additional Features Air Direction Adjusting the air direction using the horizontal air deflector control. Using the control tabs, the air flow can be directed to the left, right, straight ahead, or any combination of these directions. Slinger Fan This air conditioner is equipped with a slinger...
Page 15 - MAINTENANCE; Air Filter; Cleaning the Air Filter
15 EN MAINTENANCE WARNING • Before cleaning or performing maintenance, disconnect the power supply and wait until the fan stops. Air Filter Check the air filter at least twice a month to see if cleaning is necessary. Trapped particles in the filter can build up and block the airflow, reducing coolin...
Page 16 - TROUBLESHOOTING; Before Calling for Service; Normal Sounds You May Hear
16 EN TROUBLESHOOTING Before Calling for Service The appliance is equipped with an automatic error-monitoring system to detect and diagnose problems at an early stage. If the appliance does not function properly or does not function at all, check the following before you call for service. Normal Sou...
Page 19 - WARRANTY
19 EN WARRANTY ARBITRATION NOTICE: THIS LIMITED WARRANTY CONTAINS AN ARBITRATION PROVISION THAT REQUIRES YOU AND LG TO RESOLVE DISPUTES BY BINDING ARBITRATION INSTEAD OF IN COURT, UNLESS YOU CHOOSE TO OPT OUT. IN ARBITRATION, CLASS ACTIONS AND JURY TRIALS ARE NOT PERMITTED. PLEASE SEE THE SECTION TI...
Page 20 - FOR YOUR RECORDS
20 EN THIS WARRANTY IS IN LIEU OF ANY OTHER WARRANTY, EXPRESS OR IMPLIED, INCLUDING AND WITHOUT LIMITATION TO, ANY WARRANTY OF MERCHANTABILITY OR FITNESS FOR A PARTICULAR PURPOSE. TO THE EXTENT ANY IMPLIED WARRANTY IS REQUIRED BY LAW, THIS WARRANTY IS LIMITED IN DURATION TO THE TERM PERIOD EXPRESSED...
Page 23 - Memo