LG LW6019ER - User Manual
LG LW6019ER Air Conditioner – User Manual, read for free online in PDF format. We hope this helps you resolve any issues you may have. If you have further questions, please contact us through the contact form.


Table of Contents:
- Page 2 – TABLE OF CONTENTS
- Page 3 – READ ALL INSTRUCTIONS BEFORE USE; Your safety and the safety of others are very important.; WARNING; INSTALLATION; SAFETY INSTRUCTIONS; including the following:
- Page 4 – OPERATION
- Page 5 – GROUNDING INSTRUCTIONS
- Page 6 – CAUTION; SAVE THESE INSTRUCTIONS
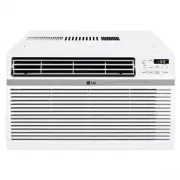
- Page 7 – Exterior Parts; PRODUCT OVERVIEW
- Page 8 – Electrical Data
- Page 9 – Tools Needed
- Page 10 – Window Requirements; NOTE; How to Install the Unit
- Page 11 – Preparation of Chassis
- Page 13 – Control Panel and Remote Control; Remote Control
- Page 14 – Wireless Remote Control; Inserting Batteries
- Page 15 – Direction; Additional Features; Slinger Fan
- Page 16 – Cleaning the Air Conditioner; MAINTENANCE; Cleaning the Air Filter
- Page 17 – Before Calling for Service; Normal Sounds You May Hear; TROUBLESHOOTING
- Page 20 – WARRANTY
- Page 21 – FOR YOUR RECORDS
LW6019ER
EN ENGLISH
TYPE : WINDOW
www.lg.com
Copyright © 2020 LG Electronics Inc. All Rights Reserved.
OWNER’S MANUAL
AIR CONDITIONER
Read this owner’s manual thoroughly before operating the
appliance and keep it handy for reference at all times.
"Loading the manual" means you need to wait until the file loads and becomes available for online reading. Some manuals are very large, and the time they take to appear depends on your internet speed.
Was this manual helpful?
About this manual
- Brand
- LG
- Model
- LW6019ER
- Document type
- User Manual
- Category
- Air Conditioner
- Language(s)
- English
- Pages
- 24
- File size
- 6.4 MB
- Format
Summary
TABLE OF CONTENTS 10 How to Install the Unit10 Window Requirements10 Storm Window Requirements11 Preparation of Chassis11 Unit Installation 13 OPERATION 13 Control Panel and Remote Control14 Wireless Remote Control15 Ventilation 15 Air Direction 15 Additional Features 3 SAFETY INSTRUCTIONS 3 IMPORTA...
SAFETY INSTRUCTIONS READ ALL INSTRUCTIONS BEFORE USE Your safety and the safety of others are very important. We have provided many important safety messages in this manual and on your appliance. Always read and follow all safety messages. This is the safety alert symbol. This symbol alerts you to p...
4 SAFETY INSTRUCTIONS ● When the power cord is to be replaced, replacement work shall be performed by authorized personnel only using only genuine replacement parts. ● Connect to a properly rated, protected, and sized power circuit to avoid electrical overload. ● Always plug into a grounded outlet. ...