Page 2 - I N T R O D U C T I O N
2 Congratulations on your purchase and welcome to the LG family. Your new LG Air Conditioner combines high-eff iciency operation with p ortab le convenience. By following the operating and care instructions in this manual, your air conditioner will provide you with many years of reliable service. TH...
Page 3 - I M P O R TA N T S A F E T Y I N S T R U C T I O N S; READ ALL INSTRUCTIONS BEFORE USE; English; Your safety and the safety of others is very important.; WARNING; BASIC SAFETY PRECAUTIONS
I M P O R TA N T S A F E T Y I N S T R U C T I O N S READ ALL INSTRUCTIONS BEFORE USE 3 English WARNING This symbol indicates the possibility of death or serious injury. CAUTION This symbol indicates the possibility of injury or damage to property. Your safety and the safety of others is very import...
Page 4 - CAUTION; ELECTRICAL SAFETY; Electrical Shock Hazard
4 I M P O R TA N T S A F E T Y I N S T R U C T I O N S READ ALL INSTRUCTIONS BEFORE USE • To avoid possible cuts, avoid contacting the metal parts of the air conditioner when removingor reinstalling the filter. It can result in the risk ofpersonal injury. • Do not block the air inlet or outlet of th...
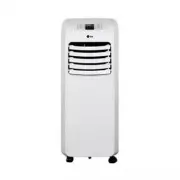
Page 6 - PARTS AND FEATURES; KEY PARTS AND COMPONENTS; Check all the accessories included in the package and
6 PARTS AND FEATURES KEY PARTS AND COMPONENTS 2 1 8 4 5 6 7 7 3 1 2 3 4 SWIVELING CASTERS INFRARED REMOTE CONTROLLER 5 Check all the accessories included in the package and please refer to the installation instructions for their usage. EXHAUST AIR OUTLET VENT Swiveling casters allow you to move the ...
Page 7 - PART AND FEATURES; CONTROL PANEL AND REMOTE; POWER; MODE; TIMER; LED Display; SLEEP MODE
PART AND FEATURES CONTROL PANEL AND REMOTE For detailed instructions on each function,see the following pages. POWER Operation begins when this button is pressed and stops when you press the button again. MODE Press this button to select Cool,Dry(Dehumidify),Fan mode. FAN SPEED Adjusts the circulati...
Page 8 - BEFORE USING YOUR AIR CONDITIONER; H O W TO U S E
Refer to the Installation Instructio ns included in this manual before using the air conditioner.Once the air conditio ner has been properly assembled and installed: Plug the power cord into its own dedicated properly grounded outlet. Do not plug ot her it could overload the outlet and create a e ha...
Page 9 - H O W TO U S E
Be sure to note proper polarity! 噝 噝 噝 1 2 3 BEFORE USING YOUR AIR CONDITIONER INSERTING BATTERIES IN THE REMOTE Before using your remote, install the provided AAA batte r ies : Press in the locking tab on the battery cover on the back of the remote and remove the cover Insert two new alkaline AAA b...
Page 10 - USING THE CONTROLS; NOTE
USING THE CONTROLS H O W TO U S E Control panel buttons shown. Operation using the remote control is the same, unless specifically noted. 1. COOLING MODE · Press MODE button to choose Cool mode, the Cool mode indicator will flash. · Press UP or DOWN button to set room temperature between . · Press S...
Page 11 - I N S TA L L AT I O N I N S T R U C T I O N S; SELECTION OF INSTALLATION LOCATION; Install the unit on a flat and dry place.
I N S TA L L AT I O N I N S T R U C T I O N S The length of the exhaust pipe is specially designed according to the specification of this product. Do not replace or prolong it with your own private hose as this could cause mal-function. WARNING SELECTION OF INSTALLATION LOCATION Install the unit on ...
Page 12 - ATTACHING THE HOSE AND DIFFUSER
NOTE : The air con ditio ner is shipped with the hose installed. The hose may be removed for cleaning and storage, if necessary. Simp ly reverse the steps below to remove. I N S TA L L AT I O N I N S T R U C T I O N S ATTACHING THE HOSE AND DIFFUSER Insert the large adapter end of the hose into the ...
Page 13 - PREPARING FOR INSTALLATION; The air conditioner is heavy! Use two or more people to
13 English I N S TA L L AT I O N I N S T R U C T I O N S PREPARING FOR INSTALLATION WARNING The air conditioner is heavy! Use two or more people to lift and install the unit! Failure to do so could result in back injury or other injuries. The following components are used for window venting. Not all...
Page 14 - WINDOW VENT PANEL AND EXTENSIONS
I N S TA L L AT I O N I N S T R U C T I O N S WINDOW VENT PANEL AND EXTENSIONS The window installation kit allows you to install the air conditioner in most vertical-sliding windows 18 " to 48 " wide, or casement-style windows from 18 " to 48 " high. For an 18 " window opening, u...
Page 15 - I N S TA L L AT I O N I N S T R U C T I O N S; INSTALLATION IN VERTICAL SLIDING WINDOWS
Foam seal A (Adhesive type) Foam seal C (Adhesive type- shorter) NOTE : The window installation kit can be used with vertical sliding windows betwe en 18" and 48" wide. 1 Cut the foam seal A(adhesive type) & C(adhesive type-shorter) to the proper length, and attach it to the window sash ...
Page 17 - INSTALLATION IN CASEMENT STYLE WINDOWS
Foam seal A (Adhesive type) Foam seal C (Adhesive type- shorter) 1 Cut the foam seal A(adhesive type) & C(adhesive type-shorter) to the proper length, and attach it to the window sash and frame. 2 Insert the vent panel assembly, including extension panels, if needed, into the window opening. Ext...
Page 19 - C A R E A N D C L E A N I N G; WATER DRAINAGE; FL
C A R E A N D C L E A N I N G Your air conditioner is designed for year-roundoperation with only minimal cleaning andmaintenance. For maximum efficiency, it is recommendedthat you have the cooling coils inspected andcleaned annually. Your local LG AuthorizedService Center can provide this inspection...
Page 20 - Air filter; the fan on to defrost the coils.
C A R E A N D C L E A N I N G Air filter · Clean the air filter every 2 weeks. If the air filter is blocked with dust, the efficiency will reduce. · Open the air filter cover upwards, then take out the air filter. · Wash the air filter by immersing it gently into warm (about 40 ć ) water with a neut...
Page 21 - STORING THE AIR CONDITIONER; hh; li
1 2 3 1 2 3 4 4 STORING THE AIR CONDITIONER If the air conditioner will not be used for an extened period of time : Drain the water collection tank completely and leave the bottom drain cap off long enough to allow any residual water to drain out. Once the tank is completely drained and no more wate...
Page 22 - BEFORE CALLING FOR SERVICE; T R O U B L E S H O O T I N G; Problem
BEFORE CALLING FOR SERVICE T R O U B L E S H O O T I N G Problem Possible Causes Solutions Air conditioner will • The air conditioner plug is • Make sure electrical plug is plugged completely into a not start not completely inserted in live, properly grounded outlet. the electrical outlet. • The hou...
Page 23 - Then contact a qualified electrician.
T R O U B L E S H O O T I N G BEFORE CALLING FOR SERVICE Problem Code appears in the display. Protection ( Water-full protection, to prevent spilling). FLE1, E2E4 Description Sensor protection, to avoid occurrence of unit damage, auto-stop protection. , the unit will stop and display E4 to defrost, ...
Page 24 - LG PORTABLE AIR CONDITIONER LIMITED
WARRANTY LG PORTABLE AIR CONDITIONER LIMITED WARRANTY - USA WHAT THIS WARRANTY COVERS: LG Electronics U.S.A., Inc. (“LG”) warrants your LG Portable Air Conditioner ("product") against defect in materials or workmanshipunder normal household use, during the warranty period set forth below, LG...
Page 25 - IN T R O D U C C I Ó N; Español
25 Felicitaciones por su compra y bienvenido a la familia de LG. Su nuevo acondicionador de aire LG combina un funcionamiento de alta eficiencia con la comodidad de la portabilidad. Siguiendo las instrucciones de funcionamiento y cuidados de este manual, su acondicionador de aire le brindará muchos ...
Page 26 - I N S T R U C C I O N E S D E S E G U R I D A D I M P O R TA N T E S; PRECAUCIÓN; Su seguridad y la seguridad de otros son muy importantes.; ADVERTENCIA; PRECAUCIONES BÁSICAS DE SEGURIDAD
I N S T R U C C I O N E S D E S E G U R I D A D I M P O R TA N T E S LEA TODAS LAS INSTRUCCIONES ANTES DE USAR ADVERTENCIA Este símbolo indica la posibilidad de muerte o lesiones graves. PRECAUCIÓN Este símbolo indica la posibilidad de lesiones o daños a la propiedad. Su seguridad y la segurid...
Page 27 - LEA TODAS LAS INSTRUCCIONES ANTES DE USAR; SEGURIDAD ELÉCTRICA; Peligro de descarga eléctrica
LEA TODAS LAS INSTRUCCIONES ANTES DE USAR • Para evitar posibles cortes, evite el contacto con las piezas metálicas del acondicionador de aire cuando quite o vuelva a instalar el filtro. Puede provocar un riesgo de lesiones personales. • No bloquee la toma o salida de aire del acondicionador de aire...
Page 29 - P I E Z A S Y C A R A C T E R Í S T I C A S; PIEZAS Y COMPONENTES CLAVE; Chequee todos los accesorios incluidos en el paquete y
8 29 P I E Z A S Y C A R A C T E R Í S T I C A S PIEZAS Y COMPONENTES CLAVE Español 1 2 2 1 3 8 4 RUEDAS GIRATORIAS CONTROL REMOTO INFRARROJO 5 Chequee todos los accesorios incluidos en el paquete y por favor consulte las instrucciones de instalación en caso de su uso. VENTANILLA PARA EXPULSAR E...
Page 30 - PANEL DE CONTROL Y CONTROL REMOTO
P I E Z A S Y C A R A C T E R Í S T I C A S 30 PANEL DE CONTROL Y CONTROL REMOTO PODER La operación se empieza al apretar el botón y se termina al hacerlo otra vez. MODO Apriete este botón para elegir el modo de COOL (REFRIGERACIÓN), DRY (SECADO), FAN (VENTILADOR) FAN SPEED Ajusta la velocidad d...
Page 31 - ANTES DE UTILIZAR EL ACONDICIONADOR DE AIRE; PREPARACIÓN PARA LA OPERACIÓN; C Ó M O U T I L I Z A R E L A R T E FA C TO
Lea las Instrucciones de instalación incluidas en este manual antes de usar el acondicionador de aire. Una vez que el acondicionador de aire se ha montado e instalado correctamente: Conecte el cable en su propia fuente de alimentación bien colocada en el suelo. No conecte otros aparatos en la misma ...
Page 33 - CÓMO USAR LOS CONTROLES; MODO DE VENTILACIÓN; NOTA; MODO DE SUSPENSIÓN
CÓMO USAR LOS CONTROLES C Ó M O U T I L I Z A R E L A R T E FA C TO A continuación pueden verse los botones del panel de control. La operación con el control remoto es la misma, a menos que se especifique lo contrario. 1. MODO DE FRESCO · Apriete el botón de MODO para elegir el modo de FRESCO,...
Page 34 - Elección de ubicación para la instalación.; Instale la unidad sobre un sitio plano y seco.; I N S T R U C C I O N E S D E I N S TA L A C I Ó N
34 La longitud del tubo de escape es designado especialmente de acuerdo a las especificaciones del producto. No lo sustituya ni prolongue con su manguera privada ya que esto podría causar mal funcionamiento. ADVERTENCIA Elección de ubicación para la instalación. Instale la unidad sobre un sitio plan...
Page 35 - CÓMO CONECTAR LA MANGUERA Y EL DIFUSOR
I N S T R U C C I O N E S D E I N S TA L A C I Ó N CÓMO CONECTAR LA MANGUERA Y EL DIFUSOR NOTA: El acondicionador de aire se envía con la manguera instalada. Si fuese necesario, la manguera puede quitarse para limpieza o almacenamiento. Simplemente invierta los pasos siguientes para quitarla. In...
Page 36 - PREPARACIÓN PARA LA INSTALACIÓN; ¡El acondicionador de aire es pesado! ¡Utilice; COMPONENTES DE SALIDA
36 Español I N S T R U C C I O N E S D E I N S TA L A C I Ó N PREPARACIÓN PARA LA INSTALACIÓN ADVERTENCIA ¡El acondicionador de aire es pesado! ¡Utilice dos o más personas para levantar e instalar la unidad! No hacerlo puede provocar lesiones en la espalda u otras lesiones. Los siguientes compon...
Page 42 - C U I D A D O Y L I M P I E Z A; Drinaje de agua; ahorrar energía para usted.
C U I D A D O Y L I M P I E Z A Su acondicionador de aire está diseñado para funcionar durante todo el año con sólo una limpieza y mantenimiento mínimos. Para una eficiencia máxima, se recomienda que haga inspeccionar y limpiar las serpentinas de enfriamiento una vez por año. Su Centro de Servic...
Page 43 - Filtro de Aire; El deshumidificador tiene un control incorporado de sentido de; Limpieza
43 Español C U I D A D O Y L I M P I E Z A Filtro de Aire · Limpie el filtro de aire a las 2 semanas. Si el filtro de aire está tapado por el polvo, la eficiencia se reducirá. · Abra la tapa del filtro de aire hacia arriba, y luego saque el filtro de aire. · Lave el filtro de aire por inmergir s...
Page 44 - CÓMO GUARDAR EL ACONDICIONADOR DE AIRE
44 C U I D A D O Y L I M P I E Z A CÓMO GUARDAR EL ACONDICIONADOR DE AIRE Si no va a usar el acondicionador de aire durante un período prolongado: Drene el tanque de recolección de aguacompletamente y deje el pico de drenajedestapado el tiempo suficiente para eliminarel agua residual. Una vez qu...
Page 45 - ANTES DE LLAMAR AL SERVICIO TÉCNICO; D E T E C C I Ó N D E P R O B L E M A S; Problema
45 Español ANTES DE LLAMAR AL SERVICIO TÉCNICO Antes de llamar al servicio técnico, examine esta lista. Puede ahorrarle tiempo y dinero. La lista incluyesituaciones comunes que no son el resultado de mano de obra o materiales defectuosos del artefacto. El acondicionador • El enchufe del acondicionad...
Page 46 - Entonces póngase en contacto con un electricista calificado.
46 D E T E C C I Ó N D E P R O B L E M A S ANTES DE LLAMAR AL SERVICIO TÉCNICO Prblemas Cotigo se muestra en la pantalla · Protección (Protección de agua llena, para evitar derrame). FLE1, E2 E4 Descripción · La protección del sensor, para evitar ocurrir daños a la unidad, protección de auto-par...